
Popular categories
Looking for a yarn?


|
|||||||||||||||||||||||||||||||||||||
Ice Dancer |
|||||||||||||||||||||||||||||||||||||
 |
 |
||||||||||||||||||||||||||||||||||||
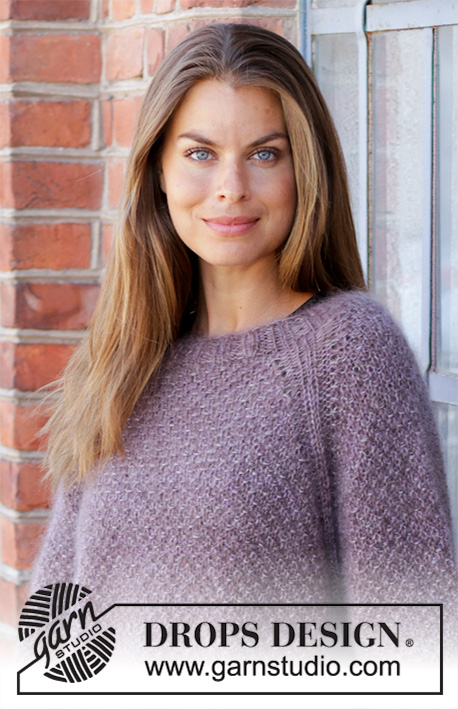
Knitted fitted jacket in DROPS Lima. Piece is knitted back and forth from mid front with lace pattern, cables and shawl collar. Size: S - XXXL
DROPS 197-25 |
|||||||||||||||||||||||||||||||||||||
|
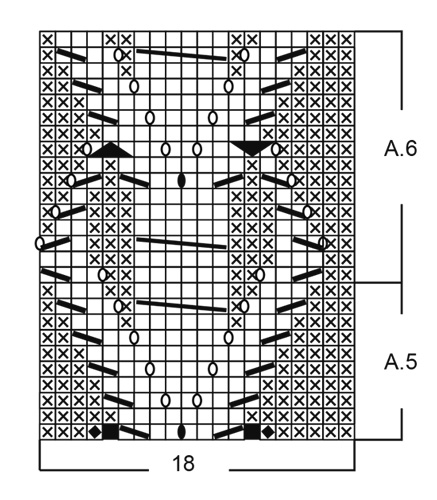
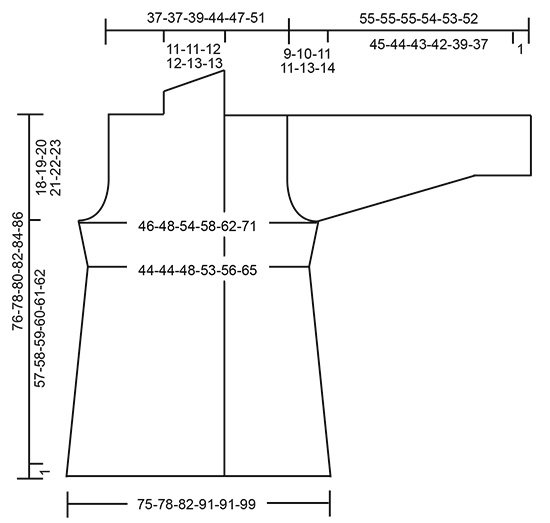
---------------------------------------------------------- EXPLANATION FOR THE PATTERN: ---------------------------------------------------------- GARTER STITCH (worked in the round): 1 ridge = 2 rounds. Knit 1 round and purl 1 round. GARTER STITCH (back and forth): 1 ridge = knit 2 rows. PATTERN: See diagrams A.1 to A.8. Diagrams show all rows in pattern seen from the right side. SHORT ROWS IN BAND: Work short rows over stitches in band to avoid it contracting vertically. Work as follows from right side every 20th row: Knit 5 (= right band), turn and work back. Work 1 row over all stitches as before. Turn and knit 5 (= left band), turn and work back. Turn and work 1 row over all stitches as before. INCREASE TIP-1 (applies to sides of body): All increases are done from the right side. Increase 2 stitches in each section with marker thread as follows: Work until first section in stockinette stitch and marker thread, knit 1, 1 yarn over, knit until 1 stitch remains in section with stockinette stitch, 1 yarn over, knit 1 (= 2 stitches increased). Repeat at each of the remaining sections with stockinette stitch and marker thread (= 8 stitches increased on every row with increase). On next row purl yarn over twisted to avoid holes. INCREASE TIP-2 (applies to collar): All increases are done from the right side. Increase 1 stitch by making a yarn over inside 3 stitches in garter stitch on band mid front. On next row knit yarn over twisted to avoid holes. INCREASE TIP-3 (applies to sleeves): Work until 2 stitches remain before marker under sleeve, make 1 yarn over, knit 4 (marker is in the middle of these stitches), make 1 yarn over. On next round knit yarn overs twisted to avoid holes. Then work the new stitches in stockinette stitch. DECREASE TIP (applies to body): All decreases are done from the right side! Decrease 2 stitches in each of the 8 sections with 20-22-24-24-24-24 stitches in stockinette stitch as follows: Work until first section with stockinette stitch, slip 1 stitch knitwise, knit 1, pass slipped stitch over, work until 2 stitches remain in this section with stockinette stitch, knit the last 2 stitches together (= 2 stitches decreased). Repeat at each of the remaining 7 sections with stockinette stitch (= 16 stitches decreased on every row with decrease). BUTTONHOLES: Decrease for buttonholes on right band when garment is worn (i.e. decrease at the beginning of row from right side). 1 BUTTONHOLE = knit third and fourth stitch from edge together and make 1 yarn over. On next row knit yarn over = hole. Decrease for buttonholes when piece measures: S: 27, 36, 45 and 54 cm M: 28, 37, 46 and 55 cm L: 29, 38, 47 and 56 cm XL: 30, 39, 48 and 57 cm XXL: 31, 40, 49 and 58 cm XXXL: 32, 41, 50 and 59 cm ---------------------------------------------------------- START THE PIECE HERE: ---------------------------------------------------------- JACKET - SHORT OVERVIEW OF THE PIECE: Worked back and forth on circular needle up to armhole, then work front pieces and back piece back and forth separately. Work sleeves in the round on double pointed needles/a short circular needle. BODY: Cast on 323-339-355-391-391-427 stitches on circular needle size 3.5 mm / US 4 with Lima. Work 1 ridge in GARTER STITCH - read explanation above. Switch to circular needle size 4 mm / US 6. Work 2 rows in stockinette stitch with 5 band stitches in garter stitch in each side towards mid front. Now work pattern from right side in the different sizes as follows: Size S, M and L: 5 band stitches in garter stitch, A.1 (= 9 stitches), A.3 (= 18 stitches), * stockinette stitch over the next 20-22-24 stitches, A.1 over the next 9 stitches *, work from *-* 3 times in total, stockinette stitch over the next 20-22-24 stitches, A.5 over the next 18 stitches, A.1 over the next 9 stitches, A.3 over the next 18 stitches, * stockinette stitch over the next 20-22-24 stitches, A.1 over the next 9 stitches *, work from *-* 3 times in total, stockinette stitch over the next 20-22-24 stitches, A.5, A.1, 5 band stitches in garter stitch. Size XL, XXL and XXXL: 5 band stitches in garter stitch, A.1 (= 9 stitches), A.7 (= 18 stitches), A.1 over the next 9-9-18 stitches (= 1-1-2 repetitions in total), * stockinette stitch over the next 24-24-24 stitches, A.1 over the next 9 stitches *, work from *-* 3 times in total, stockinette stitch over the next 24-24-24 stitches, A.1 over the next 9-9-18 stitches (= 1-1-2 repetitions in total), A.7 over the next 18 stitches, A.1 over the next 9 stitches, A.7 over the next 18 stitches, A.1 over the next 9-9-18 stitches (= 1-1-2 repetitions in total), * stotcking stitch over the next 24-24-24 stitches, A.1 over the next 9 stitches *, work from *-* 3 times in total, stockinette stitch over the next 24-24-24 stitches, A.1 over the next 9-9-18 stitches (= 1-1-2 repetitions in total), A.7 over the next 18 stitches, A.1 over the next 9 stitches, 5 band stitches in garter stitch. All sizes: On first row increase stitches in each diagram, increases are shown in diagram (= 17-17-17-21-21-25 stitches increased) = 340-356-372-412-412-452 stitches. Work band stitches in garter stitch until finished measurements and on every 20th row work SHORT ROWS IN BAND – read explanation above. When A.1, A.3, A.5 and A.7 have been worked vertically, work A.2 over A.1, A.4 over A.3, A.6 over A.5 and A.8 over A.7 until finished measurements. REMEMBER THE KNITTING GAUGE. When piece measures 9-6-7-11-8-9 cm / 3 ½"-2⅜"-2 ¾"-4 ¼"-3⅛"-3 ½", begin decrease in every section with 20-22-24-24-24-24 stitches in stockinette stitch – read DECREASE TIP. Decrease like this every 5-5-5-4-5-5 cm / 1⅞"-1⅞"-1⅞"-1 ½"-1⅞"-1⅞" 8-9-9-10-9-9 times in total = 212-212-228-252-268-308 stitches. After all decreases are done, there are 4-4-6-4-6-6 stitches in stockinette stitch in every section with stockinette stitch. Remember BUTTONHOLES on right band - read explanation above. When piece measures 47-48-49-50-51-52 cm / 18½"-19"-19¼"-19¾"-20"-20½", insert 4 marker threads in piece as follows: Insert a marker thread in 2nd, 3rd, 6th, and 7th section with stockinette stitch. I.e. the 2 middle section in stockinette stitch in each side of piece. On next row from right side, increase in every section with marker thread - read INCREASE TIP-1! Increase like this every 4-4-4-4-2-2 cm / 1 ½"-1 ½"-1 ½"-1 ½"-¾"-¾" 1-2-3-3-3-3 times in total = 220-228-252-276-292-332 stitches. When piece measures 58-59-60-61-62-63 cm / 22¾"-23¼"-23⅝"-24"-24⅜"-24¾", work next row from wrong side as follows: Work the first 56-58-64-70-74-84 stitches (= right front piece), bind off the next 8 stitches under sleeve, work the next 92-96-108-120-128-148 stitches (= back piece), bind off the next 8 stitches under sleeve, work the last 56-58-64-70-74-84 stitches on needle (= left front piece). Cut the yarn. Slip stitches for right and left front piece on separate stitch holders and work the back piece. BACK PIECE: = 92-96-108-120-128-148 stitches. Continue pattern back and forth the same way but work edge stitch in each side in garter stitch, AT THE SAME TIME bind off for armhole at the beginning of every row in each side of piece as follows: bind off 3 stitches 0-0-0-0-0-2 times, 2 stitches 1-2-3-3-3-3 times and 1 stitch 1-1-3-2-3-2 times = 86-86-90-104-110-120 stitches. When piece measures 74-76-78-80-82-84 cm / 29⅛"-30"-30¾"-31½"-32¼"-33" / 29⅛"-30"-30¾"-31½"-32¼"-33", bind off the middle 24-24-26-26-28-28 stitches for neck and finish each shoulder separately = 31-31-32-39-41-46 stitches. Continue with knit over knit and purl over purl until piece measures 75-77-79-81-83-85 cm / 29½"-30⅜"-31"-32"-32¾"-33½". Now work 1 ridge over all stitches, at the same time decrease 3-3-3-4-4-6 stitches evenly = 28-28-29-35-37-40 stitches. Bind off. Work the other shoulder the same way. RIGHT FRONT PIECE: = 56-58-64-70-74-84 stitches. Continue pattern back and forth the same way. On first row begin increase for collar - read INCREASE TIP-2. Increase like this every 4th row 8-8-10-10-12-12 times in total, AT THE SAME TIME bind off for armhole at beginning of every row from side the same way as on back piece. When all bind offs for armhole and all increases for collar are done, there are 61-61-65-72-77-82 stitches on needle. Continue until piece measures 75-77-79-81-83-85 cm / 29½"-30⅜"-31"-32"-32¾"-33½", adjust so that next row is worked from right side: Knit the first 30-30-33-33-36-36 stitches before slipping them on a stitch holder (= collar), knit the next 31-31-32-39-41-46 stitches, AT THE SAME TIME decrease 3-3-3-4-4-6 stitches evenly = 28-28-29-35-37-40 stitches for shoulder. Turn and knit over stitches for shoulder, turn and bind off. Slip stitches from stitch holder back on circular needle and knit 1 row from wrong side. Then work shawl collar in garter stitch, begin from mid front as follows: * Work 2 rows back and forth over the first 18-18-20-20-21-22 stitches, work 2 rows back and forth over all stitches *, work from *-* until collar measures 6-6-6-6-7-7 cm / 2⅜"-2⅜"-2⅜"-2⅜"-2 ¾"-2 ¾" on the shortest. Bind off. LEFT FRONT PIECE: = 56-58-64-70-74-84 stitches. Continue pattern back and forth the same way. On first row begin increase for collar - remember INCREASE TIP-2. Increase like this every 4th row 8-8-10-10-12-12 times in total, AT THE SAME TIME bind off for armhole at beginning of every row from side the same way as on back piece and right front piece. When all bind offs for armhole and all increases for collar are done, there are 61-61-65-72-77-82 stitches on needle. Continue until piece measures 75-77-79-81-83-85 cm / 29½"-30⅜"-31"-32"-32¾"-33½", adjust so that next row is worked from wrong side: Knit the first 30-30-33-33-36-36 stitches before slipping them on a stitch holder (= collar), knit the next 31-31-32-39-41-46 stitches, AT THE SAME TIME decrease 3-3-3-4-4-6 stitches evenly = 28-28-29-35-37-40 stitches for shoulder, turn and bind off. Slip stitches from stitch holder back on circular needle and knit 1 row from right side. Then work shawl collar in garter stitch, begin from mid front as follows: * Work 2 rows back and forth over the first 18-18-20-20-21-22 stitches, work 2 rows back and forth over all stitches *, work from *-* until collar measures 6-6-6-6-7-7 cm / 2⅜"-2⅜"-2⅜"-2⅜"-2 ¾"-2 ¾" on the shortest. Bind off. SLEEVE: Work sleeve in the round on double pointed needles. Cast on 52-54-56-58-60-60 stitches on double pointed needles size 3.5 mm / US 4 with Lima. Work 1 ridge. Switch to double pointed needles size 4 mm / US 6. Work 1 round in stockinette stitch. Then work as follows: 8-9-10-11-12-12 stitches in stockinette stitch, A.1 (= 9 stitches), A.7 (= 18 stitches), A.1, 8-9-10-11-12-12 stitches in stockinette stitch, insert 1 marker at the beginning of round. Continue pattern like this. When A.1 and A.7 have been worked vertically, continue with A.2 over A.1 and A.8 over A.7. When piece measures 8 cm / 3⅛", increase 1 stitch on each side of marker - read INCREASE TIP-3. Increase like this every 3-3-3-3-1-1 cm / 1⅛"-1⅛"-1⅛"-1⅛"-⅜"-⅜" 9-8-5-2-0-7 times and every 4-2-2-2-2-2 cm / 1 ½"-¾"-¾"-¾"-¾"-¾" 1-3-7-11-14-9 times = 76-80-84-88-92-96 stitches. Work the increased stitches in stockinette stitch. When piece measures 46-45-44-43-40-38 cm / 18"-17⅝"-17 ¼"-16⅞"-15 ¾"-14⅞" (shorter measurements in the larger sizes because of longer sleeve cap and wider shoulders), bind off for sleeve cap at beginning of every row in each side as follows: bind off 4 stitches 1 time, 2 stitches 4-3-3-3-3-3 times, 1 stitch 2-6-7-6-9-10 times, 2 stitches 3-1-1-1-3-3 times and 3 stitches 2-3-3-4-2-2 times = 24-26-28-28-30-32 stitches. Bind off the remaining stitches. Piece measures 55-55-55-54-53-52 cm / 21⅝"-21⅝"-21⅝"-21 ¼"-20⅞"-20⅜". Work another sleeve the same way. ASSEMBLY: Sew the shoulder seams together. Sew in sleeves. Sew the collar tog mid back and sew it to the neckline. Sew the buttons on to the left band. |
|||||||||||||||||||||||||||||||||||||
Diagram explanations |
|||||||||||||||||||||||||||||||||||||
|
|||||||||||||||||||||||||||||||||||||

|
|||||||||||||||||||||||||||||||||||||
|
|||||||||||||||||||||||||||||||||||||

|
|||||||||||||||||||||||||||||||||||||
|
|||||||||||||||||||||||||||||||||||||
|
Have you made this or any other of our designs? Tag your pictures in social media with #dropsdesign so we can see them! Do you need help with this pattern?You'll find tutorial videos, a Comments/Questions area and more by visiting the pattern on garnstudio.com. © 1982-2024 DROPS Design A/S. We reserve all rights. This document, including all its sub-sections, has copyrights. Read more about what you can do with our patterns at the bottom of each pattern on our site. |
|||||||||||||||||||||||||||||||||||||


With over 40 years in knitting and crochet design, DROPS Design offers one of the most extensive collections of free patterns on the internet - translated to 17 languages. As of today we count 304 catalogs and 11422 patterns - 11417 of which are translated into English (US/in).
We work hard to bring you the best knitting and crochet have to offer, inspiration and advice as well as great quality yarns at incredible prices! Would you like to use our patterns for other than personal use? You can read what you are allowed to do in the Copyright text at the bottom of all our patterns. Happy crafting!
Comments / Questions (90)
What are the finished bust sizes? I have karisma yarn ans will ne using a knitting machine
19.01.2023 - 05:38DROPS Design answered:
Dear Mrs Bouwhuis , you will find all finished measurements in the chart, they are taken in cm, from side to side, with garment lying flat. Read more here. Happy knitting!
19.01.2023 - 11:09Ik brei precies volgens patroon. Maar mijn werk krult om. Wat kan ik hier aan doen. Ben al een stuk op weg. En wil liever niet uithalen.
11.12.2022 - 09:21DROPS Design answered:
Dag Astrid,
Als alleen de rand omkrult zou je deze, als je het werk klaar hebt, heel voorzichtig op kunnen persen. Je legt daartoe het werk op een strijkplank en daarover leg je een natte theedoek. Vervolgens dep je voorzichtig met het strijkijzer op de theedoek, waaronder het breiwerk zit. Let erop dat je dit echt heel voorzichtig doet, om ervoor te zorgen dat je de structuur van je breiwerk in tact houdt.
12.12.2022 - 20:51Buongiorno, ho bisogno di sapere come lavorare i ferri pari degli schemi/diagrammi (lavoro le maglie come si presentano? lavoro tutto a rovescio? oppure segue la seconda riga del diagramma in senso contrario?), nella spiegazione dice che i diagrammi mostrano tutti i ferri del motivo visti sul dritto del lavoro Grazie
18.11.2022 - 10:49DROPS Design answered:
Buonasera Stefania, il diagramma mostra tutti i ferri del lavoro: i ferri pari si lavorano come indicato nella legenda. Buon lavoro!
24.11.2022 - 22:23Hi! Thank you so much for this beautiful pattern ! Just a comment to make them even better: please add row numbers to the photos so easier to keep track :) greetings
07.08.2022 - 16:29Is there a written pattern for the graphs as I find them very difficult to follow and prefer to follow the written instructions.. Thank you
30.04.2022 - 13:35DROPS Design answered:
Dear Marie, our patterns are only available in the way they are published, as a mixed format between written instructions and diagrams. You can check the following lesson on how to read knitting diagrams here: https://www.garnstudio.com/lesson.php?id=68&cid=19. You can also ask us if you are confused in a specific step or row of the diagram. Happy knitting!
30.04.2022 - 22:19On Back Piece instructions, what does "Continue with knit over knit and purl over purl" mean?
24.03.2022 - 02:27DROPS Design answered:
Hi Wendy, This means that the ribbed pattern is continued, by knitting the knitted stitches and purling the purled stitches on the subsequent rows. On the wrong side, the knitted stitches look purled (so are purled from the wrong side) and the purled stitches look knitted ( so are knitted from the wrong side). Hope this helps and happy knitting!
24.03.2022 - 07:04When binding off for the sleeve cap, am I to start working back and forth, instead of in the round? It says to bind off at the beginning of every row in each side. Thank you!
14.03.2022 - 15:45DROPS Design answered:
Dear JoAnna, correct, you will now work in rows/flat and cast off at the beginning of each row on each side, ie at the beginning of right side row, then at the beginning of next row from wrong side. Happy knitting!
14.03.2022 - 16:56Hvordan finner jeg ut hvilken str jeg skal velge når jeg ikke finner str gaid?
08.03.2022 - 21:36DROPS Design answered:
Hei Sissel, Du finner en målskisse på bunnen av oppskriften, med alle mål til de forskjellige størrelser. God fornøyelse!
09.03.2022 - 07:26Don't understand the collar ' Then work shawl collar in garter stitch, begin from mid front as follows: * Work 2 rows back and forth over the first 18 stitches, work 2 rows back and forth over all stitches *, work from *-* until collar measures 6 cm . Do I follow pattern after the 18 stitches. Or carry on with pattern. What does 'on the shortest' mean?
26.02.2022 - 17:52DROPS Design answered:
Dear Francesca, when you start the shawl collar, you have already cast off the stitches in the shoulders, so you are not working the pattern anymore. On the shortest: you need to measure the curved side, which is outwards (not towards the neck). You can check the following video, for anything related to working short rows: https://www.garnstudio.com/video.php?id=438&lang=en Happy knitting!
27.02.2022 - 17:09Jeg har svært ved at se, hvordan kraven skal syes på på ryggen. Hvordan vender jeg kraven rigtigt? Hilsner Helle
11.02.2022 - 19:08DROPS Design answered:
Hei Helle. Vi har dessverre ikke et bilde av selve kragen bak der det sys sammen. Du har en krage del fra høyre forstykke og en krage del fra venstre forstykke, disse delene sys sammen midt bak og deretter sys kragen til halsringningen. mvh DROPS Design
14.02.2022 - 11:16