
Popular categories
Looking for a yarn?


|
|||||||||||||||||||||||||||||||||||||
Ice Dancer |
|||||||||||||||||||||||||||||||||||||
 |
 |
||||||||||||||||||||||||||||||||||||
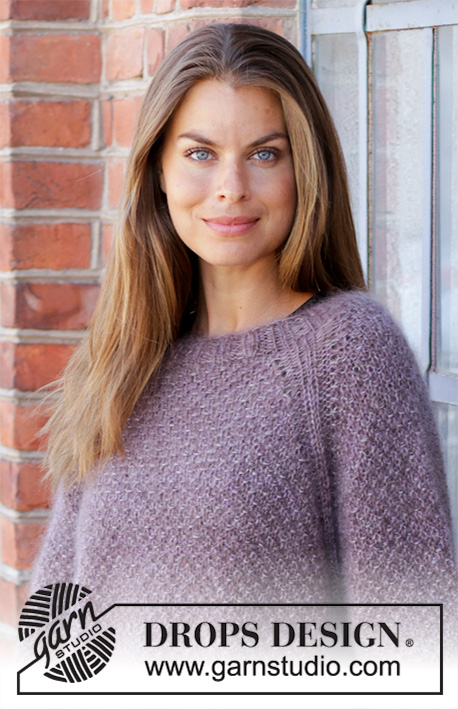
Knitted fitted jacket in DROPS Lima. Piece is knitted back and forth from mid front with lace pattern, cables and shawl collar. Size: S - XXXL
DROPS 197-25 |
|||||||||||||||||||||||||||||||||||||
|
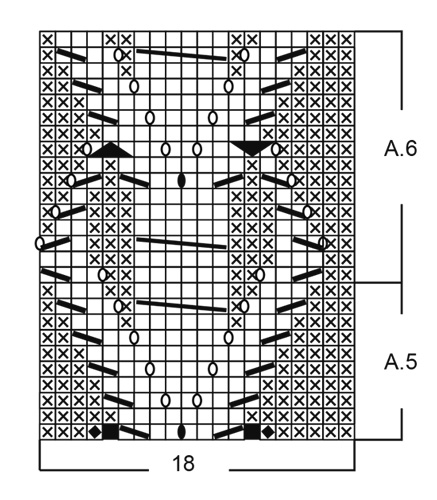
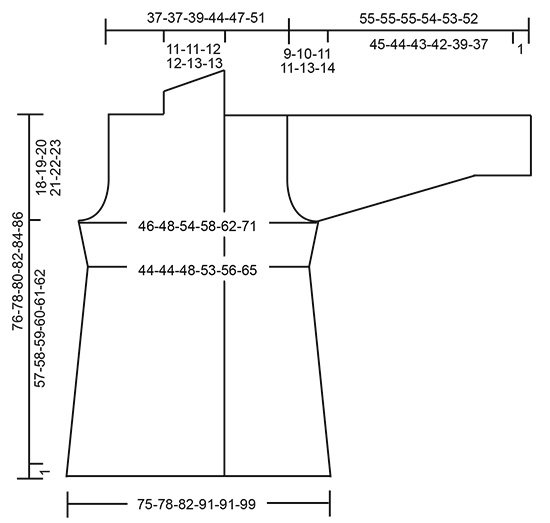
EXPLANATION FOR THE PATTERN: ---------------------------------------------------------- GARTER STITCH (worked in the round): 1 ridge = 2 rounds. Knit 1 round and purl 1 round. GARTER STITCH (back and forth): 1 ridge = knit 2 rows. PATTERN: See diagrams A.1 to A.8. Diagrams show all rows in pattern seen from the right side. SHORT ROWS IN BAND: Work short rows over stitches in band to avoid it contracting vertically. Work as follows from right side every 20th row: Knit 5 (= right band), turn and work back. Work 1 row over all stitches as before. Turn and knit 5 (= left band), turn and work back. Turn and work 1 row over all stitches as before. INCREASE TIP-1 (applies to sides of body): All increases are done from the right side. Increase 2 stitches in each section with marker thread as follows: Work until first section in stocking stitch and marker thread, knit 1, 1 yarn over, knit until 1 stitch remains in section with stocking stitch, 1 yarn over, knit 1 (= 2 stitches increased). Repeat at each of the remaining sections with stocking stitch and marker thread (= 8 stitches increased on every row with increase). On next row purl yarn over twisted to avoid holes. INCREASE TIP-2 (applies to collar): All increases are done from the right side. Increase 1 stitch by making a yarn over inside 3 stitches in garter stitch on band mid front. On next row knit yarn over twisted to avoid holes. INCREASE TIP-3 (applies to sleeves): Work until 2 stitches remain before marker under sleeve, make 1 yarn over, knit 4 (marker is in the middle of these stitches), make 1 yarn over. On next round knit yarn overs twisted to avoid holes. Then work the new stitches in stocking stitch. DECREASE TIP (applies to body): All decreases are done from the right side! Decrease 2 stitches in each of the 8 sections with 20-22-24-24-24-24 stitches in stocking stitch as follows: Work until first section with stocking stitch, slip 1 stitch knitwise, knit 1, pass slipped stitch over, work until 2 stitches remain in this section with stocking stitch, knit the last 2 stitches together (= 2 stitches decreased). Repeat at each of the remaining 7 sections with stocking stitch (= 16 stitches decreased on every row with decrease). BUTTONHOLES: Decrease for buttonholes on right band when garment is worn (i.e. decrease at the beginning of row from right side). 1 BUTTONHOLE = knit third and fourth stitch from edge together and make 1 yarn over. On next row knit yarn over = hole. Decrease for buttonholes when piece measures: S: 27, 36, 45 and 54 cm M: 28, 37, 46 and 55 cm L: 29, 38, 47 and 56 cm XL: 30, 39, 48 and 57 cm XXL: 31, 40, 49 and 58 cm XXXL: 32, 41, 50 and 59 cm ---------------------------------------------------------- START THE PIECE HERE: ---------------------------------------------------------- JACKET - SHORT OVERVIEW OF THE PIECE: Worked back and forth on circular needle up to armhole, then work front pieces and back piece back and forth separately. Work sleeves in the round on double pointed needles/a short circular needle. BODY: Cast on 323-339-355-391-391-427 stitches on circular needle size 3.5 mm with Lima. Work 1 ridge in GARTER STITCH - read explanation above. Switch to circular needle size 4 mm. Work 2 rows in stocking stitch with 5 band stitches in garter stitch in each side towards mid front. Now work pattern from right side in the different sizes as follows: Size S, M and L: 5 band stitches in garter stitch, A.1 (= 9 stitches), A.3 (= 18 stitches), * stocking stitch over the next 20-22-24 stitches, A.1 over the next 9 stitches *, work from *-* 3 times in total, stocking stitch over the next 20-22-24 stitches, A.5 over the next 18 stitches, A.1 over the next 9 stitches, A.3 over the next 18 stitches, * stocking stitch over the next 20-22-24 stitches, A.1 over the next 9 stitches *, work from *-* 3 times in total, stocking stitch over the next 20-22-24 stitches, A.5, A.1, 5 band stitches in garter stitch. Size XL, XXL and XXXL: 5 band stitches in garter stitch, A.1 (= 9 stitches), A.7 (= 18 stitches), A.1 over the next 9-9-18 stitches (= 1-1-2 repetitions in total), * stocking stitch over the next 24-24-24 stitches, A.1 over the next 9 stitches *, work from *-* 3 times in total, stocking stitch over the next 24-24-24 stitches, A.1 over the next 9-9-18 stitches (= 1-1-2 repetitions in total), A.7 over the next 18 stitches, A.1 over the next 9 stitches, A.7 over the next 18 stitches, A.1 over the next 9-9-18 stitches (= 1-1-2 repetitions in total), * stotcking stitch over the next 24-24-24 stitches, A.1 over the next 9 stitches *, work from *-* 3 times in total, stocking stitch over the next 24-24-24 stitches, A.1 over the next 9-9-18 stitches (= 1-1-2 repetitions in total), A.7 over the next 18 stitches, A.1 over the next 9 stitches, 5 band stitches in garter stitch. All sizes: On first row increase stitches in each diagram, increases are shown in diagram (= 17-17-17-21-21-25 stitches increased) = 340-356-372-412-412-452 stitches. Work band stitches in garter stitch until finished measurements and on every 20th row work SHORT ROWS IN BAND – read explanation above. When A.1, A.3, A.5 and A.7 have been worked vertically, work A.2 over A.1, A.4 over A.3, A.6 over A.5 and A.8 over A.7 until finished measurements. REMEMBER THE KNITTING TENSION. When piece measures 9-6-7-11-8-9 cm, begin decrease in every section with 20-22-24-24-24-24 stitches in stocking stitch – read DECREASE TIP. Decrease like this every 5-5-5-4-5-5 cm 8-9-9-10-9-9 times in total = 212-212-228-252-268-308 stitches. After all decreases are done, there are 4-4-6-4-6-6 stitches in stocking stitch in every section with stocking stitch. Remember BUTTONHOLES on right band - read explanation above. When piece measures 47-48-49-50-51-52 cm, insert 4 marker threads in piece as follows: Insert a marker thread in 2nd, 3rd, 6th, and 7th section with stocking stitch. I.e. the 2 middle section in stocking stitch in each side of piece. On next row from right side, increase in every section with marker thread - read INCREASE TIP-1! Increase like this every 4-4-4-4-2-2 cm 1-2-3-3-3-3 times in total = 220-228-252-276-292-332 stitches. When piece measures 58-59-60-61-62-63 cm, work next row from wrong side as follows: Work the first 56-58-64-70-74-84 stitches (= right front piece), cast off the next 8 stitches under sleeve, work the next 92-96-108-120-128-148 stitches (= back piece), cast off the next 8 stitches under sleeve, work the last 56-58-64-70-74-84 stitches on needle (= left front piece). Cut the yarn. Slip stitches for right and left front piece on separate stitch holders and work the back piece. BACK PIECE: = 92-96-108-120-128-148 stitches. Continue pattern back and forth the same way but work edge stitch in each side in garter stitch, AT THE SAME TIME cast off for armhole at the beginning of every row in each side of piece as follows: Cast off 3 stitches 0-0-0-0-0-2 times, 2 stitches 1-2-3-3-3-3 times and 1 stitch 1-1-3-2-3-2 times = 86-86-90-104-110-120 stitches. When piece measures 74-76-78-80-82-84 cm, cast off the middle 24-24-26-26-28-28 stitches for neck and finish each shoulder separately = 31-31-32-39-41-46 stitches. Continue with knit over knit and purl over purl until piece measures 75-77-79-81-83-85 cm. Now work 1 ridge over all stitches, at the same time decrease 3-3-3-4-4-6 stitches evenly = 28-28-29-35-37-40 stitches. Cast off. Work the other shoulder the same way. RIGHT FRONT PIECE: = 56-58-64-70-74-84 stitches. Continue pattern back and forth the same way. On first row begin increase for collar - read INCREASE TIP-2. Increase like this every 4th row 8-8-10-10-12-12 times in total, AT THE SAME TIME cast off for armhole at beginning of every row from side the same way as on back piece. When all cast offs for armhole and all increases for collar are done, there are 61-61-65-72-77-82 stitches on needle. Continue until piece measures 75-77-79-81-83-85 cm, adjust so that next row is worked from right side: Knit the first 30-30-33-33-36-36 stitches before slipping them on a stitch holder (= collar), knit the next 31-31-32-39-41-46 stitches, AT THE SAME TIME decrease 3-3-3-4-4-6 stitches evenly = 28-28-29-35-37-40 stitches for shoulder. Turn and knit over stitches for shoulder, turn and cast off. Slip stitches from stitch holder back on circular needle and knit 1 row from wrong side. Then work shawl collar in garter stitch, begin from mid front as follows: * Work 2 rows back and forth over the first 18-18-20-20-21-22 stitches, work 2 rows back and forth over all stitches *, work from *-* until collar measures 6-6-6-6-7-7 cm on the shortest. Cast off. LEFT FRONT PIECE: = 56-58-64-70-74-84 stitches. Continue pattern back and forth the same way. On first row begin increase for collar - remember INCREASE TIP-2. Increase like this every 4th row 8-8-10-10-12-12 times in total, AT THE SAME TIME cast off for armhole at beginning of every row from side the same way as on back piece and right front piece. When all cast offs for armhole and all increases for collar are done, there are 61-61-65-72-77-82 stitches on needle. Continue until piece measures 75-77-79-81-83-85 cm, adjust so that next row is worked from wrong side: Knit the first 30-30-33-33-36-36 stitches before slipping them on a stitch holder (= collar), knit the next 31-31-32-39-41-46 stitches, AT THE SAME TIME decrease 3-3-3-4-4-6 stitches evenly = 28-28-29-35-37-40 stitches for shoulder, turn and cast off. Slip stitches from stitch holder back on circular needle and knit 1 row from right side. Then work shawl collar in garter stitch, begin from mid front as follows: * Work 2 rows back and forth over the first 18-18-20-20-21-22 stitches, work 2 rows back and forth over all stitches *, work from *-* until collar measures 6-6-6-6-7-7 cm on the shortest. Cast off. SLEEVE: Work sleeve in the round on double pointed needles. Cast on 52-54-56-58-60-60 stitches on double pointed needles size 3.5 mm with Lima. Work 1 ridge. Switch to double pointed needles size 4 mm. Work 1 round in stocking stitch. Then work as follows: 8-9-10-11-12-12 stitches in stocking stitch, A.1 (= 9 stitches), A.7 (= 18 stitches), A.1, 8-9-10-11-12-12 stitches in stocking stitch, insert 1 marker at the beginning of round. Continue pattern like this. When A.1 and A.7 have been worked vertically, continue with A.2 over A.1 and A.8 over A.7. When piece measures 8 cm, increase 1 stitch on each side of marker - read INCREASE TIP-3. Increase like this every 3-3-3-3-1-1 cm 9-8-5-2-0-7 times and every 4-2-2-2-2-2 cm 1-3-7-11-14-9 times = 76-80-84-88-92-96 stitches. Work the increased stitches in stocking stitch. When piece measures 46-45-44-43-40-38 cm (shorter measurements in the larger sizes because of longer sleeve cap and wider shoulders), cast off for sleeve cap at beginning of every row in each side as follows: Cast off 4 stitches 1 time, 2 stitches 4-3-3-3-3-3 times, 1 stitch 2-6-7-6-9-10 times, 2 stitches 3-1-1-1-3-3 times and 3 stitches 2-3-3-4-2-2 times = 24-26-28-28-30-32 stitches. Cast off the remaining stitches. Piece measures 55-55-55-54-53-52 cm. Work another sleeve the same way. ASSEMBLY: Sew the shoulder seams together. Sew in sleeves. Sew the collar tog mid back and sew it to the neckline. Sew the buttons on to the left band. |
|||||||||||||||||||||||||||||||||||||
Diagram explanations |
|||||||||||||||||||||||||||||||||||||
|
|||||||||||||||||||||||||||||||||||||

|
|||||||||||||||||||||||||||||||||||||
|
|||||||||||||||||||||||||||||||||||||

|
|||||||||||||||||||||||||||||||||||||
|
|||||||||||||||||||||||||||||||||||||
|
Have you made this or any other of our designs? Tag your pictures in social media with #dropsdesign so we can see them! Do you need help with this pattern?You'll find tutorial videos, a Comments/Questions area and more by visiting the pattern on garnstudio.com. © 1982-2024 DROPS Design A/S. We reserve all rights. This document, including all its sub-sections, has copyrights. Read more about what you can do with our patterns at the bottom of each pattern on our site. |
|||||||||||||||||||||||||||||||||||||


With over 40 years in knitting and crochet design, DROPS Design offers one of the most extensive collections of free patterns on the internet - translated to 17 languages. As of today we count 304 catalogues and 11422 patterns - 11422 of which are translated into English (UK/cm).
We work hard to bring you the best knitting and crochet have to offer, inspiration and advice as well as great quality yarns at incredible prices! Would you like to use our patterns for other than personal use? You can read what you are allowed to do in the Copyright text at the bottom of all our patterns. Happy crafting!
Comments / Questions (90)
When A1,A3, A5, A7 have been worked vertically, work A2 over A1, A4 over A3, A6 over A5 etc until finished measurements. Does that mean I only do A1, A3, A5, A7 one time only and just keep repeating A2, A4, A6 over and over again. Never doing A1, A3, A5, A7 again. Just A2, A4, etc repeats in the body, Thanks for your help.
04.12.2019 - 23:02DROPS Design answered:
Dear Katherine, yes correct, A.1, A.3, A.5 and A.7 will be worked only one time in height, then you repeat diagrams A.2, A.3, A.6 and A.8 in height. Happy knitting!
05.12.2019 - 10:10Hallo liebes Drops Design Team, ich habe die Jacke in Größe S gestrickt und leider ist sie mir viel zu groß. Gibt es die Möglichkeit die Anleitung noch mein XS zu bekommen? Leider ist kein Drops Design bei mir in der Nähe.
01.12.2019 - 15:21DROPS Design answered:
Liebe Jirina, leider können wir jeder Anleitung nach jedem individuellen Frage anpassen und einzelne Modelle auf individuellen Wunsch hin umrechnen. Wenn sie Hilfe damit brauchen, wenden Sie sich bitte an dem Laden wo Sie die Wolle gekauft haben - auch telefonisch oder per E-Mail, dort hilft man Ihnen gerne weiter. Viel Spaß beim stricken!
02.12.2019 - 10:17Bonsoir,faut il commencer les rangs raccourcis dés le premier rang ou attendre le rang 20. Merci de votre réponse
22.11.2019 - 18:26DROPS Design answered:
Bonjour Mme Chaignepain, ils servent à compenser la différence de hauteur entre la bordure devant au point mousse et le point fantaisie; vous pouvez les commencer après les 20 premiers rangs. Bon tricot!
25.11.2019 - 08:03Bonsoir,faut il commencer les rangs raccourcis dés le premier rang ou attendre le rang 20. Merci de votre réponse
22.11.2019 - 18:24I am bit confused on the stitch count on sleeves. i am following the small size. so i start with 52 stitches and than as per pattern 4 stitches get increased. than at 8cm and at every 3cm, 11 times and 4cm 1 times. my total comes out to be 82 and yours is 76. where i am missing the four stitches. 52+4+2+(2*11)+(1*2)=82 please help
15.10.2019 - 16:03DROPS Design answered:
Hi Priya, You increase 2 stitches every 3 cm 11 times which gives 74 stitches and then once after the next 4 cm which gives 76 stitches. Happy knitting!
16.10.2019 - 07:22Ich stricke die Jacke in S und habe eine Frage zu den Lochmustern: Ist es tatsächlich so gedacht, dass die Diagrammreihenfolge ...A3...A5...A3...A5... ist (die Blendenmaschen, glatt rechten Maschen und die Zöpfe außer acht gelassen)? Damit die Strickjacke an der Mittelachse gespiegelt ist, würde es sich mir eher erschließen, dass die Reihenfolge ...A3...A3...A5....A5... ist. Oder ist das nicht beabsichtigt?
07.10.2019 - 17:37DROPS Design answered:
Liebe Miriam, in S wird es so gestrickt: 5 Blendenmaschen, A.1, A.3, dann (20 Maschen glatt rechts, A.1) x 3 (Seite), 20 Maschen glatt rechts, A.5, A.1, A.3 (mitte Rückenteil), *20 Maschen glatt rechts, A.1) x 3, 20 Maschen glatt rechts (Seite), A.5, A.1, 5 Blenden-Maschen, So sind die Zöpfe A.3/A.6 spiegelverkehr an den beiden Vorderteile. Viel Spaß beim stricken!
08.10.2019 - 09:39Har strikket 14 rader med mønster til Ice Dancer jakke på diagram A1 og A2 -samt 14 rader med diagram A7 og begynt på A8.. Regnet da med at man skulle starte på nytt på diagram A1 og A2? (Disse diagram har ikke samme antall rader) Hvis jeg skal starte fra nytt på diagram A1 -vil det si at det blir et kast, som da øker antallet fra 6 rette, der det skal flettes (som da vil bli 7 rette)?!?? Er det en feil i oppskriften?
19.08.2019 - 13:13DROPS Design answered:
Hei Wenche. Når A.1 og A.7 er strikket 1 gang i høyden fortsettes det med A.2 og A.8. Det er kun A.2 og A.8 som gjentas i høyden. God Fornøyelse!
20.08.2019 - 13:30Hi. Is this supposed to be knitted in stocking stitch or garter stitch? If the pattern is followed as is knitted in rows, not in the round, then the graph surely should read the opposite stitch on alternate rows as it is being knitted on the other side of the garment? I have tried to check the photograph to see what it should look like but the resolution is not clear enough. Sorry, but I'm confused. Thanks for a reply.
30.07.2019 - 22:32DROPS Design answered:
Hi Fiona, Yes, from the wrong side, you will purl all the stitches in stocking stitch. Happy knitting!
31.07.2019 - 07:37Bonjour,pour la manche,lorsque j'ai fini les augmentations,je n'ai pas le même nombre de mailles que vous,j'en ai 4 de plus,celles qui sont rajoutée dans les diagrammes A.1 (1m x 2),A.7 (2m) mais je ne vois nul part quand on les diminue.Merci d'avance
15.07.2019 - 20:13DROPS Design answered:
Bonjour Mme Freres, on doit augmenter 2 m tous la manche 11-10-7-4-2-9 fois tous les 3-3-3-3-1-1 cm et 1-3-7-11-14-9 fois tous les 4-2-2-2-2-2 cm soit un total de 24-26-28-30-32-36 augmentations + les 52-54-56-58-60-60 m du début = 76-80-84-88-92-96 m. Vérifiez bien votre nombre d'augmentations, l'erreur vient probablement de là. Bon tricot!
16.07.2019 - 08:58Just asked a question about the ice dancer sweater. I can get back to your site please reply there about sizes on the swater thank you Patti
24.06.2019 - 17:39DROPS Design answered:
Dear Patti, when you posting a question, as opposed to a comment that does not need a reply, please mark your comment as a question, and then you will also get an e-mail notification about the answer. Thank you! Happy Knitting!
25.06.2019 - 00:19