
Popular categories
Looking for a yarn?


|
|||||||||||||||||||
Bardu |
|||||||||||||||||||
 |
 |
||||||||||||||||||
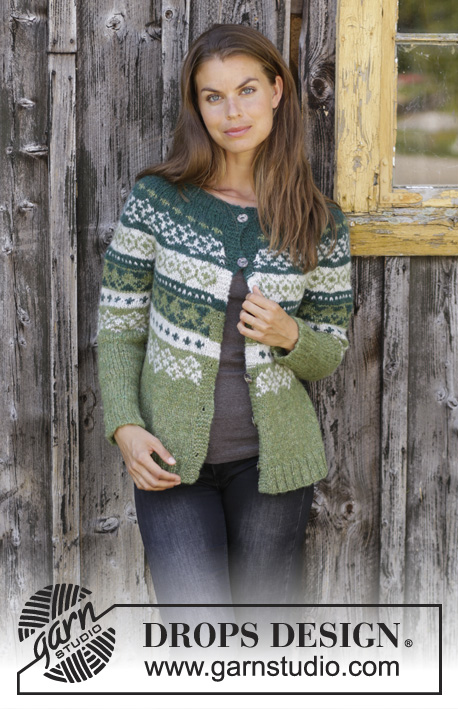
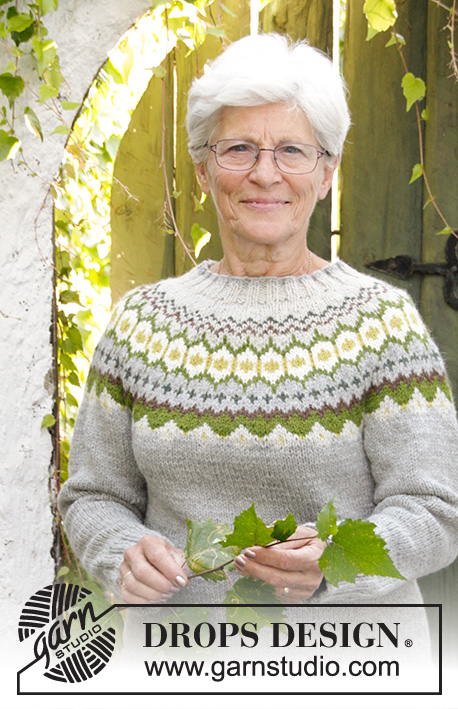
Knitted sweater with round yoke in DROPS Air. The piece is worked top down with Nordic pattern. Sizes S - XXXL.
DROPS 196-9 |
|||||||||||||||||||
|
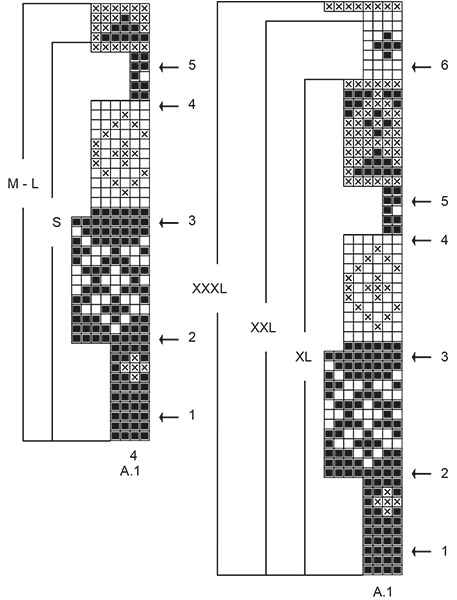
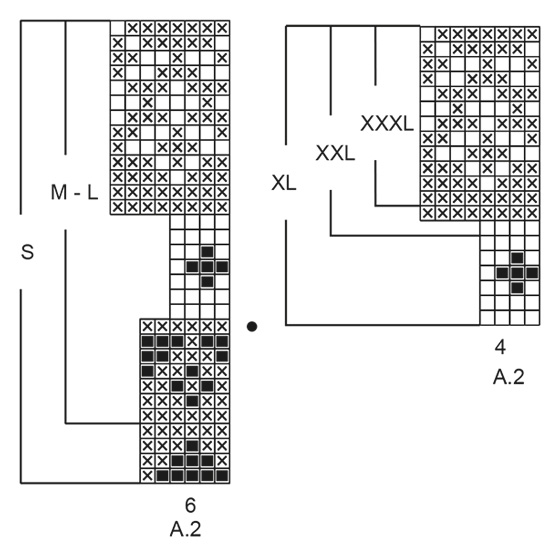
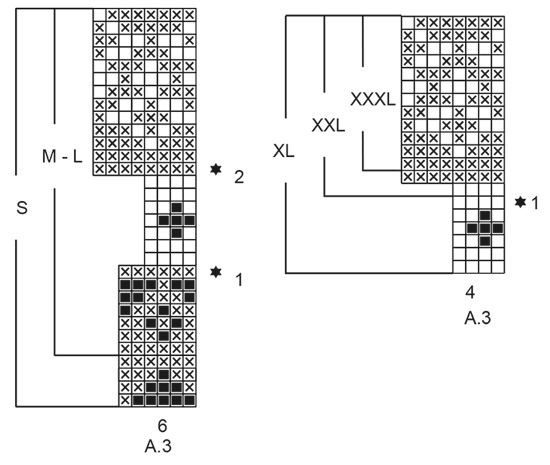
------------------------------------------------------- EXPLANATIONS FOR THE PATTERN: ------------------------------------------------------- PATTERN: See diagrams A.1 to A.3. Find your size in the diagrams. The whole pattern is worked in stockinette stitch. KNITTING TIP-1: To avoid the knitting gauge becoming tighter when working pattern it is important that the strands at the back of the piece are not tight. You can use a larger needle size when working pattern if this is a problem. KNITTING TIP-2: It is important that the knitting gauge is maintained also in height, or the yoke will be too short and the armholes too small! Check the gauge as you go and if it is right in width but not in length, you can work extra rows with forest green after the 2nd and/or the 3rd rows with increases (row with arrow) to get the right length for your size. INCREASE TIP-1 (evenly spaced): To work out how to increase evenly, count the total number of stitches on the needle (e.g. 84 stitches) and divide by the number of increases to be made (e.g. 20) = 4.2. In this example, increase by making 1 yarn over after approx. each 4th stitch. On the next round knit the yarn overs twisted to avoid holes. INCREASE TIP-2 (for sides of body): Work until there are 2 stitches left before the marker thread, 1 yarn over, knit 4 (marker thread sits in the middle of these 4 stitches), 1 yarn over (= 2 stitches increased). On the next round knit the yarn overs twisted to avoid holes. DECREASE TIP-1 (evenly spaced): To work out how to decrease evenly, count the total number of stitches on the needle (e.g. 54 stitches) and divide by the number of decreases to be made (e.g. 2) = 27. In this example, decrease by knitting each 26th and 27th stitch together. DECREASE TIP-2 (for sleeves): Decrease 1 stitch on each side of the marker thread as follows: Work until there are 3 stitches left before the marker thread, knit 2 together, knit 2 (marker thread sits in the middle of these 2 stitches), slip 1 stitch as if to knit, knit 1 and pass the slipped stitch over the knitted stitch (= 2 stitches decreased). ------------------------------------------------------- START THE PIECE HERE: ------------------------------------------------------- SWEATER - SHORT OVERVIEW OF THE PIECE: The piece is worked in the round with circular needle, from mid back and top down. The sleeves are worked in the round with double pointed needles/short circular needle, top down. SWEATER: NECK: Cast on 84-88-92-100-104-108 stitches with short circular needle size 4.5 mm / US 7 and forest green. Knit 1 round. Now work rib (knit 2, purl 2) until the rib measures 4 cm / 1½". YOKE: Change to short circular needle SIZE 5.5 mm/US 9. Now knit 1 round where you increase 20-20-24-24-28-28 stitches evenly on round – read INCREASE TIP-1 = 104-108-116-124-132-136 stitches. Knit 1 round. Now work pattern A.1 (find your size in the diagram) in the round and increase stitches evenly on the rounds marked with an arrow in the diagram. REMEMBER THE GAUGE! Read KNITTING TIP-1 and KNITTING TIP-2! ARROW-1: Increase 24-28-32-32-32-32 stitches evenly on round = 128-136-148-156-164-168 stitches. ARROW-2: Increase 32-32-36-36-36-40 stitches evenly on round = 160-168-184-192-200-208 stitches. ARROW-3: Increase 32-36-38-36-40-44 stitches evenly on round = 192-204-222-228-240-252 stitches. ARROW-4: Increase 24-30-30-30-30-36 stitches evenly on round = 216-234-252-258-270-288 stitches. ARROW-5: Increase 6-12-24-30-30-36 stitches evenly on round = 222-246-276-288-300-324 stitches. When the increases on the round marked with arrow-5 are finished, continue as follows in the different sizes: Sizes S, M, L and XL: Continue until there is 1 round left in the diagrams. The piece should now measure 25-27-27-30 cm / 9 ¾"-10⅝"-10⅝"-11 ¾" from the cast-on edge down. Sizes XXL and XXXL: Continue with pattern as before and increase as follows: ARROW-6: Increase 28-28 stitches evenly on round = 328-352 stitches. When the increases on the round marked with arrow-6 are finished, continue until there is 1 round left in the diagrams. The piece should now measure 33-34 cm / 13"-13⅜" from the cast-on edge down. ALL SIZES: Work the last round in the diagrams as follows: Work the first 31-34-39-42-48-52 stitches (= half back piece), place the next 48-54-60-60-68-72 stitches on a thread for sleeve, cast on 6-6-6-8-8-8 new stitches on the needle (= in side under sleeve), work the next 63-69-78-84-96-104 stitches (= front piece), place the next 48-54-60-60-68-72 stitches on a thread for sleeve, cast on 6-6-6-8-8-8 new stitches on the needle (= in side under sleeve), work the remaining 32-35-39-42-48-52 stitches (= half back piece). THE PIECE IS NOW MEASURED FROM HERE! BODY: = 138-150-168-184-208-224 stitches. Now work pattern as follows: Work A.2 (find your size in diagram) in the round. The pattern on the body should match the pattern on the yoke so that each repeat of A.2 is over each repeat of A.1! In sizes S and M increase 6-2 stitches evenly on the row marked with a black dot in A.2 (do not increase in sizes L, XL, XXL and XXXL) = 144-152-168-184-208-224 stitches. When A.2 has been completed in height continue with moss green and stockinette stitch. Now insert 1 marker thread in each side as follows: Insert the first marker thread after the first 36-38-42-46-52-56 stitches, then the second marker thread after the next 72-76-84-92-104-112 stitches. There are 36-38-42-46-52-56 stitches left on the round after the second marker thread. On the next round increase 2 stitches in each side (= 4 stitches increased on the row) - read INCREASE TIP-2. Increase like this every 4-2-3-4-5-6 cm / 1 ½"-¾"-1⅛"-1 ½"-1⅞"-2⅜" a total of 2-4-4-4-3-3 times = 152-168-184-200-220-236 stitches. When the piece measures 24-24-26-25-24-25 cm / 9⅜"-9⅜"-10 ¼"-9 ¾"-9⅜"-9 ¾" increase 24-28-28-32-36-36 stitches evenly on round = 176-196-212-232-256-272 stitches. Change to circular needle size 4.5 mm / US 7. Work rib (knit 2, purl 2). When the rib measures 6 cm / 2⅜" bind off with knit over knit and purl over purl; but to avoid the bind off edge being tight you can make 1 yarn over after each 4th stitch (yarn overs bind off as normal stitches). The piece measures approx. 58-60-62-64-66-68 cm / 22¾"-23⅝"-24⅜"-25¼"-26"-26¾" from the shoulder down. SLEEVE: Place the 48-54-60-60-68-72 stitches from the thread on the one side of the piece on double pointed needles/short circular needle SIZE 5.5 mm/US 9 and knit up 1 stitch in each of the 6-6-6-8-8-8 new stitches cast on under the sleeve = 54-60-66-68-76-80 stitches. Insert a marker thread mid under sleeve, i.e. in the middle of the 6-6-6-8-8-8 stitches cast on under sleeve. Let marker thread follow in piece, it is used for the decrease under the sleeve. Continue in the round with A.3 (find your size in the diagram). NOTE (applies to sizes S, M and L): Because the yoke was finished in the middle of a pattern repeat, it is important that the pattern on the sleeve matches the pattern on the yoke so that each repeat of A.3 is over each repeat of A.2! Make sure that you start on the right stitch in the diagram so that the pattern fits around the whole sleeve. Now work as follows in the different sizes: Sizes S, M and L: On the first round with a star in A.3 decrease 2-4-2 stitches evenly – read DECREASE TIP-1 and on the second round with a star decrease 4-8-8 stitches evenly = 48-48-56 stitches. Sizes XL, XXL and XXXL: On the round with a star in A.3 decrease 4-4-0 stitches evenly – read DECREASE TIP-1 = 64-72-80 stitches. When A.3 has been completed, continue with stockinette stitch and moss green. On the next round start to decrease under the sleeve - read DECREASE TIP-2. Decrease like this approx. every 2-2-1-1-1-1 cm / ¾"-¾"-⅜"-⅜"-⅜"-⅜" a total of 7-7-10-13-16-19 times = 34-34-36-38-40-42 stitches. When the sleeve measures 34-32-33-30-27-27 cm / 13⅜"-12 ½"-13"-11 ¾"-10⅝"-10⅝" from the division, knit 1 round where you increase 6-6-8-6-8-10 stitches evenly = 40-40-44-44-48-52 stitches. Change to double pointed needles size 4.5 mm / US 7. Work rib (knit 2 /purl 2) for 6 cm / 2⅜". Bind off with knit over knit and purl over purl. The sleeve measures approx. 40-38-39-36-33-33 cm / 15 ¾"-14⅞"-15 ¼"-14⅛"-13"-13". Work the other sleeve in the same way. |
|||||||||||||||||||
Diagram explanations |
|||||||||||||||||||
|
|||||||||||||||||||
|
|||||||||||||||||||
|
|||||||||||||||||||
|
|||||||||||||||||||

|
|||||||||||||||||||
|
Have you made this or any other of our designs? Tag your pictures in social media with #dropsdesign so we can see them! Do you need help with this pattern?You'll find tutorial videos, a Comments/Questions area and more by visiting the pattern on garnstudio.com. © 1982-2024 DROPS Design A/S. We reserve all rights. This document, including all its sub-sections, has copyrights. Read more about what you can do with our patterns at the bottom of each pattern on our site. |
|||||||||||||||||||


With over 40 years in knitting and crochet design, DROPS Design offers one of the most extensive collections of free patterns on the internet - translated to 17 languages. As of today we count 304 catalogs and 11422 patterns - 11417 of which are translated into English (US/in).
We work hard to bring you the best knitting and crochet have to offer, inspiration and advice as well as great quality yarns at incredible prices! Would you like to use our patterns for other than personal use? You can read what you are allowed to do in the Copyright text at the bottom of all our patterns. Happy crafting!
Comments / Questions (46)
Skal de 6 masker der slås op når der sættes masker af til ærmer, strikkes med i ryg og forstykke ?
10.01.2020 - 18:23DROPS Design answered:
Hej Bente, ja det er de masker som danner siden under ærmerne. God fornøjelse!
15.01.2020 - 15:58Missä kohtaa on hihan kerroksen vaihtumakohta?
25.10.2019 - 03:04DROPS Design answered:
Hei, kerroksen vaihtumiskohta on hihan alaosan poimittujen silmukoiden keskellä, eli merkkilangan kohdalla.
31.10.2019 - 14:27Ein sehr schöner pulli, leider fehlen die angaben für eine erhöhung am nacken. wie und wo könnte ich eine solche einstricken? besten dank für euren rat.
30.09.2019 - 07:28DROPS Design answered:
Liebe Frau Ventura, es gibt bei diesem Modell keine Erhöhung, Sie können sich von einem ähnlichen Modellen (selbe Maschenprobe und -Anzahl) inspirieren um so eine Erhöhung zu stricken. Ihr DROPS Laden kann Ihnen gerne weiterhelfen- auch telefonisch oder per E-Mail. Viel Spaß beim stricken!
30.09.2019 - 11:46Skal jeg starte med at strikke rundt på mine rundpinde fra halskanten eller skal jeg vende arbejdet, og så først strikke rundt fra bærestykket?
28.08.2019 - 20:40DROPS Design answered:
Hej Bolette, du strikker rundt helt fra starten :)
26.09.2019 - 10:04Hej. Jeg er ved at lave Bardu sweater. Jeg er kommet til at lave udtagninger på hver 2. Pind i stedet for på hver 2. Cm. Kan det fungere eller skal jeg pille op? Jeg er nybegynder med fair isle så jeg vil helst ikke pille op 😳
28.08.2019 - 20:09DROPS Design answered:
Hej Rie, Hvis du ikke er kommet så langt, så kan du sikkert bare fortsætte med hver 2. cm - god fornøjelse! :)
26.09.2019 - 10:05I asked a question about tension on 21.1.19. You explained that Drops Air gives 17st using 5mm needles and this pattern gives 16sts because it uses 5.5mm. I have a NZ yarn that gives me 17sts using 5mm on ordinary stocking stitch, I haven't tested it on the Nordic pattern. Do you think I should I use 5.5mm for this pattern? Also, what chest sizes and lengths are the S and M sizes?
03.04.2019 - 10:10DROPS Design answered:
Dear Mrs Munch, you should always check your tension knitting first a swatch, that's the best way to check the number of sts and rows for 10 cm. You'll find all measurements for each size in the measurement chart - read more about sizing here. Happy knitting!
03.04.2019 - 13:46Pinligt, men når der strikkes oppefra og ned, læses diagrammet så også oppefra og ned??
28.03.2019 - 23:32DROPS Design answered:
Hei Bettina. Det finnes ingen dumme spørsmål. Vi har allerede tilpasset diagrammene til at det strikkes ovenfra og ned, så de leses på vanlig måte: altså nedenfra og opp. God fornøyelse
03.04.2019 - 09:58Hei målene som er oppgitt i mønstret er veldig korte, i str Large skal den være 62 i lengden -dette blir jo bare-mage genser? Og noe lite garn... Skal det være 26 cm fra der mønsteret slutter og ned på selve bolen eller fra armkorken(da blir den veldig kort)?
19.02.2019 - 11:47DROPS Design answered:
Hei Cecilie. Hvor langt ned genseren rekker avhenger selvfølgelig av høyden til den som skal bruke den. Men 62 cm er helt normal lengde på en genser i den størrelsen, da denne modellen da rekker ned til øverst på hoften. Du begynner på vrangbord når bolen måler 26 cm fra der du delte bærestykket til ermer og bol. Så strikkes vrangbord i 6 cm. Det er selvfølgelig helt opp til deg hvor lang du velger å strikke bolen før du strikker vrangbord. Om du vil ha genseren til lenger ned på hoften eller over rumpen så må du jo gjerne gjøre det. Vær obs på at om du strikker lenger vil du trenge mer garn. God fornøyelse
20.02.2019 - 09:22Guten Tag, kann es sein, dass bei den Mengenangaben etwas nicht stimmt? 250 g Wolle für den ganzen Pullover (Größe S) scheint mir etwas wenig!
16.02.2019 - 14:25DROPS Design answered:
Liebe Frau Laurens, es sollte ja genügend sein. Seien Sie sicher, Ihre Maschenprobe (in der Breite sowie in der Höhe) stimmt , um die Maßen wie in der Maßskizze zu haben. Viel Spaß beim stricken!
25.02.2019 - 10:17Bonjour , j'ai commencé le modèle en taille S avec la laine et les aiguilles indiquées. mon échantillon réalisé selon vos recommandations est de bonnes dimensions. mais l'encolure est vraiment très petite, la tête ne passe pas. quand on regarde la photo du modèle, cette encolure est large, loin du cou. pouvez vous m'aider ? merci
21.01.2019 - 13:35DROPS Design answered:
Bonjour Mme Gans, essayez par exemple de monter les mailles plus souplement pour que l'encolure passe bien la tête. Votre magasin aura probablement d'autres astuces pour vous, n'hésitez pas à le contacter, même par mail ou téléphone. Bon tricot!
21.01.2019 - 16:24