
Popular categories
Looking for a yarn?


|
|||||||||||||||||||
Pure Magic |
|||||||||||||||||||
 |
 |
||||||||||||||||||
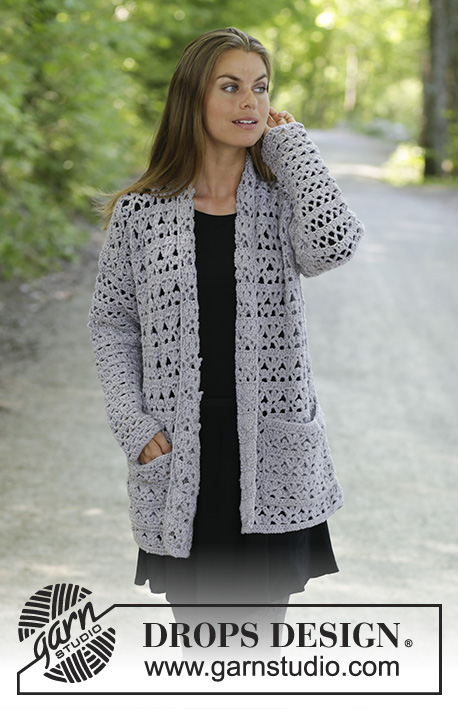
Crocheted jumper with seamless sleeves and lace pattern in DROPS Air.
DROPS 194-35 |
|||||||||||||||||||
|
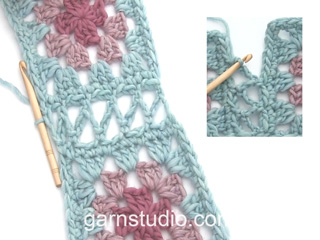
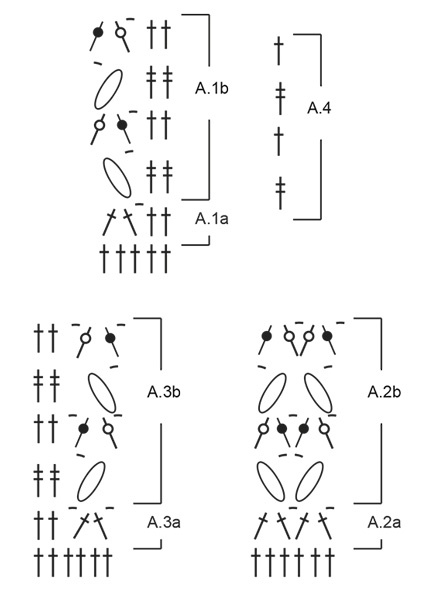
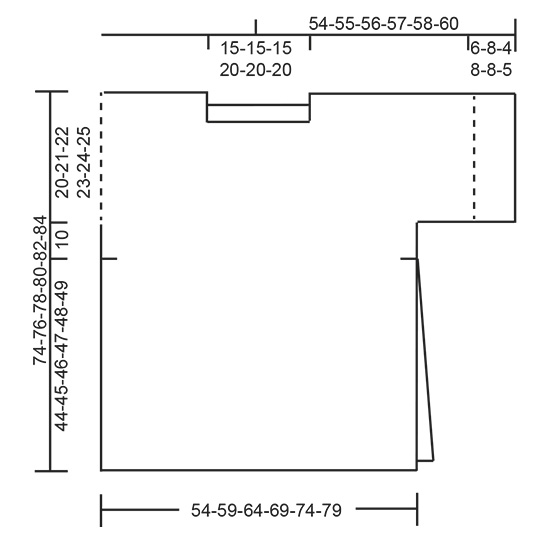
EXPLANATIONS FOR THE PATTERN: ------------------------------------------------------- PATTERN: See diagrams A.1 to A.4. STRIPE: Work a total of 3 repeats of A.1b to A.3b with blue, then finish the garment with fog. CROCHET INFO: Each row of treble crochets starts with 3 chain stitches which replace the first treble crochet. Each row of double treble crochets starts with 5 chain stitches which replace the first double treble crochet. ------------------------------------------------------- START THE PIECE HERE: ------------------------------------------------------- JUMPER - SHORT OVERVIEW OF THE PIECE: The piece is worked back and forth in 2 parts which are sewn together to finish. BACK PIECE: Work 77-84-91-98-105-112 chain stitches (including 3 chain stitches to turn) with hook size 6 mm and blue. Work 1 treble crochet in the 4th chain stitch from the hook (= 2 treble crochets) – read CROCHET INFO, 1 treble crochet in each of the next 3 chain stitches, * skip 1 chain stitch, work 1 treble crochet in each of the next 6 chain stitches *, work from *-* = 65-71-77-83-89-95 treble crochets. Work as follows from the right side: Work A.1a (= 5 treble crochets), A.2a (= 6 treble crochets) over the next 54-60-66-72-78-84 treble crochets (= 9-10-11-12-13-14 times in width) and finish with A.3a (= 6 treble crochets). Then work A.1b over A.1a, A.2b over A.2a and A.3b over A.3a in STRIPE – read description above. REMEMBER THE CROCHET TENSION! When the piece measures 52-53-54-56-57-58 cm, adjust so that the next row is from the wrong side, cut the strand and work stitches for the sleeves as follows: Work 36-34-33-31-28-27 chain stitches, work A.3b, A.2b and A.1b over the back piece as before and finish with 39-36-35-33-30-29 chain stitches (including 3 chain stitches to turn). The piece now measures approx. 54-55-56-57-58-59 cm. The next row is worked as follows from the right side: Sleeve: Work 1 treble crochet in the 4th chain stitch from the hook (= 2 treble crochets), * work 1 treble crochet in each of the next 6 chain stitches, skip 1 chain stitch *, work from *-* until there are 6-4-3-1-5-4 chain stitches left, 1 treble crochet in each of the last 0-4-3-1-5-4 chain stitches (= 32-30-29-27-25-24 treble crochets for sleeve). Back piece: Work A.1b, A.2b and A.3b as before over the stitches for back piece. Sleeve: Work 1 treble crochet in each of the first 2 chain stitches, * skip 1 chain stitch, 1 treble crochet in each of the next 6 chain stitches *, work from *-* until there are 0-4-3-1-5-4 chain stitches left and finish with 1 treble crochet in each of the last 0-4-3-1-5-4 chain stitches (= 32-30-29-27-25-24 treble crochets for sleeve) = a total of 129-131-135-137-139-143 stitches. The next row is worked as follows from the wrong side: Work A.4 over the first 8-9-5-9-10-6 treble crochets, A.3b over the next 6 treble crochets (adjust the pattern row to A.2b), A.2b a total of 17-17-19-18-18-20 times in width (= 102-102-114-108-108-120 stitches), A.1b over the next 5 treble crochets (adjust the pattern row to A.2b) and finish with A.4 over the last 8-9-5-9-10-6 treble crochets. When the piece measures 73-75-77-79-81-83 cm, adjust so that the next row is worked from the right side (i.e. with treble crochets), finish each shoulder separately. There is now 1 row left. RIGHT SHOULDER: Work over the first 55-56-58-56-57-59 stitches (do not work the middle 18-18-18-24-24-24 stitches = neck) as follows: Work A.4 as before over the first 8-9-5-9-10-6 stitches, A.1b as before, A.2b a total of 7-7-8-7-7-8 times in width. Cut the strand. LEFT SHOULDER: Work the last 56-57-59-57-58-60 stitches. Skip 3-3-3-4-4-4 repeats of A.2b for the neck and work as follows from the right side: Work 1 slip stitch in the first stitch of the next repeat of A.2b, work 3 chain stitches (= replace the 2nd stitch in A.2b, i.e. the first chain stitch is not worked the first time A.2b is repeated), work A.2b a total of 7-7-8-7-7-8 times in width, work A.3b as before and finish with A.4 in each of the last 8-9-5-9-10-6 stitches. Cut and fasten the strand. The back piece measures a total of 74-76-78-80-82-84 cm. FRONT PIECE: Work as back piece until the piece measures 66-68-70-72-74-76 cm; adjust so that the next row is worked from the wrong side (i.e. with double treble crochets). There are now 4 rows left. Now finish each shoulder separately. RIGHT SHOULDER: Work the first 56-57-59-57-58-60 stitches (i.e. do not work the middle 18-18-18-24-24-24 stitches = neck) as follows: Work A.4 as before over the first 8-9-5-9-10-6 stitches, A.3b as before, A.2b a total of 7-7-8-7-7-8 times in width and finish with 1 double treble crochet around the last chain stitch. Turn and work as follows from the right side: Work 3 chain stitches (= first treble crochet), work A.2b a total of 7-7-8-7-7-8 times in width, A.3b as before and A.4 over the last 8-9-5-9-10-6 stitches. Continue this pattern until you have worked a total of 4 rows on the shoulder (the last row is treble crochets from the right side). Cut and fasten the strand. The front piece measures a total of approx. 74-76-78-80-82-84 cm. LEFT SHOULDER: Work over the last 55-56-58-56-57-59 stitches. Skip 3-3-3-4-4-4 repeats of A.2b for the neck and work as follows from the wrong side: Work 1 slip stitch in the first stitch of the next repeat of A.2b, work 5 chain stitches (= these do not replace the first stitch in A.2b), work A.2b a total of 7-7-8-7-7-8 times in width, work A.1b as before and finish with A.4 in each of the last 8-9-5-9-10-6 stitches. Turn and work as follows from the right side: Work A.4 over the first 8-9-5-9-10-6 stitches, A.1b as before, A.2b a total of 7-7-8-7-7-8 times in width and finish with 1 treble crochet in the 5th chain stitch at the beginning of the previous row. Continue this pattern until you have worked a total of 4 rows on the shoulder (the last row is treble crochets from the right side). Cut and fasten the strand. The front piece measures a total of approx. 74-76-78-80-82-84 cm. ASSEMBLY: Lay the front and back pieces together with right side to right side and work the shoulder seams as follows: Work 1 double crochet through both layers, * 3 chain stitches, skip 1 cm, 1 double crochet around/in the next chain-space/stitch *, work from *-* along the whole shoulder; adjust so that you finish with 1 double crochet. Work the sleeve seams in the same way and continue down the sides approx. 10 cm (= 44-45-46-47-48-49 cm split). |
|||||||||||||||||||
Diagram explanations |
|||||||||||||||||||
|
|||||||||||||||||||
|
|||||||||||||||||||
|
|||||||||||||||||||
|
Have you made this or any other of our designs? Tag your pictures in social media with #dropsdesign so we can see them! Do you need help with this pattern?You'll find tutorial videos, a Comments/Questions area and more by visiting the pattern on garnstudio.com. © 1982-2024 DROPS Design A/S. We reserve all rights. This document, including all its sub-sections, has copyrights. Read more about what you can do with our patterns at the bottom of each pattern on our site. |
|||||||||||||||||||


With over 40 years in knitting and crochet design, DROPS Design offers one of the most extensive collections of free patterns on the internet - translated to 17 languages. As of today we count 304 catalogues and 11422 patterns - 11422 of which are translated into English (UK/cm).
We work hard to bring you the best knitting and crochet have to offer, inspiration and advice as well as great quality yarns at incredible prices! Would you like to use our patterns for other than personal use? You can read what you are allowed to do in the Copyright text at the bottom of all our patterns. Happy crafting!
Comments / Questions (13)
Buongiorno, chiedo spiegazioni in merito all'inizio del lavoro: incominciando con 77 catenella tre delle quali formano una m. a., (74catenelle) lavorando 3 maglie alte e lasciando una catenella di base ogni gruppo di 6 m. a. arrivo ad avere 64 in totale e una catenella di base vuota. Dove sbaglio? Grazie mille!
10.11.2021 - 11:14DROPS Design answered:
Buongiorno Lara, nelle prime 4 catenelle lavora 2 maglie alte, poi 1 maglia alta nelle 3 successive ed arriviamo a 5 maglie alte; nella parte tra asterischi, lavora 6 maglie alte ogni 7 catenelle per 10 ripetizioni arrivando a 60 maglie alte per un totale di 65 maglie alte. Buon lavoro!
10.11.2021 - 22:39I am struggling to get started on this pattern, the instructions are not very clear for the first few rows.
11.08.2021 - 15:56DROPS Design answered:
Dear Suzanne, the pattern is a bit difficult to comprehend. We work A.1A over 5 treble crochets from the previous row and A.2A is repeated (over 6 treble crochets from the previous row) throughout the row and we finish the row with A.3A, over 5 treble crochets of the previous row. The stitches which are worked in each case are shown in the diagrams below.
11.08.2021 - 17:37Posso avere il tutorial del modello 194/35 per favore come fare i punti ?
17.08.2020 - 11:42DROPS Design answered:
Buongiorno Paola. Provi a vedere se questo video le può essere di aiuto. Buon lavoro!
17.08.2020 - 16:27Ich bräuchte auch Ihre Hilfe bei den Ärmeln am Rückenteil. Ich schlage meine Luftmaschen an und gehe damit direkt ans Rückenteil und mache mit meiner Doppel-Stäbchen-Reihe weiter und dann mit den Luftmaschen für den anderen Ärmel? Das sind doch dann ganz unterschiedliche Höhen und sieht total merkwürdig aus. Das kann doch so nicht richtig sein oder? Was mache ich nur falsch 😩 Ich verstehe die Anleitung auch nach mehrmaligem durchlesen nicht. Bitte helfen Sie mir.
02.10.2019 - 18:30DROPS Design answered:
Liebe Doreen, für die Ärmel schlagen Sie zuerst 36-27 Luftmaschen, dann häkeln Sie die Diagramme wie zuvor über Rückenteil und enden diese Reihe mit 36-29 Lm (einsch. die 3 Lm zum Wenden), dann die nächste Hinreihe wie beschrieben über 1. Ärmel, Rückenteil und 2. Ärmel häkeln, es sind jetzt neuen Maschen auf beiden Seiten für die Ärmel. Viel Spaß beim häkeln!
03.10.2019 - 08:57Ich bin einfach zu dumm ! Aber wie mache ich beim Rückenteil die Ärmel ? Die erste Reihe habe ich aber wie geht es dann weiter ? Bitte , ich brauche eine Aufklärung 😪😪😪😪😥😥😥😥😥😥😥
05.08.2019 - 21:47DROPS Design answered:
Liebe Birgit, Sie häkeln neue Luftmaschen für den 1. Ärmel, dann häkeln Sie Rückenteil wie zuvor und mit neuen Luftmaschen enden. Dann häkeln Sie 32-24 Stb (siehe Größe) über die 39-29 Lm vom 1. Ärmel, dann Rückenteil wie zuvor, und 32-24 Stb über die 36-27 Lm vom 2. Ärmel = 129-143 M. Dann weiter mit A.3b, A.2b, A.1b und mit A.4 auf beiden Seiten (Anfang und Ende der Reihe). Viel Spaß beim häkeln!
07.08.2019 - 11:37Welke maat moet ik nemen vcoor dit patroon als ik normaalgezien maat 38 heb?
16.03.2019 - 13:45DROPS Design answered:
Dag Ingrid,
Maat 38 komt ongeveer overeen met maat S.
18.03.2019 - 14:11Is de kleur mist op de foto UNI of MIX ?
28.02.2019 - 11:56DROPS Design answered:
Dag Ingrid,
Kleur 10 van DROPS Air is MIX.
07.03.2019 - 22:10Is de kleur 10 mist de Drop air MIX fog 10 ?
28.02.2019 - 10:39DROPS Design answered:
Dag Ingrid,
Dat is inderdaad kleurnummer 10.
28.02.2019 - 11:19Could you tell me if your supposed to work this pattern with three repeats of A2b ? Or should it be worked A1b,A2b,A3b and then repeated.The video shows 3 repeats of A2b. Thank you
28.01.2019 - 01:36DROPS Design answered:
Dear Mrs Wieger, you first work diagrams A.1a, A.2a, A.3a then continue working and repeating A.1b, A.2b and A.3b. Happy crocheting!
28.01.2019 - 12:09Is this with 4ply yarn?
01.12.2018 - 16:41DROPS Design answered:
Dear Mrs Traylor, click here to read more about the yarn - for any further assistance about the yarn you are welcome to contact your DROPS store. Happy crocheting!
03.12.2018 - 08:36