DROPS Nord
DROPS Nord
45% Alpaca, 30% Polyamide, 25% Wool
from 2.70 £ /50g
Get the yarn to make this pattern from 13.50£.

The yarn cost is calculated from the pattern’s smallest size and the yarn’s cheapest product type. Looking for an even better price? You might find it on the DROPS Deals!

DROPS SS24

See You In Dublin

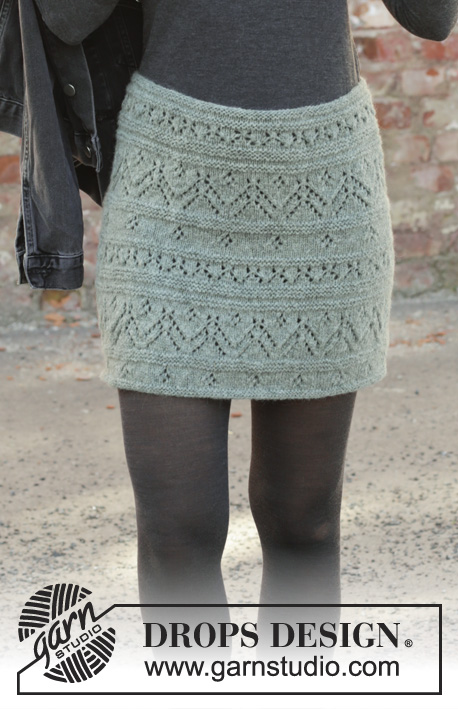
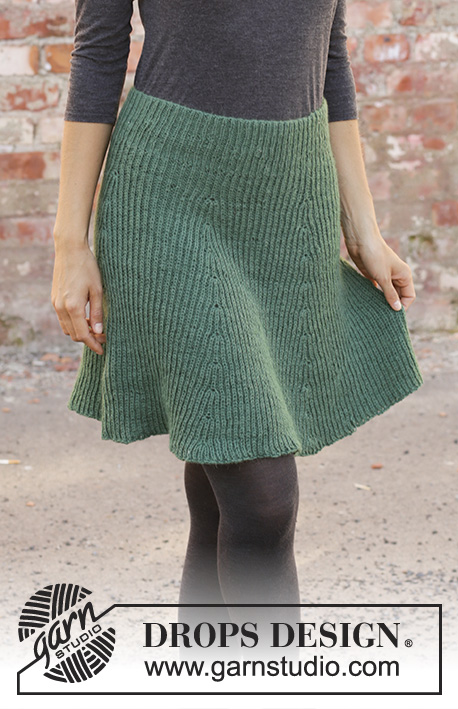
Knitted skirt in DROPS Nord. Piece is knitted top down with false English rib. Size: S - XXXL

DROPS 196-37
DROPS design: Pattern no-016
Yarn group A
----------------------------------------------------------

Size: S - M - L - XL - XXL - XXXL
Materials:
DROPS NORD from Garnstudio (belongs to yarn group A)
250-300-350-350-400-450 g colour no 19, forest green

----------------------------------------------------------
ACCESSORIES FOR THE PIECE:

KNITTING TENSION:
Garment will stretch when worn and has 2 knitting tensions.
Knitting tension 1:
When garment is worked and is flat: 24 stitches in width and 24 rows vertically (measured in knit stitch) with false English rib = 10 x 10 cm.
Knitting tension 2:
When garment is worn: 20 stitches in width and 24 rows vertically (measured in knit stitch) with false English rib = 10 x 10 cm.

NEEDLES:
DROPS CIRCULAR NEEDLE SIZE 3 mm, length 60 and 80 cm for false English rib.
DROPS CIRCULAR NEEDLE SIZE 2.5 mm, length 60 cm for rib.
Needle size is only a suggestion! If you have too many stitches on 10 cm switch to larger needles. If you have too few stitches on 10 cm switch to smaller needles.

ACCESSORIES: approx. 70-120 cm elastic

-------------------------------------------------------

Alternative Yarn – See how to change yarns here
Yarn Groups A to F – Use the same pattern and change the yarn here
Yarn usage using an alternative yarn – Use our yarn converter here

-------------------------------------------------------

DROPS Nord
DROPS Nord
45% Alpaca, 30% Polyamide, 25% Wool
from 2.70 £ /50g
Get the yarn to make this pattern from 13.50£.

The yarn cost is calculated from the pattern’s smallest size and the yarn’s cheapest product type. Looking for an even better price? You might find it on the DROPS Deals!

Pattern instructions

NOTE: This pattern is written in British English. All measurements in charts are in cm. For conversion from cm to inches - click here. There are different terms for crocheting in British and American English. If this pattern includes crochet, click for "crochet terms" here. For this pattern in American English, please click here.
----------------------------------------------------------

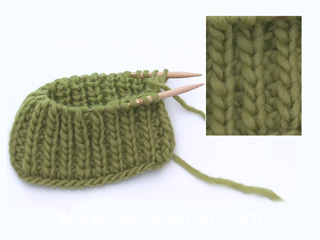
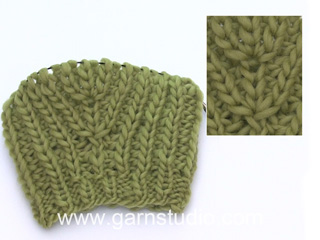
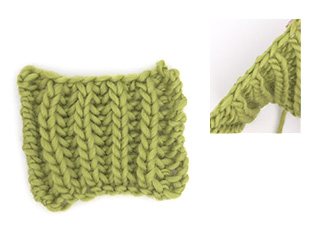
EXPLANATION FOR THE PATTERN:

----------------------------------------------------------

KNITTING TENSIONS:
Texture in garment will stretch when worn and has 2 knitting tensions.
Knitting tension 1 applies when garment is worked and is flat.
The garment should have this knitting tension when it is worked.
Knitting tension 2 is the knitting tension the skirt will have at the waist when the garment is worn.
Knitting tension vertically is given according to knit stitch, which is knitted over 1 round less than purl stitch, because knit stitch is slipped loosely on to right needle every other round. I.e. 24 rows vertically measured in knit stitch on 10 cm = 48 rows measured in purl stitch on 10 vertically.
Measurements in chart are given in cm when garment is worn.

INCREASE TIP-1 (evenly):
To calculate how to increase evenly, use the total number of stitches on row (e.g. 172 stitches) and divide stitches by number of increases to be done (e.g. 26) = 6.6.
In this example increase by making 1 yarn over after alternately approx. every 6th and 7th stitch. On next round work yarn over twisted to avoid hole.

INCREASE TIP-2:
All increases are done on a round where yarn over and knit stitch are knitted together.
Work 5 stitches in knit stitch and yarn over as follows: Knit yarn over and knit stitch together but wait to slip the yarn over and worked stitch off the needle * make 1 yarn over on right needle and knit knit stitch and yarn over together *, work from *-* 2 times in total = 5 stitches (= 4 stitches increased)

PATTERN:
See diagram A.1.

----------------------------------------------------------

START THE PIECE HERE:

----------------------------------------------------------

SKIRT - SHORT OVERVIEW OF THE PIECE:
Worked in the round on circular needle, top down. First work a hem to thread the elastic through. Then work rib and false English rib. Texture in garment will behave differently when garment is worn - read KNITTING TENSION.

HEM:
Cast on 172-188-202-228-250-292 stitches on circular needle size 2.5 mm with Nord. Purl 1 round. Then work 4 rounds in stocking stitch. Purl 1 round and increase 26-28-32-36-38-44 stitches evenly (= folding edge) - read INCREASE TIP-1 = 198-216-234-264-288-336 stitches. Insert 1 marker thread in the piece. NOW MEASURE PIECE FROM HERE!

SKIRT:
Work rib (purl 2/knit 1) for 8 cm. Switch to circular needle size 3 mm and work A.1 over all stitches (= 66-72-78-88-96-112 times in the round). When first round in A.1 has been worked, there are 132-144-156-176-192-224 stitches on needle. Yarn overs are not counted as stitches. When A.1 has been worked 1 time vertically, repeat A.1a until finished measurements. REMEMBER THE KNITTING TENSION!
When piece measures 10 cm from marker thread, insert 1 marker in every 11th-12th-13th-11th-12th-14th knit stitch (= 6-6-6-8-8-8 markers). Then increase 4 stitches in every stitch with marker – read INCREASE TIP-2 (= 24-24-24-32-32-32 stitches increased).
Continue in the round with pattern, work the increased stitches in pattern. Increase like this every 4-4-4-4½-4½-4½ cm until piece measures 48-50-52-54-56-58 cm from marker thread. There are approx. 348-384-396-464-512-544 stitches on needle. Adjust so that last round is a round with yarn overs. Then cast off with knit over knit and purl over purl, BUT cast off yarn overs as regular stitches by knitting, this is done to avoid a tight cast-off edge.

ASSEMBLY:
Fold the hem towards wrong side and fasten neatly by sewing, let there be a small opening to thread the elastic through.

This pattern has been corrected.

Updated online: 20.09.2018
Correction: piece is worked in false English rib (previously English rib)

Diagram

symbols = purl 1
symbols = purl 2 together
symbols = 1 yarn over, slip 1 stitch on to right needle purlwise
symbols = knit yarn over and knit stitch together
symbols = knitting direction
diagram
Do you have a question? See a list of frequently asked questions (FAQ)

Knitting tension is what determines the final measurements of your work, and is usually measured per 10 x 10 cm. It is provided like so: number of stitches in width x number of rows in height - eg: 19 stitches x 26 rows = 10 x 10 cm.

The knitting tension is very individual; some people knit/crochet loosely while others work tightly. You adjust the knitting tension with the needle size, which is why the suggested needle size is only meant as a guide! You need to adjust this (up or down) to ensure that YOUR knitting tension matches the knitting tension provided in the pattern. If you work with a different knitting tension than provided you will have a different yarn consumption, and your work will have different measurements than what the pattern suggests.

The knitting tension also determines which yarns can replace each other. As long as you achieve the same knitting tension you can replace one yarn with another.

See DROPS lesson: How to measure your tension/gauge

See DROPS video: How to make a gauge tension swatch

The required amount of yarn is provided in grams, eg: 450 g. To calculate how many balls you’ll need you first need to know how many grams are in 1 ball (25g, 50g or 100g). This information is available if you click on the individual yarn quality on our pages. Divide the amount required with the amount of each ball. For example, if each ball is 50g (the most common amount), the calculation will be as follows: 450 / 50 = 9 balls.

The important thing when changing from one yarn to another is that the knitting/crochet tension remains the same. This is so that the measurements of the finished piece will be the same as on the sketch provided. It is easier to achieve the same knitting tension using yarns from the same yarn group. It is also possible to work with multiple strands of a thinner yarn to achieve the knitting tension of a thicker one. Please try our yarn converter. We recommend you to always work a test swatch.

Please NOTE: when changing yarn the garment might have a different look and feel to the garment in the photo, due to individual properties and qualities of each yarn.

See DROPS lesson: Can I use a different yarn than the one mentioned in the pattern?

All our yarns are categorised into yarn groups (from A to F) according to thickness and knitting tension – group A contains the thinnest yarns and group F the thickest. This makes it easier for you to find alternative yarns to our patterns, should you wish to switch yarn. All yarns within the same group have a similar knitting tension and can easily replace each other. However, different yarn qualities have different structures and properties which will give the finished work a unique look and feel.

Click here for an overview of the yarns in each yarn group

At the top of all our patterns you’ll find a link to our yarn calculator, which is a helpful tool should you wish to use a different yarn than suggested. By filling in the yarn quality you wish to replace, the amount (in your size) and number of strands, the calculator will present good alternative yarns with the same knitting tension. Additionally it will tell you how much you’ll require in the new qualities and whether you’ll need to work with multiple strands. Most skeins are 50g (some are 25g or 100g).

If the pattern is worked with multiple colours, every colour will have to be calculated separately. Similarly, if the pattern is worked with several strands of different yarns (for example 1 strand Alpaca and 1 strand Kid-Silk) you will have to find alternatives for each, individually.

Click here to see our yarn calculator

Since different yarns have different qualities and textures we have chosen to keep the original yarn in our patterns. However, you can easily find options among our available qualities by using our yarn calculator, or simply pick a yarn from the same yarn group.

It is possible that some retailers still have discontinued yarns in stock, or that someone has a few skeins at home that they would like to find patterns for.

The yarn calculator will provide both alternative yarn as well as required amount in the new quality.

If you think it's hard to decide what size to make, it can be a good idea to measure a garment you own already and like the size of. Then you can pick the size by comparing those measures with the ones available in the pattern's size chart.

You'll find the size chart at the bottom of the pattern.

See DROPS lesson: How to read size chart

The needle size provided in the pattern serves only as a guide, the important thing is to follow the knitting tension. And since knitting tension is very individual, you will have to adjust the needle size to ensure that YOUR tension is the same as in the pattern – maybe you’ll have to adjust 1, or even 2 needle sizes, up or down to achieve the correct tension. For this, we recommend that you work test swatches.

Should you work with a different knitting tension than the one provided, the measurements of the finished garment might deviate from the measurement sketch.

See DROPS lesson: How to measure your tension/gauge

See DROPS video: How to make a tension/gauge swatch

Working a garment top-down provides more flexibility and room for personal adjustment. For example it is easier to try the garment on while working, as well as making adjustments to length of yoke and shoulder caps.

The instructions are carefully explaining every step, in the correct order. Diagrams are adjusted to the knitting direction and are worked as usual.

The diagram depicts all rows/rounds, and every stitch seen from the right side. It is read from bottom to top, from right to left. 1 square = 1 stitch.

When working back and forth, every other row is worked from the right side and every other row is worked from the wrong side. When working from the wrong side, the diagram will have to be worked reversed: from left to right, knit stitches are purled, purl stitches are knit etc.

When working in the round every round is worked from the right side and the diagram are worked from right to left on all rounds.

See DROPS lesson: How to read knitting diagrams

The diagram depicts all rows/rounds, and every stitch seen from the right side. It is worked from bottom to top, from right to left.

When working back and forth every other row is worked from the right side: from right to left and every other row is worked from the wrong side: from left to right.

When working in the round, every row in the diagram are worked from the right side, from right to left.

When working a circular diagram you start in the middle and work your way outwards, counter clockwise, row by row.

The rows usually start with a given number of chain stitches (equivalent to the height of the following stitch), this will either be depicted in the diagram or explained in the pattern.

See DROPS lesson: How to read crochet diagrams

Instructions for working several diagrams after each other on the same row/round, will often be written like so: “work A.1, A.2, A.3 a total of 0-0-2-3-4 times". This means you work A.1 once, then A.2 is worked once, and A.3 is repeated (in width) the number of times provided for your size – in this case like so: S = 0 times, M = 0 times, L=2 times, XL= 3 times and XXL = 4 times.

The diagrams are worked as usual: begin with the first row in A.1, then work the first row in A.2 etc.

See DROPS lesson: How to read knitting diagrams

See DROPS lesson: How to read crochet diagrams

The total width of the garment (from wrist-to-wrist) will be larger in the larger sizes, despite the actual sleeves being shorter. The larger sizes have longer sleeve caps and wider shoulders, so there will be a good fit in all sizes.

The measurement sketch/schematic drawing provides information regarding the full length of the garment. If it’s a jumper or a jacket the length is measured from the highest point on the shoulder closest to the neckline, and straight down to the bottom of the garment. It is NOT measured from the tip of shoulder. Similarly, the length of yoke is measured from the highest point on the shoulder and down to where yoke is split into body and sleeves.

On a jacket measures are never taken along bands, unless specifically stated. Always measure inside band stitches when measuring the length.

See DROPS lesson: How to read a schematic drawing

Diagrams are often repeated on the round or in height. 1 repeat is the diagram the way it appears in the pattern. If it says to work 5 repeats of A.1 in the round, then you work A.1 a total of 5 times after/next to each other in the round. If it says to work 2 repeats of A.1 vertically/in height you work the entire diagram once, then begin again at the start and work the entire diagram one more time.

Chain stitches are slightly narrower than other stitches and to avoid working the cast-on edge too tight, we simply chain more stitches to begin with. The stitch count will be adjusted on the following row to fit the pattern and measurement sketch.

The rib edge is more elastic and will contract slightly compared to, for example, stocking stitch. By increasing before the rib edge, you avoid a visible difference in width between the rib edge and the rest of the body.

It’s very easy to cast off too tightly, and by making yarn overs while casting off (and simultaneously casting these off) you avoid a too tight cast off edge.

See DROPS video: How to bind off with yarn overs (yo)

To achieve an even increase (or decrease) you can increase on, for example: every 3rd and 4th row alternately, like so: work 2 rows and increase on the 3rd row, work 3 rows and increase on the 4th. Repeat this until the increase is complete.

See DROPS lesson: Increase or decrease 1 st on every 3rd and 4th row alternately

Should you prefer to work in the round instead of back and forth, you may of course adjust the pattern. You’ll need to add steeks mid-front (usually 5 stitches), and follow the instructions. When you would normally turn and work from the wrong side, simply work across the steek and continue in the round. At the end you’ll cut the piece open, pick up stitches to work bands, and cover the cut edges.

See DROPS video: How to knit steeks and cut open

Should you prefer to work back and forth instead of in the round, you may of course adjust the pattern so you work the pieces separately and then assemble them at the end. Divide the stitches for the body in 2, add 1 edge stitch in each side (for sewing) and work the front and back pieces separately.

See DROPS lesson: Can I adapt a pattern for circular needles into straight needles?

Pattern repeats can vary slightly in the different sizes, in order to get the correct proportions. If you’re not working the exact same size as the garment in the photo, yours might deviate slightly. This has been carefully developed and adjusted so that the complete impression of the garment is the same in all sizes.

Make sure to follow instructions and diagrams for your size!

If you have found a pattern you like which is available in women’s size it’s not very difficult to convert it to men’s size. The biggest difference will be the length of sleeves and body. Start working on the women size that you think would fit across the chest. The additional length will be worked right before you cast off for the armhole/sleeve cap. If the pattern is worked top-down you can add the length right after the armhole or before the first decrease on sleeve.

Regarding additional yarn amount, this will depend on how much length you add, but it is better with a skein too many than too few.

All yarns will have excess fibres (from production) that might come off as lint or shedding. Brushed yarns (ie hairier yarns) have more of these loose, excess fibres, causing more shedding.

Shedding also depends on what is worn under or over the garment, and whether this pulls at the yarn fibres. It’s therefore not possible to guarantee that there will be no shedding

Below are some tips on how to get the best result when working with hairier yarns:

1. When the garment is finished (before you wash it) shake it vigorously so the looser hairs come off. NOTE: do NOT use a lint roller, brush or any method that pulls at the yarn.

2. Place the garment in a plastic bag and put it in your freezer - the temperature will cause the fibres to become less attached to each other, and excess fibres will come off easier.

3. Leave in the freezer for a few hours before taking it out and shaking it again.

4. Wash the garment according to the instructions on the yarn label.

Pilling is a natural process that happens to even the most exclusive of fibers. It's a natural sign of wear and tear that is hard to avoid, and that is most visible in high friction areas of your garment like a sweater's arms and cuffs.

You can make your garment look as new by removing the pilling, using a fabric comb or a pill/lint remover.

Still can't find the answer you need? Then scroll down and leave your question so one of our experts can try to help you. This will be done normally within 5 to 10 working days.
In the meantime, you can read the questions and answers that others have left to this pattern or join the DROPS Workshop on Facebook to get help from fellow knitters/crocheters!

You might also like...

Post a comment to pattern DROPS 196-37

We would love to hear what you have to say about this pattern!

If you want to leave a question, please make sure you select the correct category in the form below, to speed up the answering process. Required fields are marked *.

Comments / Questions (34)

country flag Kristen wrote:

No you misunderstand what I'm saying. The wrong side of the pattern is showing up on the outside when I switch to the A1 pattern. The hem is accurate with the rib on the outside of the skirt, but once I begin A1 and *P2 tog, then yarn over, slip 1 as if to P* and then continue on with the false english rib, the rib pattern is sowing up on the inside of the skirt. I pulled the whole project and started again and once I get to this point it happened again.

23.02.2020 - 18:51

DROPS Design answered:

Dear Kristen, sorry I may still misundertand what you mean here. After you have worked the first 3 rows in A.1 you should continue working A.1a = round 1: P1, Ktog YO and slipped st - round 2: P1, YO, slip st as if to P. Ie the first st in A.1 will always be purled and the 2nd st in A.1 (= the k stitch from the rib) will be worked alternately slipped with YO and knit tog with YO. Happy knitting!

24.02.2020 - 09:36

country flag Kristen wrote:

When I switched from knitting the rib to the English rib (purl 2, knit 1 - > A1 pattern) the wrong side is lining up with the original ribbing, so that the English rib is showing up on the INSIDE of the garment, and the wrong side is showing up on the outside. I'm confused about what has happened. I feel like I'm following the pattern exactly.

05.02.2020 - 23:28

DROPS Design answered:

Dear Kristen, on first row in A.1 you first work:*P2 tog, then yarn over, slip 1 as if to P* then you should get the correct stitches to work: *P1, Knit together yo and slipped stitch* - see video. Happy knitting!

06.02.2020 - 10:22

country flag Sissel wrote:

Hej, jeg tænker lige som Paula på miljøet i forhold til polyamid, men jeg tænker også på om rent uld vil gøre at nederdelen hurtigere bliver slidt og/eller bliver filtet til især på siddefladen?

12.12.2019 - 20:48

DROPS Design answered:

Hej Sissel, garn med polyamid vil være mere slidstærkt end det uden, men vi har også nederdele i ren Alpaca... :)

16.12.2019 - 15:36

country flag Paula wrote:

Hei, jeg vil gjerne strikke dette skjørtet med ren ullgarn, et miljøvennlig alternativ, vil med andre ord unngå polyamid. Har forsøkt å finne garnalternativ på kalkulatoren, men fant ingen. Har du noen forslag til alternativ? Mvh Paula

05.12.2019 - 19:28

DROPS Design answered:

Hej Paula, jo men du kan vælge både, Drops Alpaca, BabyAlpaca Silk, Baby Merino og Flora ingen af dem indeholder polyamid :)

06.12.2019 - 08:05

country flag Sue wrote:

Hi. I have watched repeatedly the video for false English rib but I still can’t work out what is happening with the purl stitch on row 1. Is it knitted into twice somehow? Or through the back loop twisted? I don’t knit continental style so find it very difficult to follow. The written instructions don’t seem to give specific instructions on how to knit this stitch. Thanks.

27.10.2019 - 11:47

DROPS Design answered:

Hello Sue! Purl stitches are just purled. Happy knitting!

30.10.2019 - 14:47

country flag Renee wrote:

I'm having trouble understanding why there are two gauges and what worn means on the second gauge. Could you please clarify these two things?

29.06.2019 - 16:01

DROPS Design answered:

Dear Renee, the pattern the piece is knitted in streches over time, so the first gauge is given, what you should get, when you first knitted the piece and it is fat on a surface. The second gauge given imeasured after the piece is worn for a while and slightly streched. Happpy Knitting!

30.06.2019 - 01:10

country flag Ingrid Mørkeseth wrote:

I understand that, but the very first increase has to be from a knit stitch, not a purl stitch.. If I increase every 11th stitch half of them will be increased from a purl stitch. It has to be an even number, like it is for most of the sizes..

25.03.2019 - 17:17

DROPS Design answered:

Dear Mrs Mørkeseth, marker should be inserted in every 11th knit stitch, not in every 11th stitch, so that the stitch with a marker with will a knit stitch. Happy knitting!

05.04.2019 - 08:29

country flag Ingrid wrote:

Hey! The first rounds of increases is every 11th stitch for my size. But then every other increase will be in a purled stitch, which doesn't work with the pattern. All the increases need to be done on an even numbered repeat.

23.03.2019 - 12:25

DROPS Design answered:

Dear Ingrid, you increase 4 sts but the marker should be kept in the middle of the 5 new sts on needle as shown in this video = knit stitch. Happy knitting!

25.03.2019 - 09:52

country flag Arnoux Guylaine wrote:

Bonjour es ce que je peut realisèe ce modele avec des aiguylles droite merci

26.02.2019 - 15:12

DROPS Design answered:

Bonjour Mme Arnoux, vous trouverez ici quelques informations pour ajuster un modèle sur aiguilles droites, dans le cas présent, il vous faudra également ajuster le point fantaisie qui est ici décrit en rond (= tous les tours sur l'endroit). Bon tricot!

26.02.2019 - 15:48

country flag Joke Boukema wrote:

Hallo, ik begrijp het telpatroon niet. Betekent het dat A.1a uit 2 naalden bestaat en A.1 uit 5 naalden? Dus dat je na A.1 vijf keer rond gebreid hebt?

21.02.2019 - 19:09

DROPS Design answered:

Dag Joke,

Klopt zoals je het zegt Je breit eerst inderdaad A.1 helemaal en deze bestaat uit 5 naalden. (De steken in A.1 herhaal je steeds in de breedte). Daarna herhaal je steeds de laatste 2 naalden van A.1, dit is dus A.1a .

22.02.2019 - 14:01