DROPS Melody
DROPS Melody
71% Alpaca, 25% Wool, 4% Polyamide
from 9.00 BGN /50g
Get the yarn to make this pattern from 27.00BGN.

The yarn cost is calculated from the pattern’s smallest size and the yarn’s cheapest product type. Looking for an even better price? You might find it on the DROPS Deals!

DROPS SS24

Ice Pieces

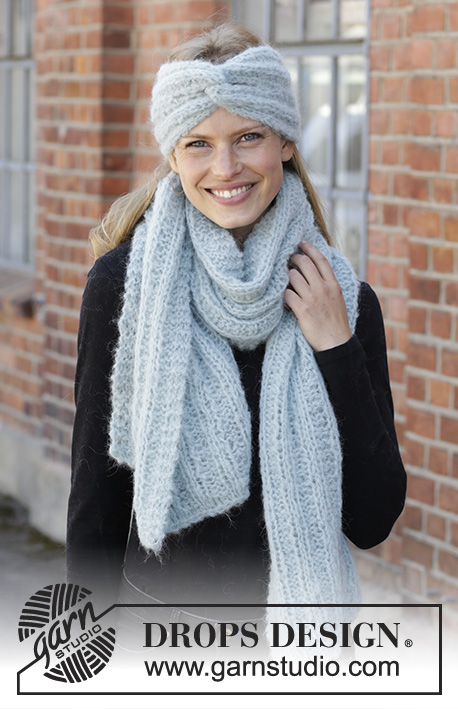
Knitted head band in DROPS Melody. Piece is knitted in rib. Knitted scarf in DROPS Melody. Piece is knitted in rib. The entire set can be knitted in 1 strand DROPS Melody or 2 strands DROPS Brushed Alpaca Silk.

DROPS 192-35
DROPS design: Pattern ml-027
Yarn group D or C + C
----------------------------------------------------------

YARN FOR THE ENTIRE SET:
Size: One-size
Materials:
DROPS MELODY from Garnstudio (belongs to yarn group D)
150 g colour 09, light sea green
Or use:
DROPS BRUSHED ALPACA SILK from Garnstudio (belongs to yarn group C)
150 g colour 14, light grey green

YARN FOR HEAD BAND:
Size: One-size
Head circumference: approx. 56/58 cm
Materials:
DROPS MELODY from Garnstudio (belongs to yarn group D)
50 g colour 09, light sea green
Or use:
DROPS BRUSHED ALPACA SILK from Garnstudio (belongs to yarn group C)
25 g colour 14, light grey green

YARN FOR SCARF:
Measurements: approx. 40 x 160 cm
Materials:
DROPS MELODY from Garnstudio (belongs to yarn group D)
150 g colour 09, light sea green
Or use:
DROPS BRUSHED ALPACA SILK from Garnstudio (belongs to yarn group C)
150 g colour 14, light grey green

----------------------------------------------------------
ACCESSORIES FOR THE PIECE:

HEAD BAND:

KNITTING TENSION:
14 stitches in width and 15 rows vertically in rib with 1 strand Melody or 2 strands Brushed Alpaca Silk = 10 x 10 cm.

NEEDLES:
DROPS NEEDLES SIZE 7 mm
Needle size is only a suggestion! If you have too many stitches on 10 cm switch to larger needles. If you have too few stitches on 10 cm switch to smaller needles.

SCARF:

KNITTING TENSION:
11 stitches in width and 12 rows vertically in rib = 10 x 10 cm.

NEEDLES:
DROPS NEEDLES SIZE 9 mm
Needle size is only a suggestion! If you have too many stitches on 10 cm switch to larger needles. If you have too few stitches on 10 cm switch to smaller needles.

----------------------------------------------------------

-------------------------------------------------------

Alternative Yarn – See how to change yarns here
Yarn Groups A to F – Use the same pattern and change the yarn here
Yarn usage using an alternative yarn – Use our yarn converter here

-------------------------------------------------------

DROPS Melody
DROPS Melody
71% Alpaca, 25% Wool, 4% Polyamide
from 9.00 BGN /50g
Get the yarn to make this pattern from 27.00BGN.

The yarn cost is calculated from the pattern’s smallest size and the yarn’s cheapest product type. Looking for an even better price? You might find it on the DROPS Deals!

Pattern instructions

EXPLANATION FOR PATTERN:

----------------------------------------------------------

INCREASE TIP (applies to head band):
Increase 1 stitch by purling 1 stitch in front and back loop of same stitch.

GARTER STITCH (back and forth):
1 ridge = knit 2 rows.

----------------------------------------------------------

BEGIN PIECE HERE:

----------------------------------------------------------

HEAD BAND - SHORT SUMMARY OF GARMENT:
Work piece back and forth on needle. First work piece in 2 parts, then put pieces together into 1 part. Work over all stitches before dividing into 2 parts again. Sew piece together mid front.

HEAD BAND:
Cast on 5 stitches on pointed needles size 7 mm with 1 strand Melody or 2 strands Brushed Alpaca Silk. Purl 1 row while increasing 1 stitch in each of the first 4 stitches - read INCREASE TIP = 9 stitches.
Work next row as follows from right side: knit 1, purl 2, knit 2, purl 2 and knit 2. Continue rib back and forth but be aware that the first stitch and the last 2 stitches (seen from right side) are worked in stocking stitch until finished measurements, i.e. do not work them in garter stitch or slip them loosely off the needle without working. This is done so that the stitches look nice against the head when the head band is worn. REMEMBER THE KNITTING TENSION!
When piece measures 5 cm, put piece aside (finish after a row from wrong side).
Work next part as follows: Cast on 5 stitches on pointed needles size 7 mm with 1 strand Melody or 2 strands Brushed Alpaca Silk. Purl 1 row while increasing 1 stitch in each of the last 4 stitches = 9 stitches.
Work next row as follows from right side: Knit 2, purl 2, knit 2, purl 2, knit 1. Continue rib like this and make sure that the first 2 stitches and the last stitch (seen from right side) are worked in stocking stitch the same way as on first part. Finish after a row from wrong side when piece measures 5 cm.
Put the two parts together as follows (work first row from right side): Continue rib over the 9 stitches on the last part worked and then work from right side over the 9 stitches from the first part worked = 18 stitches on needle. Continue rib back and forth as before over all stitches until piece measures approx. 43 cm from cast-on edge (5 cm remain until finished measurements).
Now divide the piece in the middle again and finish the two parts separately as at beginning of piece. When piece measures 48 cm (adjust so that next row is worked from wrong side), purl the 8 stitches towards the middle together 2 by 2 on one part = 5 stitches remain. Cast off knitting from right side. Repeat on the other part.

ASSEMBLY:
Sew short sides in one side of piece together wrong side against wrong side, there is now a hole to pull one of the parts in opposite side through piece.
In opposite side of piece pull one part through the hole, then sew short sides together wrong side against wrong side. A knot is now formed mid front on head band.

----------------------------------------------------------

SCARF - SHORT SUMMARY OF GARMENT:
Work piece back and forth on needle.

SCARF:
Cast on 44 stitches on pointed needles size 9 mm with 1 strand Melody or 2 strands Brushed Alpaca Silk. Purl 1 row (= wrong side). Work next row as follows from right side: 3 edge stitches in GARTER STITCH - read explanation above - * knit 2, purl 2 *, work from *-* until 5 stitches remain on needle, knit 2 and finish with 3 edge stitches in garter stitch. Continue rib back and forth like this. REMEMBER THE KNITTING TENSION! When piece measures approx. 159 cm, purl 1 row from wrong side. Loosely cast off with knit from right side.
Do you have a question? See a list of frequently asked questions (FAQ)

Knitting tension is what determines the final measurements of your work, and is usually measured per 10 x 10 cm. It is provided like so: number of stitches in width x number of rows in height - eg: 19 stitches x 26 rows = 10 x 10 cm.

The knitting tension is very individual; some people knit/crochet loosely while others work tightly. You adjust the knitting tension with the needle size, which is why the suggested needle size is only meant as a guide! You need to adjust this (up or down) to ensure that YOUR knitting tension matches the knitting tension provided in the pattern. If you work with a different knitting tension than provided you will have a different yarn consumption, and your work will have different measurements than what the pattern suggests.

The knitting tension also determines which yarns can replace each other. As long as you achieve the same knitting tension you can replace one yarn with another.

See DROPS lesson: How to measure your tension/gauge

See DROPS video: How to make a gauge tension swatch

The required amount of yarn is provided in grams, eg: 450 g. To calculate how many balls you’ll need you first need to know how many grams are in 1 ball (25g, 50g or 100g). This information is available if you click on the individual yarn quality on our pages. Divide the amount required with the amount of each ball. For example, if each ball is 50g (the most common amount), the calculation will be as follows: 450 / 50 = 9 balls.

The important thing when changing from one yarn to another is that the knitting/crochet tension remains the same. This is so that the measurements of the finished piece will be the same as on the sketch provided. It is easier to achieve the same knitting tension using yarns from the same yarn group. It is also possible to work with multiple strands of a thinner yarn to achieve the knitting tension of a thicker one. Please try our yarn converter. We recommend you to always work a test swatch.

Please NOTE: when changing yarn the garment might have a different look and feel to the garment in the photo, due to individual properties and qualities of each yarn.

See DROPS lesson: Can I use a different yarn than the one mentioned in the pattern?

All our yarns are categorised into yarn groups (from A to F) according to thickness and knitting tension – group A contains the thinnest yarns and group F the thickest. This makes it easier for you to find alternative yarns to our patterns, should you wish to switch yarn. All yarns within the same group have a similar knitting tension and can easily replace each other. However, different yarn qualities have different structures and properties which will give the finished work a unique look and feel.

Click here for an overview of the yarns in each yarn group

At the top of all our patterns you’ll find a link to our yarn calculator, which is a helpful tool should you wish to use a different yarn than suggested. By filling in the yarn quality you wish to replace, the amount (in your size) and number of strands, the calculator will present good alternative yarns with the same knitting tension. Additionally it will tell you how much you’ll require in the new qualities and whether you’ll need to work with multiple strands. Most skeins are 50g (some are 25g or 100g).

If the pattern is worked with multiple colours, every colour will have to be calculated separately. Similarly, if the pattern is worked with several strands of different yarns (for example 1 strand Alpaca and 1 strand Kid-Silk) you will have to find alternatives for each, individually.

Click here to see our yarn calculator

Since different yarns have different qualities and textures we have chosen to keep the original yarn in our patterns. However, you can easily find options among our available qualities by using our yarn calculator, or simply pick a yarn from the same yarn group.

It is possible that some retailers still have discontinued yarns in stock, or that someone has a few skeins at home that they would like to find patterns for.

The yarn calculator will provide both alternative yarn as well as required amount in the new quality.

If you think it's hard to decide what size to make, it can be a good idea to measure a garment you own already and like the size of. Then you can pick the size by comparing those measures with the ones available in the pattern's size chart.

You'll find the size chart at the bottom of the pattern.

See DROPS lesson: How to read size chart

The needle size provided in the pattern serves only as a guide, the important thing is to follow the knitting tension. And since knitting tension is very individual, you will have to adjust the needle size to ensure that YOUR tension is the same as in the pattern – maybe you’ll have to adjust 1, or even 2 needle sizes, up or down to achieve the correct tension. For this, we recommend that you work test swatches.

Should you work with a different knitting tension than the one provided, the measurements of the finished garment might deviate from the measurement sketch.

See DROPS lesson: How to measure your tension/gauge

See DROPS video: How to make a tension/gauge swatch

Working a garment top-down provides more flexibility and room for personal adjustment. For example it is easier to try the garment on while working, as well as making adjustments to length of yoke and shoulder caps.

The instructions are carefully explaining every step, in the correct order. Diagrams are adjusted to the knitting direction and are worked as usual.

The diagram depicts all rows/rounds, and every stitch seen from the right side. It is read from bottom to top, from right to left. 1 square = 1 stitch.

When working back and forth, every other row is worked from the right side and every other row is worked from the wrong side. When working from the wrong side, the diagram will have to be worked reversed: from left to right, knit stitches are purled, purl stitches are knit etc.

When working in the round every round is worked from the right side and the diagram are worked from right to left on all rounds.

See DROPS lesson: How to read knitting diagrams

The diagram depicts all rows/rounds, and every stitch seen from the right side. It is worked from bottom to top, from right to left.

When working back and forth every other row is worked from the right side: from right to left and every other row is worked from the wrong side: from left to right.

When working in the round, every row in the diagram are worked from the right side, from right to left.

When working a circular diagram you start in the middle and work your way outwards, counter clockwise, row by row.

The rows usually start with a given number of chain stitches (equivalent to the height of the following stitch), this will either be depicted in the diagram or explained in the pattern.

See DROPS lesson: How to read crochet diagrams

Instructions for working several diagrams after each other on the same row/round, will often be written like so: “work A.1, A.2, A.3 a total of 0-0-2-3-4 times". This means you work A.1 once, then A.2 is worked once, and A.3 is repeated (in width) the number of times provided for your size – in this case like so: S = 0 times, M = 0 times, L=2 times, XL= 3 times and XXL = 4 times.

The diagrams are worked as usual: begin with the first row in A.1, then work the first row in A.2 etc.

See DROPS lesson: How to read knitting diagrams

See DROPS lesson: How to read crochet diagrams

The total width of the garment (from wrist-to-wrist) will be larger in the larger sizes, despite the actual sleeves being shorter. The larger sizes have longer sleeve caps and wider shoulders, so there will be a good fit in all sizes.

The measurement sketch/schematic drawing provides information regarding the full length of the garment. If it’s a jumper or a jacket the length is measured from the highest point on the shoulder closest to the neckline, and straight down to the bottom of the garment. It is NOT measured from the tip of shoulder. Similarly, the length of yoke is measured from the highest point on the shoulder and down to where yoke is split into body and sleeves.

On a jacket measures are never taken along bands, unless specifically stated. Always measure inside band stitches when measuring the length.

See DROPS lesson: How to read a schematic drawing

Diagrams are often repeated on the round or in height. 1 repeat is the diagram the way it appears in the pattern. If it says to work 5 repeats of A.1 in the round, then you work A.1 a total of 5 times after/next to each other in the round. If it says to work 2 repeats of A.1 vertically/in height you work the entire diagram once, then begin again at the start and work the entire diagram one more time.

Chain stitches are slightly narrower than other stitches and to avoid working the cast-on edge too tight, we simply chain more stitches to begin with. The stitch count will be adjusted on the following row to fit the pattern and measurement sketch.

The rib edge is more elastic and will contract slightly compared to, for example, stocking stitch. By increasing before the rib edge, you avoid a visible difference in width between the rib edge and the rest of the body.

It’s very easy to cast off too tightly, and by making yarn overs while casting off (and simultaneously casting these off) you avoid a too tight cast off edge.

See DROPS video: How to bind off with yarn overs (yo)

To achieve an even increase (or decrease) you can increase on, for example: every 3rd and 4th row alternately, like so: work 2 rows and increase on the 3rd row, work 3 rows and increase on the 4th. Repeat this until the increase is complete.

See DROPS lesson: Increase or decrease 1 st on every 3rd and 4th row alternately

Should you prefer to work in the round instead of back and forth, you may of course adjust the pattern. You’ll need to add steeks mid-front (usually 5 stitches), and follow the instructions. When you would normally turn and work from the wrong side, simply work across the steek and continue in the round. At the end you’ll cut the piece open, pick up stitches to work bands, and cover the cut edges.

See DROPS video: How to knit steeks and cut open

Should you prefer to work back and forth instead of in the round, you may of course adjust the pattern so you work the pieces separately and then assemble them at the end. Divide the stitches for the body in 2, add 1 edge stitch in each side (for sewing) and work the front and back pieces separately.

See DROPS lesson: Can I adapt a pattern for circular needles into straight needles?

Pattern repeats can vary slightly in the different sizes, in order to get the correct proportions. If you’re not working the exact same size as the garment in the photo, yours might deviate slightly. This has been carefully developed and adjusted so that the complete impression of the garment is the same in all sizes.

Make sure to follow instructions and diagrams for your size!

If you have found a pattern you like which is available in women’s size it’s not very difficult to convert it to men’s size. The biggest difference will be the length of sleeves and body. Start working on the women size that you think would fit across the chest. The additional length will be worked right before you cast off for the armhole/sleeve cap. If the pattern is worked top-down you can add the length right after the armhole or before the first decrease on sleeve.

Regarding additional yarn amount, this will depend on how much length you add, but it is better with a skein too many than too few.

All yarns will have excess fibres (from production) that might come off as lint or shedding. Brushed yarns (ie hairier yarns) have more of these loose, excess fibres, causing more shedding.

Shedding also depends on what is worn under or over the garment, and whether this pulls at the yarn fibres. It’s therefore not possible to guarantee that there will be no shedding

Below are some tips on how to get the best result when working with hairier yarns:

1. When the garment is finished (before you wash it) shake it vigorously so the looser hairs come off. NOTE: do NOT use a lint roller, brush or any method that pulls at the yarn.

2. Place the garment in a plastic bag and put it in your freezer - the temperature will cause the fibres to become less attached to each other, and excess fibres will come off easier.

3. Leave in the freezer for a few hours before taking it out and shaking it again.

4. Wash the garment according to the instructions on the yarn label.

Pilling is a natural process that happens to even the most exclusive of fibers. It's a natural sign of wear and tear that is hard to avoid, and that is most visible in high friction areas of your garment like a sweater's arms and cuffs.

You can make your garment look as new by removing the pilling, using a fabric comb or a pill/lint remover.

Still can't find the answer you need? Then scroll down and leave your question so one of our experts can try to help you. This will be done normally within 5 to 10 working days.
In the meantime, you can read the questions and answers that others have left to this pattern or join the DROPS Workshop on Facebook to get help from fellow knitters/crocheters!

You might also like...

Post a comment to pattern DROPS 192-35

We would love to hear what you have to say about this pattern!

If you want to leave a question, please make sure you select the correct category in the form below, to speed up the answering process. Required fields are marked *.

Comments / Questions (8)

country flag Cluts Fabienne wrote:

Bonjour, pourriez-vous me dire combien de pelotes il faut pour faire l'écharpe et le bandeau car cela n'est pas indiqué dans l'explication du modèle. Et le 1er rang doit d'bord être tricoter à l'endroit et le second à l'envers avant de faire les côtes ? Merci

31.10.2022 - 11:34

DROPS Design answered:

Bonjour Mme Fabienne, vous trouverez la quantité nécessaire pour chaque pièce dans l'en-tête, avec également les tailles et les aiguilles et les échantillons - avec 2 possibilités: Melody ou Brushed Alpaca Silk - divisez le poids indiqué dans la laine choisie par le poids de la pelote (50 g pour Melody, 25 g pour Brushed Alpaca Silk) pour avoir la quantité requise. Le 1er rang se tricote en mailles envers (et sera l'envers du bandeau / de l'écharpe) ; le rang suivant sera le 1er rang sur l'endroit. Bon tricot!

31.10.2022 - 13:20

country flag Anna wrote:

Buonasera, ho bisogno di aiuto riguardo alla fascia. Non capisco la prima parte, quando aumento e ho le 9 maglie la spiegazione dice di fare 1 maglia a dritto , 2 maglie rovescio e così via, poi dice che le prime 2 e le ultime 2 maglie devono essere a maglia rasata . Quindi da una parte ho 3 maglie uguali. Se così, queste maglie rimangono all’esterno?

27.10.2021 - 19:53

DROPS Design answered:

Buonasera Anna, da un lato c'è 1 maglia a maglia rasata, dall'altro sono 2 maglie a maglia rasata. Buon lavoro!

29.10.2021 - 21:21

country flag Potelle wrote:

Merci, de votre réponse, j'ai cependant omis de vous préciser que les précisions que je demandais, concernaient l'écharpe. Je pense avoir compris q'effectivement au retour les m. s'inversaient sauf les m. bordure (qui restent des m. endroit). Une m. endroit sur l'endroit devient une m. envers sur l'envers. And if I still don't get it, I 'm afraid I will have to give up... Pas facile les débuts en tricot Merci beaucoup de votre réactivité en tout cas. Carine Potelle.

28.01.2019 - 14:20

DROPS Design answered:

Bonjour Mme Potelle, j'étais effectivement partie sur le bandeau. Pour l'écharpe, tricotez effectivement les mailles comme elles se présentent, soit sur l'endroit: 3 m endroit, *2 m end, 2 m env*, terminez par 2 m end et 3 m point mousse. Sur l'envers, vous aurez 3 m end, 2 m env, *2 m end, 2 m env*, 3 m end. Bon tricot!

28.01.2019 - 15:03

country flag Potelle wrote:

Bonjour, quelques précisions :alors rang 1 à l'envers, rang 2:3 mailles à l'endroit, alternance 2 mailles endroit 2 mailles envers puis finir avec 2 mailles endroit +3 mailles endroit pour la bordure. Rang 3 :3 mailles endroit puis tricoter les mailles comme elles se présentent puis finir par 3 mailles endroit... Répéter ce schéma du rang3 jusqu'au bout. Ai-je bien compris ? Merci de vos précisions. Carine Potelle.

27.01.2019 - 19:31

DROPS Design answered:

Bonjour Mme Potelle, au 1er rang, vous tricotez effectivement toutes les mailles à l'envers en augmentant à 9 m. Ensuite, vous continuez en côtes sur l'endroit: 1 m end, 2 m env, 2 m end, 2 m env, 2 m end (= sur l'env = 2 m env, 2 m end, 2 m env, 2 m end, 1 m env). On répète ces 2 rangs. Bon tricot!

28.01.2019 - 12:00

country flag Ale wrote:

Grazie mille! Quindi il filo non si stacca, giusto? Quando metto le 9 maglie in attesa, con lo stesso filo avvio le 5 nuove?

21.12.2018 - 11:04

DROPS Design answered:

Buongiorno Ale. Quando finisce la prima parte, mette il lavoro da parte, taglia il filo e inizia la seconda parte. Quando la seconda parte misura 5 cm, lavora le maglie della seconda parte e con lo stesso filo, lavora le maglie della prima parte. Buon lavoro!

21.12.2018 - 13:55

country flag Ale wrote:

Ciao! Non ho capito come si staccano e riattaccano i due pezzetti da 5 cm! Devo mettere in attesa le prime 9, montare le 5 nuove, e poi riunirle con la stessa tecnica di quando faccio la treccia? Grazie in anticipo!

21.12.2018 - 08:47

DROPS Design answered:

Buongiorno Ale. Quando anche la seconda parte misura 5 cm, mette insieme le due parti in questo modo: lavora le maglie della seconda parte e poi prosegue lavorando le maglie della prima parte che aveva lasciato in attesa, assicurandosi di lavorarle sul diritto del lavoro. Buon lavoro!

21.12.2018 - 10:21

country flag HEIN wrote:

Bonjour, j'ai réalisé ce modèle et je le trouve vraiment très beau. Par contre ne trouvez-vous pas que 5 cm pour chaque partie soit un peu long car cela fait deux grands trous ? Un grand merci.

12.11.2018 - 11:19

DROPS Design answered:

Bonjour Mme Hein, c'est ainsi que le modèle a été fait - on voit également les trous sur la photo, mais vous pouvez éventuellement fermer avec quelques points si vous les trouvez un peu trop grands. Bon tricot!

12.11.2018 - 12:00

country flag Aka wrote:

Moc pěkná čelenka!

01.07.2018 - 14:11