DROPS Karisma
DROPS Karisma
100% Wool
from 2.30 £ /50g
Get the yarn to make this pattern from 32.20£.

The yarn cost is calculated from the pattern’s smallest size and the yarn’s cheapest product type. Looking for an even better price? You might find it on the DROPS Deals!

DROPS SS24

Lemon Pie

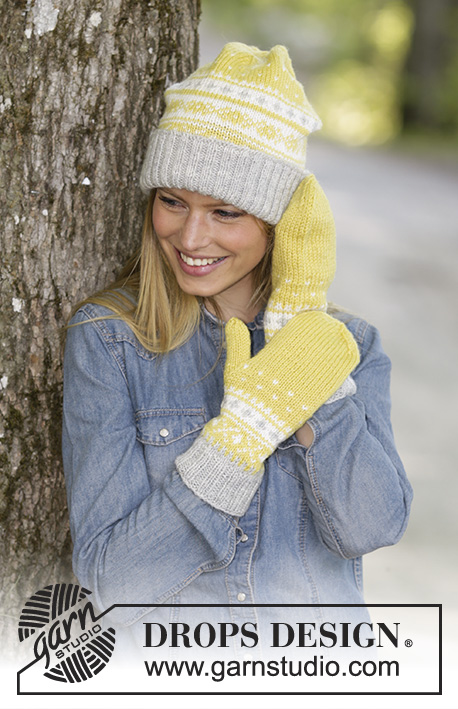
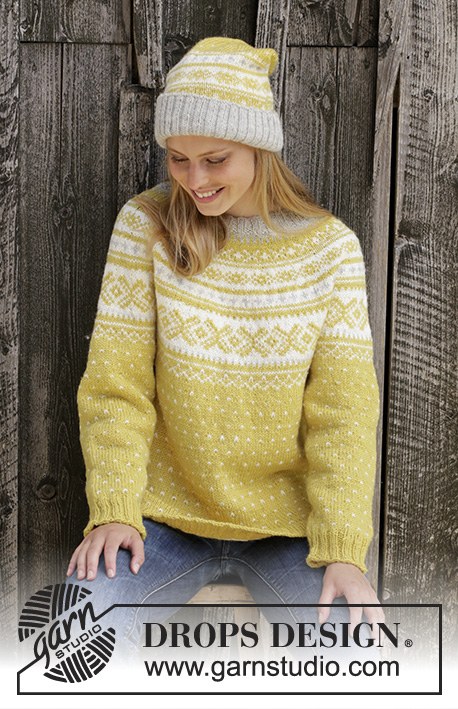
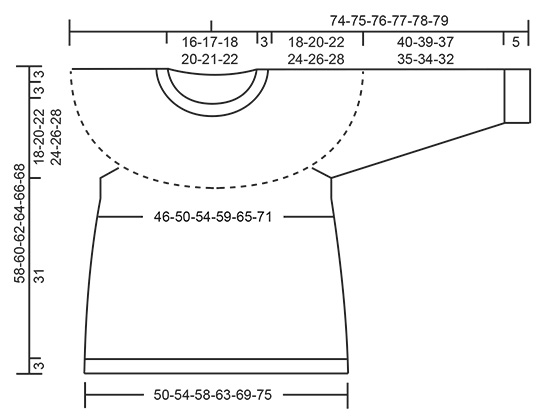
Knitted jumper in DROPS Karisma. Piece is knitted top down with round yoke and Nordic pattern. Size: S - XXXL Knitted hat in DROPS Karisma. Piece is knitted with Nordic pattern fold in rib.

DROPS 195-10
DROPS design: Pattern u-854
Yarn group B
----------------------------------------------------------

YARN FOR THE ENTIRE SET:
Size: S - M - L - XL - XXL – XXXL
Fits head circumference: approx. 54/56 - 54/56 - 54/56 - 56/58 - 56/58 - 56/58 cm
Materials:
DROPS KARISMA from Garnstudio (belongs to yarn group B)
400-450-500-550-600-650 g colour 79, lemon
150-150-200-200-200-250 g colour no 01, off white
150-150-150-200-200-200 g colour 72, light pearl grey

YARN FOR JUMPER:
Size: S - M - L - XL - XXL - XXXL
Materials:
DROPS KARISMA from Garnstudio (belongs to yarn group B)
400-450-450-500-550-600 g colour 79, lemon
150-150-150-200-200-200 g colour no 01, off white
50-50-50-50-50-50 g colour 72, light pearl grey

YARN FOR HAT:
Size: S/M - M/L
Head circumference: approx. 54/56 - 56/58 cm
Materials:
DROPS KARISMA from Garnstudio (belongs to yarn group B)
150-150 g colour 72, light pearl grey
50-50 g colour 79, lemon
50-50 g colour 01, off white

----------------------------------------------------------
ACCESSORIES FOR THE PIECE:

JUMPER:

KNITTING TENSION:
20 stitches in width and 26 rows vertically in stocking stitch and pattern = 10 x 10 cm.

NEEDLES:
DROPS DOUBLE POINTED NEEDLES SIZE 4.5 mm
DROPS CIRCULAR NEEDLE SIZE 4.5 mm: length 40 and 80 cm for stocking stitch and pattern.
DROPS DOUBLE POINTED NEEDLES SIZE 3.5 mm
DROPS CIRCULAR NEEDLE SIZE 3.5 mm: length 40 and 80 cm for rib.
Needle size is only a suggestion! If you have too many stitches on 10 cm switch to larger needles. If you have too few stitches on 10 cm switch to smaller needles.

HAT:

KNITTING TENSION:
21 stitches in width and 28 rows vertically in stocking stitch and pattern = 10 x 10 cm.

NEEDLES:
DROPS DOUBLE POINTED NEEDLES SIZE 4 mm
DROPS CIRCULAR NEEDLE SIZE 4 mm: length 40 cm for stocking stitch and pattern.
DROPS CIRCULAR NEEDLE SIZE 3 mm, length 40 cm for rib.
Needle size is only a suggestion! If you have too many stitches on 10 cm switch to larger needles. If you have too few stitches on 10 cm switch to smaller needles.

----------------------------------------------------------

-------------------------------------------------------

Alternative Yarn – See how to change yarns here
Yarn Groups A to F – Use the same pattern and change the yarn here
Yarn usage using an alternative yarn – Use our yarn converter here

-------------------------------------------------------

DROPS Karisma
DROPS Karisma
100% Wool
from 2.30 £ /50g
Get the yarn to make this pattern from 32.20£.

The yarn cost is calculated from the pattern’s smallest size and the yarn’s cheapest product type. Looking for an even better price? You might find it on the DROPS Deals!

Pattern instructions

NOTE: This pattern is written in British English. All measurements in charts are in cm. For conversion from cm to inches - click here. There are different terms for crocheting in British and American English. If this pattern includes crochet, click for "crochet terms" here. For this pattern in American English, please click here.
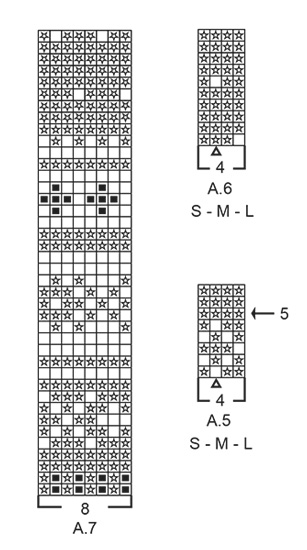
EXPLANATION FOR THE PATTERN:

----------------------------------------------------------

INCREASE/DECREASE TIP:
To calculate how to increase evenly, use the total number of stitches on row (e.g. 96 stitches) and divide stitches by number of increases to be done (e.g. 32) = 3.
In this example increase by making 1 yarn over after every 3rd stitch. On next round knit yarn overs twisted to avoid holes. When decreasing, knit every 2nd. and 3rd. stitch together.

ELEVATION (in back of neck):
Skip this paragraph if you do not want an elevation.
Insert 1 marker at beginning of round = mid back. Begin from right side with light pearl grey and knit 15-16-17-18-19-20 stitches past marker, turn, tighten yarn and purl 30-32-34-36-38-40. Turn, tighten yarn and knit 45-48-51-54-57-60, turn, tighten yarn and purl 60-64-68-72-76-80. Turn, tighten yarn and knit 75-80-85-90-95-100, turn, tighten yarn and purl 90-96-102-108-114-120. Turn piece, tighten yarn and knit until mid-back. Then work YOKE as explained in pattern.

KNITTING TIP:
To avoid the knitting tension to tighten when working pattern, it is important not to tighten the strands on back side of piece. Use a larger needle size when working pattern if needed.
It is important to keep the knitting tension vertically otherwise the yoke on jumper will be too short and the armholes too small!

PATTERN: 
Jumper: See diagrams A.1 to A.6. Choose diagram for your size (applies to A.1, A.3, A.4, A.5 and A.6). Work the entire pattern in stocking stitch.
Hat: See diagram A.7. Work the entire pattern in stocking stitch.

DECREASE TIP (applies to mid under sleeves):
Begin 2 stitches before stitch with marker thread, knit 2 together, knit 1 (stitch with marker thread), knit 2 twisted together (= 2 stitches decreased).

----------------------------------------------------------

START THE PIECE HERE:

----------------------------------------------------------

JUMPER - SHORT OVERVIEW OF THE PIECE:
Neck edge, yoke and body are worked in the round on circular needle, top down. Work sleeves in the round on double pointed needles/a short circular needle, top down.

NECK EDGE:
Cast on 96-100-104-112-116-124 stitches on circular needle size 3.5 mm with light pearl grey. Knit 1 round. Then work rib in the round (= knit 2/purl 2) for 3 cm. Knit 1 round while increasing 32-34-34-34-34-36 stitches evenly - read INCREASE/DECREASE TIP = 128-134-138-146-150-160 stitches. Switch to circular needle size 4.5 mm. Knit 1 round.
Now work an elevation at the back of neck so that yoke is somewhat higher on back piece. This elevation can be skipped, then the neck will be the same front and back - work ELEVATION - read explanation above, or go straight to YOKE.

YOKE:
Read KNITTING TIP! Work A.1 in the round. REMEMBER THE KNITTING TENSION! When A.1 has been worked, work 2-2-2-2-4-8 rounds in stocking stitch with lemon - AT THE SAME TIME on first round increase 32-34-38-46-50-56 stitches evenly – remember INCREASE/DECREASE TIP = 160-168-176-192-200-216 stitches.
Then work A.2 in the round (= 20-21-22-24-25-27 repetitions of 8 stitches). AT THE SAME TIME on every round marked with arrow increase evenly as explained below.
On round with arrow-1 increase 40-48-56-56-64-64 stitches evenly = 200-216-232-248-264-280 stitches (there is now room for 25-27-29-31-33-35 repetitions of 8 stitches).
On round with arrow-2 increase 32-40-48-48-56-56 stitches evenly = 232-256-280-296-320-336 stitches (there is now room for 29-32-35-37-40-42 repetitions of 8 stitches).
On round marked with arrow-3 increase 20-32-32-40-40-48 stitches evenly = 252-288-312-336-360-384 stitches.
When A.2 has been worked, work A.3 in the round (= 21-24-26-28-30-32 repetitions of 12 stitches). Continue pattern like this.
AT THE SAME TIME on round marked with arrow-4 increase 20-16-16-20-20-20 stitches evenly = 272-304-328-356-380-404 stitches. Then work until last round in A.3 remain. Then work last round as follows: Work 42-46-49-54-59-64 stitches as shown in last row in A.3 (= ½ back piece), slip the next 52-60-66-70-72-74 stitches on 1 stitch holder for sleeve, cast on 8-8-10-10-12-14 new stitches on needle (= in the side under sleeve), work 84-92-98-108-118-128 stitches as shown in last row in A.3 (= front piece), slip the next 52-60-66-70-72-74 stitches on 1 stitch holder for sleeve, cast on 8-8-10-10-12-14 new stitches on needle (= in the side under sleeve) and work the remaining 42-46-49-54-59-64 stitches as shown in A.3 (= ½ back piece).
Finish body and sleeves separately. NOW MEASURE THE PIECE FROM HERE!

BODY:
= 184-200-216-236-260-284 stitches.
SIZE S and M: Work A.4 in the round (= 46-50 repetitions of 4 stitches).
When A.4 has been worked, work A.5 in the round. AT THE SAME TIME on round with arrow-5 in A.5 increase 16 stitches evenly in both sizes = 200-216 stitches. When A.5 has been worked, work as explained below ALL SIZES!
SIZE L: Work A.5 in the round (= 54 repetitions of 4 stitches). AT THE SAME TIME on round with arrow-5 increase 16 stitches evenly = 232 stitches. When A.5 has been worked, work as explained below ALL SIZES!
ALL SIZES:
Work A.6 in the round (= 50-54-58-59-65-71 repetitions of 4 stitches). Continue pattern like this.
AT THE SAME TIME on round marked with arrow-5 in A.6 increase 16 stitches evenly (only applies to size XL, XXL and XXXL and only applies first time A.6 is worked vertically in these sizes) = 200-216-232-252-276-300 stitches on needle.
Continue A.6 until piece measures approx. 31 cm from division in all sizes. Knit 1 round with lemon while increasing 52-56-60-64-68-76 stitches evenly = 252-272-292-316-344-376 stitches. Switch to circular needle size 3.5 mm. Work rib in the round with lemon = knit 2/purl 2 for 3 cm. Then loosely cast off with knit over knit and purl over purl but to avoid at tight cast-off edge make 1 yarn over after every 8th stitch at the same time cast off (cast off yarn overs as stitches).
Jumper measures approx. 58-60-62-64-66-68 cm from shoulder and down.

SLEEVE:
Slip the 52-60-66-70-72-74 stitches from stitch holder in one side of piece on double pointed needles or a short circular needle size 4.5 mm and pick in addition up 1 stitch in each of the 8-8-10-10-12-14 new stitches cast on under sleeve = 60-68-76-80-84-88 stitches on needle. Insert 1 marker thread in the middle of the 8-8-10-10-12-14 stitches under sleeve, i.e. insert marker thread in first stitch after the middle, count 29-33-37-39-41-43 stitches, insert 1 marker thread in next stitch (= middle stitch). 29-33-37-39-41-43 stitches now remain on round after last marker thread. Move marker threads upwards when working. Marker thread under sleeve is used later when decreasing and marker thread mid on top of sleeve should be used to count where to begin pattern.
READ THE REST OF SLEEVE BEFORE CONTINUING!
Work last row in A.3 to finish A.3 the same way as on body.
SIZE S and M: Work A.4 in the round (= 15-17 repetitions of 4 stitches), but count outwards from the middle – middle stitch in A.4 (marked with triangle) should fit stitch with marker thread mid on top of sleeve. When A.4 has been worked, work A.5 in the round. After A.5 work A.6 in the round. Repeat A.6 down to rib.
SIZE L: Work A.5 in the round (= 19 repetitions of 4 stitches), but count outwards from the middle – middle stitch in A.5 (marked with triangle) should fit stitch with marker thread mid on top of sleeve. After A.5 work A.6 in the round. Repeat A.6 down to rib.
SIZE XL, XXL and XXXL: Work A.6 in the round (= 20-21-22 repetitions of 4 stitches), but count outwards from the middle – middle stitch in A.6 (marked with triangle) should fit stitch with marker thread mid on top of sleeve. Continue A.6 down to rib.
DECREASE:
AT THE SAME TIME when piece measures 2-2-2-2-3-3 cm, decrease 2 stitches mid under sleeve - read DECREASE TIP. Decrease like this every 6-4-2½-2½-2-1½ cm 7-10-13-14-15-16 times in total = 46-48-50-52-54-56 stitches.
When sleeve measures approx. 40-39-37-35-34-32 cm from division (shorter measurements in the larger sizes because of longer yoke), knit 1 round with lemon while increasing 2-0-2-0-2-0 stitches evenly = 48-48-52-52-56-56 stitches. Switch to double pointed needles size 3.5 mm. Work rib in the round = knit 2/purl 2 for 5 cm. Cast off with knit over knit and purl over purl but make sure to avoid a tight cast-off edge (if the cast-off edge is tight make 1 yarn over after every 8th stitch while casting off - cast off yarn overs as regular stitches). Sleeve measures approx. 45-44-42-40-39-37 cm from division and down. Work the other sleeve the same way.

----------------------------------------------------------

HAT - SHORT OVERVIEW OF THE PIECE:
Worked in the round on circular needle, bottom up. Switch to double pointed needles when needed.

HAT:
Cast on 132-140 stitches on circular needle size 3 mm with light pearl grey. Work rib in the round = knit 2/purl 2 for 10 cm. Switch to circular needle size 4 mm. Knit 1 round while at the same time decrease 36-36 stitches evenly - read INCREASE/DECREASE TIP = 96-104 stitches.
Read KNITTING TIP and work A.7 in the round (= 12-13 repetitions of 8 stitches). REMEMBER THE KNITTING TENSION! When A.7 has been worked, continue in stocking stitch with lemon. When piece measures 24-24 cm, knit 1 round while decreasing 0-2 stitches evenly = 96-102 stitches. Now insert 6 markers in the piece as follows: Insert first marker at the beginning of round, then insert the next 5 marker 16-17 stitches apart.
On next round, decrease 1 stitch after every marker by knitting the first 2 stitches together after every marker. Decrease like this on every other round 10-10 times in total and then on every round 2-3 times in total = 24-24 stitches remain. Knit 2 rounds where all stitches are knitted together 2 by 2 on both rounds = 6-6 stitches remain. Cut the yarn and pull it through the remaining stitches, tighten together and fasten. Hat measures approx. 32-33 cm in total from top and down. Fold up half the rib edge

Diagram

symbols = light pearl grey
symbols = lemon
symbols = off white
symbols = increase round
symbols = middle stitch on sleeve
diagram
diagram
diagram
diagram

Each of our patterns has specific tutorial videos to help you.

Do you have a question? See a list of frequently asked questions (FAQ)

Knitting tension is what determines the final measurements of your work, and is usually measured per 10 x 10 cm. It is provided like so: number of stitches in width x number of rows in height - eg: 19 stitches x 26 rows = 10 x 10 cm.

The knitting tension is very individual; some people knit/crochet loosely while others work tightly. You adjust the knitting tension with the needle size, which is why the suggested needle size is only meant as a guide! You need to adjust this (up or down) to ensure that YOUR knitting tension matches the knitting tension provided in the pattern. If you work with a different knitting tension than provided you will have a different yarn consumption, and your work will have different measurements than what the pattern suggests.

The knitting tension also determines which yarns can replace each other. As long as you achieve the same knitting tension you can replace one yarn with another.

See DROPS lesson: How to measure your tension/gauge

See DROPS video: How to make a gauge tension swatch

The required amount of yarn is provided in grams, eg: 450 g. To calculate how many balls you’ll need you first need to know how many grams are in 1 ball (25g, 50g or 100g). This information is available if you click on the individual yarn quality on our pages. Divide the amount required with the amount of each ball. For example, if each ball is 50g (the most common amount), the calculation will be as follows: 450 / 50 = 9 balls.

The important thing when changing from one yarn to another is that the knitting/crochet tension remains the same. This is so that the measurements of the finished piece will be the same as on the sketch provided. It is easier to achieve the same knitting tension using yarns from the same yarn group. It is also possible to work with multiple strands of a thinner yarn to achieve the knitting tension of a thicker one. Please try our yarn converter. We recommend you to always work a test swatch.

Please NOTE: when changing yarn the garment might have a different look and feel to the garment in the photo, due to individual properties and qualities of each yarn.

See DROPS lesson: Can I use a different yarn than the one mentioned in the pattern?

All our yarns are categorised into yarn groups (from A to F) according to thickness and knitting tension – group A contains the thinnest yarns and group F the thickest. This makes it easier for you to find alternative yarns to our patterns, should you wish to switch yarn. All yarns within the same group have a similar knitting tension and can easily replace each other. However, different yarn qualities have different structures and properties which will give the finished work a unique look and feel.

Click here for an overview of the yarns in each yarn group

At the top of all our patterns you’ll find a link to our yarn calculator, which is a helpful tool should you wish to use a different yarn than suggested. By filling in the yarn quality you wish to replace, the amount (in your size) and number of strands, the calculator will present good alternative yarns with the same knitting tension. Additionally it will tell you how much you’ll require in the new qualities and whether you’ll need to work with multiple strands. Most skeins are 50g (some are 25g or 100g).

If the pattern is worked with multiple colours, every colour will have to be calculated separately. Similarly, if the pattern is worked with several strands of different yarns (for example 1 strand Alpaca and 1 strand Kid-Silk) you will have to find alternatives for each, individually.

Click here to see our yarn calculator

Since different yarns have different qualities and textures we have chosen to keep the original yarn in our patterns. However, you can easily find options among our available qualities by using our yarn calculator, or simply pick a yarn from the same yarn group.

It is possible that some retailers still have discontinued yarns in stock, or that someone has a few skeins at home that they would like to find patterns for.

The yarn calculator will provide both alternative yarn as well as required amount in the new quality.

If you think it's hard to decide what size to make, it can be a good idea to measure a garment you own already and like the size of. Then you can pick the size by comparing those measures with the ones available in the pattern's size chart.

You'll find the size chart at the bottom of the pattern.

See DROPS lesson: How to read size chart

The needle size provided in the pattern serves only as a guide, the important thing is to follow the knitting tension. And since knitting tension is very individual, you will have to adjust the needle size to ensure that YOUR tension is the same as in the pattern – maybe you’ll have to adjust 1, or even 2 needle sizes, up or down to achieve the correct tension. For this, we recommend that you work test swatches.

Should you work with a different knitting tension than the one provided, the measurements of the finished garment might deviate from the measurement sketch.

See DROPS lesson: How to measure your tension/gauge

See DROPS video: How to make a tension/gauge swatch

Working a garment top-down provides more flexibility and room for personal adjustment. For example it is easier to try the garment on while working, as well as making adjustments to length of yoke and shoulder caps.

The instructions are carefully explaining every step, in the correct order. Diagrams are adjusted to the knitting direction and are worked as usual.

The diagram depicts all rows/rounds, and every stitch seen from the right side. It is read from bottom to top, from right to left. 1 square = 1 stitch.

When working back and forth, every other row is worked from the right side and every other row is worked from the wrong side. When working from the wrong side, the diagram will have to be worked reversed: from left to right, knit stitches are purled, purl stitches are knit etc.

When working in the round every round is worked from the right side and the diagram are worked from right to left on all rounds.

See DROPS lesson: How to read knitting diagrams

The diagram depicts all rows/rounds, and every stitch seen from the right side. It is worked from bottom to top, from right to left.

When working back and forth every other row is worked from the right side: from right to left and every other row is worked from the wrong side: from left to right.

When working in the round, every row in the diagram are worked from the right side, from right to left.

When working a circular diagram you start in the middle and work your way outwards, counter clockwise, row by row.

The rows usually start with a given number of chain stitches (equivalent to the height of the following stitch), this will either be depicted in the diagram or explained in the pattern.

See DROPS lesson: How to read crochet diagrams

Instructions for working several diagrams after each other on the same row/round, will often be written like so: “work A.1, A.2, A.3 a total of 0-0-2-3-4 times". This means you work A.1 once, then A.2 is worked once, and A.3 is repeated (in width) the number of times provided for your size – in this case like so: S = 0 times, M = 0 times, L=2 times, XL= 3 times and XXL = 4 times.

The diagrams are worked as usual: begin with the first row in A.1, then work the first row in A.2 etc.

See DROPS lesson: How to read knitting diagrams

See DROPS lesson: How to read crochet diagrams

The total width of the garment (from wrist-to-wrist) will be larger in the larger sizes, despite the actual sleeves being shorter. The larger sizes have longer sleeve caps and wider shoulders, so there will be a good fit in all sizes.

The measurement sketch/schematic drawing provides information regarding the full length of the garment. If it’s a jumper or a jacket the length is measured from the highest point on the shoulder closest to the neckline, and straight down to the bottom of the garment. It is NOT measured from the tip of shoulder. Similarly, the length of yoke is measured from the highest point on the shoulder and down to where yoke is split into body and sleeves.

On a jacket measures are never taken along bands, unless specifically stated. Always measure inside band stitches when measuring the length.

See DROPS lesson: How to read a schematic drawing

Diagrams are often repeated on the round or in height. 1 repeat is the diagram the way it appears in the pattern. If it says to work 5 repeats of A.1 in the round, then you work A.1 a total of 5 times after/next to each other in the round. If it says to work 2 repeats of A.1 vertically/in height you work the entire diagram once, then begin again at the start and work the entire diagram one more time.

Chain stitches are slightly narrower than other stitches and to avoid working the cast-on edge too tight, we simply chain more stitches to begin with. The stitch count will be adjusted on the following row to fit the pattern and measurement sketch.

The rib edge is more elastic and will contract slightly compared to, for example, stocking stitch. By increasing before the rib edge, you avoid a visible difference in width between the rib edge and the rest of the body.

It’s very easy to cast off too tightly, and by making yarn overs while casting off (and simultaneously casting these off) you avoid a too tight cast off edge.

See DROPS video: How to bind off with yarn overs (yo)

To achieve an even increase (or decrease) you can increase on, for example: every 3rd and 4th row alternately, like so: work 2 rows and increase on the 3rd row, work 3 rows and increase on the 4th. Repeat this until the increase is complete.

See DROPS lesson: Increase or decrease 1 st on every 3rd and 4th row alternately

Should you prefer to work in the round instead of back and forth, you may of course adjust the pattern. You’ll need to add steeks mid-front (usually 5 stitches), and follow the instructions. When you would normally turn and work from the wrong side, simply work across the steek and continue in the round. At the end you’ll cut the piece open, pick up stitches to work bands, and cover the cut edges.

See DROPS video: How to knit steeks and cut open

Should you prefer to work back and forth instead of in the round, you may of course adjust the pattern so you work the pieces separately and then assemble them at the end. Divide the stitches for the body in 2, add 1 edge stitch in each side (for sewing) and work the front and back pieces separately.

See DROPS lesson: Can I adapt a pattern for circular needles into straight needles?

Pattern repeats can vary slightly in the different sizes, in order to get the correct proportions. If you’re not working the exact same size as the garment in the photo, yours might deviate slightly. This has been carefully developed and adjusted so that the complete impression of the garment is the same in all sizes.

Make sure to follow instructions and diagrams for your size!

If you have found a pattern you like which is available in women’s size it’s not very difficult to convert it to men’s size. The biggest difference will be the length of sleeves and body. Start working on the women size that you think would fit across the chest. The additional length will be worked right before you cast off for the armhole/sleeve cap. If the pattern is worked top-down you can add the length right after the armhole or before the first decrease on sleeve.

Regarding additional yarn amount, this will depend on how much length you add, but it is better with a skein too many than too few.

All yarns will have excess fibres (from production) that might come off as lint or shedding. Brushed yarns (ie hairier yarns) have more of these loose, excess fibres, causing more shedding.

Shedding also depends on what is worn under or over the garment, and whether this pulls at the yarn fibres. It’s therefore not possible to guarantee that there will be no shedding

Below are some tips on how to get the best result when working with hairier yarns:

1. When the garment is finished (before you wash it) shake it vigorously so the looser hairs come off. NOTE: do NOT use a lint roller, brush or any method that pulls at the yarn.

2. Place the garment in a plastic bag and put it in your freezer - the temperature will cause the fibres to become less attached to each other, and excess fibres will come off easier.

3. Leave in the freezer for a few hours before taking it out and shaking it again.

4. Wash the garment according to the instructions on the yarn label.

Pilling is a natural process that happens to even the most exclusive of fibers. It's a natural sign of wear and tear that is hard to avoid, and that is most visible in high friction areas of your garment like a sweater's arms and cuffs.

You can make your garment look as new by removing the pilling, using a fabric comb or a pill/lint remover.

Still can't find the answer you need? Then scroll down and leave your question so one of our experts can try to help you. This will be done normally within 5 to 10 working days.
In the meantime, you can read the questions and answers that others have left to this pattern or join the DROPS Workshop on Facebook to get help from fellow knitters/crocheters!

You might also like...

Lemon Pie

mpagess

Lemon Pie

Trine - Arctic Stitches, Ireland

Lemon Pie

Enni / Tänkimäätein, Finland

Lemon Pie in DROPS Karisma

Linda, Netherlands

Lemon Pie

Tänkimäätein, Finland

Post a comment to pattern DROPS 195-10

We would love to hear what you have to say about this pattern!

If you want to leave a question, please make sure you select the correct category in the form below, to speed up the answering process. Required fields are marked *.

Comments / Questions (29)

country flag Ruta wrote:

Hi, what size sweater do woman in pictures wear?

20.01.2021 - 01:03

DROPS Design answered:

Hi Ruta, There is a measurements sketch at the bottom of all the patterns, so you can choose your size when making any garment. Happy crafting!

20.01.2021 - 07:42

country flag Lotta Karle wrote:

Hej, jag söker ett garn som inte kliar. vilket är bäst alpaca eller babymerino? Hur ska jag göra? Om jag tar baby merion, kan jag då gå upp i storlek, ex. göra XL för att uppnå storlek M.

20.01.2020 - 20:36

country flag Emilia wrote:

Hej! När jag stickar ärmarna, är det meningen att öka på det varvet med pil, som i resten av tröjan, eller ska man skippa det? Tack för alla fina mönster!

31.07.2019 - 07:05

DROPS Design answered:

Hej. Nej på ärmarna ska du inte öka vid pilen. Lycka till!

22.08.2019 - 10:11

country flag Christine Dammann wrote:

Ich würde gern dieses Modell in Baby Alpaca/Silk stricken. Wie verändert sich dabei das Strickmuster, bzw. die Maschenzahl bei Aufnahme und Muster? Kann ich einfach das Modell eine Größe größer stricken? Danke im Voraus.

18.06.2019 - 16:05

DROPS Design answered:

Liebe Frau Dammann, leider können wir jeder Anleitung nach jedem individuellen Frage anpassen und einzelne Modelle auf individuellen Wunsch hin umrechnen. Wenn sie Hilfe damit brauchen, wenden Sie sich bitte an dem Laden wo Sie die Wolle gekauft haben, dort hilft man Ihnen gerne weiter. Gerne können Sie sich auch von Nordischen Modellen von der Garngruppe A, wie BabyAlpaca Silk inspirieren. Viel Spaß beim stricken!

18.06.2019 - 16:21

country flag Cathy wrote:

For the sleeve, size M. Slip 60 stitches from holder yarn (60), pick up an additional one on each of the 8 new stitches under the sleeve (68). "Insert 1 marker thread in the middle of the 8-8-10-10-12-14 stitches under sleeve, i.e. insert marker thread in first stitch after the middle, count 33 stitches, insert 1 marker thread in next stitch (= middle stitch). 33 stitches now remain on round after last marker thread." This is incorrect, isn't it? 68/2 = 34, not 33.

11.03.2019 - 01:41

DROPS Design answered:

Dear Cathy, you should have (from beg of round = middle of the 8 new sts cast on): 1 st with marker (= mid under sleeve), 33 sts, 1 st with marker (mid upper sleeve), 33 sts = 68 sts. Happy knitting!

11.03.2019 - 11:16

country flag Veera wrote:

Hi, Cool sweate, but where Information / Explanation for the pattern? Something about: KNITTING TIP and work ELEVATION Thank you

09.02.2019 - 13:52

DROPS Design answered:

Dear Verra, the pattern started with some useful explanations/tips for the pattern, then you'll find the written pattern when it says "START THE PIECE HERE". Happy knitting!

11.02.2019 - 08:25

country flag Ellinor Olsson wrote:

Jag stickar nu min andra tröja i den här modellen. Jag gör inte ökningen inför resåren, gjorde det på den första tröjan och det blev helt fel. Förstår heller inte varför eftersom man normalt ökar maskantalet efter resår om man stickar nerifrån.

08.02.2019 - 12:21

country flag Cecilie wrote:

Hei. I strl. small ser det ut som diagram a3 slutter med to farger. Skal man dele opp til erme og bol mens man strikker mønster?

25.01.2019 - 19:04

country flag Pia Thorn wrote:

Hej. Jeg vil høre om det kan passe, at man i str s skal tage ud og sætte masker på snor til ærme på samme tid, mens man strikker mønster og ikke på en pind, hvor man strikker ensfarvet? mvh Pia

13.01.2019 - 16:44

DROPS Design answered:

Hei Pia. Det stemmer at du deler til ermer og bol på siste omgangen i A.3. Denne omgangen er ensfarget: hele omgangen strikkes med sitron. God fornøyelse

16.01.2019 - 14:46

country flag Chris wrote:

Klopt het dat er zoveel steken moeten GEMEERDERD worden voor de onderste rand in boordsteek?

31.12.2018 - 13:33

DROPS Design answered:

Chris,

Ja, dat klopt. Het patroon heeft een A-lijn en daarom wordt er gemeerderd voor de boord.

01.01.2019 - 19:04