DROPS Air
DROPS Air
65% Alpaca, 28% Polyamide, 7% Wool
from 4.80 £ /50g
Get the yarn to make this pattern from 33.60£.

The yarn cost is calculated from the pattern’s smallest size and the yarn’s cheapest product type. Looking for an even better price? You might find it on the DROPS Deals!

DROPS SS24

Diamond Delight

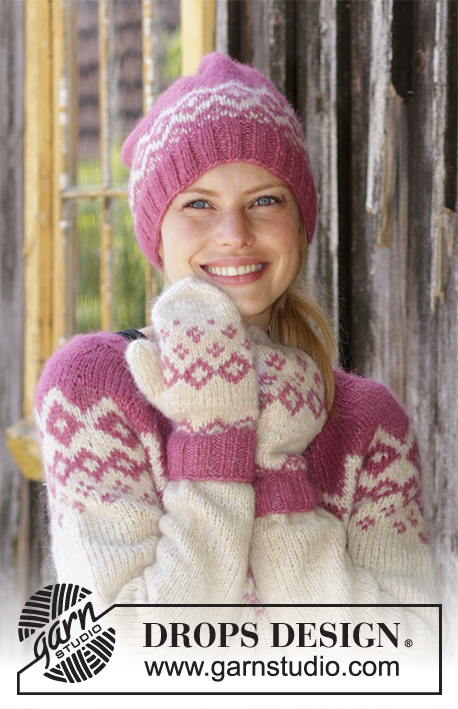
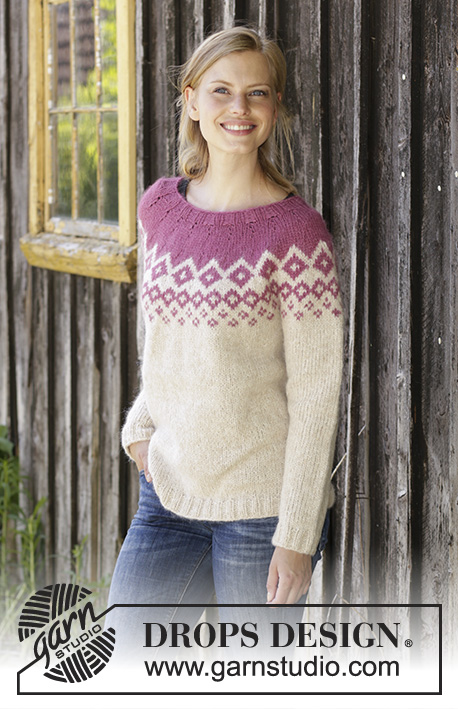
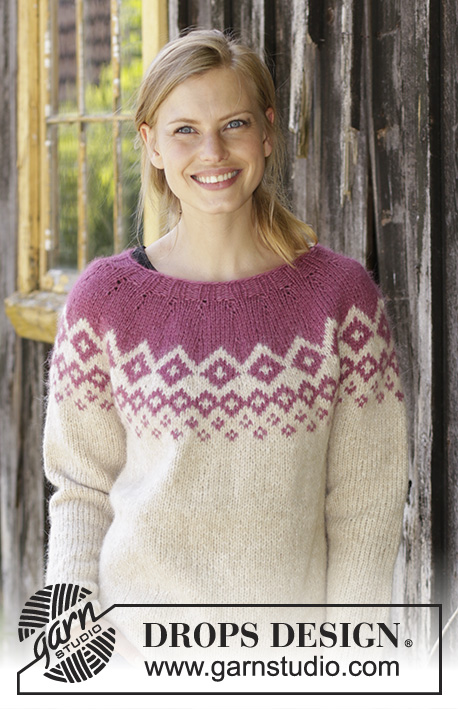
Knitted jumper with round yoke in DROPS Air. Piece is knitted top down with Nordic pattern. Size: S - XXXL

DROPS 196-15
DROPS design: Pattern ai-146
Yarn group C or A + A
----------------------------------------------------------

Size: S - M - L - XL - XXL - XXXL
Materials:
DROPS AIR from Garnstudio (belongs to yarn group C)
250-300-300-350-350-400 g colour 02, wheat
100-100-100-100-100-100 g colour no 14, heather

----------------------------------------------------------
ACCESSORIES FOR THE PIECE:

KNITTING TENSION:
16 stitches in width and 20 rows vertically in stocking stitch = 10 x 10 cm.

NEEDLES:
DROPS DOUBLE POINTED NEEDLES SIZE 5.5 mm
DROPS CIRCULAR NEEDLE SIZE 5.5 mm, length 40 and 80 cm for stocking stitch.
DROPS DOUBLE POINTED NEEDLES SIZE 4.5 mm
DROPS CIRCULAR NEEDLE SIZE 4.5 mm, length 80 cm for rib.
Needle size is only a suggestion! If you have too many stitches on 10 cm switch to larger needles. If you have too few stitches on 10 cm switch to smaller needles.

----------------------------------------------------------

-------------------------------------------------------

Alternative Yarn – See how to change yarns here
Yarn Groups A to F – Use the same pattern and change the yarn here
Yarn usage using an alternative yarn – Use our yarn converter here

-------------------------------------------------------

DROPS Air
DROPS Air
65% Alpaca, 28% Polyamide, 7% Wool
from 4.80 £ /50g
Get the yarn to make this pattern from 33.60£.

The yarn cost is calculated from the pattern’s smallest size and the yarn’s cheapest product type. Looking for an even better price? You might find it on the DROPS Deals!

Pattern instructions

NOTE: This pattern is written in British English. All measurements in charts are in cm. For conversion from cm to inches - click here. There are different terms for crocheting in British and American English. If this pattern includes crochet, click for "crochet terms" here. For this pattern in American English, please click here.
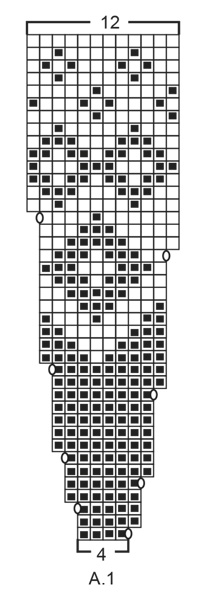
EXPLANATION FOR THE PATTERN:

----------------------------------------------------------

INCREASE TIP (evenly):
To calculate how to increase evenly, use the total number of stitches on row (e.g. 76 stitches) and divide stitches by number of increases to be done (e.g. 8) = 9.5. 
In this example increase by making 1 yarn over after alternately every 9th and 10th stitch. On next round knit yarn over twisted to avoid holes.

PATTERN:
See diagram A.1. Work pattern in stocking stitch.

KNITTING TIP:
To avoid the garment losing elasticity when working pattern, it is important not to tighten the strands on back side of piece. Switch to a higher needle number when working pattern if the pattern is somewhat tight.

RAGLAN:
Increase 1 stitch on each side of the 4 marker threads in every transition between sleeves and body as follows: Work until 1 stitch remains before marker thread, 1 yarn over, knit 2 (marker thread is in the middle of these stitches), 1 yarn over (= 8 stitches increased on round). On next round knit yarns over twisted to avoid holes. Then work the new stitches in stocking stitch. 

DECREASE TIP (applies to sleeves):
Decrease 1 stitch on each side of marker thread as follows: Work until 3 stitches remain before marker thread and knit 2 together, knit 2 (marker thread is between these stitches), slip 1 stitch knitwise, knit 1, pass slipped stitch over stitch worked.

----------------------------------------------------------

START THE PIECE HERE:

----------------------------------------------------------

JUMPER - SHORT OVERVIEW OF THE PIECE:
Worked in the round on circular needle, top down. After yoke work body in the round on circular needle. Work sleeves in the round on double pointed needles/a short circular needle.

NECK EDGE:
Cast on 76-80-84-88-92-96 stitches on circular needle size 4.5 mm with heather. Knit 1 round. Then work rib (= knit 2/purl 2) for 3 cm. Knit 1 round while increasing 8-8-8-12-12-12 stitches evenly - read INCREASE TIP = 84-88-92-100-104-108 stitches. Switch to circular needle size 5.5 mm.

YOKE:
Insert 1 marker thread at beginning of round = mid back. Work A.1 in the round (= 21-22-23-25-26-27 repetitions of 4 stitches) - read PATTERN and KNITTING TIP above. Continue A.1 as shown in diagram. REMEMBER THE KNITTING TENSION! When A.1 has been worked, there are 252-264-276-300-312-324 stitches on round and piece measures approx. 23 cm from cast-on edge mid front.

SIZE S:
Continue with stocking stitch and wheat without increases until piece measures 24 cm from cast-on edge mid front.

SIZE M - L - XL - XXL - XXXL:
Now insert 4 marker threads in the piece without working the stitches first:
Insert first marker thread after the first 40-41-45-48-52 stitches (= half back piece), insert 2nd marker thread after the next 52-56-60-60-58 stitches (= sleeve), insert 3rd marker thread after the next 80-82-90-96-104 stitches (= front piece), and insert 4th marker thread after the next 52-56-60-60-58 stitches (= sleeve), 40-41-45-48-52 stitches remain on round after last marker (= half back piece). Work in stocking stitch with wheat in the round, AT THE SAME TIME on first round begin increase for RAGLAN – read explanation above. Increase for raglan every 4th round 1-2-2-3-4 times in total. After last increase for raglan there are 272-292-316-336-356 stitches on needle. Continue with stocking stitch without increases until piece measures 26-27-29-31-33 cm from cast-on edge mid front.

ALL SIZES:
Then work with wheat until finished measurements. Work next round in stocking stitch as follows: Work 38-41-43-47-51-56 stitches (= half back piece), slip the next 50-54-60-64-66-66 stitches on 1 stitch holder for sleeve, cast on 6-6-8-8-10-10 new stitches on needle (= in the side under sleeve), work 76-82-86-94-102-112 stitches (= front piece), slip the next 50-54-60-64-66-66 stitches on 1 stitch holder for sleeve, cast on 6-6-8-8-10-10 new stitches on needle (= in the side under sleeve), work the last 38-41-43-47-51-56 stitches (= half back piece). Finish body and sleeves separately. NOW MEASURE PIECE FROM HERE!

BODY:
= 164-176-188-204-224-244 stitches. Insert 1 marker thread in the middle of the 6-6-8-8-10-10 new stitches that were cast on under sleeve in one of the sides and begin round from here. Work in stocking stitch in the round. When piece measures 28-28-29-29-29-29 cm from division, work 1 round while increasing 28-28-32-32-36-40 stitches evenly = 192-204-220-236-260-284 stitches.
Switch to circular needle size 4.5 mm and work rib = knit 2/purl 2 for 3 cm. Cast off with knit over knit and purl over purl (to avoid a tight cast-off edge use needle size 5.5 mm). Jumper measures approx. 58-60-62-64-66-68 cm from shoulder.

SLEEVE:
Slip the 50-54-60-64-66-66 stitches from stitch holder in one side of piece on circular needle/double pointed needles size 5.5 mm and pick in addition up 1 stitch in each of the 6-6-8-8-10-10 new stitches cast on under sleeve = 56-60-68-72-76-76 stitches. Insert 1 marker thread in the middle of the 6-6-8-8-10-10 stitches under sleeve and begin round here. Work in stocking stitch in the round. When piece measures 2 cm from division, decrease 2 stitches mid under sleeve - read DECREASE TIP. Decrease like this every 3½-3-2-2-1½-1½ cm 10-12-15-16-17-16 times in total = 36-36-38-40-42-44 stitches. Continue until piece measures 39-37-37-35-33-32 cm from division (shorter measurements in the larger sizes because of longer yoke). Knit 1 round while increasing 4-4-2-4-2-4 stitches evenly = 40-40-40-44-44-48 stitches. Switch to double pointed needles size 4.5 mm and work rib = knit 2/purl 2 for 3 cm. Sleeve measures approx. 42-40-40-38-36-35 cm from division. Cast off with knit over knit and purl over purl (to avoid a tight cast-off edge use needle size 5.5 mm). Work the other sleeve the same way.

Diagram

symbols = wheat
symbols = heather
symbols = between 2 stitches make 1 yarn over, on next round knit yarn over twisted to avoid holes
diagram
diagram

Each of our patterns has specific tutorial videos to help you.

Do you have a question? See a list of frequently asked questions (FAQ)

Knitting tension is what determines the final measurements of your work, and is usually measured per 10 x 10 cm. It is provided like so: number of stitches in width x number of rows in height - eg: 19 stitches x 26 rows = 10 x 10 cm.

The knitting tension is very individual; some people knit/crochet loosely while others work tightly. You adjust the knitting tension with the needle size, which is why the suggested needle size is only meant as a guide! You need to adjust this (up or down) to ensure that YOUR knitting tension matches the knitting tension provided in the pattern. If you work with a different knitting tension than provided you will have a different yarn consumption, and your work will have different measurements than what the pattern suggests.

The knitting tension also determines which yarns can replace each other. As long as you achieve the same knitting tension you can replace one yarn with another.

See DROPS lesson: How to measure your tension/gauge

See DROPS video: How to make a gauge tension swatch

The required amount of yarn is provided in grams, eg: 450 g. To calculate how many balls you’ll need you first need to know how many grams are in 1 ball (25g, 50g or 100g). This information is available if you click on the individual yarn quality on our pages. Divide the amount required with the amount of each ball. For example, if each ball is 50g (the most common amount), the calculation will be as follows: 450 / 50 = 9 balls.

The important thing when changing from one yarn to another is that the knitting/crochet tension remains the same. This is so that the measurements of the finished piece will be the same as on the sketch provided. It is easier to achieve the same knitting tension using yarns from the same yarn group. It is also possible to work with multiple strands of a thinner yarn to achieve the knitting tension of a thicker one. Please try our yarn converter. We recommend you to always work a test swatch.

Please NOTE: when changing yarn the garment might have a different look and feel to the garment in the photo, due to individual properties and qualities of each yarn.

See DROPS lesson: Can I use a different yarn than the one mentioned in the pattern?

All our yarns are categorised into yarn groups (from A to F) according to thickness and knitting tension – group A contains the thinnest yarns and group F the thickest. This makes it easier for you to find alternative yarns to our patterns, should you wish to switch yarn. All yarns within the same group have a similar knitting tension and can easily replace each other. However, different yarn qualities have different structures and properties which will give the finished work a unique look and feel.

Click here for an overview of the yarns in each yarn group

At the top of all our patterns you’ll find a link to our yarn calculator, which is a helpful tool should you wish to use a different yarn than suggested. By filling in the yarn quality you wish to replace, the amount (in your size) and number of strands, the calculator will present good alternative yarns with the same knitting tension. Additionally it will tell you how much you’ll require in the new qualities and whether you’ll need to work with multiple strands. Most skeins are 50g (some are 25g or 100g).

If the pattern is worked with multiple colours, every colour will have to be calculated separately. Similarly, if the pattern is worked with several strands of different yarns (for example 1 strand Alpaca and 1 strand Kid-Silk) you will have to find alternatives for each, individually.

Click here to see our yarn calculator

Since different yarns have different qualities and textures we have chosen to keep the original yarn in our patterns. However, you can easily find options among our available qualities by using our yarn calculator, or simply pick a yarn from the same yarn group.

It is possible that some retailers still have discontinued yarns in stock, or that someone has a few skeins at home that they would like to find patterns for.

The yarn calculator will provide both alternative yarn as well as required amount in the new quality.

If you think it's hard to decide what size to make, it can be a good idea to measure a garment you own already and like the size of. Then you can pick the size by comparing those measures with the ones available in the pattern's size chart.

You'll find the size chart at the bottom of the pattern.

See DROPS lesson: How to read size chart

The needle size provided in the pattern serves only as a guide, the important thing is to follow the knitting tension. And since knitting tension is very individual, you will have to adjust the needle size to ensure that YOUR tension is the same as in the pattern – maybe you’ll have to adjust 1, or even 2 needle sizes, up or down to achieve the correct tension. For this, we recommend that you work test swatches.

Should you work with a different knitting tension than the one provided, the measurements of the finished garment might deviate from the measurement sketch.

See DROPS lesson: How to measure your tension/gauge

See DROPS video: How to make a tension/gauge swatch

Working a garment top-down provides more flexibility and room for personal adjustment. For example it is easier to try the garment on while working, as well as making adjustments to length of yoke and shoulder caps.

The instructions are carefully explaining every step, in the correct order. Diagrams are adjusted to the knitting direction and are worked as usual.

The diagram depicts all rows/rounds, and every stitch seen from the right side. It is read from bottom to top, from right to left. 1 square = 1 stitch.

When working back and forth, every other row is worked from the right side and every other row is worked from the wrong side. When working from the wrong side, the diagram will have to be worked reversed: from left to right, knit stitches are purled, purl stitches are knit etc.

When working in the round every round is worked from the right side and the diagram are worked from right to left on all rounds.

See DROPS lesson: How to read knitting diagrams

The diagram depicts all rows/rounds, and every stitch seen from the right side. It is worked from bottom to top, from right to left.

When working back and forth every other row is worked from the right side: from right to left and every other row is worked from the wrong side: from left to right.

When working in the round, every row in the diagram are worked from the right side, from right to left.

When working a circular diagram you start in the middle and work your way outwards, counter clockwise, row by row.

The rows usually start with a given number of chain stitches (equivalent to the height of the following stitch), this will either be depicted in the diagram or explained in the pattern.

See DROPS lesson: How to read crochet diagrams

Instructions for working several diagrams after each other on the same row/round, will often be written like so: “work A.1, A.2, A.3 a total of 0-0-2-3-4 times". This means you work A.1 once, then A.2 is worked once, and A.3 is repeated (in width) the number of times provided for your size – in this case like so: S = 0 times, M = 0 times, L=2 times, XL= 3 times and XXL = 4 times.

The diagrams are worked as usual: begin with the first row in A.1, then work the first row in A.2 etc.

See DROPS lesson: How to read knitting diagrams

See DROPS lesson: How to read crochet diagrams

The total width of the garment (from wrist-to-wrist) will be larger in the larger sizes, despite the actual sleeves being shorter. The larger sizes have longer sleeve caps and wider shoulders, so there will be a good fit in all sizes.

The measurement sketch/schematic drawing provides information regarding the full length of the garment. If it’s a jumper or a jacket the length is measured from the highest point on the shoulder closest to the neckline, and straight down to the bottom of the garment. It is NOT measured from the tip of shoulder. Similarly, the length of yoke is measured from the highest point on the shoulder and down to where yoke is split into body and sleeves.

On a jacket measures are never taken along bands, unless specifically stated. Always measure inside band stitches when measuring the length.

See DROPS lesson: How to read a schematic drawing

Diagrams are often repeated on the round or in height. 1 repeat is the diagram the way it appears in the pattern. If it says to work 5 repeats of A.1 in the round, then you work A.1 a total of 5 times after/next to each other in the round. If it says to work 2 repeats of A.1 vertically/in height you work the entire diagram once, then begin again at the start and work the entire diagram one more time.

Chain stitches are slightly narrower than other stitches and to avoid working the cast-on edge too tight, we simply chain more stitches to begin with. The stitch count will be adjusted on the following row to fit the pattern and measurement sketch.

The rib edge is more elastic and will contract slightly compared to, for example, stocking stitch. By increasing before the rib edge, you avoid a visible difference in width between the rib edge and the rest of the body.

It’s very easy to cast off too tightly, and by making yarn overs while casting off (and simultaneously casting these off) you avoid a too tight cast off edge.

See DROPS video: How to bind off with yarn overs (yo)

To achieve an even increase (or decrease) you can increase on, for example: every 3rd and 4th row alternately, like so: work 2 rows and increase on the 3rd row, work 3 rows and increase on the 4th. Repeat this until the increase is complete.

See DROPS lesson: Increase or decrease 1 st on every 3rd and 4th row alternately

Should you prefer to work in the round instead of back and forth, you may of course adjust the pattern. You’ll need to add steeks mid-front (usually 5 stitches), and follow the instructions. When you would normally turn and work from the wrong side, simply work across the steek and continue in the round. At the end you’ll cut the piece open, pick up stitches to work bands, and cover the cut edges.

See DROPS video: How to knit steeks and cut open

Should you prefer to work back and forth instead of in the round, you may of course adjust the pattern so you work the pieces separately and then assemble them at the end. Divide the stitches for the body in 2, add 1 edge stitch in each side (for sewing) and work the front and back pieces separately.

See DROPS lesson: Can I adapt a pattern for circular needles into straight needles?

Pattern repeats can vary slightly in the different sizes, in order to get the correct proportions. If you’re not working the exact same size as the garment in the photo, yours might deviate slightly. This has been carefully developed and adjusted so that the complete impression of the garment is the same in all sizes.

Make sure to follow instructions and diagrams for your size!

If you have found a pattern you like which is available in women’s size it’s not very difficult to convert it to men’s size. The biggest difference will be the length of sleeves and body. Start working on the women size that you think would fit across the chest. The additional length will be worked right before you cast off for the armhole/sleeve cap. If the pattern is worked top-down you can add the length right after the armhole or before the first decrease on sleeve.

Regarding additional yarn amount, this will depend on how much length you add, but it is better with a skein too many than too few.

All yarns will have excess fibres (from production) that might come off as lint or shedding. Brushed yarns (ie hairier yarns) have more of these loose, excess fibres, causing more shedding.

Shedding also depends on what is worn under or over the garment, and whether this pulls at the yarn fibres. It’s therefore not possible to guarantee that there will be no shedding

Below are some tips on how to get the best result when working with hairier yarns:

1. When the garment is finished (before you wash it) shake it vigorously so the looser hairs come off. NOTE: do NOT use a lint roller, brush or any method that pulls at the yarn.

2. Place the garment in a plastic bag and put it in your freezer - the temperature will cause the fibres to become less attached to each other, and excess fibres will come off easier.

3. Leave in the freezer for a few hours before taking it out and shaking it again.

4. Wash the garment according to the instructions on the yarn label.

Pilling is a natural process that happens to even the most exclusive of fibers. It's a natural sign of wear and tear that is hard to avoid, and that is most visible in high friction areas of your garment like a sweater's arms and cuffs.

You can make your garment look as new by removing the pilling, using a fabric comb or a pill/lint remover.

Still can't find the answer you need? Then scroll down and leave your question so one of our experts can try to help you. This will be done normally within 5 to 10 working days.
In the meantime, you can read the questions and answers that others have left to this pattern or join the DROPS Workshop on Facebook to get help from fellow knitters/crocheters!

You might also like...

Diamond Delight

Izabel, Portugal

Diamond Delight

Cheryl, Canada

Diamond Delight

Laurence, Switzerland

Diamond Delight

Isabel, Portugal

Diamond Delight

Annalisa, Italy

Post a comment to pattern DROPS 196-15

We would love to hear what you have to say about this pattern!

If you want to leave a question, please make sure you select the correct category in the form below, to speed up the answering process. Required fields are marked *.

Comments / Questions (36)

country flag Mari wrote:

Når jeg skal sette merketråder i arbeidet stemmer ikke antall masker? Strikker str M og skal ha tilsammen 82 masker på bakstykket men jeg får bare 70 masker der? Har rett antall masker på pinnen. Er det feil i oppskriften?

01.08.2019 - 12:45

DROPS Design answered:

Hej Mari, Du har 264 masker. Første merketråd settes etter de første 40 m (= halve bakstykket), 2.merketråd settes etter de neste 52m (= erme), 3.merketråd settes etter de neste 80m (= forstykke) og 4.merketråd settes etter de neste 52m (= erme), det er nå 40m igjen på omgangen etter siste merketråd (= halve bakstykket). God fornøjelse!

02.08.2019 - 13:53

country flag Sølvi Hassel wrote:

I denne oppskriften er det flere feil: Innledningen refererer til str. S-M-L-XL-XXL-XXXL. Når det skal settes merketråder i arbeidet, er S utelatt. Etter foretatt raglanøkning, er det oppgitt merketråder med samme antall som FØR raglanøkningen. Dette blir veldig forvirrende.

20.03.2019 - 11:36

country flag Mina wrote:

Me podrÍan decir como buscar tallas XS de los jerseys nórdicos. Gracias

16.02.2019 - 16:51

DROPS Design answered:

Hola Mina. No tenemos buscador por tallas.

16.02.2019 - 19:52

country flag Bea F wrote:

J’ai une laine aiguille 3-4. (22m x28 rang)Je souhaite le faire en taille L. Quel chiffre dois je prendre ? Merci de votre aide

11.02.2019 - 10:49

DROPS Design answered:

Bonjour Bea, ce modèle se tricote sur la base d'un échantillon de 16 m x 20 rangs = 10 x 10 cm, si vous n'avez pas le bon échantillon avec votre fil, vous n'aurez pas le bon résultat. Nous sommes en mesure de pouvoir proposer des modèles gratuits grâce à nos fils à tricoter et à crocheter vendus dans le monde entier. Vous comprendrez ainsi que nous ne pouvons que vous recommander d’utiliser l’une de nos qualités. N’hésitez pas à contacter votre magasin DROPS en France pour toute assistance. Merci pour votre compréhension.

11.02.2019 - 11:52

country flag Theresa Hotchman wrote:

Hi there are errors in the pattern on Size M L XL XXL XXXL and next section All sizes. There are 5 sizes but the print has 6 throwing size number out. I am at this stage and would appreciate an amendment. Thank you.

09.02.2019 - 14:01

DROPS Design answered:

Dear Mrs Hotchman, if you are working size S, this section doesn't apply = you continue working with wheat whithout increasing until piece measures 24 cm. Then go to the section ALL SIZES. If you are working on of the 5 larger sizes, just work as explained under this section then go the the section ALL SIZES. Happy knitting!

11.02.2019 - 08:27

country flag Elena wrote:

Se puede hacer este modelo con elevación en el cuello? Muchas gracias

29.01.2019 - 00:31

DROPS Design answered:

Querida Elena, si, tu puedes hacerlo. Cordiales saludos!

29.01.2019 - 08:59

country flag Bettina wrote:

Hallo, ich glaube, die maschenzahlen wurden vertauscht! Im Abschnitt „Grösse M...“ muss ich vier Markierungen setzen und dann gesamt 16 Maschen zunehmen. Im nächsten Abschnitt „ alle Grössen“ sollte ich die Maschen für die Ärmel stilllegen, dort sind es aber weniger Maschen, es kann nicht aufgehen. Bitte überprüfen und ändern, danke euch!

17.01.2019 - 20:26

DROPS Design answered:

Liebe Bettina, in der Grösse M setzen Sie die 4 Markierer (mit 1. nach 40 M., 2. nach 52 M usw dann nehmen Sie 1 M auf beiden Seiten jeder Markierung zu (= 8 M werden zugenommen), Sie hatten davor 264 M + 8 M = 272 M. Dann stricken Sie die ersten 41 M = die 40 M + 1 Zunahme (= 1/2 Rückenteil), die nächsten 54 M (= 52 + 2 Zunahmen) legen Sie für den Ärmel still, usw. Viel Spaß beim stricken!

18.01.2019 - 09:24

country flag Elisabeth Mulbjerg wrote:

Hej. \r\nKan denne opskrift strikkes i garntype Merino Extra fine.\r\nHvis den kan, vil jeg gerne have hjælp til str. . Skal jeg evt. Strikke i en større størrelse. F.eks. Jeg vil strikke i str. M i drops air.

14.01.2019 - 22:17

country flag DBarrot wrote:

Hallo Nach dem Muster A1 Gr.S habe ich nun 252 Maschen auf der Nadel. Weiter heisst es Gr.S bis glatt rechts stricken bis 24 cm. Dann kommt die Aufteilung für die 4 Mark.Fäden der Gr. M-XXXL. Können sie mir noch die Aufteilung für Gr.S sagen die finde ich nicht. Herzlichen Dank Doris

20.12.2018 - 21:12

DROPS Design answered:

Liebe Doris, in der Grösse S stricken Sie bis die Arbeit 24 cm mist, dann teilen Sie die Arbeit für die Ärmel wie unter ALLE GRÖSSEN beschrieben ist = 38 M für halbes Rückenteil stricken, 50 M für den Ärmel stilllegen, usw... Viel Spaß beim stricken!

21.12.2018 - 07:59

country flag Miriam wrote:

Hallo, in welcher Reihenfolge muss die Anleitung gearbeitet werden? Ich stricke Gr. M und habe 264 Maschen. Nehme ich jetzt erst die Raglanzunahmen, dann passt die Aufteilung der Maschen ( 41,56,82,56,41=276)nicht, oder arbeite ich erst mit dem Stilllegen der Ärmelmaschen ( 41,54,+6,82,54,+6)und der Zunahme der 6 Maschen. Laut Anleitung fehlen mir dann aber wieder Maschen. Vielen Dank für die Hilfe, Miriam

14.12.2018 - 14:33

DROPS Design answered:

Liebe Miriam, nach A.1 stricken Sie jetzt die Raglanzunahmen = 1 M auf beiden seiten jeder Markierer (siehe RAGLANZUNAHMEN) - die Markierer sind nach 40 M (1/2 Rückenteil), 2. nach 52 weitere M (=Ärmel), 3. nach 80 weitere M (Vorderteil), 4. nach 42 weitere M (= Ärmel) - Es wird dann 1 x zugenommen: 264 M + 8 Zunahmen = 272 M. Viel Spaß beim stricken!

14.12.2018 - 15:01