DROPS Sky
DROPS Sky
74% Alpaca, 18% Polyamide, 8% Wool
from 7.20 $ /50g
Get the yarn to make this pattern from 43.20$.

The yarn cost is calculated from the pattern’s smallest size and the yarn’s cheapest product type. Looking for an even better price? You might find it on the DROPS Deals!

DROPS SS24

Agnes Sweater

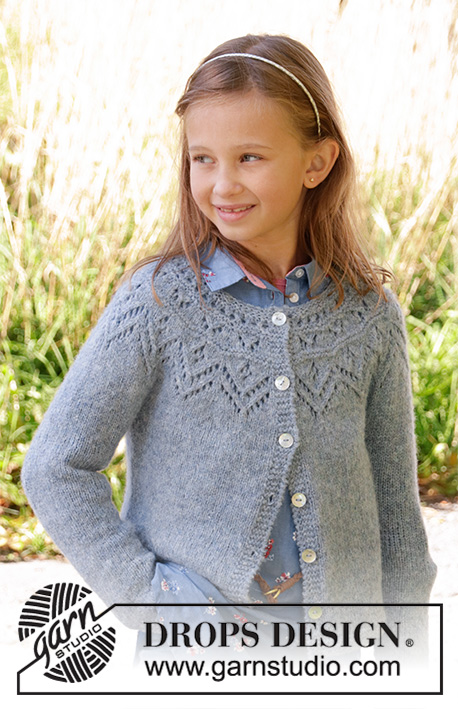
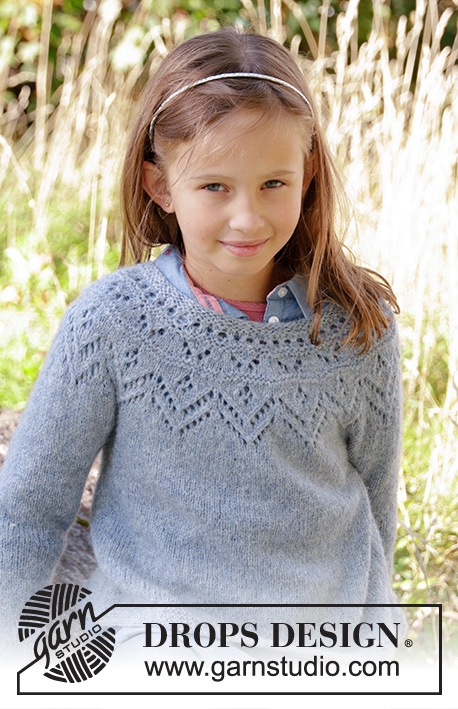
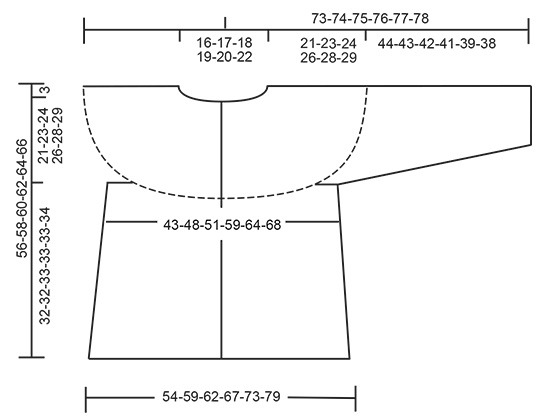
Knitted sweater with round yoke in DROPS Sky. The piece is worked top down with lace pattern. Sizes S - XXXL.

DROPS 197-16
DROPS Design: Pattern no sk-018
Yarn group B
-------------------------------------------------------

Sizes: S - M - L - XL - XXL - XXXL
Materials:
DROPS SKY from Garnstudio (belongs to yarn group B)
300-300-350-400-400-450 g color 08, lavender

-------------------------------------------------------
ACCESSORIES FOR THE PIECE:

KNITTING GAUGE:
21 stitches in width and 28 rows in height with stockinette stitch = 4" x 4" (10 x 10 cm).

DROPS DOUBLE POINTED NEEDLES AND CIRCULAR NEEDLE SIZE 4 MM / US 6: length 40 cm and 80 cm /16" and 32" for stockinette stitch.
DROPS DOUBLE POINTED NEEDLES AND CIRCULAR NEEDLE SIZE 3.5 MM / US 4: length 40 cm and 80 cm/16" and 32" for garter stitch edges.
The needle size is only a guide. If you get too many stitches on 10 cm / 4", change to a larger needle size. If you get too few stitches on 10 cm / 4", change to a smaller needle size.

-------------------------------------------------------

Color combination shown is:
A) DROPS Sky 19.

-------------------------------------------------------

Alternative Yarn – See how to change yarns here
Yarn Groups A to F – Use the same pattern and change the yarn here
Yarn usage using an alternative yarn – Use our yarn converter here

-------------------------------------------------------

DROPS Sky
DROPS Sky
74% Alpaca, 18% Polyamide, 8% Wool
from 7.20 $ /50g
Get the yarn to make this pattern from 43.20$.

The yarn cost is calculated from the pattern’s smallest size and the yarn’s cheapest product type. Looking for an even better price? You might find it on the DROPS Deals!

Pattern instructions

NOTE: This pattern is written in American English. All measurements in charts are in cm. For conversion from inches to cm - click here. There are different terms for crocheting in American and British English. If this pattern includes crochet, click for "crochet terms" here. For this pattern in British English, please click here.
-------------------------------------------------------

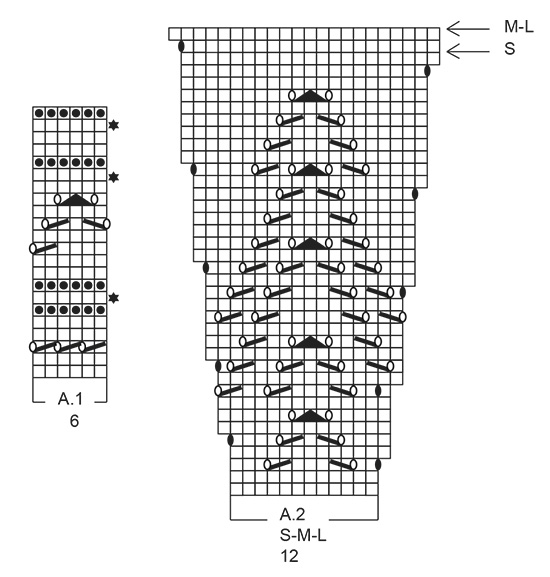
EXPLANATIONS FOR THE PIECE:

-------------------------------------------------------

RIDGE/GARTER STITCH (worked in the round):
1 ridge = 2 rounds. Knit 1 round and purl 1 round.

PATTERN: 
See diagrams A.1 and A.2. Choose diagram for your size.

ELEVATION (for back of neck):
The elevation is worked in garter stitch. Insert 1 marker at the start of the round (= approx. mid back). Start from the right side and knit as far as 7-8-8-9-9-10 stitches past the marker thread, turn, tighten the strand and knit 14-16-16-18-18-20 stitches back. Turn, tighten the strand and knit 21-24-24-27-27-30 stitches, turn, tighten the strand and knit 28-32-32-36-36-40 stitches back. Turn, tighten the strand and knit 35-40-40-45-45-50 stitches, turn, tighten the strand and knit 42-48-48-54-54-60 stitches back. Turn, tighten the strand and knit 49-56-56-63-63-70 stitches back, turn, tighten the strand and knit to marker thread. 
INCREASE TIP-1 (evenly spaced):
To work out how to increase evenly, count the total number of stitches on the needle (e.g. 92 stitches) and divide these stitches by the number of increases to be made (e.g. 22) = 4.18. 
In this example, increase by making 1 yarn over after approx. each 4th stitch. On the next round, work the yarn overs twisted to avoid holes.

INCREASE TIP-2 (for sides of body):
All increases are made from the right side.
Work until there are 2 stitches left before the marker thread, 1 yarn over, knit 4 stitches (the marker thread sits in the middle of these stitches) 1 yarn over.
On the next round work the yarn overs twisted to avoid holes. Then work the new stitches in stockinette stitch

DECREASE TIP-1 (for sleeves): 
Decrease 1 stitch on each side of the marker thread as follows: Work until there are 3 stitches left before the marker thread, knit 2 together, knit 2 (marker thread sits in the middle of these stitches), slip 1 as if to knit, knit 1, pass the slipped stitch over the knitted stitch.

-------------------------------------------------------

START THE PIECE HERE:

-------------------------------------------------------

SWEATER - SHORT OVERVIEW OF THE PIECE:
The piece is worked in the round, top down with circular needle as far as the armholes, then the body and sleeves are finished separately. The body is continued in the round with circular needle. The sleeves are worked in the round with double pointed needles.

YOKE:
Cast on 92-96-100-108-112-118 stitches with circular needle size 3.5 mm / US 4 and Sky. Work 2 RIDGES – read description above.
Knit 1 round and increase 22-24-26-24-26-26 stitches evenly on round – read INCREASE TIP-1 = 114-120-126-132-138-144 stitches. Purl 1 round.
Change to circular needle size 4 mm / US 6.
For a better fit, you can now work an elevation in the back of the neck so that the yoke is slightly higher at the back. This elevation can be left out; the neck will then be the same front and back – read ELEVATION.
Work A.1 (= 6 stitches) over all stitches (= a total of 19-20-21-22-23-24 times in width).
On each round with a star (= increase round) work as follows:
REMEMBER THE GAUGE!
INCREASE 1: Increase 24-24-24-24-30-30 stitches evenly on round = 138-144-150-156-168-174 stitches. A.1 is then repeated 23-24-25-26-28-29 times in width.
INCREASE 2: Increase 18-18-24-24-24-30 stitches evenly on round = 156-162-174-180-192-204 stitches. A.1 is then repeated 26-27-29-30-32-34 times in width.
INCREASE 3: Increase 12-18-18-24-24-24 stitches evenly on round = 168-180-192-204-216-228 stitches. A.1 is then repeated 28-30-32-34-36-38 times in width.
When A.1 has been worked 1 time in height the piece measures approx. 8 cm / 3⅛" from the cast-on edge.
Work A.2 (= 12 stitches) over all stitches (= 14-15-16-17-18-19 times in width).
When A.2 has been worked 1 time in height there are 294-330-352-391-414-437 stitches on the needle.
The piece measures approx. 21-22-22-24-24-24 cm / 8 ¼"-8⅝"-8⅝"-9⅜"-9⅜"-9⅜". Continue in the round with stockinette stitch until the piece measures 21-23-24-26-28-29 cm / 8 ¼"-9"-9⅜"-10 ¼"-11"-11⅜" from the cast-on edge. Now divide the piece for body and sleeves as follows:
Work stockinette stitch over the first 42-47-49-57-62-66 stitches, place the next 64-72-78-82-84-88 stitches on a thread for sleeve and cast on 8-8-10-10-12-12 stitches under the sleeve, work stockinette stitch over the next 83-93-98-114-123-130 stitches, place the next 64-72-78-82-84-88 stitches on a thread for sleeve and cast on 8-8-10-10-12-12 stitches under the sleeve, work 41-46-49-56-61-65 stitches stockinette stitch = 182-202-216-247-270-285 stitches.

BODY:
Insert 1 marker thread in the middle of the 8-8-10-10-12-12 stitches under each sleeve.
Work stockinette stitch. When the piece measures 2 cm / ¾" from where the body was divided from the sleeves, increase 1 stitch on each side of both marker threads – read INCREASE TIP-2.
Increase like this every 2-2-2-3-3-2 cm / ¾"-¾"-¾"-1⅛"-1⅛"-¾" a total of 11-11-11-9-9-12 times = 226-246-260-283-306-333 stitches. Continue with stockinette stitch until the piece measures 30-30-31-31-31-32 cm / 11 ¾"-11 ¾"-12⅛"-12⅛"-12⅛"-12 ½" from where the body was divided from the sleeves. Change to circular needle size 3.5 mm / US 4 and work garter stitch until the piece measures 32-32-33-33-33-34 cm / 12 ½"-12 ½"-13"-13"-13"-13⅜" from where the body was divided from the sleeves. Bind off with knit. The piece measures approx. 56-58-60-62-64-66 cm / 22"-22¾"-23⅝"-24⅜"-25¼"-26" from the shoulder down.

SLEEVE:
Place the 64-72-78-82-84-88 stitches from the thread on the one side of the piece on double pointed needles size 4 mm / US 6 and knit up 1 stitch in each of the 8-8-10-10-12-12 stitches under the sleeve = 72-80-88-92-96-100 stitches. Insert 1 marker thread in the middle of the 8-8-10-10-12-12 stitches under the sleeve. Work stockinette stitch in the round.
When the piece measures 3 cm / 1", decrease 1 stitch on each side of the marker thread - read DECREASE TIP-1. Decrease like this every 2½-2-1½-1½-1½-1½ cm a total of 13-16-19-19-20-21 times = 46-48-50-54-56-58 stitches. When the piece measures 42-41-40-39-37-36 cm / 16 ½"-16⅛"-15 ¾"-15 ¼"-14 ½"-14⅛" from where the sleeve was divided from the body, change to double pointed needles size 3.5 mm / US 4 and work 3 RIDGES in the round - see description above. Then bind off with knit. The sleeve measures a total of 65-66-66-67-67-67 cm / 25 ½"-26"-26"-26⅜"-26⅜"-26⅜" from the cast-on edge. Work the other sleeve in the same way.

Diagram

All measurements in charts are in cm.

symbols = knit
symbols = purl
symbols = knit 2 together
symbols = slip 1 stitch as if to knit, knit 1, pass the slipped stitch over the knitted stitch
symbols = between 2 stitches make 1 yarn over
symbols = between 2 stitches make 1 yarn over; the yarn over is worked twisted on the next round to avoid a hole
symbols = slip 1 stitch as if to knit, knit 2 together, pass the slipped stitch over the knitted together stitches
symbols = increase round; on this round increase stitches evenly, see description in text
diagram
diagram
diagram

Each of our patterns has specific tutorial videos to help you.

Do you have a question? See a list of frequently asked questions (FAQ)

Knitting tension is what determines the final measurements of your work, and is usually measured per 10 x 10 cm. It is provided like so: number of stitches in width x number of rows in height - eg: 19 stitches x 26 rows = 10 x 10 cm.

The knitting tension is very individual; some people knit/crochet loosely while others work tightly. You adjust the knitting tension with the needle size, which is why the suggested needle size only serve as a guide! You need to adjust this (up or down) to ensure that YOUR knitting tension matches the knitting tension provided in the pattern. If you work with a different knitting tension than provided you will have a different yarn consumption, and your work will have different measurements than what the pattern suggests.

The knitting tension also determines which yarns can replace each other. As long as you achieve the same knitting tension you can replace one yarn with another.

See DROPS lesson: How to measure your tension/gauge

See DROPS video: How to make a gauge tension swatch

The required amount of yarn is provided in grams, eg: 450 g. To calculate how many balls you’ll need you first need to know how many grams are in 1 ball (25g, 50g or 100g). This information is available if you click on the individual yarn quality on our pages. Divide the amount required with the amount of each ball. For example, if each ball is 50g (the most common amount), the calculation will be as follows: 450 / 50 = 9 balls.

The important thing when changing from one yarn to another is that the knitting/crochet tension remains the same. This is so that the measurements of the finished piece will be the same as on the sketch provided. It is easier to achieve the same knitting tension using yarns from the same yarn group. It is also possible to work with multiple strands of a thinner yarn to achieve the knitting tension of a thicker one. Please try our yarn converter. We recommend you to always work a test swatch.

Please NOTE: when changing yarn the garment might have a different look and feel to the garment in the photo, due to individual properties and qualities of each yarn.

See DROPS lesson: Can I use a different yarn than the one mentioned in the pattern?

All our yarns are categorised into yarn groups (from A to F) according to thickness and knitting tension – group A contains the thinnest yarns and group F the thickest. This makes it easier for you to find alternative yarns to our patterns, should you wish to switch yarn. All yarns within the same group have a similar knitting tension and can easily replace each other. However, different yarn qualities have different structures and properties which will give the finished work a unique look and feel.

Click here for an overview of the yarns in each yarn group

At the top of all our patterns you’ll find a link to our yarn converter, which is a helpful tool should you wish to use a different yarn than suggested. By filling in the yarn quality you wish to replace, the amount (in your size) and number of strands, the converter will present good alternative yarns with the same knitting tension. Additionally it will tell you how much you’ll require in the new qualities and whether you’ll need to work with multiple strands. Most skeins are 50g (some are 25g or 100g).

If the pattern is worked with multiple colours, every colour will have to be converted separately. Similarly, if the pattern is worked with several strands of different yarns (for example 1 strand Alpaca and 1 strand Kid-Silk) you will have to find alternatives for each, individually.

Click here to see our yarn converter

Since different yarns have different qualities and textures we have chosen to keep the original yarn in our patterns. However, you can easily find options among our available qualities by using our yarn converter, or simply pick a yarn from the same yarn group.

It is possible that some retailers still have discontinued yarns in stock, or that someone has a few skeins at home that they would like to find patterns for.

The yarn converter will provide both alternative yarn as well as required amount in the new quality.

If you think it's hard to decide what size to make, it can be a good idea to measure a garment you own already and like the size of. Then you can pick the size by comparing those measures with the ones available in the pattern's size chart.

You'll find the size chart at the bottom of the pattern.

See DROPS lesson: How to read size chart

The needle size provided in the pattern serves only as a guide, the important thing is to follow the knitting tension. And since knitting tension is very individual, you will have to adjust the needle size to ensure that YOUR tension is the same as in the pattern – maybe you’ll have to adjust 1, or even 2 needle sizes, up or down to achieve the correct tension. For this, we recommend that you work test swatches.

Should you work with a different knitting tension than the one provided, the measurements of the finished garment might deviate from the measurement sketch.

See DROPS lesson: How to measure your tension/gauge

See DROPS video: How to make a gauge tension swatch

Working a garment top-down provides more flexibility and room for personal adjustment. For example it is easier to try the garment on while working, as well as making adjustments to length of yoke and shoulder caps.

The instructions are carefully explaining every step, in the correct order. Diagrams are adjusted to the knitting direction and are worked as usual.

The diagram depicts all rows/rounds, and every stitch seen from the right side. It is read from bottom to top, from right to left. 1 square = 1 stitch.

When working back and forth, every other row is worked from the right side and every other row is worked from the wrong side. When working from the wrong side, the diagram will have to be worked reversed: from left to right, knit stitches are purled, purl stitches are knit etc.

When working in the round every round is worked from the right side and the diagram are worked from right to left on all rounds.

See DROPS lesson: How to read knitting diagrams

The diagram depicts all rows/rounds, and every stitch seen from the right side. It is worked from bottom to top, from right to left.

When working back and forth every other row is worked from the right side: from right to left and every other row is worked from the wrong side: from left to right.

When working in the round, every row in the diagram are worked from the right side, from right to left.

When working a circular diagram you start in the middle and work your way outwards, counter clockwise, row by row.

The rows usually start with a given number of chain stitches (equivalent to the height of the following stitch), this will either be depicted in the diagram or explained in the pattern.

See DROPS lesson: How to read crochet diagrams

Instructions for working several diagrams after each other on the same row/round, will often be written like so: “work A.1, A.2, A.3 a total of 0-0-2-3-4 times". This means you work A.1 once, then A.2 is worked once, and A.3 is repeated (in width) the number of times provided for your size – in this case like so: S = 0 times, M = 0 times, L=2 times, XL= 3 times and XXL = 4 times.

The diagrams are worked as usual: begin with the first row in A.1, then work the first row in A.2 etc.

See DROPS lesson: How to read knitting diagrams

See DROPS lesson: How to read crochet diagrams

The total width of the garment (from wrist-to-wrist) will be larger in the larger sizes, despite the actual sleeves being shorter. The larger sizes have longer sleeve caps and wider shoulders, so there will be a good fit in all sizes.

The measurement sketch/schematic drawing provides information regarding the full length of the garment. If it’s a jumper or a jacket the length is measured from the highest point on the shoulder (usually closest to the neckline), and straight down to the bottom of the garment. It is NOT measured from the tip of shoulder. Similarly, the length of yoke is measured from the highest point on the shoulder and down to where yoke is split into body and sleeves.

See DROPS lesson: How to read a schematic drawing

Diagrams are often repeated on the round or in height. 1 repeat is the diagram the way it appears in the pattern. If it says to work 5 repeats of A.1 in the round, then you work A.1 a total of 5 times after/next to each other in the round. If it says to work 2 repeats of A.1 vertically/in height you work the entire diagram once, then begin again at the start and work the entire diagram one more time.

Chain stitches are slightly narrower than other stitches and to avoid working the cast-on edge too tight, we simply chain more stitches to begin with. The stitch count will be adjusted on the following row to fit the pattern and measurement sketch.

The rib edge is more elastic and will contract slightly compared to, for example, stocking stitch. By increasing before the rib edge, you avoid a visible difference in width between the rib edge and the rest of the body.

It’s very easy to cast off too tightly, and by making yarn overs while casting off (and simultaneously casting these off) you avoid a too tight cast off edge.

See DROPS video: How to bind off with yarn overs (yo)

To achieve an even increase (or decrease) you can increase on, for example: every 3rd and 4th row alternately, like so: work 2 rows and increase on the 3rd row, work 3 rows and increase on the 4th. Repeat this until the increase is complete.

See DROPS lesson: Increase or decrease 1 st on every 3rd and 4th row alternately

Should you prefer to work in the round instead of back and forth, you may of course adjust the pattern. You’ll need to add steeks mid-front (usually 5 stitches), and follow the instructions. When you would normally turn and work from the wrong side, simply work across the steek and continue in the round. At the end you’ll cut the piece open, pick up stitches to work bands, and cover the cut edges.

See DROPS video: How to knit steeks and cut open

Should you prefer to work back and forth instead of in the round, you may of course adjust the pattern so you work the pieces separately and then assemble them at the end. Divide the stitches for the body in 2, add 1 edge stitch in each side (for sewing) and work the front and back pieces separately.

See DROPS lesson: Can I adapt a pattern for circular needles into straight needles?

Pattern repeats can vary slightly in the different sizes, in order to get the correct proportions. If you’re not working the exact same size as the garment in the photo, yours might deviate slightly. This has been carefully developed and adjusted so that the complete impression of the garment is the same in all sizes.

Make sure to follow instructions and diagrams for your size!

If you have found a pattern you like which is available in women’s size it’s not very difficult to convert it to men’s size. The biggest difference will be the length of sleeves and body. Start working on the women size that you think would fit across the chest. The additional length will be worked right before you cast off for the armhole/sleeve cap. If the pattern is worked top-down you can add the length right after the armhole or before the first decrease on sleeve.

Regarding additional yarn amount, this will depend on how much length you add, but it is better with a skein too many than too few.

All yarns will have excess fibres (from production) that might come off as lint or shedding. Brushed yarns (ie hairier yarns) have more of these loose, excess fibres, causing more shedding.

Shedding also depends on what is worn under or over the garment, and whether this pulls at the yarn fibres. It’s therefore not possible to guarantee that there will be no shedding

Below are some tips on how to get the best result when working with hairier yarns:

1. When the garment is finished (before you wash it) shake it vigorously so the looser hairs come off. NOTE: do NOT use a lint roller, brush or any method that pulls at the yarn.

2. Place the garment in a plastic bag and put it in your freezer - the temperature will cause the fibres to become less attached to each other, and excess fibres will come off easier.

3. Leave in the freezer for a few hours before taking it out and shaking it again.

4. Wash the garment according to the instructions on the yarn label.

Pilling is a natural process that happens to even the most exclusive of fibers. It's a natural sign of wear and tear that is hard to avoid, and that is most visible in high friction areas of your garment like a sweater's arms and cuffs.

You can make your garment look as new by removing the pilling, using a fabric comb or a pill/lint remover.

Still can't find the answer you need? Then scroll down and leave your question so one of our experts can try to help you. This will be done normally within 5 to 10 working days.
In the meantime, you can read the questions and answers that others have left to this pattern or join the DROPS Workshop on Facebook to get help from fellow knitters/crocheters!

You might also like...

Agnes Sweater

Marieann-, Germany

Agnes Sweater

Jette, Denmark

Agnes Sweater

Monika Martinson, Sweden

Post a comment to pattern DROPS 197-16

We would love to hear what you have to say about this pattern!

If you want to leave a question, please make sure you select the correct category in the form below, to speed up the answering process. Required fields are marked *.

Comments / Questions (57)

country flag Valérie wrote:

Bonjour, il est indiqué au tout début de tricoter 2 côtes mousses, hors sur la photo, on voit clairement 1 côte mousse. S'agit il d'une erreur dans les explications ? Merci.

31.03.2020 - 19:23

DROPS Design answered:

Bonjour Valérie, ce modèle commence bien par 2 côtes mousse, toutefois, vous pouvez n'en faire qu'une seule si vous préférez. Bon tricot!

01.04.2020 - 08:15

country flag Perezvv wrote:

Je ne trouve pas où se trouvent les explications en français Merci pour votre aide

15.03.2020 - 00:54

DROPS Design answered:

Bonjour Mme Perezvv, tous nos modèles sont disponibles en français, cliquez sur le menu déroulant sous la photo et sélectionnez "français" dans la liste. Bon tricot!

16.03.2020 - 09:51

country flag Ingunn Hodø wrote:

Strikker Agnes genser til voksen, str S. Finnes det rettelser til ermestrikk? Ermlengde er lengst på minste størrelse, og med 3 riller blir de Ca 20-30 cm lengre.

01.03.2020 - 19:50

DROPS Design answered:

Hei Ingunn. Kortere mål i de større størrelsene pga bredere skuldervidde. Usikker på hva du mener med 3 riller så blir de ca 20-30 cm lengre. 1 rille = 1 omgang rett og 1 omgang vrang (3 riller = 6 omganger). I oppskriften står det: Når ermet måler 42-41-40-39-37-36 cm fra der ermet ble DELT FRA BOLEN,..... Neste gang det henviser til et mål er det fra OPPLEGGSKANTEN. mvh DROPS design

02.03.2020 - 13:40

country flag Genevieve Charlier wrote:

Bonjour que signifie fil groupe b pour le convertisseur il faut indiquer fil 1 ou 2 etc la laine sky comme pour le modele je ne sais pas merci encore de vos reponses

15.11.2019 - 10:07

DROPS Design answered:

Bonjour Mme Charlier, vous trouverez ici comment utiliser notre convertisseur; DROPS Sky appartient au groupe B de nos fils; Ce pull se tricote avec 1 seul fil DROPS Sky, laissez "1 fil" par défaut dans le convertisseur et cliquez sur "Trouver des alternatives" pour voir la quantité nécessaire dans les différentes suggestions. Bon tricot!

15.11.2019 - 11:43

country flag Genevieve Charlier wrote:

Bonjour je cherche d autres modeles comme celui ci sans couture que j ai eu du plaisir a faire et surtout a decouvrir les methodes d aiguilles circulaires avez vous d autres patrons gratuits avec de la laine indigo je n en trouve pas merci

12.11.2019 - 19:00

DROPS Design answered:

Bonjour Mme Charlier, vous trouverez ici tous nos modèles tricotés en top down, qui sont généralement réalisés ainsi. N'hésitez pas à contacter directement votre magasin DROPS pour toute aide au choix d'une couleur. Bon tricot!

13.11.2019 - 08:45

country flag Genevieve Charlier wrote:

Bonjour dans les graphiques il y a les jetes blancs et des jetes noirs pourquoi sont ils distingues puisqu au rang d apres on fait des mailles torses pour le premier graphique j ai excecute a chaque jete des mailles torses comme s est precise pour chaque augmentationfaite par un jete au rang precedent est ce que je me suis trompee ou ai je mal interprete merci

19.09.2019 - 16:43

DROPS Design answered:

Bonjour Mme Charlier, les jetés noirs se tricotent torse au tour suivant (= ils ne doivent pas former de trous) alors que les jetés blancs vont se tricoter normalement au tour suivant = ils appartiennent au point ajouré. Bon tricot!

20.09.2019 - 08:24

country flag Genevieve Charlier wrote:

Bonjour surtout merci car il est tres agreable d etre suivie et conseillee votre reponse confirme ce que je pensais mais je n etais pas sure de ma realisation grace a vous c est au top merci mille fois d etre a l ecoute surtout de prendre la peine de nous lire

14.09.2019 - 18:33

country flag Charlier wrote:

Bonjour je comprends toutes les explications generales sauf le plus simple comme les cotes mousse =2tours pour moi les cotes peuvent alterner une maille endroit et une maille envers ou deux mailles de chaque mais que veut dire 2 tours et que veut dire tricoter un tour que cela soit a l endroit ou a l envers merci de m eclaicir

12.09.2019 - 18:39

DROPS Design answered:

Bonjour Mme Charlier, quand on tricote en rond, le point mousse et le jersey ne vont pas se tricoter comme quand on les tricote en rangs. Pour le point mousse en rond, on va devoir alterner 1 tour endroit, 1 tour envers pour obtenir 1 côte mousse (que l'on obtient en rangs par 2 rangs endroit). Cette vidéo montre comment tricoter du point mousse en rond. Pour tricoter du jersey en rond, on va tricoter tous les rangs à l'endroit - cf vidéo. Bon tricot!

13.09.2019 - 08:20

country flag Mandrillon wrote:

Bonjour, J'ai commencé ce modèle et je voudrais savoir si il n'est pas possible pour le diagramme n°2 de faire les augmentations dans le rang en jersey endroit, (sans jeté) ce sui serait plus facile pour faire le point dentelle sans erreur. Vous remerciant de votre réponse, Bien cordialement, J. M

16.08.2019 - 08:48

DROPS Design answered:

Bonjour Mme Mandrillon, les augmentations dans A.2 sont placées de sorte qu'elles n'interfèrent pas dans le point ajouré, à intervalles réguliers en hauteur pour donner la forme souhaitée. Dans les premiers tours, veillez bien à ce que les jetés en noir soient tricotés torse et les autres à l'endroit pour éviter des trous supplémentaires. Bon tricot!

16.08.2019 - 09:33

country flag Detlev wrote:

Hallo, nachdem ich A.2einmal in der Höhe gestrickt habe, Hab ich 308 Maschen anstatt der von Ihnen beschriebenen 294. Wo liegt denn mein Fehler?

27.06.2019 - 21:52

DROPS Design answered:

Lieber Detlev, in der 1. Größe soll die letzte Reihe die mit dem Pfeil sein, dh die 2 letzten Reihen im Diagram strickt man nicht in diese Größe so haben Sie 12 M + 9 Zunahmen in jedem A.2 = 21 M in jedem A.2 x 14 Rapporte = 294 M. Viel Spaß beim stricken!

28.06.2019 - 06:34