DROPS Alpaca
DROPS Alpaca
100% Alpaca
from 3.40 £ /50g
Get the yarn to make this pattern from 47.60£.

The yarn cost is calculated from the pattern’s smallest size and the yarn’s cheapest product type. Looking for an even better price? You might find it on the DROPS Deals!

DROPS SS24

Fading Sunset

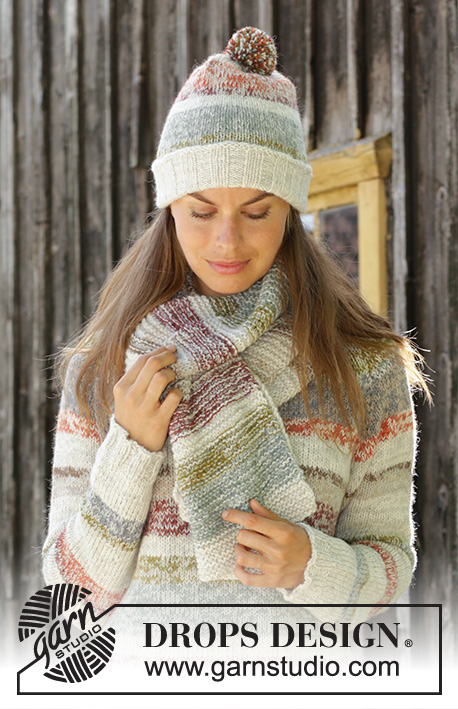
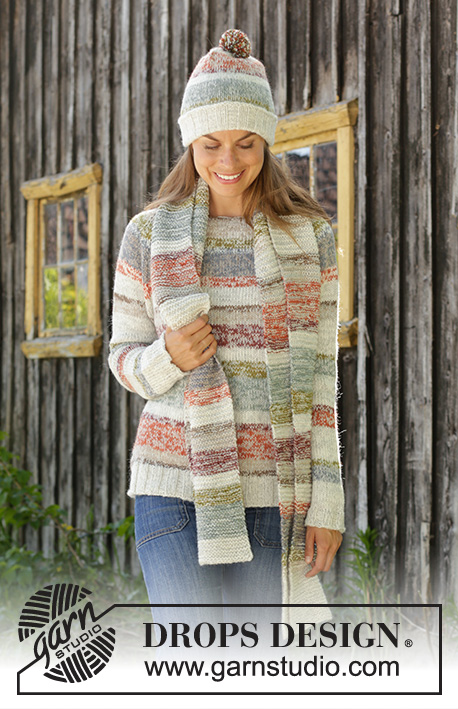
Knitted jumper in 2 strands DROPS Alpaca or 1 thread Nepal. The piece is worked top down with raglan and stripe. Sizes S - XXXL. Knitted hat in 2 strands DROPS Alpaca. The piece is worked with turn-up, stripes and pom pom. Knitted scarf in 2 strands DROPS Alpaca. The piece is worked with garter stitch and stripes.

DROPS 197-7
DROPS Design: Pattern no z-830
Yarn group A + A or C
-------------------------------------------------------

YARN FOR JUMPER:
Sizes: S - M - L - XL - XXL - XXXL
Materials:
DROPS ALPACA from Garnstudio (belongs to yarn group A)
200-250-250-300-300-350 g colour 9020, light pearl grey
150-150-150-150-200-200 g colour 100, off white
50-50-50-50-100-100 g colour 2020, light camel
50-50-50-50-50-50 g colour 607, light brown
50-50-50-50-50-50 g colour 2925, rust
50-50-50-50-50-50 g colour 5565, light maroon
50-50-50-50-50-50 g colour 8120, denim/green
50-50-50-50-50-50 g colour 7233, olive
50-50-50-50-50-50 g colour 7323, aqua grey

Or use:
DROPS NEPAL from Garnstudio (belongs to yarn group C)
250-300-300-350-350-400 g colour 0500, light grey
100-100-100-100-100-100 g colour 300, beige
100-100-100-100-100-100 g colour 312, medium brown
100-100-100-100-100-100 g colour 2920, orange
100-100-100-100-100-100 g colour 3608, deep red
100-100-100-100-100-100 g colour 7139, grey green
100-100-100-100-100-100 g colour 8038, light olive
100-100-100-100-100-100 g colour 7120, light grey green

YARN FOR HAT:
Sizes: S/M - M/L
Fits head size: approx. 54/56 - 56/58 cm
Materials:
DROPS ALPACA from Garnstudio (belongs to yarn group A)
50-50 g colour 9020, light pearl grey
50-50 g colour 100, off white
50-50 g colour 2020, light camel
50-50 g colour 607, light brown
50-50 g colour 2925, rust
50-50 g colour 5565, light maroon
50-50 g colour 7233, olive
50-50 g colour 7323, aqua grey

YARN FOR SCARF:
Measurements: approx. 30 x 160 cm.
Materials:
DROPS ALPACA from Garnstudio (belongs to yarn group A)
100 g colour 9020, light pearl grey
100 g colour 100, off white
100 g colour 8120, denim/green
50 g colour 2020, light camel
50 g colour 607, light brown
50 g colour 2925, rust
50 g colour 5565, light maroon
50 g colour 7233, olive
50 g colour 7323, aqua grey

-------------------------------------------------------
ACCESSORIES FOR THE PIECE:

JUMPER:

KNITTING TENSION:
16 stitches in width and 20 rows in height with stocking stitch and 2 strands Alpaca or 1 strand Nepal = 10 x 10 cm.

NEEDLES:
DROPS DOUBLE POINTED NEEDLES AND CIRCULAR NEEDLE SIZE 5.5 MM: length 40 cm and 80 cm for stocking stitch.
DROPS DOUBLE POINTED NEEDLES AND CIRCULAR NEEDLE SIZE 4.5 MM: length 40 cm and 80 cm for rib.
The needle size is only a guide. If you get too many stitches on 10 cm, change to a larger needle size. If you get too few stitches on 10 cm, change to a smaller needle size.

HAT:

KNITTING TENSION:
18 stitches in width and 23 rows in height with stocking stitch and 2 strands = 10 x 10 cm.

NEEDLES:
DROPS DOUBLE POINTED NEEDLES AND CIRCULAR NEEDLE SIZE 4.5 MM: length 40 cm for stocking stitch.
DROPS CIRCULAR NEEDLE SIZE 3.5 MM: length 40 cm for rib.
The needle size is only a guide. If you get too many stitches on 10 cm, change to a larger needle size. If you get too few stitches on 10 cm, change to a smaller needle size.

SCARF:

KNITTING TENSION:
16 stitches in width and 30 rows in height with garter stitch and 2 strands = 10 x 10 cm.

NEEDLES:
DROPS NEEDLES SIZE 5.5 MM.
The needle size is only a guide. If you get too many stitches on 10 cm, change to a larger needle size. If you get too few stitches on 10 cm, change to a smaller needle size.
-------------------------------------------------------

-------------------------------------------------------

Alternative Yarn – See how to change yarns here
Yarn Groups A to F – Use the same pattern and change the yarn here
Yarn usage using an alternative yarn – Use our yarn converter here

-------------------------------------------------------

DROPS Alpaca
DROPS Alpaca
100% Alpaca
from 3.40 £ /50g
Get the yarn to make this pattern from 47.60£.

The yarn cost is calculated from the pattern’s smallest size and the yarn’s cheapest product type. Looking for an even better price? You might find it on the DROPS Deals!

Pattern instructions

NOTE: This pattern is written in British English. All measurements in charts are in cm. For conversion from cm to inches - click here. There are different terms for crocheting in British and American English. If this pattern includes crochet, click for "crochet terms" here. For this pattern in American English, please click here.
-------------------------------------------------------
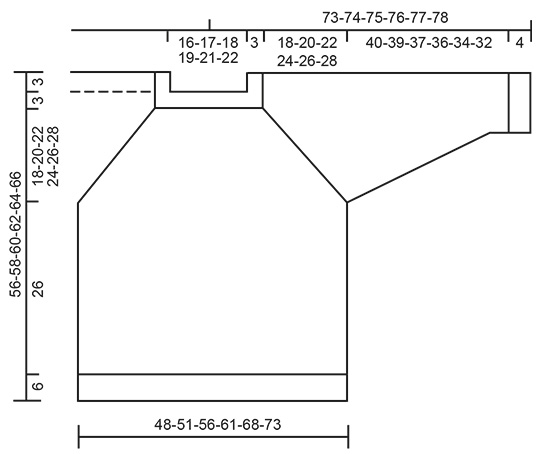
EXPLANATIONS FOR THE PATTERN:
-------------------------------------------------------

RIDGE/GARTER STITCH (worked back and forth):
1 ridge = Knit 2 rows.

INCREASE TIP (evenly spaced):
To work out how to increase evenly, count the total number of stitches on the needle (e.g. 78 stitches) and divide by the number of increases to be made (e.g. 26) = 3.
In this example, increase by making 1 yarn over after every 3rd stitch. On the next round, knit the yarn overs twisted to avoid holes.

RAGLAN:
Increase to raglan on each side of the 4 marker threads as follows: Start 1 stitch before the stitch with the marker thread, make 1 yarn over, knit 3 (the marker thread sits in the middle stitch of the 3), make 1 yarn over (= 2 stitches increased).
On the next round knit the yarn overs twisted to avoid holes. The new stitches are then worked in stocking stitch

DECREASE TIP-1 (for sleeves): 
Decrease 1 stitch on each side of the marker thread as follows: Work until there are 3 stitches left before the marker thread, knit 2 together, knit 2 (the marker thread sits between these 2 stitches), slip 1 stitch as if to knit, knit 1, pass the slipped stitch over the knitted stitch (= 2 stitches decreased).

DECREASE TIP-2 (for top of hat):
Start after the marker thread and work as follows: Slip 1 stitch as if to knit, knit 1, pass the slipped stitch over the knitted stitch (= 1 stitch decreased).

STRIPES YOKE:
The stripes are given in cm, but if the knitting tension is correct in height you can work twice as many rounds as given in cm (2 cm = 4 rounds, 3 cm = 6 rounds etc).
All stripes are worked in stocking stitch with 2 strands Alpaca or 1 stransd Nepal:
2-3-3-3-4-4 cm with off white and light camel Alpaca / beige Nepal
2-2-2-2-2-3 cm with off white and olive Alpaca / light olive Nepal
1-1-2-2-2-2 cm with off white and denim/green Alpaca / grey green Nepal
5-5-6-6-6-7 cm with denim/green and light camel Alpaca / grey green Nepal
2-2-2-3-3-3 cm with off white and rust Alpaca / orange Nepal
3-4-4-4-5-5 cm with off white and light pearl grey Alpaca / light grey Nepal
1-1-1-1-1-1 cm with light pearl grey and light brown Alpaca / medium brown Nepal
2-2-2-3-3-3 cm with light pearl grey and light camel Alpaca / beige Nepal

STRIPES BODY:
The given cm measurements are for all sizes and the stripes continue in stocking stitch with 2 strands Alpaca or 1 strand Nepal:
4 cm with light pearl grey and light maroon Alpaca / deep red Nepal
2 cm with light pearl grey and off white Alpaca / light grey Nepal
3 cm with light pearl grey and olive Alpaca / light olive Nepal
6 cm with light pearl grey and aqua grey Alpaca / light grey green Nepal
2 cm with light pearl grey and off white Alpaca / light grey Nepal
1 cm with light pearl grey and light maroon Alpaca / deep red Nepal
5 cm with light pearl grey and rust Alpaca / orange Nepal
2 cm with light pearl grey and light camel Alpaca / beige Nepal
1 cm with light pearl grey and light brown Alpaca / medium brown Nepal

STRIPES SLEEVES:
The stripes continue in stocking stitch with 2 strands Alpaca or 1 strand Nepal:
7-7-7-6-6-5 cm with light pearl grey and off white Alpaca / light grey Nepal
1-1-1-1-1-1 cm with light pearl grey and olive Alpaca / light olive Nepal
4-4-4-4-3-3 cm with light pearl grey and aqua grey Alpaca / light grey green Nepal
7-7-7-6-6-5 cm with light pearl grey and off white Alpaca / light grey Nepal
1-1-1-1-1-1 cm with light pearl grey and light maroon Alpaca / deep red Nepal
4-4-4-4-3-3 cm with light pearl grey and rust Alpaca / orange Nepal
7-7-7-6-6-5 cm with light pearl grey and off white Alpaca / light grey Nepal
1-1-1-1-1-1 cm with off white and olive Alpaca / light olive Nepal
4-4-4-4-3-3 cm with off white and denim/green Alpaca / grey green Nepal
Then work with light pearl grey and off white (= 2 strands Alpaca) or 1 strand light grey to finished length.

STRIPES HAT:
The stripes are given in cm and are for both sizes. If the knitting tension is correct in height, you can work double so many rounds as given in cm (2 cm = 4 rounds, 3 cm = 6 rounds etc).
All stripes are worked in stocking stitch with 2 strands Alpaca:
3 cm with light pearl grey and olive
5 cm with light pearl grey and aqua grey
2 cm with light pearl grey and off white
1 cm with light pearl grey and light maroon
4 cm with light pearl grey and rust
2 cm with light pearl grey and light camel
1 cm with light pearl grey and light brown
Continue with light pearl grey and off white (= 2 strands) to finished length.

STRIPES SCARF:
Stripes are given in cm. All stripes are worked in garter stitch with 2 strands Alpaca as follows:
2 cm with off white and light camel
2 cm with off white and olive
1 cm with off white and denim/green
5 cm with denim/green and light camel
2 cm with off white and rust
3 cm with off white and light pearl grey
1 cm with light pearl grey and light brown
2 cm with light pearl grey and light camel
4 cm with light pearl grey and light maroon
2 cm with light pearl grey and off white
3 cm with light pearl grey and olive
6 cm with light pearl grey and aqua grey
2 cm with light pearl grey and off white
1 cm with light pearl grey and light maroon
5 cm with light pearl grey and rust
2 cm with light pearl grey and light camel
1 cm with light pearl grey and light brown
4 cm with light pearl grey and off white.
Repeat the stripes to finished length.

-------------------------------------------------------

START THE PIECE HERE:

-------------------------------------------------------

JUMPER – SHORT OVERVIEW OF THE WORK:
The yoke and body are worked in the round with circular needle, top down. The sleeves are worked in the round with circular needle/double pointed needles, top down. The whole piece is worked with 2 strands Alpaca or 1 strand i Nepal.

NECK:
Cast on 78-84-84-90-96-102 stitches with short circular needle size 4.5 mm and 1 strand light pearl grey and 1 strand light brown (= 2 strands Alpaca) or 1 strand medium brown Nepal. Knit 1 round. Then work the next round as follows: Knit 2, * purl 3, knit 3 *, work from *-* until there are 4 stitches left on the round, purl 3 and finish with knit 1. Change to 1 strand light pearl grey + 1 strand light camel (= 2 strands Alpaca) or 1 strand beige Nepal and continue the rib. When the neck measures 3 cm knit 1 round where you increase 26-28-28-30-32-34 stitches evenly on round – read INCREASE TIP = 104-112-112-120-128-136 stitches.
Change to circular needle size 5.5 mm. Continue by working yoke as described below.

YOKE:
Insert 4 marker threads for raglan in the piece as follows (without working the stitches): Count 18-20-20-22-24-26 stitches (= ½ back piece), insert 1 marker thread in the next stitch, count 14 stitches (= sleeve), insert 1 marker thread in the next stitch, count 36-40-40-44-48-52 stitches (= front piece), insert 1 marker thread in the next stitch, count 14 stitches (= sleeve), insert 1 marker thread in the next stitch. There are 18-20-20-22-24-26 stitches left on the round after the last marker thread (= ½ back piece).
Work STRIPES YOKE – read description above. REMEMBER THE KNITTING TENSION!
AT THE SAME TIME on the first round begin to increase to RAGLAN – read description above (= 8 stitches increased). Continue to increase to raglan every 2nd round until you have increased a total of 16-18-20-22-24-26 times on each side of the 4 marker threads = 232-256-272-296-320-344 stitches on the needle. Finish working STRIPES YOKE. The piece now measures approx. 21-23-25-27-29-31 cm from the cast-on edge mid front.
On the next round divide the stitches for body and sleeves as follows (continue with the colours in the last stripe): Knit 35-38-41-45-49-53 stitches (= ½ back piece), place the next 46-52-54-58-62-66 stitches on 1 thread for sleeve, cast on 6-6-8-8-10-10 new stitches on the needle (= in side under the sleeve), knit 70-76-82-90-98-106 stitches (= front piece), place the next 46-52-54-58-62-66 stitches on 1 thread for sleeve, cast on 6-6-8-8-10-10 new stitches on needle (= in side under the sleeve) and knit the remaining 35-38-41-45-49-53 stitches (= ½ back piece). Cut the strands. Body and sleeves are finished separately. THE PIECE S NOW MEASURED FROM HERE!

BODY:
= 152-164-180-196-216-232 stitches. Start the round in the middle of the 6-6-8-8-10-10 stitches cast on under the one sleeve. Continue in the round with stocking stitch and STRIPES BODY – read description above. When the piece measures 26 cm from the division (the stripes should now be finished), knit 1 round with the colours in the last stripe and increase 22-28-30-32-36-38 stitches evenly on round = 174-192-210-228-252-270 stitches. Change to circular needle size 4.5 mm and work rib with 1 strand light pearl grey and + 1 strand off white (= 2 strands Alpaca) or 1 strand light grey Nepal as follows: Knit 2, * purl 3, knit 3 *, work from *-* until there are 4 stitches left on the row, purl 3 and finish with knit 1. Continue the rib like this for 6 cm. Then loosely cast off with knit over knit and purl over purl; make sure the cast-off edge is not tight (if it is tight, cast off with a larger needle size).
The jumper measures approx. 56-58-60-62-64-66 cm from the shoulder down.

SLEEVE:
Place the 46-52-54-58-62-66 stitches from the thread on one side of the piece on short circular needle size 5.5 mm and in addition knit up 1 stitch in each of the 6-6-8-8-10-10 stitches cast on under the sleeve = 52-58-62-66-72-76 stitches on the needle. Insert 1 marker thread in the middle of the 6-6-8-8-10-10 stitches (= mid under sleeve). Allow the marker thread to follow your work onwards, it will be used when decreasing mid under sleeve.
Work STRIPES SLEEVE – read description above. AT THE SAME TIME when the piece measures 2-2-3-2-3-3 cm from the division, decrease 2 stitches mid under sleeve - read DECREASE TIP-1. Decrease like this every 4½-3½-3-3-2-2 cm a total of 9-11-11-12-14-14 times = 34-36-40-42-44-48 stitches.
Continue working until the piece measures approx. 40-39-37-36-34-32 cm from the division (the decreases should now be finished). Continue with 1 strand light pearl grey + 1 strand off white (= 2 strands Alpaca) or 1 strand light grey Nepal. Knit 1 round where you increase 2-6-8-6-4-6 stitches evenly on round = 36-42-48-48-48-54 stitches. Change to double pointed needles size 4.5 mm and work rib in the round (= knit 3 / purl 3) for 4 cm. Then loosely cast off with knit over knit and purl over purl; make sure the cast-off edge is not tight (if it is tight, cast off with a larger needle size). The sleeve measures approx. 44-43-41-40-38-36 cm from the division. Work the other sleeve in the same way.

-------------------------------------------------------

HAT – SHORT OVERVIEW OF THE WORK:
The piece is worked in the round with circular needle, bottom up. Change to double pointed needles when necessary. First work rib which is folded up to finish. Then work stripes in stocking stitch. A pom pom is attached to the top.

HAT:
Cast on 90-96 stitches with short circular needle size 3.5 mm and 1 strand off white and 1 strand light pearl grey (= 2 strands). Work rib in the round (= knit 3 / purl 3) for 10-10 cm. Knit 1 round where you decrease 6 stitches evenly on round (in S/M knit together every 14th and 15th stitch and in M/L knit together every 15th and 16th stitch) = 84-90 stitches. Change to circular needle size 4.5 mm and work stocking stitch and STRIPES HAT – read description above. REMEMBER THE KNITTING TENSION!
When the piece measures 25-26 cm from the cast-on edge, insert 6 marker threads (the marker threads will be used when decreasing and are inserted without working the stitches): The first marker thread is inserted at the beginning of the round, then the next 5 marker threads with 14-15 stitches between each one.
On the next round decrease 1 stitch after each marker thread – read DECREASE TIP-2 = 6 stitches decreased. Decrease like this every 2nd round a total of 5 times and then every round a total of 4 times in both sizes = 30-36 stitches left on the needles. Work 2 rounds where all stitches are knitted together 2 and 2 on both rounds = 8-9 stitches left on the needles. Cut the strand, pull it through the remaining stitches, tighten and fasten well. The hat measures approx. 31-32 cm from the top down. Fold up the bottom 5 cm of rib.

POM POM:
Make a pom pom of approx. 4 cm in diameter, with all the colours. Sew the pom pom to the top of the hat.

-------------------------------------------------------

SCARF – SHORT OVERVIEW OF THE WORK:
The piece is worked back and forth on the needle. The whole scarf is worked in garter stitch and stripes.

SCARF:
Cast on 48 stitches with needle size 5.5 mm and 1 strand off white and 1 strand light pearl grey (= 2 strands). Work GARTER STITCH – read description above. REMEMBER THE KNITTING TENSION! When the piece measures 12 cm work STRIPES SCARF. The stripes are repeated until the piece measures approx. 156 cm, or to desired length. Change to 1 strand off white and 1 strand light pearl grey. Work garter stitch for 4 cm. Then loosely cast off with knit from the right side. The scarf measures approx. 160 cm.

Diagram

diagram measurements

Each of our patterns has specific tutorial videos to help you.

Do you have a question? See a list of frequently asked questions (FAQ)

Knitting tension is what determines the final measurements of your work, and is usually measured per 10 x 10 cm. It is provided like so: number of stitches in width x number of rows in height - eg: 19 stitches x 26 rows = 10 x 10 cm.

The knitting tension is very individual; some people knit/crochet loosely while others work tightly. You adjust the knitting tension with the needle size, which is why the suggested needle size is only meant as a guide! You need to adjust this (up or down) to ensure that YOUR knitting tension matches the knitting tension provided in the pattern. If you work with a different knitting tension than provided you will have a different yarn consumption, and your work will have different measurements than what the pattern suggests.

The knitting tension also determines which yarns can replace each other. As long as you achieve the same knitting tension you can replace one yarn with another.

See DROPS lesson: How to measure your tension/gauge

See DROPS video: How to make a gauge tension swatch

The required amount of yarn is provided in grams, eg: 450 g. To calculate how many balls you’ll need you first need to know how many grams are in 1 ball (25g, 50g or 100g). This information is available if you click on the individual yarn quality on our pages. Divide the amount required with the amount of each ball. For example, if each ball is 50g (the most common amount), the calculation will be as follows: 450 / 50 = 9 balls.

The important thing when changing from one yarn to another is that the knitting/crochet tension remains the same. This is so that the measurements of the finished piece will be the same as on the sketch provided. It is easier to achieve the same knitting tension using yarns from the same yarn group. It is also possible to work with multiple strands of a thinner yarn to achieve the knitting tension of a thicker one. Please try our yarn converter. We recommend you to always work a test swatch.

Please NOTE: when changing yarn the garment might have a different look and feel to the garment in the photo, due to individual properties and qualities of each yarn.

See DROPS lesson: Can I use a different yarn than the one mentioned in the pattern?

All our yarns are categorised into yarn groups (from A to F) according to thickness and knitting tension – group A contains the thinnest yarns and group F the thickest. This makes it easier for you to find alternative yarns to our patterns, should you wish to switch yarn. All yarns within the same group have a similar knitting tension and can easily replace each other. However, different yarn qualities have different structures and properties which will give the finished work a unique look and feel.

Click here for an overview of the yarns in each yarn group

At the top of all our patterns you’ll find a link to our yarn calculator, which is a helpful tool should you wish to use a different yarn than suggested. By filling in the yarn quality you wish to replace, the amount (in your size) and number of strands, the calculator will present good alternative yarns with the same knitting tension. Additionally it will tell you how much you’ll require in the new qualities and whether you’ll need to work with multiple strands. Most skeins are 50g (some are 25g or 100g).

If the pattern is worked with multiple colours, every colour will have to be calculated separately. Similarly, if the pattern is worked with several strands of different yarns (for example 1 strand Alpaca and 1 strand Kid-Silk) you will have to find alternatives for each, individually.

Click here to see our yarn calculator

Since different yarns have different qualities and textures we have chosen to keep the original yarn in our patterns. However, you can easily find options among our available qualities by using our yarn calculator, or simply pick a yarn from the same yarn group.

It is possible that some retailers still have discontinued yarns in stock, or that someone has a few skeins at home that they would like to find patterns for.

The yarn calculator will provide both alternative yarn as well as required amount in the new quality.

If you think it's hard to decide what size to make, it can be a good idea to measure a garment you own already and like the size of. Then you can pick the size by comparing those measures with the ones available in the pattern's size chart.

You'll find the size chart at the bottom of the pattern.

See DROPS lesson: How to read size chart

The needle size provided in the pattern serves only as a guide, the important thing is to follow the knitting tension. And since knitting tension is very individual, you will have to adjust the needle size to ensure that YOUR tension is the same as in the pattern – maybe you’ll have to adjust 1, or even 2 needle sizes, up or down to achieve the correct tension. For this, we recommend that you work test swatches.

Should you work with a different knitting tension than the one provided, the measurements of the finished garment might deviate from the measurement sketch.

See DROPS lesson: How to measure your tension/gauge

See DROPS video: How to make a tension/gauge swatch

Working a garment top-down provides more flexibility and room for personal adjustment. For example it is easier to try the garment on while working, as well as making adjustments to length of yoke and shoulder caps.

The instructions are carefully explaining every step, in the correct order. Diagrams are adjusted to the knitting direction and are worked as usual.

The diagram depicts all rows/rounds, and every stitch seen from the right side. It is read from bottom to top, from right to left. 1 square = 1 stitch.

When working back and forth, every other row is worked from the right side and every other row is worked from the wrong side. When working from the wrong side, the diagram will have to be worked reversed: from left to right, knit stitches are purled, purl stitches are knit etc.

When working in the round every round is worked from the right side and the diagram are worked from right to left on all rounds.

See DROPS lesson: How to read knitting diagrams

The diagram depicts all rows/rounds, and every stitch seen from the right side. It is worked from bottom to top, from right to left.

When working back and forth every other row is worked from the right side: from right to left and every other row is worked from the wrong side: from left to right.

When working in the round, every row in the diagram are worked from the right side, from right to left.

When working a circular diagram you start in the middle and work your way outwards, counter clockwise, row by row.

The rows usually start with a given number of chain stitches (equivalent to the height of the following stitch), this will either be depicted in the diagram or explained in the pattern.

See DROPS lesson: How to read crochet diagrams

Instructions for working several diagrams after each other on the same row/round, will often be written like so: “work A.1, A.2, A.3 a total of 0-0-2-3-4 times". This means you work A.1 once, then A.2 is worked once, and A.3 is repeated (in width) the number of times provided for your size – in this case like so: S = 0 times, M = 0 times, L=2 times, XL= 3 times and XXL = 4 times.

The diagrams are worked as usual: begin with the first row in A.1, then work the first row in A.2 etc.

See DROPS lesson: How to read knitting diagrams

See DROPS lesson: How to read crochet diagrams

The total width of the garment (from wrist-to-wrist) will be larger in the larger sizes, despite the actual sleeves being shorter. The larger sizes have longer sleeve caps and wider shoulders, so there will be a good fit in all sizes.

The measurement sketch/schematic drawing provides information regarding the full length of the garment. If it’s a jumper or a jacket the length is measured from the highest point on the shoulder closest to the neckline, and straight down to the bottom of the garment. It is NOT measured from the tip of shoulder. Similarly, the length of yoke is measured from the highest point on the shoulder and down to where yoke is split into body and sleeves.

On a jacket measures are never taken along bands, unless specifically stated. Always measure inside band stitches when measuring the length.

See DROPS lesson: How to read a schematic drawing

Diagrams are often repeated on the round or in height. 1 repeat is the diagram the way it appears in the pattern. If it says to work 5 repeats of A.1 in the round, then you work A.1 a total of 5 times after/next to each other in the round. If it says to work 2 repeats of A.1 vertically/in height you work the entire diagram once, then begin again at the start and work the entire diagram one more time.

Chain stitches are slightly narrower than other stitches and to avoid working the cast-on edge too tight, we simply chain more stitches to begin with. The stitch count will be adjusted on the following row to fit the pattern and measurement sketch.

The rib edge is more elastic and will contract slightly compared to, for example, stocking stitch. By increasing before the rib edge, you avoid a visible difference in width between the rib edge and the rest of the body.

It’s very easy to cast off too tightly, and by making yarn overs while casting off (and simultaneously casting these off) you avoid a too tight cast off edge.

See DROPS video: How to bind off with yarn overs (yo)

To achieve an even increase (or decrease) you can increase on, for example: every 3rd and 4th row alternately, like so: work 2 rows and increase on the 3rd row, work 3 rows and increase on the 4th. Repeat this until the increase is complete.

See DROPS lesson: Increase or decrease 1 st on every 3rd and 4th row alternately

Should you prefer to work in the round instead of back and forth, you may of course adjust the pattern. You’ll need to add steeks mid-front (usually 5 stitches), and follow the instructions. When you would normally turn and work from the wrong side, simply work across the steek and continue in the round. At the end you’ll cut the piece open, pick up stitches to work bands, and cover the cut edges.

See DROPS video: How to knit steeks and cut open

Should you prefer to work back and forth instead of in the round, you may of course adjust the pattern so you work the pieces separately and then assemble them at the end. Divide the stitches for the body in 2, add 1 edge stitch in each side (for sewing) and work the front and back pieces separately.

See DROPS lesson: Can I adapt a pattern for circular needles into straight needles?

Pattern repeats can vary slightly in the different sizes, in order to get the correct proportions. If you’re not working the exact same size as the garment in the photo, yours might deviate slightly. This has been carefully developed and adjusted so that the complete impression of the garment is the same in all sizes.

Make sure to follow instructions and diagrams for your size!

If you have found a pattern you like which is available in women’s size it’s not very difficult to convert it to men’s size. The biggest difference will be the length of sleeves and body. Start working on the women size that you think would fit across the chest. The additional length will be worked right before you cast off for the armhole/sleeve cap. If the pattern is worked top-down you can add the length right after the armhole or before the first decrease on sleeve.

Regarding additional yarn amount, this will depend on how much length you add, but it is better with a skein too many than too few.

All yarns will have excess fibres (from production) that might come off as lint or shedding. Brushed yarns (ie hairier yarns) have more of these loose, excess fibres, causing more shedding.

Shedding also depends on what is worn under or over the garment, and whether this pulls at the yarn fibres. It’s therefore not possible to guarantee that there will be no shedding

Below are some tips on how to get the best result when working with hairier yarns:

1. When the garment is finished (before you wash it) shake it vigorously so the looser hairs come off. NOTE: do NOT use a lint roller, brush or any method that pulls at the yarn.

2. Place the garment in a plastic bag and put it in your freezer - the temperature will cause the fibres to become less attached to each other, and excess fibres will come off easier.

3. Leave in the freezer for a few hours before taking it out and shaking it again.

4. Wash the garment according to the instructions on the yarn label.

Pilling is a natural process that happens to even the most exclusive of fibers. It's a natural sign of wear and tear that is hard to avoid, and that is most visible in high friction areas of your garment like a sweater's arms and cuffs.

You can make your garment look as new by removing the pilling, using a fabric comb or a pill/lint remover.

Still can't find the answer you need? Then scroll down and leave your question so one of our experts can try to help you. This will be done normally within 5 to 10 working days.
In the meantime, you can read the questions and answers that others have left to this pattern or join the DROPS Workshop on Facebook to get help from fellow knitters/crocheters!

You might also like...

Post a comment to pattern DROPS 197-7

We would love to hear what you have to say about this pattern!

If you want to leave a question, please make sure you select the correct category in the form below, to speed up the answering process. Required fields are marked *.

Comments / Questions (16)

country flag Anneke Kleppe wrote:

Ik kan haast niet wachten tot het patroon beschikbaar komt. Heel mooi! Simpel maar elegant.

25.07.2018 - 17:28

country flag Miranda wrote:

Schitterende kleuren. Deze zou ik absoluut willen breien!

15.07.2018 - 11:50

country flag Ines wrote:

Bela combinação de cores! Gosto muito!

12.06.2018 - 15:35

country flag Ingrid wrote:

Love it!

08.06.2018 - 11:25

country flag Sandra Balla wrote:

I love the colours chosen to knit this pattern. I would name it "Strips & Stripes" or even "Candy Canes" My Grand Daughter would love it when she goes skiing. Thank you.

06.06.2018 - 21:57

country flag Chantal wrote:

Un modèle superbe et un choix des coloris de très bon goût. L'ensemble est très classe. Félicitations.

05.06.2018 - 15:26