DROPS Sky
DROPS Sky
74% Alpaca, 18% Polyamide, 8% Wool
from 7.20 $ /50g
Get the yarn to make this pattern from 57.60$.

The yarn cost is calculated from the pattern’s smallest size and the yarn’s cheapest product type. Looking for an even better price? You might find it on the DROPS Deals!

DROPS SS24

Regn

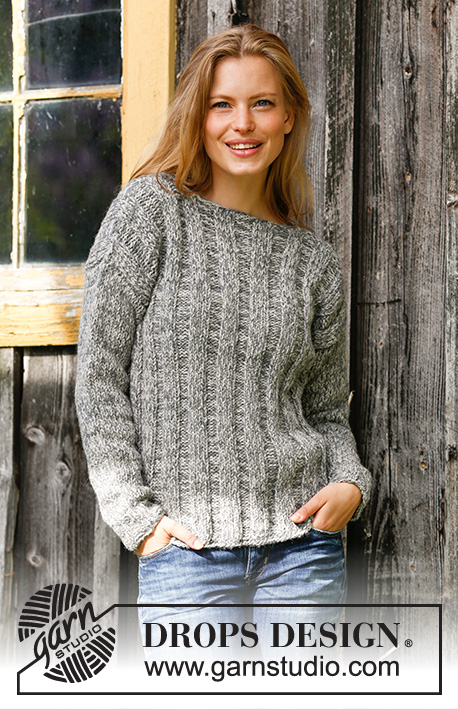
Knitted sweater in 2 strands DROPS Sky. The piece is worked with rib. Sizes S - XXXL.

DROPS 195-20
DROPS Design: Pattern no sk-003
Yarn group B + B or D
-------------------------------------------------------

Sizes: S - M - L - XL – XXL - XXXL
NOTE: The measurements on the sketch can seem a bit small (on body), but because of the pattern the piece will be quite elastic. Work the size you usually use.
Materials:
DROPS SKY from Garnstudio (belongs to yarn group B)
200-250-250-250-300-300 g color 03, light beige
200-250-250-250-300-300 g color 04, gray

-------------------------------------------------------
ACCESSORIES FOR THE PIECE:

KNITTING GAUGE:
14 stitches in width and 16 rows in height with stockinette stitch and 2 strands = 4" x 4" (10 x 10 cm).

NEEDLES:
DROPS DOUBLE POINTED NEEDLES SIZE 6 MM / US 10.
DROPS CIRCULAR NEEDLE SIZE 6 MM / US 10: length 40 cm and 60 cm or 80 cm/16" and 24" or 32" for main body of work.
DROPS DOUBLE POINTED NEEDLES SIZE 5.5 MM/US 9: for rib on sleeves.
The needle size is only a guide. If you get too many stitches on 10 cm / 4", change to a larger needle size. If you get too few stitches on 10 cm / 4", change to a smaller needle size.

-------------------------------------------------------

Alternative Yarn – See how to change yarns here
Yarn Groups A to F – Use the same pattern and change the yarn here
Yarn usage using an alternative yarn – Use our yarn converter here

-------------------------------------------------------

DROPS Sky
DROPS Sky
74% Alpaca, 18% Polyamide, 8% Wool
from 7.20 $ /50g
Get the yarn to make this pattern from 57.60$.

The yarn cost is calculated from the pattern’s smallest size and the yarn’s cheapest product type. Looking for an even better price? You might find it on the DROPS Deals!

Pattern instructions

NOTE: This pattern is written in American English. All measurements in charts are in cm. For conversion from inches to cm - click here. There are different terms for crocheting in American and British English. If this pattern includes crochet, click for "crochet terms" here. For this pattern in British English, please click here.
-------------------------------------------------------

EXPLANATIONS FOR THE PATTERN:

-------------------------------------------------------

DECREASE TIP (evenly spaced):
To work out how to decrease evenly, count the total number of stitches on the needle (e.g. 32 stitches) and divide by the number of decreases to be made (e.g. 2) = 16. In this example, decrease by working each 15th and 16th stitch together.

INCREASE TIP (for sleeves):
Work until there is 1 stitch left before the marker thread, 1 yarn over, knit 2 (the marker thread sits in the middle of these 2 stitches), 1 yarn over. On the next round, knit the yarn overs twisted to avoid holes. Then work the new stitches in stockinette stitch

-------------------------------------------------------

START THE PIECE HERE:

-------------------------------------------------------

SWEATER - SHORT OVERVIEW OF THE PIECE:
The piece is worked in the round with circular needle up to the armholes, then the front and back pieces are finished separately back and forth. The sleeves are worked in the round with double pointed needles/short circular needle.

BODY:
Cast on 160-176-192-208-224-240 stitches with circular needle size 6 mm / US 10 and 1 strand light beige and 1 strand gray (= 2 strands). Knit 1 round. Then work rib as follows: Purl 2, * knit 4, purl 4 *, work from *-* until there are 2 stitches left, purl 2. Continue like this. REMEMBER THE GAUGE! When the piece measures 37-38-39-40-41-42 cm / 14½"-15"-15¼"-15¾"-16⅛"-16½" work only over the first 80-88-96-104-112-120 stitches on the needle; the last 80-88-96-104-112-120 stitches are placed on a thread.

FRONT PIECE:
= 80-88-96-104-112-120 stitches. Continue with rib as before to finished length. When the piece measures 50-52-54-56-58-60 cm / 19¾"-20½"-21¼"-22"-22¾"-23⅝" work short rows as follows: * Work the first 26-26-30-34-38-42 stitches, turn, tighten the strand and work back. Turn, tighten the strand and work the first 22-22-26-30-34-38 stitches, turn, tighten the strand and work back. Work 1 row over all 80-88-96-104-112-120 stitches *, repeat from *-* 1 more time. Bind off with knit over knit and purl over purl. The piece measures approx. 54-56-58-60-62-64 cm / 21¼"-22"-22¾"-23⅝"-24⅜"-25¼".

BACK PIECE:
Place the 80-88-96-104-112-120 stitches from the thread on circular needle size 6 mm / US 10 and work in the same way as the front piece.

SLEEVE:
Cast on 32-32-32-32-40-40 stitches with double pointed needles SIZE 5.5 mm/US 9 and 1 strand light beige and 1 strand gray (= 2 strands). Knit 1 round. Then work rib (= knit 4 / purl 4) for 4 cm / 1½". Change to double pointed needles size 6 mm / US 10 and knit 1 round where you decrease 2-2-0-0-4-4 stitches evenly on round – read DECREASE TIP = 30-30-32-32-36-36 stitches. Insert 1 marker at the beginning of the round = mid under sleeve. Then work stockinette stitch. When the piece measures 7-6-8-7-7-7 cm / 2 ¾"-2⅜"-3⅛"-2 ¾"-2 ¾"-2 ¾" increase 1 stitch on each side of the marker thread – read INCREASE TIP. Increase like this every 4½-4-3-3-3-2½ cm a total of 9-10-11-12-11-13 times = 48-50-54-56-58-62 stitches. Bind off when the piece measures 45-44-42-42-39-38 cm / 17⅝"-17 ¼"-16 ½"-16 ½"-15 ¼"-14⅞" (shorter measurements in larger sizes due to wider shoulders) – make sure the bind-off edge is not tight. Work the other sleeve.

ASSEMBLY:
Sew the shoulder seams, leave approx. 19-20-21-22-23-24 cm / 7½"-8"-8¼"-8¾"-9"-9½" for neck. Sew in the sleeves.

Diagram

All measurements in charts are in cm.

diagram measurements
Do you have a question? See a list of frequently asked questions (FAQ)

Knitting tension is what determines the final measurements of your work, and is usually measured per 10 x 10 cm. It is provided like so: number of stitches in width x number of rows in height - eg: 19 stitches x 26 rows = 10 x 10 cm.

The knitting tension is very individual; some people knit/crochet loosely while others work tightly. You adjust the knitting tension with the needle size, which is why the suggested needle size only serve as a guide! You need to adjust this (up or down) to ensure that YOUR knitting tension matches the knitting tension provided in the pattern. If you work with a different knitting tension than provided you will have a different yarn consumption, and your work will have different measurements than what the pattern suggests.

The knitting tension also determines which yarns can replace each other. As long as you achieve the same knitting tension you can replace one yarn with another.

See DROPS lesson: How to measure your tension/gauge

See DROPS video: How to make a gauge tension swatch

The required amount of yarn is provided in grams, eg: 450 g. To calculate how many balls you’ll need you first need to know how many grams are in 1 ball (25g, 50g or 100g). This information is available if you click on the individual yarn quality on our pages. Divide the amount required with the amount of each ball. For example, if each ball is 50g (the most common amount), the calculation will be as follows: 450 / 50 = 9 balls.

The important thing when changing from one yarn to another is that the knitting/crochet tension remains the same. This is so that the measurements of the finished piece will be the same as on the sketch provided. It is easier to achieve the same knitting tension using yarns from the same yarn group. It is also possible to work with multiple strands of a thinner yarn to achieve the knitting tension of a thicker one. Please try our yarn converter. We recommend you to always work a test swatch.

Please NOTE: when changing yarn the garment might have a different look and feel to the garment in the photo, due to individual properties and qualities of each yarn.

See DROPS lesson: Can I use a different yarn than the one mentioned in the pattern?

All our yarns are categorised into yarn groups (from A to F) according to thickness and knitting tension – group A contains the thinnest yarns and group F the thickest. This makes it easier for you to find alternative yarns to our patterns, should you wish to switch yarn. All yarns within the same group have a similar knitting tension and can easily replace each other. However, different yarn qualities have different structures and properties which will give the finished work a unique look and feel.

Click here for an overview of the yarns in each yarn group

At the top of all our patterns you’ll find a link to our yarn converter, which is a helpful tool should you wish to use a different yarn than suggested. By filling in the yarn quality you wish to replace, the amount (in your size) and number of strands, the converter will present good alternative yarns with the same knitting tension. Additionally it will tell you how much you’ll require in the new qualities and whether you’ll need to work with multiple strands. Most skeins are 50g (some are 25g or 100g).

If the pattern is worked with multiple colours, every colour will have to be converted separately. Similarly, if the pattern is worked with several strands of different yarns (for example 1 strand Alpaca and 1 strand Kid-Silk) you will have to find alternatives for each, individually.

Click here to see our yarn converter

Since different yarns have different qualities and textures we have chosen to keep the original yarn in our patterns. However, you can easily find options among our available qualities by using our yarn converter, or simply pick a yarn from the same yarn group.

It is possible that some retailers still have discontinued yarns in stock, or that someone has a few skeins at home that they would like to find patterns for.

The yarn converter will provide both alternative yarn as well as required amount in the new quality.

If you think it's hard to decide what size to make, it can be a good idea to measure a garment you own already and like the size of. Then you can pick the size by comparing those measures with the ones available in the pattern's size chart.

You'll find the size chart at the bottom of the pattern.

See DROPS lesson: How to read size chart

The needle size provided in the pattern serves only as a guide, the important thing is to follow the knitting tension. And since knitting tension is very individual, you will have to adjust the needle size to ensure that YOUR tension is the same as in the pattern – maybe you’ll have to adjust 1, or even 2 needle sizes, up or down to achieve the correct tension. For this, we recommend that you work test swatches.

Should you work with a different knitting tension than the one provided, the measurements of the finished garment might deviate from the measurement sketch.

See DROPS lesson: How to measure your tension/gauge

See DROPS video: How to make a gauge tension swatch

Working a garment top-down provides more flexibility and room for personal adjustment. For example it is easier to try the garment on while working, as well as making adjustments to length of yoke and shoulder caps.

The instructions are carefully explaining every step, in the correct order. Diagrams are adjusted to the knitting direction and are worked as usual.

The diagram depicts all rows/rounds, and every stitch seen from the right side. It is read from bottom to top, from right to left. 1 square = 1 stitch.

When working back and forth, every other row is worked from the right side and every other row is worked from the wrong side. When working from the wrong side, the diagram will have to be worked reversed: from left to right, knit stitches are purled, purl stitches are knit etc.

When working in the round every round is worked from the right side and the diagram are worked from right to left on all rounds.

See DROPS lesson: How to read knitting diagrams

The diagram depicts all rows/rounds, and every stitch seen from the right side. It is worked from bottom to top, from right to left.

When working back and forth every other row is worked from the right side: from right to left and every other row is worked from the wrong side: from left to right.

When working in the round, every row in the diagram are worked from the right side, from right to left.

When working a circular diagram you start in the middle and work your way outwards, counter clockwise, row by row.

The rows usually start with a given number of chain stitches (equivalent to the height of the following stitch), this will either be depicted in the diagram or explained in the pattern.

See DROPS lesson: How to read crochet diagrams

Instructions for working several diagrams after each other on the same row/round, will often be written like so: “work A.1, A.2, A.3 a total of 0-0-2-3-4 times". This means you work A.1 once, then A.2 is worked once, and A.3 is repeated (in width) the number of times provided for your size – in this case like so: S = 0 times, M = 0 times, L=2 times, XL= 3 times and XXL = 4 times.

The diagrams are worked as usual: begin with the first row in A.1, then work the first row in A.2 etc.

See DROPS lesson: How to read knitting diagrams

See DROPS lesson: How to read crochet diagrams

The total width of the garment (from wrist-to-wrist) will be larger in the larger sizes, despite the actual sleeves being shorter. The larger sizes have longer sleeve caps and wider shoulders, so there will be a good fit in all sizes.

The measurement sketch/schematic drawing provides information regarding the full length of the garment. If it’s a jumper or a jacket the length is measured from the highest point on the shoulder (usually closest to the neckline), and straight down to the bottom of the garment. It is NOT measured from the tip of shoulder. Similarly, the length of yoke is measured from the highest point on the shoulder and down to where yoke is split into body and sleeves.

See DROPS lesson: How to read a schematic drawing

Diagrams are often repeated on the round or in height. 1 repeat is the diagram the way it appears in the pattern. If it says to work 5 repeats of A.1 in the round, then you work A.1 a total of 5 times after/next to each other in the round. If it says to work 2 repeats of A.1 vertically/in height you work the entire diagram once, then begin again at the start and work the entire diagram one more time.

Chain stitches are slightly narrower than other stitches and to avoid working the cast-on edge too tight, we simply chain more stitches to begin with. The stitch count will be adjusted on the following row to fit the pattern and measurement sketch.

The rib edge is more elastic and will contract slightly compared to, for example, stocking stitch. By increasing before the rib edge, you avoid a visible difference in width between the rib edge and the rest of the body.

It’s very easy to cast off too tightly, and by making yarn overs while casting off (and simultaneously casting these off) you avoid a too tight cast off edge.

See DROPS video: How to bind off with yarn overs (yo)

To achieve an even increase (or decrease) you can increase on, for example: every 3rd and 4th row alternately, like so: work 2 rows and increase on the 3rd row, work 3 rows and increase on the 4th. Repeat this until the increase is complete.

See DROPS lesson: Increase or decrease 1 st on every 3rd and 4th row alternately

Should you prefer to work in the round instead of back and forth, you may of course adjust the pattern. You’ll need to add steeks mid-front (usually 5 stitches), and follow the instructions. When you would normally turn and work from the wrong side, simply work across the steek and continue in the round. At the end you’ll cut the piece open, pick up stitches to work bands, and cover the cut edges.

See DROPS video: How to knit steeks and cut open

Should you prefer to work back and forth instead of in the round, you may of course adjust the pattern so you work the pieces separately and then assemble them at the end. Divide the stitches for the body in 2, add 1 edge stitch in each side (for sewing) and work the front and back pieces separately.

See DROPS lesson: Can I adapt a pattern for circular needles into straight needles?

Pattern repeats can vary slightly in the different sizes, in order to get the correct proportions. If you’re not working the exact same size as the garment in the photo, yours might deviate slightly. This has been carefully developed and adjusted so that the complete impression of the garment is the same in all sizes.

Make sure to follow instructions and diagrams for your size!

If you have found a pattern you like which is available in women’s size it’s not very difficult to convert it to men’s size. The biggest difference will be the length of sleeves and body. Start working on the women size that you think would fit across the chest. The additional length will be worked right before you cast off for the armhole/sleeve cap. If the pattern is worked top-down you can add the length right after the armhole or before the first decrease on sleeve.

Regarding additional yarn amount, this will depend on how much length you add, but it is better with a skein too many than too few.

All yarns will have excess fibres (from production) that might come off as lint or shedding. Brushed yarns (ie hairier yarns) have more of these loose, excess fibres, causing more shedding.

Shedding also depends on what is worn under or over the garment, and whether this pulls at the yarn fibres. It’s therefore not possible to guarantee that there will be no shedding

Below are some tips on how to get the best result when working with hairier yarns:

1. When the garment is finished (before you wash it) shake it vigorously so the looser hairs come off. NOTE: do NOT use a lint roller, brush or any method that pulls at the yarn.

2. Place the garment in a plastic bag and put it in your freezer - the temperature will cause the fibres to become less attached to each other, and excess fibres will come off easier.

3. Leave in the freezer for a few hours before taking it out and shaking it again.

4. Wash the garment according to the instructions on the yarn label.

Pilling is a natural process that happens to even the most exclusive of fibers. It's a natural sign of wear and tear that is hard to avoid, and that is most visible in high friction areas of your garment like a sweater's arms and cuffs.

You can make your garment look as new by removing the pilling, using a fabric comb or a pill/lint remover.

Still can't find the answer you need? Then scroll down and leave your question so one of our experts can try to help you. This will be done normally within 5 to 10 working days.
In the meantime, you can read the questions and answers that others have left to this pattern or join the DROPS Workshop on Facebook to get help from fellow knitters/crocheters!

You might also like...

Post a comment to pattern DROPS 195-20

We would love to hear what you have to say about this pattern!

If you want to leave a question, please make sure you select the correct category in the form below, to speed up the answering process. Required fields are marked *.

Comments / Questions (22)

country flag Nuria March wrote:

En la explicacion de como hacercel jersey dicen: DELANTERO:\r\n= 80-88-96-104-112-120 puntos. Continuar con el elástico como antes hasta la largura final. Cuando la labor mida 50-52-54-56-58-60 cm trabajar filas cortas como sigue: *Trabajar los primeros 26-26-30-34-38-42 puntos, girar, estirar el hilo y trabajar de vuelta. \r\n\r\nDesconozco que significa \"estirar el hilo\"\r\n¿Podrian explicarme en que consiste?\r\nGracias

09.02.2019 - 12:58

DROPS Design answered:

Hola Nuria. Aquí tienes un video tutorial de cómo trabajar las filas cortas. Estirar o apretar el hilo, este término lo usamos para tener el hilo más tenso ( para evitar que se formen agujeros en medio de la labor).

11.02.2019 - 19:56

country flag Annegret wrote:

Ich möchte dieses-oder ein vergleichbares Modell- gern mit einem Faden Drops Sky stricken und freue mich über einen Tipp

20.01.2019 - 13:45

DROPS Design answered:

Liebe Annegret, dieses Modell wird nur mit 2 Fäden Sky gestrickt, dh nicht nur 1 Faden. Am besten blättern Sie in unseren Anleitungen für Pullover Garngruppe B um die richtige Maschenprobe zu haben wenn Sie nicht mit 2 Fäden stricken möchten. Viel Spaß beim stricken!

21.01.2019 - 11:08

country flag Sue wrote:

Ich habe sehr lange Arme und benötige 5 cm mehr Armlänge. Wo füge ich diese am besten ein?

27.12.2018 - 09:26

DROPS Design answered:

Liebe Sue, vielleicht können Sie die Zunahmen etwas später anfangen? oder dann diese 5 cm regelmäßig zwischen die Zunahmen verteilen? Viel Spaß beim stricken!

02.01.2019 - 12:18

country flag Patricia Olivia Fuchs wrote:

Bei Größe S werden 160 Maschen angeschlagen. Das ergibt bei mir mit Maschenprobe 14 in der Breite aber 57 cm für vorne und hinten, nicht 50. Bitte um Erklärung, danke.

21.12.2018 - 16:12

DROPS Design answered:

Liebe Frau Fuchs, die Maschenprobe wird glatt rechts gestrickt = 14 M x 16 R glatt rechts = 10 x 10 cm. Wenn diese Maschenprobe stimmt, dann sollten Sie die richtigen Massen in der jeweiligen Grösse bekommen, auch wenn Sie dann Bündchen/Rippenmuster stricken. Viel Spaß beim stricken!

02.01.2019 - 08:29

country flag Maillard wrote:

Bonsoir ,j.aimerai savoir si je peux tricoter ce modèle avec la laine Brushed alpaca silk et avec combien de pelotes et qu.elle n d.aiguille merci d.avance

20.11.2018 - 23:29

DROPS Design answered:

Bonjour Mme Maillard, ce pull se tricote avec 2 fils DROPS Sky qui appartient au groupe B, DROPS Brushed Alpaca Silk appartient au groupe C et n'apparaît pas comme une alternative. Vous trouverez ici quelques informations sur les alternatives - n'hésitez pas à contacter votre magasin DROPS, même par mail ou téléphone -pour une assistance personnalisée. Bon tricot!

21.11.2018 - 08:34

country flag Mary wrote:

Hallo, Kann ich denn statt im Rippenmuster auch in einem anderen Muster Stricken? Wenn ja, welche Alternativen würden Sie vorschlagen? Vielen Dank!

15.11.2018 - 21:27

DROPS Design answered:

Liebe Mary, dieses Modell wird im Rippenmuster gestrickt und geschrieben, dh alle Angaben sind so kalkuliert, am besten genauso stricken, wie in der Anleitung beschrieben ist. Viel Spaß beim stricken!

16.11.2018 - 09:35

country flag Dorthe Hald-sørensen wrote:

Hvornår kan man købe andre farver i dette garn

18.10.2018 - 14:28

DROPS Design answered:

Hej Dorthe, til at begynde med kan du købe det i disse 14 flotte farver. Vi har ikke besluttet om flere farver endnu. Men gå gerne ind på farvekortet og skriv en kommentar om hvilken farve du ville ønske dig :)

23.10.2018 - 16:19

country flag Mc wrote:

Bonjour, J'aimerais réaliser ce modèle en "LIMA", cependant quand je calcule mon mètrage de fil, je trouve des quantités astronomiques. Dans les explications que vous donnez il faut 10 pelotes, soit 1900 mètres, il me faudrait donc en "lima" 19 pelotes, pour une taille L ? Merci

28.07.2018 - 11:20

DROPS Design answered:

Bonjour Mc, la quantité sera automatiquement différente si vous utilisez Lima, car Sky fait environ 190 m pour 50 g alors que Lima fait 100 m environ pour 50 g. Rappelez-vous que des fils de composition différentes donneront des résultats différents, vous trouverez ici plus d'infos sur les alternatives. Bon tricot!

31.07.2018 - 08:54

country flag Sara M wrote:

I cannot wear real wool and would like an alternative to knit this in that doesn’t contain wool. Do you have any suggested alternatives? I tried the yarn converter and it didn’t offer any suggestions. Thank you

26.07.2018 - 02:20

DROPS Design answered:

Dear Sara M, you can use any other yarn group B - remember that different yarns with different textures will give different result - read more about alternatives here. Happy knitting!

26.07.2018 - 10:08

country flag Glorija wrote:

Prosty i piękny

20.06.2018 - 12:36