DROPS Sky
DROPS Sky
74% Alpaca, 18% Polyamide, 8% Wool
from 5.10 £ /50g
Get the yarn to make this pattern from 25.50£.

The yarn cost is calculated from the pattern’s smallest size and the yarn’s cheapest product type. Looking for an even better price? You might find it on the DROPS Deals!

DROPS SS24

Grey Sparrow

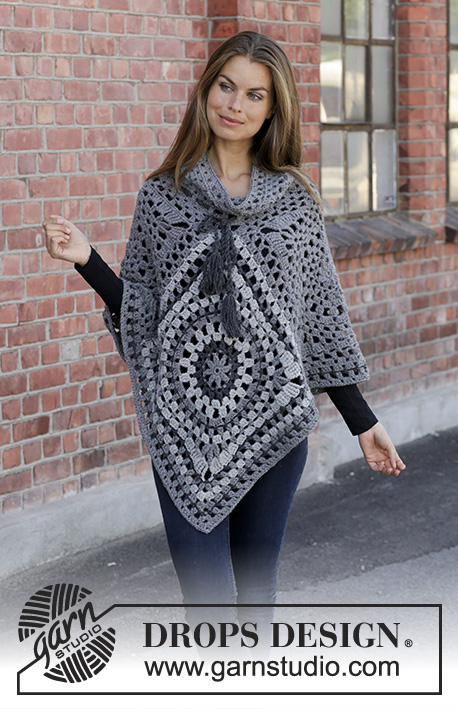
Crocheted jumper in DROPS Sky. The piece is worked top down with lace pattern and long split in the sides. Sizes S - XXXL.

DROPS 195-14
DROPS Design: Pattern no sk-011
Yarn group B
-------------------------------------------------------

Sizes: S - M - L - XL - XXL - XXXL
Materials:
DROPS SKY from Garnstudio (belongs to yarn group B)
250-300-300-350-350-400 g colour 04, grey

-------------------------------------------------------
ACCESSORIES FOR THE PIECE:

CROCHET TENSION:
16 treble crochets in width and 8 rows in height = 10 x 10 cm.

HOOK:
DROPS CROCHET HOOK SIZE 4.5 MM.
The hook number is just a guide. If you get too many stitches on 10 cm, change to a larger hook size. If you get too few stitches on 10 cm, change to a smaller hook size.

-------------------------------------------------------

-------------------------------------------------------

Alternative Yarn – See how to change yarns here
Yarn Groups A to F – Use the same pattern and change the yarn here
Yarn usage using an alternative yarn – Use our yarn converter here

-------------------------------------------------------

DROPS Sky
DROPS Sky
74% Alpaca, 18% Polyamide, 8% Wool
from 5.10 £ /50g
Get the yarn to make this pattern from 25.50£.

The yarn cost is calculated from the pattern’s smallest size and the yarn’s cheapest product type. Looking for an even better price? You might find it on the DROPS Deals!

Pattern instructions

NOTE: This pattern is written in British English. All measurements in charts are in cm. For conversion from cm to inches - click here. There are different terms for crocheting in British and American English. If this pattern includes crochet, click for "crochet terms" here. For this pattern in American English, please click here.
-------------------------------------------------------

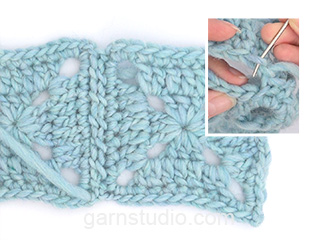
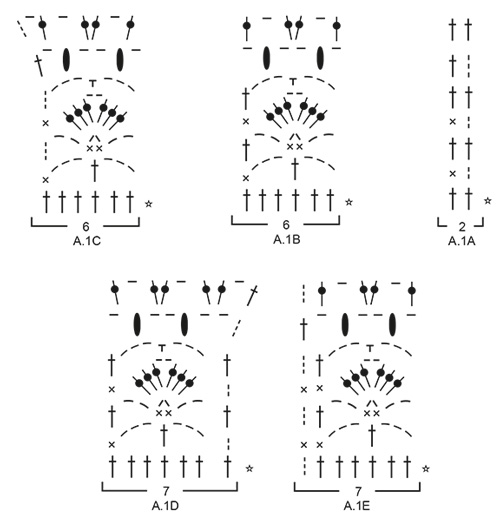
EXPLANATIONS FOR THE PATTERN:

-------------------------------------------------------

CROCHET INFO:
At the beginning of each row of treble crochets, the first treble crochet is replaced by 3 chain stitches. The row finishes with 1 treble crochet in the 3rd or 2nd chain stitch from the beginning of the previous row (depending on whether the previous row started with 3 or 2 chain stitches).
At the beginning of each row of double crochets, the first double crochet is replaced by 2 chain stitches. The row finishes with 1 double crochet in the 3rd or 2nd chain stitch from the beginning of the previous round.

PATTERN:
See diagrams A.1 to A.3.

DECREASE TIP (for sleeves):
Decrease 1 stitch inside of the 2 outermost stitches in each side. Decrease 1 stitch by skipping 1 stitch. It is difficult to say where the decreases will occur in the pattern, but adjust so that you decrease on a row of treble/double crochets (not on a row of large chain-spaces).

INCREASE TIP (for bottom of sleeves):
Increase 1 stitch by working 2 double crochets in same stitch.

-------------------------------------------------------

START THE PIECE HERE:

-------------------------------------------------------

JUMPER - QUICK SUMMARY OF THE PIECE:
Front and back pieces are worked back and forth separately, top down. You first work the right front shoulder increasing for the neck, then the left shoulder increasing for the neck before the pieces are worked together back and forth to finished length. The back piece is worked in the same way. The sleeves are worked back and forth, top down. The garment is sewn together before working a finishing edge to the neck.

RIGHT FRONT SHOULDER (when the garment is worn):
Read CROCHET INFO!
Work 28-28-36-44-44-52 chain stitches with hook size 4.5 mm and Sky. The first row is worked as follows from the wrong side: Work 1 treble crochet in the 4th chain stitch from the hook, * skip 1 chain stitch, work 1 treble crochet in each of the next 3 chain stitches *, work from *-* to end of row = 20-20-26-32-32-38 treble crochets on the row.
The next row is worked as follows from the right side: Work A.1A (= 2 stitches), work A.1B over the next 12-12-18-24-24-30 stitches (= 2-2-3-4-4-5 repeats of 6 stitches) and finish with A.1C (= 6 stitches). Continue this pattern back and forth until A.1 has been completed. REMEMBER THE CROCHET TENSION! Lay the piece to one side and work the left front shoulder as described below.

LEFT FRONT SHOULDER (when the garment is worn):
Work 28-28-36-44-44-52 chain stitches with hook size 4.5 mm and Sky. The first row is worked as follows from the wrong side: Work 1 treble crochet in the 4th chain stitch from the hook, * skip 1 chain stitch, work 1 treble crochet in each of the next 3 chain stitches *, work from *-* to end of row = 20-20-26-32-32-38 treble crochets on the row.
The next row is worked as follows from the right side: Work A.1D (= 7 stitches), work A.1B over the next 6-6-12-18-18-24 stitches (= 1-1-2-3-3-4 repeats of 6 stitches) and finish with A.1E (= 7 stitches). Continue this pattern back and forth until A.1 has been completed. At the end of the last row, work 25-31-25-25-31-31 slightly loose chain stitches for the neck. Fasten the loose chains with 1 slip stitch in the outermost stitch towards the neck on right shoulder on the front (from wrong side). Cut and fasten the strand. Now work the pieces together for the front piece as described below.

FRONT PIECE:
Start from the right side of the right front shoulder; continue working over the chain stitches for the neck and then work over the stitches on the left front shoulder as follows: Work A.2A (= 2 stitches), work A.2B over the next 60-66-72-84-90-102 stitches (= 10-11-12-14-15-17 repeats of 6 stitches) and finish with A.2C (= 7 stitches). NOTE: When working over the chain stitches for the neckline, work 1 treble crochet in each chain stitch. Continue this pattern back and forth. When A.2 has been worked one time in height, work A.3 one time in height in the same way. Then work A.2 to finished length, NOTE: When A.2 is repeated after itself, the 1st row on the 2nd repeat will be worked from wrong side. The 1st treble crochet on row is replaced with 3 chain stitches as usual.
AT THE SAME TIME when the piece measures 18-18-20-20-22-23 cm from the cast-on edge, insert 1 marker in each side to mark the armholes.
Continue working as described above until the piece measures approx. 65-67-69-71-73-75 cm. Finish with 1 row of treble crochets – NOTE: Choose a row from one of the diagrams which fits with where you are in the repeat so that you have 69-75-81-93-99-111 treble crochets on the row. Cut and fasten the strands. The front piece measures approx. 66-68-70-72-74-76 cm from the shoulder down.

LEFT BACK SHOULDER (when the garment is worn):
Work 28-28-36-44-44-52 chain stitches with hook size 4.5 mm and Sky. The first row is worked as follows from the wrong side: Work 1 treble crochet in the 4th chain stitch from the hook, * skip 1 chain stitch, work 1 treble crochet in each of the next 3 chain stitches *, work from *-* to end of row = 20-20-26-32-32-38 treble crochets on the row. Lay the piece to one side and work the right back shoulder as described below.

RIGHT BACK SHOULDER (when the garment is worn)
Work 28-28-36-44-44-52 chain stitches with hook size 4.5 mm and Sky. The first row is worked as follows from the wrong side: Work 1 treble crochet in the 4th chain stitch from the hook, * skip 1 chain stitch, work 1 treble crochet in each of the next 3 chain stitches *, work from *-* to end of row = 20-20-26-32-32-38 treble crochets on row. At the end of this row, work 29-35-29-29-35-35 slightly loose chain stitches for the neck. Fasten the loose chains with 1 slip stitch in the outermost stitch towards the neck on left shoulder on the back (from wrong side). Cut and fasten the strand.Now work the pieces together for the back piece as described below.

BACK PIECE:
Start from the right side of the left back shoulder; continue working over the chain stitches for the neck and then over the stitches on the right back shoulder as follows: Work A.1A (= 2 stitches), work A.1B over the next 60-66-72-84-90-102 stitches (= 10-11-12-14-15-17 repeats of 6 stitches) and finish with A.1E (= 7 stitches). Continue this pattern back and forth. When A.1 has been completed, work A.2 in the same way. When A.2 has been worked one time in height, work A.3 one time in height in the same way. Then work A.2 to finished length in the same way as the front piece.
AT THE SAME TIME when the piece measures 18-18-20-20-22-23 cm from the cast-on edge, insert 1 marker in each side to mark the armholes.
Continue working as described above until the piece measures approx. 65-67-69-71-73-75 cm – adjust to match the front piece. Finish with 1 row of treble crochets in the same way as the front piece. Cut and fasten the strands. The back piece measures approx. 66-68-70-72-74-76 cm from the shoulder down.

SLEEVE:
Work 77-77-85-85-93-101 chain stitches with hook size 4.5 mm and Sky. The first row is worked as follows from the right side: Work 1 treble crochet in the 4th chain stitch from the hook, work 1 treble crochet in the next chain stitch, * skip 1 chain stitch, work 1 treble crochet in each of the next 3 chain stitches *, work from *-* to end of row = 57-57-63-63-69-75 treble crochets on the row.
The next row is worked as follows from the wrong side: 4 chain stitches (equivalent to 1 treble crochet + 1 chain stitch), skip 2 treble crochets, * 2 treble crochets in the space before the next 3 treble crochets, 1 chain stitch * work from *-* until there are 3 treble crochets left on the row, skip 2 treble crochets and finish with 1 treble crochet in the last treble crochet = 57-57-63-63-69-75 stitches on the row.
The next row is worked as follows from the right side: Work A.2A (= 2 stitches), work A.2B over the next 48-48-54-54-60-66 stitches (= 8-8-9-9-10-11 repeats of 6 stitches) and finish with A.2C (= 7 stitches). Continue this pattern back and forth. A.2 is repeated in height.
AT THE SAME TIME when the piece measures 2 cm in all sizes, decrease 1 stitch in each side – read DECREASE TIP (= 2 stitches decreased). Decrease like this approx. every 5½-5½-4½-4-3½-2½ cm a total of 9-9-11-11-13-15 times in each side = 39-39-41-41-43-45 stitches on the row.
When the sleeve measures approx. 50-49-48-46-45-42 cm (shorter measurements in larger sizes due to wider shoulders) work 1 row of double crochets from the wrong side where you increase 6-6-4-4-8-6 stitches evenly on the row - read INCREASE TIP = 45-45-45-45-51-51 double crochets. The next row is worked as follows from the right side: Work A.1A (= 2 stitches), work A.1B over the next 36-36-36-36-42-42 stitches (= 6-6-6-6-7-7 repeats of 6 stitches) and finish with A.1E (= 7 stitches). Continue this pattern, but finish after the 3rd row of A.1. Cut and fasten the strands. The sleeve measures approx. 54-53-52-50-49-46 cm from the top down. Work the other sleeve in the same way.

ASSEMBLY:
Sew the shoulder seams. Sew in the sleeves between the markers on the front and back pieces. Sew the sleeve and side seams in one go – start at the bottom of the sleeve and sew edge to edge in the outermost stitch, but finish the seam when there is still 34 cm left, leaving a split in each side.

NECK:
Start on the one shoulder and work the first round as follows with hook size 4.5 mm: Work 1 double crochet in the first stitch, * 3 chain stitches, 1 double crochet around the next row/chain-space *, work from *-* around the whole neck, finish with 3 chain stitches and 1 slip stitch in the first double crochet at the beginning of the round. Work slip stitches to the middle of the first chain-space, work 3 chain stitches, * 1 double crochet around the next chain-space, 2 chain stitches *, work from *-* to end of round, finish with 1 slip stitch in the first chain stitch at the beginning of the round. Cut and fasten the strand.

This pattern has been corrected.

Updated online: 12.04.2019
Correction - FRONT PIECE: Then work A.2 to finished length, NOTE: When A.2 is repeated after itself, the 1st row on the 2nd repeat will be worked from wrong side. The 1st treble crochet on row is replaced with 3 chain stitches as usual.
Updated online: 19.10.2020
under BACK PIECE:
Start from the right side of the left back shoulder; continue working over the chain stitches for the neck and then over the stitches on the right back shoulder as follows:...

Diagram

symbols = 1 chain stitch
symbols = 1 double crochet in stitch
symbols = 1 double crochet around chain stitch/chain-space
symbols = 1 treble crochet in stitch
symbols = 1 treble crochet around chain stitch/chain-space
symbols = 3 TREBLE CROCHETS TOGETHER IN SAME STITCH: Work 2 treble crochets in next double crochet, but wait with the last yarn over and pull through on both these treble crochets, work 1 treble crochet in the same stitch and pull the last yarn over through all 4 loops on the hook
symbols = 3 TREBLE CROCHETS TOGETHER AROUND CHAIN STITCH/CHAIN-SPACE: Work 2 treble crochets around the chain stitch/chain-space, but wait with the last yarn over and pull through on both these treble crochets, work 1 treble crochet around the same chain stitch/chain-space and pull the last yarn over through all 4 loops on the hook
symbols = first row is not worked; it has already been worked and just shows how the next row is worked in the stitches
diagram
diagram
diagram
diagram
Do you have a question? See a list of frequently asked questions (FAQ)

Knitting tension is what determines the final measurements of your work, and is usually measured per 10 x 10 cm. It is provided like so: number of stitches in width x number of rows in height - eg: 19 stitches x 26 rows = 10 x 10 cm.

The knitting tension is very individual; some people knit/crochet loosely while others work tightly. You adjust the knitting tension with the needle size, which is why the suggested needle size is only meant as a guide! You need to adjust this (up or down) to ensure that YOUR knitting tension matches the knitting tension provided in the pattern. If you work with a different knitting tension than provided you will have a different yarn consumption, and your work will have different measurements than what the pattern suggests.

The knitting tension also determines which yarns can replace each other. As long as you achieve the same knitting tension you can replace one yarn with another.

See DROPS lesson: How to measure your tension/gauge

See DROPS video: How to make a gauge tension swatch

The required amount of yarn is provided in grams, eg: 450 g. To calculate how many balls you’ll need you first need to know how many grams are in 1 ball (25g, 50g or 100g). This information is available if you click on the individual yarn quality on our pages. Divide the amount required with the amount of each ball. For example, if each ball is 50g (the most common amount), the calculation will be as follows: 450 / 50 = 9 balls.

The important thing when changing from one yarn to another is that the knitting/crochet tension remains the same. This is so that the measurements of the finished piece will be the same as on the sketch provided. It is easier to achieve the same knitting tension using yarns from the same yarn group. It is also possible to work with multiple strands of a thinner yarn to achieve the knitting tension of a thicker one. Please try our yarn converter. We recommend you to always work a test swatch.

Please NOTE: when changing yarn the garment might have a different look and feel to the garment in the photo, due to individual properties and qualities of each yarn.

See DROPS lesson: Can I use a different yarn than the one mentioned in the pattern?

All our yarns are categorised into yarn groups (from A to F) according to thickness and knitting tension – group A contains the thinnest yarns and group F the thickest. This makes it easier for you to find alternative yarns to our patterns, should you wish to switch yarn. All yarns within the same group have a similar knitting tension and can easily replace each other. However, different yarn qualities have different structures and properties which will give the finished work a unique look and feel.

Click here for an overview of the yarns in each yarn group

At the top of all our patterns you’ll find a link to our yarn calculator, which is a helpful tool should you wish to use a different yarn than suggested. By filling in the yarn quality you wish to replace, the amount (in your size) and number of strands, the calculator will present good alternative yarns with the same knitting tension. Additionally it will tell you how much you’ll require in the new qualities and whether you’ll need to work with multiple strands. Most skeins are 50g (some are 25g or 100g).

If the pattern is worked with multiple colours, every colour will have to be calculated separately. Similarly, if the pattern is worked with several strands of different yarns (for example 1 strand Alpaca and 1 strand Kid-Silk) you will have to find alternatives for each, individually.

Click here to see our yarn calculator

Since different yarns have different qualities and textures we have chosen to keep the original yarn in our patterns. However, you can easily find options among our available qualities by using our yarn calculator, or simply pick a yarn from the same yarn group.

It is possible that some retailers still have discontinued yarns in stock, or that someone has a few skeins at home that they would like to find patterns for.

The yarn calculator will provide both alternative yarn as well as required amount in the new quality.

If you think it's hard to decide what size to make, it can be a good idea to measure a garment you own already and like the size of. Then you can pick the size by comparing those measures with the ones available in the pattern's size chart.

You'll find the size chart at the bottom of the pattern.

See DROPS lesson: How to read size chart

The needle size provided in the pattern serves only as a guide, the important thing is to follow the knitting tension. And since knitting tension is very individual, you will have to adjust the needle size to ensure that YOUR tension is the same as in the pattern – maybe you’ll have to adjust 1, or even 2 needle sizes, up or down to achieve the correct tension. For this, we recommend that you work test swatches.

Should you work with a different knitting tension than the one provided, the measurements of the finished garment might deviate from the measurement sketch.

See DROPS lesson: How to measure your tension/gauge

See DROPS video: How to make a tension/gauge swatch

Working a garment top-down provides more flexibility and room for personal adjustment. For example it is easier to try the garment on while working, as well as making adjustments to length of yoke and shoulder caps.

The instructions are carefully explaining every step, in the correct order. Diagrams are adjusted to the knitting direction and are worked as usual.

The diagram depicts all rows/rounds, and every stitch seen from the right side. It is read from bottom to top, from right to left. 1 square = 1 stitch.

When working back and forth, every other row is worked from the right side and every other row is worked from the wrong side. When working from the wrong side, the diagram will have to be worked reversed: from left to right, knit stitches are purled, purl stitches are knit etc.

When working in the round every round is worked from the right side and the diagram are worked from right to left on all rounds.

See DROPS lesson: How to read knitting diagrams

The diagram depicts all rows/rounds, and every stitch seen from the right side. It is worked from bottom to top, from right to left.

When working back and forth every other row is worked from the right side: from right to left and every other row is worked from the wrong side: from left to right.

When working in the round, every row in the diagram are worked from the right side, from right to left.

When working a circular diagram you start in the middle and work your way outwards, counter clockwise, row by row.

The rows usually start with a given number of chain stitches (equivalent to the height of the following stitch), this will either be depicted in the diagram or explained in the pattern.

See DROPS lesson: How to read crochet diagrams

Instructions for working several diagrams after each other on the same row/round, will often be written like so: “work A.1, A.2, A.3 a total of 0-0-2-3-4 times". This means you work A.1 once, then A.2 is worked once, and A.3 is repeated (in width) the number of times provided for your size – in this case like so: S = 0 times, M = 0 times, L=2 times, XL= 3 times and XXL = 4 times.

The diagrams are worked as usual: begin with the first row in A.1, then work the first row in A.2 etc.

See DROPS lesson: How to read knitting diagrams

See DROPS lesson: How to read crochet diagrams

The total width of the garment (from wrist-to-wrist) will be larger in the larger sizes, despite the actual sleeves being shorter. The larger sizes have longer sleeve caps and wider shoulders, so there will be a good fit in all sizes.

The measurement sketch/schematic drawing provides information regarding the full length of the garment. If it’s a jumper or a jacket the length is measured from the highest point on the shoulder closest to the neckline, and straight down to the bottom of the garment. It is NOT measured from the tip of shoulder. Similarly, the length of yoke is measured from the highest point on the shoulder and down to where yoke is split into body and sleeves.

On a jacket measures are never taken along bands, unless specifically stated. Always measure inside band stitches when measuring the length.

See DROPS lesson: How to read a schematic drawing

Diagrams are often repeated on the round or in height. 1 repeat is the diagram the way it appears in the pattern. If it says to work 5 repeats of A.1 in the round, then you work A.1 a total of 5 times after/next to each other in the round. If it says to work 2 repeats of A.1 vertically/in height you work the entire diagram once, then begin again at the start and work the entire diagram one more time.

Chain stitches are slightly narrower than other stitches and to avoid working the cast-on edge too tight, we simply chain more stitches to begin with. The stitch count will be adjusted on the following row to fit the pattern and measurement sketch.

The rib edge is more elastic and will contract slightly compared to, for example, stocking stitch. By increasing before the rib edge, you avoid a visible difference in width between the rib edge and the rest of the body.

It’s very easy to cast off too tightly, and by making yarn overs while casting off (and simultaneously casting these off) you avoid a too tight cast off edge.

See DROPS video: How to bind off with yarn overs (yo)

To achieve an even increase (or decrease) you can increase on, for example: every 3rd and 4th row alternately, like so: work 2 rows and increase on the 3rd row, work 3 rows and increase on the 4th. Repeat this until the increase is complete.

See DROPS lesson: Increase or decrease 1 st on every 3rd and 4th row alternately

Should you prefer to work in the round instead of back and forth, you may of course adjust the pattern. You’ll need to add steeks mid-front (usually 5 stitches), and follow the instructions. When you would normally turn and work from the wrong side, simply work across the steek and continue in the round. At the end you’ll cut the piece open, pick up stitches to work bands, and cover the cut edges.

See DROPS video: How to knit steeks and cut open

Should you prefer to work back and forth instead of in the round, you may of course adjust the pattern so you work the pieces separately and then assemble them at the end. Divide the stitches for the body in 2, add 1 edge stitch in each side (for sewing) and work the front and back pieces separately.

See DROPS lesson: Can I adapt a pattern for circular needles into straight needles?

Pattern repeats can vary slightly in the different sizes, in order to get the correct proportions. If you’re not working the exact same size as the garment in the photo, yours might deviate slightly. This has been carefully developed and adjusted so that the complete impression of the garment is the same in all sizes.

Make sure to follow instructions and diagrams for your size!

If you have found a pattern you like which is available in women’s size it’s not very difficult to convert it to men’s size. The biggest difference will be the length of sleeves and body. Start working on the women size that you think would fit across the chest. The additional length will be worked right before you cast off for the armhole/sleeve cap. If the pattern is worked top-down you can add the length right after the armhole or before the first decrease on sleeve.

Regarding additional yarn amount, this will depend on how much length you add, but it is better with a skein too many than too few.

All yarns will have excess fibres (from production) that might come off as lint or shedding. Brushed yarns (ie hairier yarns) have more of these loose, excess fibres, causing more shedding.

Shedding also depends on what is worn under or over the garment, and whether this pulls at the yarn fibres. It’s therefore not possible to guarantee that there will be no shedding

Below are some tips on how to get the best result when working with hairier yarns:

1. When the garment is finished (before you wash it) shake it vigorously so the looser hairs come off. NOTE: do NOT use a lint roller, brush or any method that pulls at the yarn.

2. Place the garment in a plastic bag and put it in your freezer - the temperature will cause the fibres to become less attached to each other, and excess fibres will come off easier.

3. Leave in the freezer for a few hours before taking it out and shaking it again.

4. Wash the garment according to the instructions on the yarn label.

Pilling is a natural process that happens to even the most exclusive of fibers. It's a natural sign of wear and tear that is hard to avoid, and that is most visible in high friction areas of your garment like a sweater's arms and cuffs.

You can make your garment look as new by removing the pilling, using a fabric comb or a pill/lint remover.

Still can't find the answer you need? Then scroll down and leave your question so one of our experts can try to help you. This will be done normally within 5 to 10 working days.
In the meantime, you can read the questions and answers that others have left to this pattern or join the DROPS Workshop on Facebook to get help from fellow knitters/crocheters!

You might also like...

Post a comment to pattern DROPS 195-14

We would love to hear what you have to say about this pattern!

If you want to leave a question, please make sure you select the correct category in the form below, to speed up the answering process. Required fields are marked *.

Comments / Questions (61)

country flag Britt-Louise Holgersson wrote:

Det fattas förklaring till virksymboler på mönster 195-14\r\nVissa symboler finns inte heller med i er information vad gäller ”lära sig virka efter mönster”\r\nTacksam för svar\r\nMvh Britt-Louise

24.11.2023 - 20:45

country flag Velvet79_it wrote:

Buongiorno, il campione dato lo devo svolgere con che punti? A maglia alta? Perché non è specificato Grazie mille

23.10.2023 - 06:59

DROPS Design answered:

Buonasera Velvet79_it, all'inizio del lavoro è specificato che il campione è lavorato a maglie alte. Buon lavoro!

23.10.2023 - 22:27

country flag Suzanne wrote:

I am struggling with joining the back shoulders and starting the back piece pattern. I can’t understand how to incorporate the chain without creating a step, or uneven pattern. Thank you

26.09.2023 - 20:41

DROPS Design answered:

Dear Suzanne, you first work 1 row treble crochets (UK-English terminology) over first shoulder, then over 2nd shoulder and at the end of this row on 2nd shoulder, crochet chain stitches for neck and join with a slip stitch to the first shoulder, cut the yarn and now work BACK PIECE. Happy knitting!

29.09.2023 - 07:56

country flag MONTSERRAT BADIA NOGUÉS wrote:

Hola otra vez....gracias por las instrucciones en Español, aunque ya las tenia! Y sigo teniendo el mismo problema, en la segunda vuelta, si hago los dos puntos altos antes de cada grupo de tres, me salen muchos menos puntos que los que pone en el patron! .....que es lo que hago mal?

28.09.2022 - 22:53

DROPS Design answered:

Hola Montserrat, parece ser una errata en la traducción en español. Serían 57-57-63-63-69-75 puntos en la fila (sumando los puntos altos y los puntos de cadeneta). Lo corregiremos lo antes posible.

09.10.2022 - 23:09

country flag Montse wrote:

Era referido a las mangas, justo al principio....gracias!

25.09.2022 - 20:51

DROPS Design answered:

Hola Montse, puedes ver la respuesta debajo.

25.09.2022 - 22:12

country flag Montse wrote:

Ui..no se envió mi primera parte... en esta vuelta tengo problemas: The next row is worked as follows from the wrong side: 4 chain stitches (equivalent to 1 treble crochet + 1 chain stitch), skip 2 treble crochets, * 2 treble crochets in the space before the next 3 treble crochets, 1 chain stitch * work from *-* until there are 3 treble crochets left on the row, skip 2 treble crochets and finish with 1 treble crochet in the last treble crochet = 57-57-63-63-69-75 stitches on the row.

25.09.2022 - 20:50

DROPS Design answered:

Hola Montse, puedes ver aquí las instrucciones en español por si te resuelven dudas: La siguiente fila se trabaja como sigue por el lado revés: 4 puntos de cadeneta (equivalente a 1 punto alto + 1 punto de cadeneta), saltar 2 puntos altos, * 2 puntos altos en el arco antes de los siguientes 3 puntos altos, 1 punto de cadeneta*, trabajar de * a * hasta que solo queden 3 puntos altos en la fila, saltar 2 puntos altos y finalizar con 1 punto alto en el último punto alto = 57-57-63-63-69-75 puntos altos en la fila. Puedes encontrar el patrón en español en este link: https://www.garnstudio.com/pattern.php?id=8692&cid=23

25.09.2022 - 21:05

country flag Montse wrote:

Sigo.... Entiendo que tengo que hacer dos puntos altos cada tres puntos altos de la vuelta anterior, pero entonces me salen muchos menos puntos de los que dice el patrón, unos 40 o menos....o son dos puntos altos cada dos puntos altos de la vuelta anterior, con lo que me falta un punto alto para tener los 63 que dices que tengo que tener al final de la vuelta..... Espero que me saques de este lio! Gracias!!

25.09.2022 - 20:47

DROPS Design answered:

Hola Montse, puedes ver la respuesta arriba.

25.09.2022 - 22:12

country flag Robin wrote:

I love your designs. However, I find it difficult to use diagrams only. I so much prefer written instructions , stitch by stitch. Maybe that is something you can consider for the future.

14.12.2021 - 02:14

country flag Michaela wrote:

Vielen Dank für Ihre Antwort! Sie haben natürlich recht, das war ein kompletter Denkfehler von mir. Habe schon lange nicht mehr nach einer Häkelschrift gearbeitet.

23.11.2021 - 05:26

country flag Michaela wrote:

Entschuldigung, ich meinte A2A, B und C.

17.11.2021 - 21:24