DROPS Merino Extra Fine
100% Wool
from 3.50 £ /50g
Get the yarn to make this pattern from 45.50£.

The yarn cost is calculated from the pattern’s smallest size and the yarn’s cheapest product type. Looking for an even better price? You might find it on the DROPS Deals!

DROPS SS24

Sheep Happens!

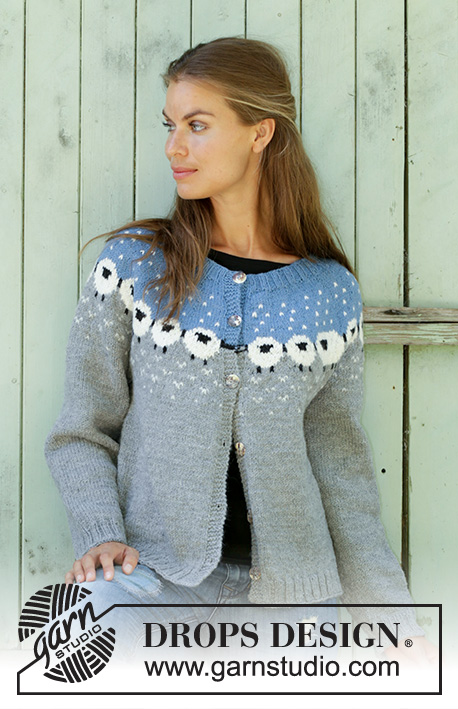
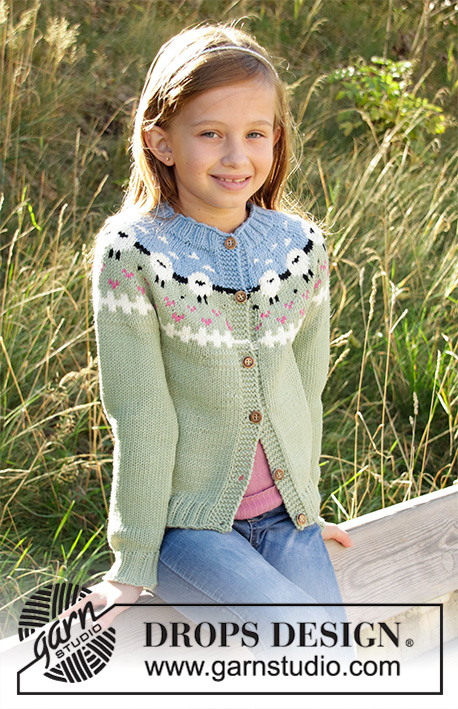
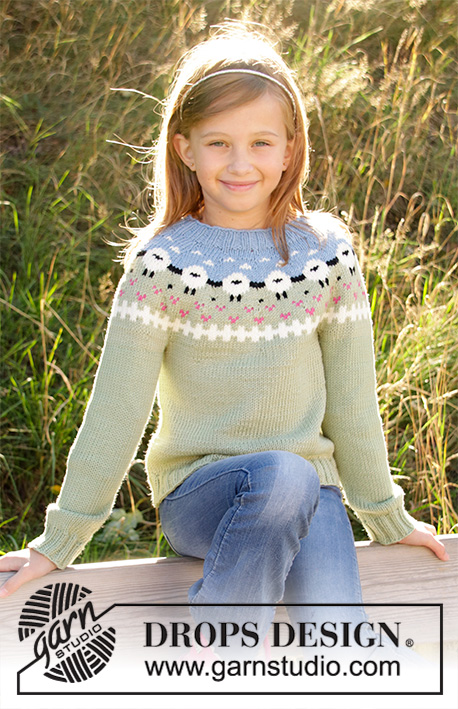
Knitted jumper with round yoke in DROPS Merino Extra Fine or Lima. The piece is worked top down in Nordic pattern with sheep S - XXXL.

DROPS 194-2
DROPS Design: Pattern no me-159
Yarn group B
-------------------------------------------------------

Sizes: S - M - L - XL - XXL - XXXL
Materials:
DROPS MERINO EXTRA FINE from Garnstudio (belongs to yarn group B)
450-500-550-600-650-700 g colour 05, light grey
100-100-100-100-100-100 g colour 19, light grey blue
50-50-50-50-50-50 g colour 01, off white
50-50-50-50-50-50 g colour 02, black
Or use:
DROPS LIMA from Garnstudio (belongs to yarn group B)
450-500-550-600-650-750 g colour 9015, grey
100-100-100-100-100-100 g colour 6235, grey blue
50-50-50-50-50-50 g colour 0100, off white
50-50-50-50-50-50 g colour 8903, black

-------------------------------------------------------
ACCESSORIES FOR THE PIECE:

KNITTING TENSION:
21 stitches in width and 28 rows in height with stocking stitch = 10 x 10 cm.

NEEDLES:
DROPS DOUBLE POINTED NEEDLES AND CIRCULAR NEEDLE SIZE 4 MM: length 40 cm and 80 cm for stocking stitch.
DROPS DOUBLE POINTED NEEDLES AND CIRCULAR NEEDLE SIZE 3 MM: length 40 cm and 80 cm for rib.
The needle size is only a guide. If you get too many stitches on 10 cm, change to a larger needle size. If you get too few stitches on 10 cm, change to a smaller needle size.

-------------------------------------------------------

-------------------------------------------------------

Alternative Yarn – See how to change yarns here
Yarn Groups A to F – Use the same pattern and change the yarn here
Yarn usage using an alternative yarn – Use our yarn converter here

-------------------------------------------------------

DROPS Merino Extra Fine
100% Wool
from 3.50 £ /50g
Get the yarn to make this pattern from 45.50£.

The yarn cost is calculated from the pattern’s smallest size and the yarn’s cheapest product type. Looking for an even better price? You might find it on the DROPS Deals!

Pattern instructions

NOTE: This pattern is written in British English. All measurements in charts are in cm. For conversion from cm to inches - click here. There are different terms for crocheting in British and American English. If this pattern includes crochet, click for "crochet terms" here. For this pattern in American English, please click here.
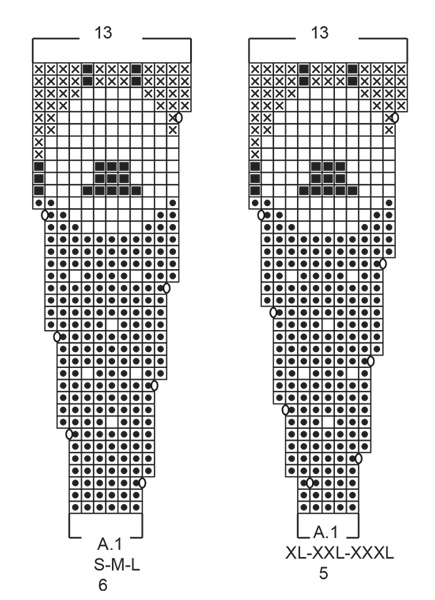
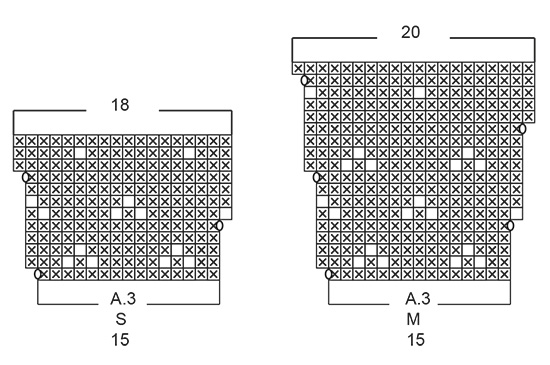
EXPLANATIONS FOR THE PATTERN:

-------------------------------------------------------

PATTERN: 
See diagrams A.1 to A.3. Choose diagram for your size. The diagrams are worked in stocking stitch.
As there are long spaces between colour changes, you should twist the strands together approx. every 7th stitch to avoid having long, loose strands at the back.

INCREASE TIP (evenly spaced):
To work out how to increase evenly, count the total number of stitches on the row (e.g. 90 stitches) and divide these stitches by the number of increases to be made (e.g. 31) = 2.9. In this example, make 1 yarn over after approx. each 3rd stitch. On the next row work the yarn overs twisted to avoid holes.


DECREASE TIP (for sleeves): 
Decrease 1 stitch on each side of the marker thread as follows: Work until there are 3 stitches left before the marker thread, knit 2 together, knit 2 (the marker thread sits in the middle of these 2 stitches), slip 1 stitch as if to knit, knit 1, pass the slipped stitch over the knitted stitch (= 2 stitches decreased).

-------------------------------------------------------

START THE PIECE HERE:

-------------------------------------------------------

JUMPER - SHORT OVERVIEW OF THE PIECE:
The yoke is worked in the round with circular needle, top down. The yoke is divided for body and sleeves and the body is continued in the round. The sleeves are worked in the round with double pointed needles.

YOKE:
Cast on 92-96-100-104-112-120 stitches with circular needle size 3 mm and light grey blue.
Knit 1 round. Then work rib (= knit 2 / purl 2).
Work rib for 3 cm. Change to circular needle size 4 mm.
Knit 1 round and increase 28-24-32-30-32-34 stitches evenly spaced – read INCREASE TIP = 120-120-132-134-144-154 stitches.
Then work pattern as follows (the round starts mid back):
Work A.1 (= 6-6-6-5-5-5 stitches) over the first 12-12-12-10-10-10 stitches (= a total of 2 times), A.2 (= 12 stitches), A.1 over the next 42-42-48-50-55-60 stitches (= a total of 7-7-8-10-11-12 times), A.2 over the next 12 stitches, A.1 over the last 42-42-48-50-55-60 stitches (= a total of 7-7-8-10-11-12 times).
REMEMBER THE KNITTING TENSION!
When A.1 and A.2 have been worked 1 time in height there are 244-244-270-322-348-374 stitches on the needle. The piece measures approx. 16 cm (including the rib).
Knit 1 round with light grey and increase 11-11-15-8-12-1 stitches evenly on round = 255-255-285-330-360-375 stitches.
Work A.3 (= 15 stitches) over all stitches (= a total of 17-17-19-22-24-25 times in width).
When A.3 has been worked 1 time in height there are 306-340-361-396-432-450 stitches on the needle.
The piece is now worked with light grey to finished length.
Work stocking stitch until the piece measures 21-23-25-26-28-30 cm (including the rib).
Then divide the piece for body and sleeves as follows:
Work 44-48-50-56-62-67 stitches stocking stitch (= half back piece), place the next 64-72-79-84-90-90 stitches on a thread for sleeve and cast on 8-8-10-10-10-14 new stitches under the sleeve, work 89-99-102-115-127-135 stitches stocking stitch (= front piece), place the next 64-72-79-84-90-90 stitches on a thread for sleeve and cast on 8-8-10-10-10-14 new stitches under the sleeve, finally work 45-49-51-57-63-68 stitches stocking stitch (= half back piece) = 194-212-223-248-272-298 stitches.

BODY:
Continue working in stocking stitch. When the piece measures 26-26-26-27-27-27 cm from where the body was divided from the sleeves, increase 26-32-33-32-40-42 stitches evenly on next round = 220-244-256-280-312-340 stitches. Change to circular needle size 3 mm and work rib (= knit 2 / purl 2) over all stitches (the yarn overs are worked twisted to avoid holes). Cast off with knit when the rib measures 4 cm (i.e. the piece measures a total of approx. 30-30-30-31-31-31 cm from where the body was divided from the sleeves). The jacket measures a total of 54-56-58-60-62-64 cm, measured from the shoulder.

SLEEVE:
Place the 64-72-79-84-90-90 stitches from the thread on the one side of the piece on double pointed needles size 4 mm and knit up 1 stitch in each of the 8-8-10-10-10-14 stitches cast on under the sleeve = 72-80-89-94-100-104 stitches. Insert 1 marker thread in the middle of the 8-8-10-10-10-14 stitches (= mid under sleeve). Work stocking stitch in the round with light grey. When the piece measures 1 cm from where the sleeve was divided from the body, decrease 2 stitches mid under sleeve – read DECREASE TIP. Decrease like this every 3-2-1½-1½-1½-1 cm a total of 11-15-18-19-22-23 times = 50-50-53-56-56-58 stitches. When the sleeve measures 40-38-37-36-35-33 cm from where the sleeve was divided from the body, increase 2-2-3-0-4-2 evenly on round = 52-52-56-56-60-60 stitches. Change to double pointed needles size 3 mm. Work rib in the round (= knit 2 / purl 2). Cast off with knit when the piece measures 44-42-41-40-39-37 cm from where the sleeve was divided from the body (approx. 4 cm rib). Work the other sleeve in the same way.

This pattern has been corrected.

Updated online: 31.07.2018
Small edit in diagram A.1 in sizes XL-XXL-XXXL.
Updated online: 06.08.2018
Correction: YOKE:
Cast on 92-96-100-104-112-120 stitches with circular needle size 3 mm and light grey blue.
Knit 1 round. Then work rib (= knit 2 / purl 2).
Work rib for 3 cm. Change to circular needle size 4 mm.
Knit 1 round and increase 28-24-32-30-32-34 stitches evenly spaced – read INCREASE TIP = 120-120-132-134-144-154 stitches...

Diagram

symbols = light grey blue
symbols = off white
symbols = black
symbols = light grey
symbols = between 2 stitches make 1 yarn over, work the yarn over twisted on next round
diagram
diagram
diagram
diagram
diagram

Each of our patterns has specific tutorial videos to help you.

Do you have a question? See a list of frequently asked questions (FAQ)

Knitting tension is what determines the final measurements of your work, and is usually measured per 10 x 10 cm. It is provided like so: number of stitches in width x number of rows in height - eg: 19 stitches x 26 rows = 10 x 10 cm.

The knitting tension is very individual; some people knit/crochet loosely while others work tightly. You adjust the knitting tension with the needle size, which is why the suggested needle size is only meant as a guide! You need to adjust this (up or down) to ensure that YOUR knitting tension matches the knitting tension provided in the pattern. If you work with a different knitting tension than provided you will have a different yarn consumption, and your work will have different measurements than what the pattern suggests.

The knitting tension also determines which yarns can replace each other. As long as you achieve the same knitting tension you can replace one yarn with another.

See DROPS lesson: How to measure your tension/gauge

See DROPS video: How to make a gauge tension swatch

The required amount of yarn is provided in grams, eg: 450 g. To calculate how many balls you’ll need you first need to know how many grams are in 1 ball (25g, 50g or 100g). This information is available if you click on the individual yarn quality on our pages. Divide the amount required with the amount of each ball. For example, if each ball is 50g (the most common amount), the calculation will be as follows: 450 / 50 = 9 balls.

The important thing when changing from one yarn to another is that the knitting/crochet tension remains the same. This is so that the measurements of the finished piece will be the same as on the sketch provided. It is easier to achieve the same knitting tension using yarns from the same yarn group. It is also possible to work with multiple strands of a thinner yarn to achieve the knitting tension of a thicker one. Please try our yarn converter. We recommend you to always work a test swatch.

Please NOTE: when changing yarn the garment might have a different look and feel to the garment in the photo, due to individual properties and qualities of each yarn.

See DROPS lesson: Can I use a different yarn than the one mentioned in the pattern?

All our yarns are categorised into yarn groups (from A to F) according to thickness and knitting tension – group A contains the thinnest yarns and group F the thickest. This makes it easier for you to find alternative yarns to our patterns, should you wish to switch yarn. All yarns within the same group have a similar knitting tension and can easily replace each other. However, different yarn qualities have different structures and properties which will give the finished work a unique look and feel.

Click here for an overview of the yarns in each yarn group

At the top of all our patterns you’ll find a link to our yarn calculator, which is a helpful tool should you wish to use a different yarn than suggested. By filling in the yarn quality you wish to replace, the amount (in your size) and number of strands, the calculator will present good alternative yarns with the same knitting tension. Additionally it will tell you how much you’ll require in the new qualities and whether you’ll need to work with multiple strands. Most skeins are 50g (some are 25g or 100g).

If the pattern is worked with multiple colours, every colour will have to be calculated separately. Similarly, if the pattern is worked with several strands of different yarns (for example 1 strand Alpaca and 1 strand Kid-Silk) you will have to find alternatives for each, individually.

Click here to see our yarn calculator

Since different yarns have different qualities and textures we have chosen to keep the original yarn in our patterns. However, you can easily find options among our available qualities by using our yarn calculator, or simply pick a yarn from the same yarn group.

It is possible that some retailers still have discontinued yarns in stock, or that someone has a few skeins at home that they would like to find patterns for.

The yarn calculator will provide both alternative yarn as well as required amount in the new quality.

If you think it's hard to decide what size to make, it can be a good idea to measure a garment you own already and like the size of. Then you can pick the size by comparing those measures with the ones available in the pattern's size chart.

You'll find the size chart at the bottom of the pattern.

See DROPS lesson: How to read size chart

The needle size provided in the pattern serves only as a guide, the important thing is to follow the knitting tension. And since knitting tension is very individual, you will have to adjust the needle size to ensure that YOUR tension is the same as in the pattern – maybe you’ll have to adjust 1, or even 2 needle sizes, up or down to achieve the correct tension. For this, we recommend that you work test swatches.

Should you work with a different knitting tension than the one provided, the measurements of the finished garment might deviate from the measurement sketch.

See DROPS lesson: How to measure your tension/gauge

See DROPS video: How to make a tension/gauge swatch

Working a garment top-down provides more flexibility and room for personal adjustment. For example it is easier to try the garment on while working, as well as making adjustments to length of yoke and shoulder caps.

The instructions are carefully explaining every step, in the correct order. Diagrams are adjusted to the knitting direction and are worked as usual.

The diagram depicts all rows/rounds, and every stitch seen from the right side. It is read from bottom to top, from right to left. 1 square = 1 stitch.

When working back and forth, every other row is worked from the right side and every other row is worked from the wrong side. When working from the wrong side, the diagram will have to be worked reversed: from left to right, knit stitches are purled, purl stitches are knit etc.

When working in the round every round is worked from the right side and the diagram are worked from right to left on all rounds.

See DROPS lesson: How to read knitting diagrams

The diagram depicts all rows/rounds, and every stitch seen from the right side. It is worked from bottom to top, from right to left.

When working back and forth every other row is worked from the right side: from right to left and every other row is worked from the wrong side: from left to right.

When working in the round, every row in the diagram are worked from the right side, from right to left.

When working a circular diagram you start in the middle and work your way outwards, counter clockwise, row by row.

The rows usually start with a given number of chain stitches (equivalent to the height of the following stitch), this will either be depicted in the diagram or explained in the pattern.

See DROPS lesson: How to read crochet diagrams

Instructions for working several diagrams after each other on the same row/round, will often be written like so: “work A.1, A.2, A.3 a total of 0-0-2-3-4 times". This means you work A.1 once, then A.2 is worked once, and A.3 is repeated (in width) the number of times provided for your size – in this case like so: S = 0 times, M = 0 times, L=2 times, XL= 3 times and XXL = 4 times.

The diagrams are worked as usual: begin with the first row in A.1, then work the first row in A.2 etc.

See DROPS lesson: How to read knitting diagrams

See DROPS lesson: How to read crochet diagrams

The total width of the garment (from wrist-to-wrist) will be larger in the larger sizes, despite the actual sleeves being shorter. The larger sizes have longer sleeve caps and wider shoulders, so there will be a good fit in all sizes.

The measurement sketch/schematic drawing provides information regarding the full length of the garment. If it’s a jumper or a jacket the length is measured from the highest point on the shoulder closest to the neckline, and straight down to the bottom of the garment. It is NOT measured from the tip of shoulder. Similarly, the length of yoke is measured from the highest point on the shoulder and down to where yoke is split into body and sleeves.

On a jacket measures are never taken along bands, unless specifically stated. Always measure inside band stitches when measuring the length.

See DROPS lesson: How to read a schematic drawing

Diagrams are often repeated on the round or in height. 1 repeat is the diagram the way it appears in the pattern. If it says to work 5 repeats of A.1 in the round, then you work A.1 a total of 5 times after/next to each other in the round. If it says to work 2 repeats of A.1 vertically/in height you work the entire diagram once, then begin again at the start and work the entire diagram one more time.

Chain stitches are slightly narrower than other stitches and to avoid working the cast-on edge too tight, we simply chain more stitches to begin with. The stitch count will be adjusted on the following row to fit the pattern and measurement sketch.

The rib edge is more elastic and will contract slightly compared to, for example, stocking stitch. By increasing before the rib edge, you avoid a visible difference in width between the rib edge and the rest of the body.

It’s very easy to cast off too tightly, and by making yarn overs while casting off (and simultaneously casting these off) you avoid a too tight cast off edge.

See DROPS video: How to bind off with yarn overs (yo)

To achieve an even increase (or decrease) you can increase on, for example: every 3rd and 4th row alternately, like so: work 2 rows and increase on the 3rd row, work 3 rows and increase on the 4th. Repeat this until the increase is complete.

See DROPS lesson: Increase or decrease 1 st on every 3rd and 4th row alternately

Should you prefer to work in the round instead of back and forth, you may of course adjust the pattern. You’ll need to add steeks mid-front (usually 5 stitches), and follow the instructions. When you would normally turn and work from the wrong side, simply work across the steek and continue in the round. At the end you’ll cut the piece open, pick up stitches to work bands, and cover the cut edges.

See DROPS video: How to knit steeks and cut open

Should you prefer to work back and forth instead of in the round, you may of course adjust the pattern so you work the pieces separately and then assemble them at the end. Divide the stitches for the body in 2, add 1 edge stitch in each side (for sewing) and work the front and back pieces separately.

See DROPS lesson: Can I adapt a pattern for circular needles into straight needles?

Pattern repeats can vary slightly in the different sizes, in order to get the correct proportions. If you’re not working the exact same size as the garment in the photo, yours might deviate slightly. This has been carefully developed and adjusted so that the complete impression of the garment is the same in all sizes.

Make sure to follow instructions and diagrams for your size!

If you have found a pattern you like which is available in women’s size it’s not very difficult to convert it to men’s size. The biggest difference will be the length of sleeves and body. Start working on the women size that you think would fit across the chest. The additional length will be worked right before you cast off for the armhole/sleeve cap. If the pattern is worked top-down you can add the length right after the armhole or before the first decrease on sleeve.

Regarding additional yarn amount, this will depend on how much length you add, but it is better with a skein too many than too few.

All yarns will have excess fibres (from production) that might come off as lint or shedding. Brushed yarns (ie hairier yarns) have more of these loose, excess fibres, causing more shedding.

Shedding also depends on what is worn under or over the garment, and whether this pulls at the yarn fibres. It’s therefore not possible to guarantee that there will be no shedding

Below are some tips on how to get the best result when working with hairier yarns:

1. When the garment is finished (before you wash it) shake it vigorously so the looser hairs come off. NOTE: do NOT use a lint roller, brush or any method that pulls at the yarn.

2. Place the garment in a plastic bag and put it in your freezer - the temperature will cause the fibres to become less attached to each other, and excess fibres will come off easier.

3. Leave in the freezer for a few hours before taking it out and shaking it again.

4. Wash the garment according to the instructions on the yarn label.

Pilling is a natural process that happens to even the most exclusive of fibers. It's a natural sign of wear and tear that is hard to avoid, and that is most visible in high friction areas of your garment like a sweater's arms and cuffs.

You can make your garment look as new by removing the pilling, using a fabric comb or a pill/lint remover.

Still can't find the answer you need? Then scroll down and leave your question so one of our experts can try to help you. This will be done normally within 5 to 10 working days.
In the meantime, you can read the questions and answers that others have left to this pattern or join the DROPS Workshop on Facebook to get help from fellow knitters/crocheters!

You might also like...

Sheep Happens!

Stefanie Altenhofer, Germany

Sheep Happens!

Dominique, France

Sheep Happens!

Gillian Johnstone, Cyprus

Sheep Happens!

Guinevere, Greece

Sheep Happens!

rawgreenbeans, United States

Sheep Happens!

Lin, United States

Sheep Happens!

Karo, Finland

Sheep Happens!

Claudia, United States

Post a comment to pattern DROPS 194-2

We would love to hear what you have to say about this pattern!

If you want to leave a question, please make sure you select the correct category in the form below, to speed up the answering process. Required fields are marked *.

Comments / Questions (126)

country flag Ksenia wrote:

Hello, drops! I have started knitting this sweater and got to the mid-body, but when I tried it on, it did not sit as well as expected. Seems the problem is because there is no elevation of the back. So my question is why there is no elevation of the back of this sweater?

29.04.2020 - 07:48

DROPS Design answered:

Dear Ksenia, some of our patterns do have an elevation on back piece, some others, like this one, do not, so that the neck is the same on front and back piece. If you rather like one, you can take inspiration from a similar pattern (same tension) with an elevation. Happy knitting!

29.04.2020 - 09:19

country flag Elizabeth wrote:

Thank you for a beautiful pattern. I am confused about stitch increase frequency from the neck rib down. Should l increase 32 stitches every 4th row? This is the first time l have knitted anything from the top down. Many thanks

13.04.2020 - 19:22

DROPS Design answered:

Dear Elizabeth, you are working the 3rd or 5th size, right? You work 3 cm rib then knit 1 round with larger needle increasing evenly 32 stitches (read more here how to increase evenly) on the round, there are now 132 sts in 3d size and 144 sts in 5th size. You then continue working following diagrames - read more about diagrams here. Happy knitting!

14.04.2020 - 13:14

country flag Allison wrote:

Hi, this will be my first time using circular needles - the pattern says to have both 40cm and 80cm needles, but doesn't say which ones should be used where. Which length of needle should be used at what point? Thanks!

10.04.2020 - 20:56

DROPS Design answered:

Dear Allison, you will first start with the 40 cm circular needle, then when you will have increased enough stitches, you will continue with 80 cm needle. Happy knitting!

14.04.2020 - 10:50

country flag Kristin wrote:

Hei. Jeg får det ikke til å stemme med mønsteret. Strikker str M, og er kommet til omgang 12 i mønsteret. Forstår jeg det rett, så skal A1 strikkes 2 ganger, A2 en gang før A1 strikkes 7 ganger, A2 en gang, for så A1 7 ganger. Har nå 170 masker på pinnene, men teller meg frem til at det skal være 156. Hva gjør jeg galt?

17.02.2020 - 09:20

DROPS Design answered:

Hej Kristin, sæt gerne er mærke imellem hver rapport. På denne måde kan du let kontrollere om du har fået alle udtagninger med fra hver rapport. God fornøjelse!

18.02.2020 - 14:10

country flag Jayne Price wrote:

Please can a tutorial be done it would make it a lot easier for us that haven't do this before I have managed to do the hat and need the jumper

05.01.2020 - 03:28

DROPS Design answered:

Dear Mrs Price, you will find tutorial videos relevant to this pattern here. Happy knitting!

06.01.2020 - 08:37

country flag Line wrote:

Avec des aiguilles no 6, j'arrive à 15 cm de large, comment régler la confection ?

19.12.2019 - 22:37

DROPS Design answered:

Bonjour Line, tricotez-vous bien Merino Extra Fine ou Lima? Vous devez avoir 21 m x 28 rangs = 10 x 10 cm. Si vous utilisez une autre laine d'une épaisseur différente, et donc d'un échantillon différent, il vous faudra recalculer le modèle en fonction de vos mesures. N'hésitez pas à contacter le magasin où vous avez acheté votre laine. Bon tricot!

20.12.2019 - 09:15

country flag Anne Grethe Tønnesen Evensen wrote:

Strikker denne i str L, holder på med a3 i mønster har strikket 2 økninger og skal til på tredje mønster med hvitt men det stemmer ikke med mønster, disse mønstrene skal være jevnt , h å er galt?

18.09.2019 - 22:35

DROPS Design answered:

Hej Anne Grethe, Jo mønsteret stemmer. Sæt gerne et mærke imellem hver rapport, så du er sikker på at få økningerne med i alle rapporter hele vejen rundt. God fornøjelse!

02.10.2019 - 11:49

country flag Morag MacNeil wrote:

Hi, I cannot seem to find a size chart ( like a previous knitter) at the bottom of the pattern, I also looked at your sizing guide and couldn’t make that out either, please can you tell me what an average Uk size 16 /18 would be on this pattern. Many thanks.

15.09.2019 - 10:23

DROPS Design answered:

Dear Mrs MacNeil, measure one similar garment you have and like the shape, then compare these measurements to those in the measurement chart to find out the matching size. Read more about sizing here. Happy knitting!

16.09.2019 - 11:07

country flag Astrid Fredriksen wrote:

Strikker genser i str L Har begynt med økninger og det ser ut som det er 20 masker på hver runde med økninger på bærestykket. Likevel så står det at det skal være 270 igjen til slutt men hvis jeg teller 20 så står jeg igjen med 272masker?

11.09.2019 - 13:08

DROPS Design answered:

Hej Astrid, du har 7 udtagninger for hver gang du strikker A.1 og 6 i A.2 og 4 i A.3 (så det stemmer ikke med 20 pr omgang). Hvis du ellers har fået mønsteret til at stemme, så er det lettere at tage de 2 masker ind (jævnt fordelt) som du har for meget end at trevle det hele op. God fornøjelse!

12.09.2019 - 13:45

country flag Tanja wrote:

Same problem as Barbara, 10.12.2018 - 17:32: when trying to print this pattern, you will only get 1 page (to the part about needles). This is the only pattern with this problem, so it is not about the printer.

01.09.2019 - 17:53

DROPS Design answered:

Dear Tanja, we successfully could print this pattern in your language, make sure your settings are right, you can try to refresh the page before trying to print it again. Happy knitting!

02.09.2019 - 11:42