
Popular categories
Looking for a yarn?


|
|||||||||||||||||||
Last Days of Autumn |
|||||||||||||||||||
 |
 |
||||||||||||||||||
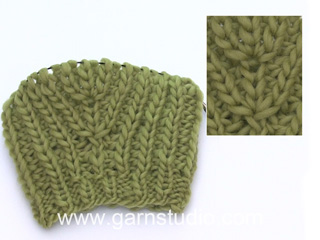
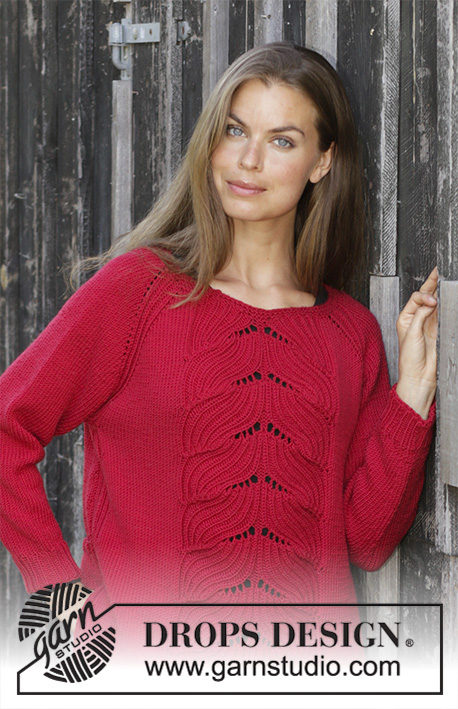
Knitted jumper with raglan in DROPS Alpaca. The piece is worked top down in false English rib and with rolled edge. Sizes S - XXXL.
DROPS 197-2 |
|||||||||||||||||||
|
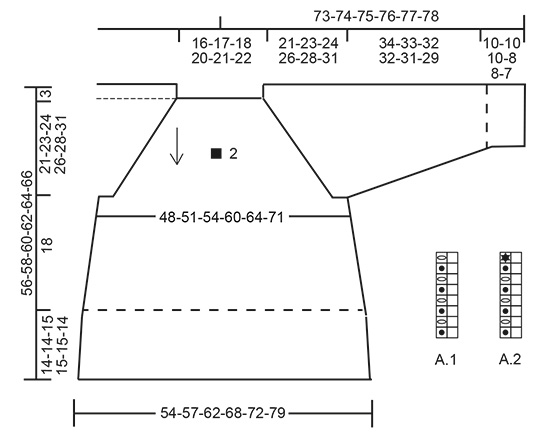
------------------------------------------------------- EXPLANATIONS FOR THE PATTERN: ------------------------------------------------------- PATTERN: See diagrams A.1 and A.2. KNITTING TENSIONS: The texture of the garment will stretch when worn; we have therefore given 2 knitting tensions and 2 sketches. Knitting tension 1 and sketch 1 apply when the garment is worked and lies flat. It is this/these knitting tensions/measurements the piece should have when worked. Knitting tension 2 and sketch 2 are for when the garment is worn. The knitting tension in height is given after the knitted stitch, which is worked over 1 row less than the purled stitch, because the knitted stitch is slipped onto the right needle every 2nd round. In other words, 24 rows in height measured in the knitted stitch on 10 cm are equivalent to 48 rows measured in the purled stitch on 10 cm in height. INCREASE TIP-1 (for sides of body): All increases are made on a round where the yarn over and knitted stitch are knitted together! Work 5 stitches in the stitch and yarn over as follows: Knit the yarn over and stitch together, but wait to slip the yarn over and worked stitch off the needle, * make 1 yarn over the right needle and knit 1 more stitch in the stitch and yarn over worked *, work from *-* a total of 2 times = 5 stitches (= 4 stitches increased). Increase like this by both markers (= a total of 8 stitches increased). The increased stitches are worked into the pattern. INCREASE TIP-2 (evenly spaced): To work out how to increase evenly, count the total number of stitches on the needle (e.g. 216 stitches) and divide these stitches by the number of increases to be made (e.g. 44) = 4.9. In this example, increase by making 1 yarn over after approx. each 5th stitch. On the next round, knit the yarn overs twisted to avoid holes. DECREASE TIP (for sleeves): All decreases are made on a round where the yarn over and knitted stitch are knitted together! Decrease as follows: Work until there are 3 stitches left before the marker thread (without the yarn overs, the yarn overs between the stitches are also slipped), slip the next 3 stitches to right needle as if to knit together: Slip 1 knit stitch + 1 purl stitch + 1 knit stitch (= stitch with marker) = 3 stitches without the yarn overs. Then knit together: 1 purl stitch and 1 knit stitch (= 2 stitches). Now pass the 3 slipped stitches over the stitches that was knitted together (= 4 stitches decreased – not counting the yarn overs). ------------------------------------------------------- START THE PIECE HERE: ------------------------------------------------------- JUMPER - SHORT OVERVIEW OF THE PIECE: The piece is worked in the round with circular needle, top down. The yoke is worked first in false English rib, then the yoke is divided for body and sleeves. The body is continued in the round. The sleeves are worked in the round with double pointed needles. As the garment is worked with a texture which will stretch when worn, we have given 2 KNITTING TENSIONS – read description above. YOKE: Cast on 108-112-116-124-132-136 stitches with circular needle size 3 mm and Alpaca. Work 4 rounds stocking stitch (= rolled edge). Then work pattern as follows: The round starts approx. mid back. Half back piece: Work A.1 (= 2 stitches) over the first 20-20-22-24-26-26 stitches. Right sleeve: Work A.2 (= 2 stitches), A.1 over the next 12 stitches, A.2 over the next 2 stitches. Front piece: Work A.1 over the next 38-40-42-46-50-52 stitches. Left sleeve: Work A.2 over the next 2 stitches, A.1 over the next 12 stitches, A.2 over the next 2 stitches. Half back piece: Work A.1 over the last 18-20-20-22-24-26 stitches. On round 8 (i.e. every 4th round in the knitted stitch) in A.2 increase 4 stitches in each A.2 (= a total of 16 stitches, the increase is drawn in the diagram), the increased stitches are worked into pattern A.1. Continue the pattern like this in height. I.e. you increase a total of 16 stitches every 8th round. REMEMBER THE KNITTING TENSION! Work A.1 and A.2 a total of 12-13-14-15-16-18 times in height. In other words, you have now increased 12-13-14-15-16-18 times = 300-320-340-364-388-424 stitches. Continue working A.1 over all stitches until the piece measures 21-23-24-26-28-31 cm from the cast-on edge. Now divide the piece for body and sleeves as follows: Half back piece: Work pattern as before over the first 44-46-50-54-58-64 stitches. Right sleeve: Place the next 64-68-72-76-80-84 stitches on a thread for sleeve and cast on 10-10-10-14-14-14 stitches under the sleeve. Front piece: Work pattern as before over the next 86-92-98-106-114-128 stitches. Left sleeve: Place the next 64-68-72-76-80-84 stitches on a thread for sleeve and cast on 10-10-10-14-14-14 stitches under the sleeve. Half back piece: Work pattern as before over the last 42-46-48-52-56-64 stitches. BODY: = 192-204-216-240-256-284 stitches. Continue in the round with pattern. When the piece measures 3 cm from where the body and sleeves were divided, insert 1 marker in the middle knitted stitch under each sleeve (= in sides). On the next round (adjust so that the next round is a round where the yarn over and knitted stitch are knitted together), increase in the stitch with the marker under each sleeve – read INCREASE TIP-1. Increase like this every 5-5-4-4-4-4 cm a total of 3-3-4-4-4-4 times = 216-228-248-272-288-316 stitches. When the piece measures 18 cm from where the body and sleeves were divided (adjust so that the last round is a round without yarn overs) continue working in stocking stitch. On first round in stocking stitch increase 44-44-48-56-56-64 stitches evenly on round – read INCREASE TIP-2 = 260-272-296-328-344-380 stitches. When the piece measures 31-31-32-32-32-31 cm from where the body and sleeves were divided, work rib in the round (= knit 3, purl 1). Work a total of 3 rounds. Then knit 1 round before casting off with knit. SLEEVE: Knit up 1 stitch in each of the last 5-5-5-7-7-7 stitches that where cast on under the sleeve, work the 64-68-72-76-80-84 stitches from the thread on one side of the piece and knit up 1 stitch in each of the first 5-5-5-7-7-7 stitches that where cast on under the sleeve = 74-78-82-90-94-98 stitches. Work pattern in the round. When the piece measures 3 cm from where the sleeve was divided from the body, insert 1 marker in the middle knitted stitch under the sleeve. On the next round (adjust so that the next round is 1 round where the yarn over and knitted stitch are knitted together), decrease 2 stitches on each side of the stitch with the marker - read DECREASE TIP. Decrease like this every 5-4-3½-3-2½-2½ cm a total of 7-8-9-10-11-11 times = 46-46-46-50-50-54 stitches. When the sleeve measures 34-33-32-32-31-29 cm from where the sleeve was divided from the body (adjust so that the last round is a round without yarn overs) continue working stocking stitch. On the first round with stocking stitch increase 10 stitches evenly on round = 56-56-56-60-60-64 stitches. Work stocking stitch until the piece measures 43-42-41-39-38-35 cm from where the sleeve was divided from the body. On the next round work rib in the round (= knit 3, purl 1). Work a total of 3 rounds of rib. Knit 1 round and cast off with knit. The sleeve measures approx. 65-66-66-66-67-67 cm from the cast-on edge. Work the other sleeve in the same way. |
|||||||||||||||||||
Diagram explanations |
|||||||||||||||||||
|
|||||||||||||||||||
|
|||||||||||||||||||

|
|||||||||||||||||||
|
Have you made this or any other of our designs? Tag your pictures in social media with #dropsdesign so we can see them! Do you need help with this pattern?You'll find tutorial videos, a Comments/Questions area and more by visiting the pattern on garnstudio.com. © 1982-2024 DROPS Design A/S. We reserve all rights. This document, including all its sub-sections, has copyrights. Read more about what you can do with our patterns at the bottom of each pattern on our site. |
|||||||||||||||||||


With over 40 years in knitting and crochet design, DROPS Design offers one of the most extensive collections of free patterns on the internet - translated to 17 languages. As of today we count 304 catalogues and 11422 patterns - 11422 of which are translated into English (UK/cm).
We work hard to bring you the best knitting and crochet have to offer, inspiration and advice as well as great quality yarns at incredible prices! Would you like to use our patterns for other than personal use? You can read what you are allowed to do in the Copyright text at the bottom of all our patterns. Happy crafting!
Comments / Questions (68)
Angående økningen i A2 hver 8.omgang: Skal det økes rett over forrige økning som på instruksjonsvideoen, eller skal det forskyves noe sideveis? oppskriften er ikke dekkende.
03.05.2019 - 21:37Angående økningen i A2 hver 8.omgang: Skal det alltid økes rett over forrige økning som på instruksjonsvideoen - eller skal det forskyves noe sideveis?
03.05.2019 - 21:36Hej Hvorfor vælger man at strikke oppe fra og ned? Jeg synes at det er nemmere (vant til ;-) ) at strikke nede fra og op? Mvh Hanne
03.03.2019 - 10:59DROPS Design answered:
Hei Hanne. Det er fordi det gir mer fleksibilitetet til strikkeren. Det er lettere å justere plaggets lengde (særlig på bærestykket) om det strikeks ovenfra og ned. Altså det blir penere å feks legge til på lengden nærmere ermhullet enn øverst ved halsen. Det er også lettere å prøve plagget på underveis når det strikkes ovenfra og ned. God fornøyelse
04.03.2019 - 14:45Buon giorno! Sto realizzando questo modello ma sono in difficoltà per diminuire nelle maniche. Non ho ben compreso la spiegazione. La diminuzione si esegue nel giro in cui sui ferri si hanno anche le maglie gettate, giusto? Queste vanno passate sul ferro destro ma poi vanno accavallate tutte sulle due che vengono lavorate insieme? Mi sembrano un po' tante! Inoltre nel modo descritto vengono diminuite 4 maglie, per cui come posso fare per diminuire solo 2 maglie per ciascun lato?
20.02.2019 - 10:15DROPS Design answered:
Buongiorno Agnese. Deve diminuire sui giri dove la maglia gettata e la maglia diritto vengono lavorate insieme a diritto. Deve diminuire 2 maglie prima e dopo il segno, come indicato nel paragrafo: suggerimento per le diminuzioni. Ad ogni segno vengono quindi diminuite 4 maglie. Buon lavoro!
20.02.2019 - 11:40Bonjour, pourquoi indiquez vous deux longueurs de cable d'aiguilles : 40 cm et 80 cm . Je ne vois pas à quel moment vous changez de longueur de cables.Merci
23.01.2019 - 08:37DROPS Design answered:
Bonjour Pascaline, on va commencer avec la petite aiguille circulaire de 40 cm pour l'empiècement, puis, au fur et à mesure des augmentations, on n'aura plus assez de place, on changera alors pour l'aiguille circulaire de 80 cm. Bon tricot!
23.01.2019 - 09:55The pattern says it's worked in false fisherman's rib, but the stitch described is false English rib. Also, in the stitch description, it says to purl together the yarn over and the knitted stitch when it should say purl together the yarn over and the slipped stitch. I found this all very confusing until I searched your site and found the correct videos showing me what to do.
22.01.2019 - 13:37DROPS Design answered:
Dear Mrs Berkel, thanks for your feedback, pattern will be edited into false English rib. Happy knitting!
23.01.2019 - 08:38Hola buenos días, lo que quiero saber es cuantas madejas tendría que pedir para un jerseis de una talla M ó L. Un saludo
16.01.2019 - 11:29DROPS Design answered:
Hola Angeles. Para la talla M necesitas 8 ovillos de Alpaca y para la talla L 9 ovillos.
20.01.2019 - 12:00Sim a tradução esta errada. Ele é feito de baixo para cima e não de cima para baixo.
10.01.2019 - 18:04Mijn proeflapje is na 24 naalden 5 cm. Klopt dat met wat hieronder staat? " De stekenverhouding in de hoogte is opgegeven na de recht gebreide steek, welke wordt gebreid over 1 naald minder dan de averecht gebreide steek, omdat de recht gebreide steek op de rechter naald wordt gezet iedere 2e naald. Met andere woorden, 24 naalden in de hoogte gemeten in de recht gebreide steek op 10 cm staat gelijk aan 48 naalden gemeten in de averecht gebreide steek op 10 cm in de hoogte."
27.11.2018 - 09:05DROPS Design answered:
Dag Mariëtte
Klopt precies zoals je het zegt en je stekenverhouding klopt dus mooi. Maar let er ook op of het breiwerk plat ligt of gedragen wordt. Dit is dus stekenverhouding 1.
28.11.2018 - 12:27Ik wil graag deze trui gaan breien, maar ik begrijp A1 en A2 niet. Moet ik gewoon A1 breien, en rekt het dan vanzelf uit naar A2?????
25.11.2018 - 17:27DROPS Design answered:
Dag Mariette,
In het patroon staat precies beschreven waar je A.2 moet breien. Deze brei je namelijk op de raglanlijnen. In A.2 zijn namelijk meerderingen voor de raglan verwerkt (stersymbooltje), maar dit is niet op elke naald, maar op iedere 8e naald, waardoor A.2 voor een groot deel op A.1 lijkt.
28.11.2018 - 12:38