DROPS Paris
DROPS Paris
100% Cotton
from 2.20 CAD /50g
Get the yarn to make this pattern from 15.40CAD.

The yarn cost is calculated from the pattern’s smallest size and the yarn’s cheapest product type. Looking for an even better price? You might find it on the DROPS Deals!

DROPS SS24

Sailor Jane

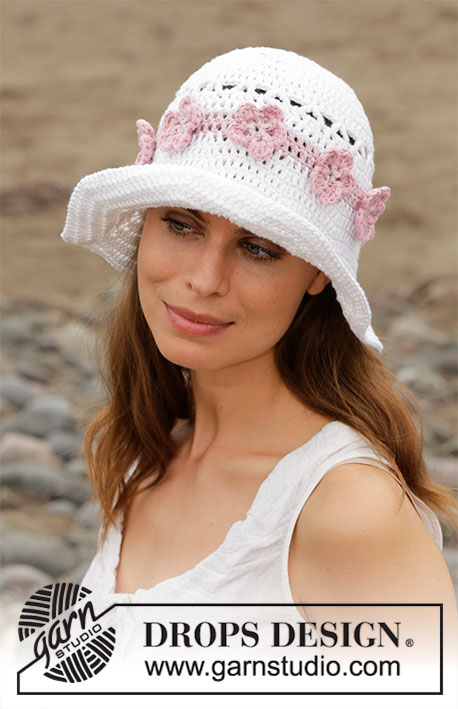
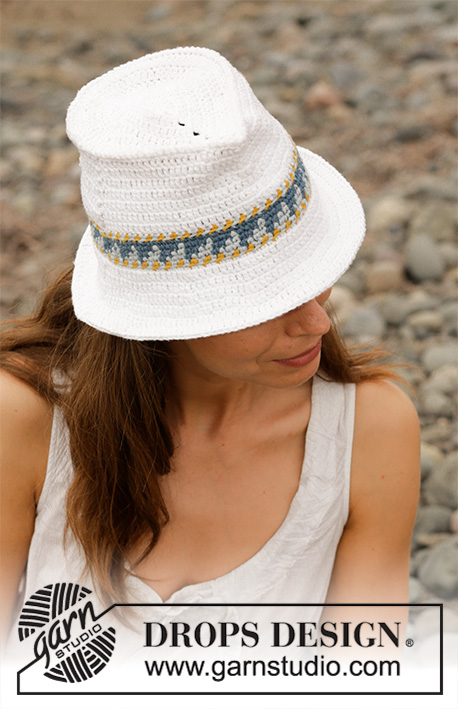
Set consists of: Crocheted hat with crocheted band and bracelet. Piece is crocheted in DROPS Paris.

DROPS 190-22
DROPS design: Pattern w-682
Yarn group C
----------------------------------------------------------
HAT:
Size: One-size
Materials:
DROPS PARIS from Garnstudio (belongs to yarn group C)
150 g color 48, petrol
50 g color 06, shocking pink
50 g color 17, off white

DROPS CROCHET Hook size 4 mm / G/6 - or size needed to get 17 double crochets x 10 rows = 10 cm / 4'' in width and 10 cm / 4'' vertically.

BRACELET:
DROPS PARIS from Garnstudio (belongs to yarn group C)
50 g color 06, shocking pink
50 g color 07, heather

DROPS CROCHET Hook size 4 mm / G/6 - or size needed to get 17 double crochets x 10 rows = 10 cm / 4'' in width and 10 cm / 4'' vertically.

Wooden beads for decoration – with ½ cm/1/4" hole (in diameter) in the middle so they can be thread easily:
For bracelet: 1 bead for each bracelet.

-------------------------------------------------------

Alternative Yarn – See how to change yarns here
Yarn Groups A to F – Use the same pattern and change the yarn here
Yarn usage using an alternative yarn – Use our yarn converter here

-------------------------------------------------------

DROPS Paris
DROPS Paris
100% Cotton
from 2.20 CAD /50g
Get the yarn to make this pattern from 15.40CAD.

The yarn cost is calculated from the pattern’s smallest size and the yarn’s cheapest product type. Looking for an even better price? You might find it on the DROPS Deals!

Pattern instructions

NOTE: This pattern is written in American English. All measurements in charts are in cm. For conversion from inches to cm - click here. There are different terms for crocheting in American and British English. If this pattern includes crochet, click for "crochet terms" here. For this pattern in British English, please click here.
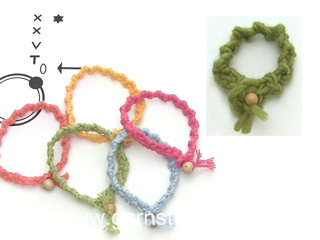
INFORMATION FOR PATTERN:

CROCHET INFO:
Replace first treble crochet on round with 4 chain stitches, finish round with 1 slip stitch in 4th chain stitch Replace first single crochet on round with 1 chain stitch, finish round with 1 slip stitch in first chain stitch

PATTERN:
See diagram A.1 (bracelet).
----------------------------------------------------------

HAT:
The hat is worked top down.

Work 7 chain stitches on hook size 4 mm / G/6 with petrol and form a ring with one slip stitch in first chain stitch.

ROUND 1: Work 13 single crochet in ring – read CROCHET INFO!
ROUND 2: Work 2 treble crochets in every single crochet = 26 treble crochets.
ROUND 3: * Work 1 single crochet in next treble crochet, 2 single crochets in next treble crochet *, repeat from *-* the entire round = 39 single crochets.
ROUND 4: * Work 1 treble crochet in each of the next 2 single crochets, 2 treble crochet in next single crochet *, repeat from *-* the entire round = 52 treble crochets.
ROUND 5: * Work 1 single crochet in each of the next 3 treble crochets, 2 single crochets in next treble crochet *, repeat from *-* the entire round = 65 single crochets.
ROUND 6: * Work 1 treble crochet in each of the next 4 single crochets, 2 treble crochets in next single crochet *, repeat from *-* the entire round = 78 treble crochets.

Work * 1 round with 1 single crochet in each treble crochet, 1 round with 1 treble crochet in every single crochet *, work from *-* until piece measures 18 cm / 7'', finish with a round with single crochets.

BRIM:
ROUND 1: * Work 1 treble crochet in next single crochet, 2 treble crochets in next single crochet *, repeat from *-* the entire round = 117 treble crochets.
ROUND 2: * Work 1 single crochet in each of the next 2 treble crochets, 2 single crochets in next treble crochet *, repeat from *-* the entire round = 156 single crochets.
ROUND 3: Work 1 treble crochet in every single crochet.
ROUND 4: Work 1 single crochet in every treble crochet.
ROUND 5: Work 1 treble crochet in every single crochet.
ROUND 5: Work 1 single crochet in every treble crochet. Fasten off.

CROCHET BAND:
Work on hook size 4 mm / G/6, begin with off white. Work 5 chain stitches with off white and form a ring with 1 slip stitch in first chain stitch made. Then work according to diagram A.2, so that every other row (marked with star) is worked with off white / shocking pink (stripes). Continue until band measures approx. 90 cm, tie a knot in each end. Tie the band around the hat.

----------------------------------------------------------
BRACELET:
Work on hook size 4 mm / G/6 and shocking pink. Work 5 chain stitches and form a ring with 1 slip stitch in first chain stitch made Then work according to diagram A.1. When piece measures approx. 19 cm from chain stitch ring, pull loop on hook until it measures approx. 12 cm / 4¾'', tie the long loop (= 2 strands) together with the other strand (= 1 strand). Thread a bead on the 3 strands and fasten by making a double knot at the end. Cut the 3 strands so that the end is approx. 1 cm / 3/8''. Work another bracelet in heather.

This pattern has been corrected.

Updated online: 12.05.2020
CROCHET BAND: ...Then work according to diagram A.2,

Diagram

symbols = work 5 chain stitches and form a ring with 1 slip stitch in first chain stitch made Black dot is beginning of round
symbols = begin here
symbols = 1 chain stitch
symbols = 1 single crochet around chain space ring, turn piece once towards the left so that wrong side of piece is towards you
symbols = insert hook top down in the outermost loop that is over the edge towards the left side of piece (= one stitch loop of chain stitch worked to form a ring at the beginning of piece), 1 yarn over, pull strand through first loop on hook, 1 yarn over, pull strand through the 2 loops on hook, turn piece once towards the left.
symbols = insert hook top down in the 2 loops place together over the edge towards left side of piece, 1 yarn over, pull yarn through the 2 loops, 1 yarn over, pull strand through the 2 loops on hook, turn piece 1 time towards the left.
symbols = repeat this row until piece measures approx. 19 cm/7½" from chain stitch ring worked at beginning of piece
symbols = with off white: insert hook top down in the 2 loops place together over the edge towards left side of piece, 1 yarn over, pull yarn through the 2 loops, 1 yarn over, pull strand through the 2 loops on hook, turn piece 1 time towards the left, do not cut the off white strand
symbols = with shocking pink: insert hook top down in the 2 loops place together over the edge towards left side of piece, 1 yarn over, pull yarn through the 2 loops, 1 yarn over, pull strand through the 2 loops on hook, turn piece 1 time towards the left, do not cut the shocking pink strand
symbols = repeat these 2 rows upwards, then work every other round with off white and shocking pink
diagram
Do you have a question? See a list of frequently asked questions (FAQ)

Knitting tension is what determines the final measurements of your work, and is usually measured per 10 x 10 cm. It is provided like so: number of stitches in width x number of rows in height - eg: 19 stitches x 26 rows = 10 x 10 cm.

The knitting tension is very individual; some people knit/crochet loosely while others work tightly. You adjust the knitting tension with the needle size, which is why the suggested needle size only serve as a guide! You need to adjust this (up or down) to ensure that YOUR knitting tension matches the knitting tension provided in the pattern. If you work with a different knitting tension than provided you will have a different yarn consumption, and your work will have different measurements than what the pattern suggests.

The knitting tension also determines which yarns can replace each other. As long as you achieve the same knitting tension you can replace one yarn with another.

See DROPS lesson: How to measure your tension/gauge

See DROPS video: How to make a gauge tension swatch

The required amount of yarn is provided in grams, eg: 450 g. To calculate how many balls you’ll need you first need to know how many grams are in 1 ball (25g, 50g or 100g). This information is available if you click on the individual yarn quality on our pages. Divide the amount required with the amount of each ball. For example, if each ball is 50g (the most common amount), the calculation will be as follows: 450 / 50 = 9 balls.

The important thing when changing from one yarn to another is that the knitting/crochet tension remains the same. This is so that the measurements of the finished piece will be the same as on the sketch provided. It is easier to achieve the same knitting tension using yarns from the same yarn group. It is also possible to work with multiple strands of a thinner yarn to achieve the knitting tension of a thicker one. Please try our yarn converter. We recommend you to always work a test swatch.

Please NOTE: when changing yarn the garment might have a different look and feel to the garment in the photo, due to individual properties and qualities of each yarn.

See DROPS lesson: Can I use a different yarn than the one mentioned in the pattern?

All our yarns are categorised into yarn groups (from A to F) according to thickness and knitting tension – group A contains the thinnest yarns and group F the thickest. This makes it easier for you to find alternative yarns to our patterns, should you wish to switch yarn. All yarns within the same group have a similar knitting tension and can easily replace each other. However, different yarn qualities have different structures and properties which will give the finished work a unique look and feel.

Click here for an overview of the yarns in each yarn group

At the top of all our patterns you’ll find a link to our yarn converter, which is a helpful tool should you wish to use a different yarn than suggested. By filling in the yarn quality you wish to replace, the amount (in your size) and number of strands, the converter will present good alternative yarns with the same knitting tension. Additionally it will tell you how much you’ll require in the new qualities and whether you’ll need to work with multiple strands. Most skeins are 50g (some are 25g or 100g).

If the pattern is worked with multiple colours, every colour will have to be converted separately. Similarly, if the pattern is worked with several strands of different yarns (for example 1 strand Alpaca and 1 strand Kid-Silk) you will have to find alternatives for each, individually.

Click here to see our yarn converter

Since different yarns have different qualities and textures we have chosen to keep the original yarn in our patterns. However, you can easily find options among our available qualities by using our yarn converter, or simply pick a yarn from the same yarn group.

It is possible that some retailers still have discontinued yarns in stock, or that someone has a few skeins at home that they would like to find patterns for.

The yarn converter will provide both alternative yarn as well as required amount in the new quality.

If you think it's hard to decide what size to make, it can be a good idea to measure a garment you own already and like the size of. Then you can pick the size by comparing those measures with the ones available in the pattern's size chart.

You'll find the size chart at the bottom of the pattern.

See DROPS lesson: How to read size chart

The needle size provided in the pattern serves only as a guide, the important thing is to follow the knitting tension. And since knitting tension is very individual, you will have to adjust the needle size to ensure that YOUR tension is the same as in the pattern – maybe you’ll have to adjust 1, or even 2 needle sizes, up or down to achieve the correct tension. For this, we recommend that you work test swatches.

Should you work with a different knitting tension than the one provided, the measurements of the finished garment might deviate from the measurement sketch.

See DROPS lesson: How to measure your tension/gauge

See DROPS video: How to make a gauge tension swatch

Working a garment top-down provides more flexibility and room for personal adjustment. For example it is easier to try the garment on while working, as well as making adjustments to length of yoke and shoulder caps.

The instructions are carefully explaining every step, in the correct order. Diagrams are adjusted to the knitting direction and are worked as usual.

The diagram depicts all rows/rounds, and every stitch seen from the right side. It is read from bottom to top, from right to left. 1 square = 1 stitch.

When working back and forth, every other row is worked from the right side and every other row is worked from the wrong side. When working from the wrong side, the diagram will have to be worked reversed: from left to right, knit stitches are purled, purl stitches are knit etc.

When working in the round every round is worked from the right side and the diagram are worked from right to left on all rounds.

See DROPS lesson: How to read knitting diagrams

The diagram depicts all rows/rounds, and every stitch seen from the right side. It is worked from bottom to top, from right to left.

When working back and forth every other row is worked from the right side: from right to left and every other row is worked from the wrong side: from left to right.

When working in the round, every row in the diagram are worked from the right side, from right to left.

When working a circular diagram you start in the middle and work your way outwards, counter clockwise, row by row.

The rows usually start with a given number of chain stitches (equivalent to the height of the following stitch), this will either be depicted in the diagram or explained in the pattern.

See DROPS lesson: How to read crochet diagrams

Instructions for working several diagrams after each other on the same row/round, will often be written like so: “work A.1, A.2, A.3 a total of 0-0-2-3-4 times". This means you work A.1 once, then A.2 is worked once, and A.3 is repeated (in width) the number of times provided for your size – in this case like so: S = 0 times, M = 0 times, L=2 times, XL= 3 times and XXL = 4 times.

The diagrams are worked as usual: begin with the first row in A.1, then work the first row in A.2 etc.

See DROPS lesson: How to read knitting diagrams

See DROPS lesson: How to read crochet diagrams

The total width of the garment (from wrist-to-wrist) will be larger in the larger sizes, despite the actual sleeves being shorter. The larger sizes have longer sleeve caps and wider shoulders, so there will be a good fit in all sizes.

The measurement sketch/schematic drawing provides information regarding the full length of the garment. If it’s a jumper or a jacket the length is measured from the highest point on the shoulder (usually closest to the neckline), and straight down to the bottom of the garment. It is NOT measured from the tip of shoulder. Similarly, the length of yoke is measured from the highest point on the shoulder and down to where yoke is split into body and sleeves.

See DROPS lesson: How to read a schematic drawing

Diagrams are often repeated on the round or in height. 1 repeat is the diagram the way it appears in the pattern. If it says to work 5 repeats of A.1 in the round, then you work A.1 a total of 5 times after/next to each other in the round. If it says to work 2 repeats of A.1 vertically/in height you work the entire diagram once, then begin again at the start and work the entire diagram one more time.

Chain stitches are slightly narrower than other stitches and to avoid working the cast-on edge too tight, we simply chain more stitches to begin with. The stitch count will be adjusted on the following row to fit the pattern and measurement sketch.

The rib edge is more elastic and will contract slightly compared to, for example, stocking stitch. By increasing before the rib edge, you avoid a visible difference in width between the rib edge and the rest of the body.

It’s very easy to cast off too tightly, and by making yarn overs while casting off (and simultaneously casting these off) you avoid a too tight cast off edge.

See DROPS video: How to bind off with yarn overs (yo)

To achieve an even increase (or decrease) you can increase on, for example: every 3rd and 4th row alternately, like so: work 2 rows and increase on the 3rd row, work 3 rows and increase on the 4th. Repeat this until the increase is complete.

See DROPS lesson: Increase or decrease 1 st on every 3rd and 4th row alternately

Should you prefer to work in the round instead of back and forth, you may of course adjust the pattern. You’ll need to add steeks mid-front (usually 5 stitches), and follow the instructions. When you would normally turn and work from the wrong side, simply work across the steek and continue in the round. At the end you’ll cut the piece open, pick up stitches to work bands, and cover the cut edges.

See DROPS video: How to knit steeks and cut open

Should you prefer to work back and forth instead of in the round, you may of course adjust the pattern so you work the pieces separately and then assemble them at the end. Divide the stitches for the body in 2, add 1 edge stitch in each side (for sewing) and work the front and back pieces separately.

See DROPS lesson: Can I adapt a pattern for circular needles into straight needles?

Pattern repeats can vary slightly in the different sizes, in order to get the correct proportions. If you’re not working the exact same size as the garment in the photo, yours might deviate slightly. This has been carefully developed and adjusted so that the complete impression of the garment is the same in all sizes.

Make sure to follow instructions and diagrams for your size!

If you have found a pattern you like which is available in women’s size it’s not very difficult to convert it to men’s size. The biggest difference will be the length of sleeves and body. Start working on the women size that you think would fit across the chest. The additional length will be worked right before you cast off for the armhole/sleeve cap. If the pattern is worked top-down you can add the length right after the armhole or before the first decrease on sleeve.

Regarding additional yarn amount, this will depend on how much length you add, but it is better with a skein too many than too few.

All yarns will have excess fibres (from production) that might come off as lint or shedding. Brushed yarns (ie hairier yarns) have more of these loose, excess fibres, causing more shedding.

Shedding also depends on what is worn under or over the garment, and whether this pulls at the yarn fibres. It’s therefore not possible to guarantee that there will be no shedding

Below are some tips on how to get the best result when working with hairier yarns:

1. When the garment is finished (before you wash it) shake it vigorously so the looser hairs come off. NOTE: do NOT use a lint roller, brush or any method that pulls at the yarn.

2. Place the garment in a plastic bag and put it in your freezer - the temperature will cause the fibres to become less attached to each other, and excess fibres will come off easier.

3. Leave in the freezer for a few hours before taking it out and shaking it again.

4. Wash the garment according to the instructions on the yarn label.

Pilling is a natural process that happens to even the most exclusive of fibers. It's a natural sign of wear and tear that is hard to avoid, and that is most visible in high friction areas of your garment like a sweater's arms and cuffs.

You can make your garment look as new by removing the pilling, using a fabric comb or a pill/lint remover.

Still can't find the answer you need? Then scroll down and leave your question so one of our experts can try to help you. This will be done normally within 5 to 10 working days.
In the meantime, you can read the questions and answers that others have left to this pattern or join the DROPS Workshop on Facebook to get help from fellow knitters/crocheters!

You might also like...

Post a comment to pattern DROPS 190-22

We would love to hear what you have to say about this pattern!

If you want to leave a question, please make sure you select the correct category in the form below, to speed up the answering process. Required fields are marked *.

Comments / Questions (16)

country flag Anja Silvola wrote:

Pysyykö lieri ihan oikeasti nuin jäykkänä virkattuna Paris langasta? Itse virkkasin kiinteillä silmukoilla ohuen puutarha rautalangan reunaan.

02.07.2023 - 11:48

country flag Guillemette Gondard wrote:

Bonjour, les explications pour le bracelet et le ruban ne semblent pas cohérentes avec la vidéo des bracelets. Un exemple : piquer de haut en bas alors que sur la video le geste est inverse. Au secours le résultat ressemble à une ficelle plutôt qu'à un ruban. Merci pour votre aide.

09.03.2023 - 07:51

country flag Iris wrote:

Minkä kokoiselle päänympärykselle ohje on? Saako ohjeella tai sovellettuna tehtyä 58 cm ympärysmitalla?

23.09.2022 - 16:03

DROPS Design answered:

Mikäli virkkuutiheys täsmää, hatun ympärys on n. 46 cm (hattu venyy hieman). Työ virkataan ylhäältä alas, joten voit sovittaa työtä ja tarvittaessa voit lisätä työhön silmukoita.

29.09.2022 - 18:35

country flag Riviere wrote:

Bonjour, lorsque je crochète la bordure, elle gondole (des vagues). Est-ce que je crochete selon vous trop serré ou trop large ? merci

05.05.2022 - 06:55

DROPS Design answered:

Bonjour Mme Riviere, essayez de conserver la même tension que pour le reste du chapeau, il est possible que vous ayez relâché un peu et que vous crochetiez un peu plus large. Bon crochet!

05.05.2022 - 09:09

country flag Piek wrote:

Wat bedoelen jullie met herhaal van *-* Staat begin van de hoed. Moet je deze toer dus 2x haken? Gr liedi-Janneke

19.04.2022 - 15:48

DROPS Design answered:

Dag Piek,

Hiermee wordt bedoeld dat je steeds herhaalt wat tussen de sterretjes staat.

20.04.2022 - 10:52

country flag Anke wrote:

Hallo, Wat ik lastig vind bij rondhaken is een nette overgang van de ene naar de volgende toer. Jullie geven goed aan afsluiten met een vaste, het eerste dubbele stokje bestaat uit vier lossen en de eerste vaste is een losse. Maar haak ik die vier lossen of die ene losse dan door de eerste steek? Of komen deze steken bovenop de laatste vaste die ik heb gehaakt? En moet ik dan nog een steek overslaan? Bestaan hier filmpjes van.? Ik hoor het heel graag voor het netjes afwerken van de rij.

09.06.2021 - 21:48

DROPS Design answered:

Dag Anke,

Je sluit als het ware de toer met een halve vaste. Deze halve vaste komt zeg maar in de bovenste 4 lossen van het begin van de toer. deze 4 lossen heb je gehaakt als vervanging van het eerste dubbele stokje. Wanneer je de toer hebt gesloten met een halve vaste, begint de toer opnieuw met 4 lossen. Deze komen er dus gelijk boven. Je slaat geen steken over. In deze video wordt het uitgelegd voor stokjes. In het patroon haak je dubbele stokjes en 3 lossen aan het begin van de toer.

13.06.2021 - 09:36

country flag Anne wrote:

I’m a bit confused when the pattern says continue until piece measures 18cm. Is this measured from the first round?

01.02.2021 - 07:29

DROPS Design answered:

Dear Anne, correct, measure from the beginning of piece, ie from the very first round. Happy crocheting!

01.02.2021 - 10:13

country flag Martine wrote:

Bonsoir, j'ai fini le chapeau et depuis des jours j'essaye de faire le ruban mais je ne comprends rien car dans le diagramme A1 il n'y a pas les 2 couleurs et le diagramme A2 ne figure pas dans les explications. Pouvez-vous m'indiquer comment trouver un tuto ou une vidéo pour le faire car je trouve qu'il donne un charme supplémentaire à ce chapeau. Merci Cordialement

12.05.2020 - 00:15

DROPS Design answered:

Bonjour Martine, il semble effectivement qu'il y ait une erreur, nos stylistes vont vérifier ceci, vous devriez crocheter le diagramme A.2 = autrement dit, de la même façon que A.1 mais en suivant les rayures indiquées par A.2. Cette vidéo vous montre comment réaliser A.1, changez simplement de couleur comme le diagramme l'indique. Bon crochet!

12.05.2020 - 09:31

country flag Martine wrote:

Bonsoir, J'ai commencé le crochet depuis peu de temps. Je suis après le 6ème rang: " Crocheter ensuite ...... jusqu'à ce que l'ouvrage mesure 18 cm, terminer par un tour de mailles serrées." Je ne comprends pas 18cm de quoi ?, rayon à partir du centre du chapeau ou de hauteur ? Merci pour votre réponse

27.04.2020 - 01:50

DROPS Design answered:

Bonjour Martine, mesurez ces 18 cm en hauteur, à partir du milieu du chapeau (début du chapeau). Bon crochet!

27.04.2020 - 09:35

country flag Nataliya wrote:

Hi, the brim description doesn't match the photo. I think there sc and hdc . And there are not 6 rounds..

07.04.2020 - 15:37

DROPS Design answered:

Dear Nataliya, make sure you are following the English pattern in the appropriate English since UK and US have different terms - eg a US sc = UK dc etc.. Happy crocheting!

09.04.2020 - 15:51