
Popular categories
Looking for a yarn?


|
||||||||||||||||
Valdres |
||||||||||||||||
 |
 |
|||||||||||||||
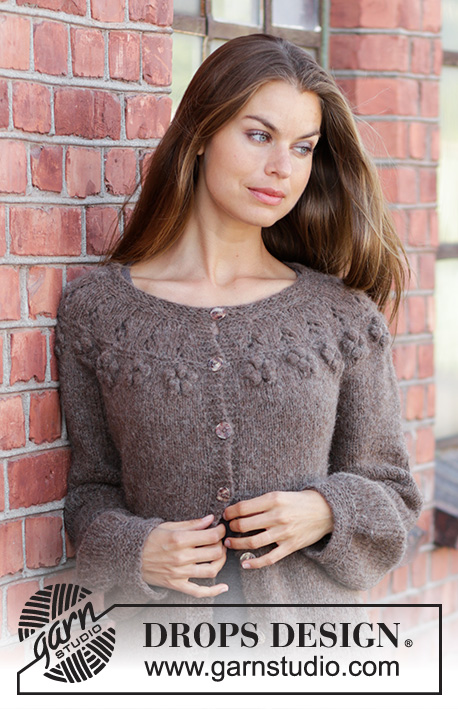
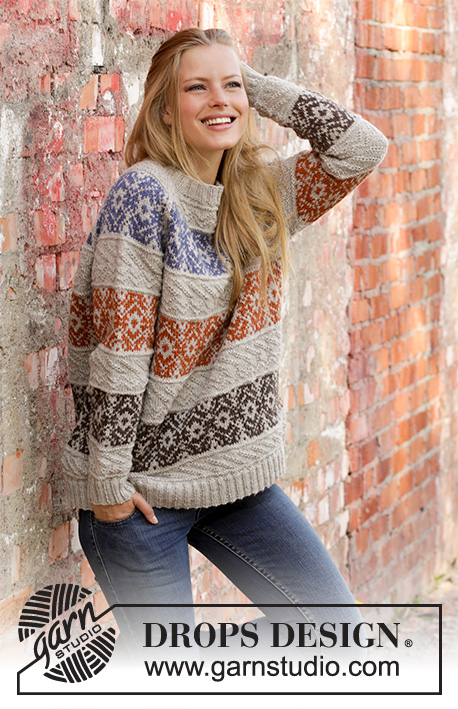
Knitted sweater with raglan in DROPS Karisma. The piece is worked bottom up with Nordic pattern and textured pattern in stripes. Sizes S - XXXL.
DROPS 197-1 |
||||||||||||||||
|
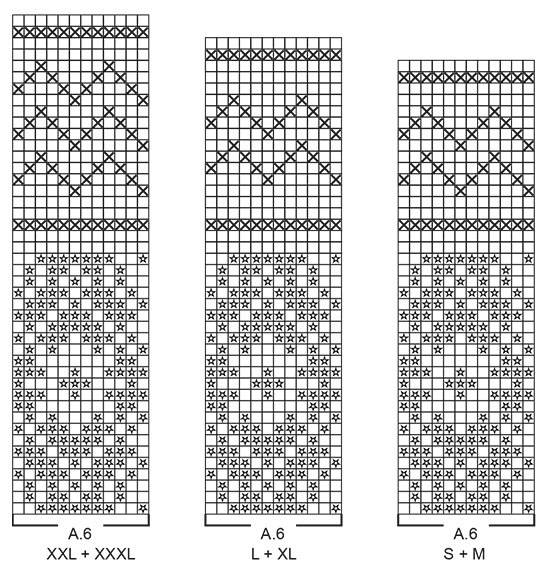
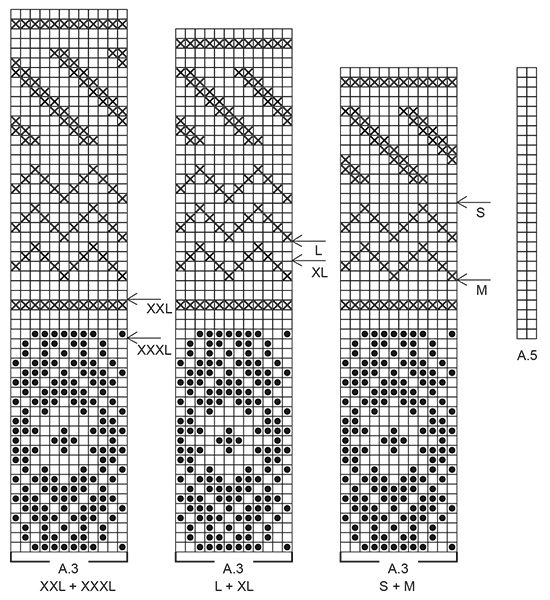
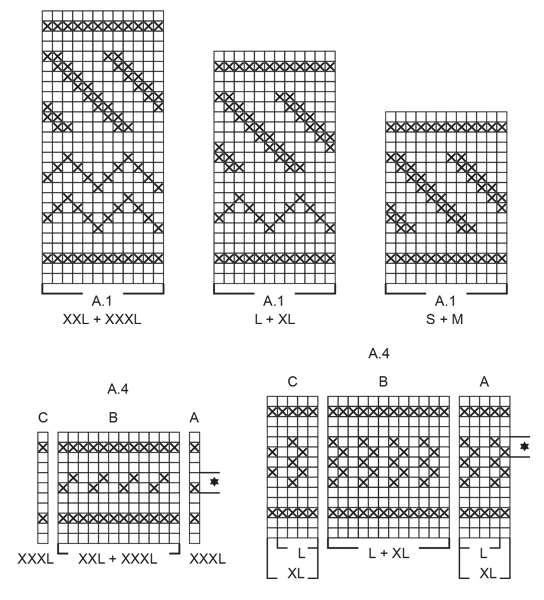
------------------------------------------------------- EXPLANATIONS FOR THE PATTERN: ------------------------------------------------------- PATTERN: See diagrams A.1 to A.6. Choose diagram for your size. DECREASE TIP (evenly spaced): To work out how to decrease evenly, count the total number of stitches on the needle (e.g. 260 stitches) and divide by the number of decreases to be made (e.g. 44) = 5.9. In this example, work together approx. each 5th and 6th stitch. KNITTING TIP-1: To avoid the knitting gauge becoming tighter when working Nordic pattern, it is important that the strands at the back of the piece are not tight. You can use a size larger needle when working pattern if this is a problem. KNITTING TIP-2 (for yoke): If the knitting gauge is not right in height and you work more rows on 10 cm / 4" than described in the text, the yoke will be too short and the armholes too small. This can be adjusted for by working 1 extra row of stockinette stitch regularly on the yoke. INCREASE TIP (for sleeves): Work until there are 2 stitches left before the marker thread, make 1 yarn over (= 1 stitch increased), knit 4 (the marker thread sits in the middle of these 4 stitches), make 1 yarn over (= 1 stitch increased). On the next round knit the yarn overs twisted to avoid holes. RAGLAN: Decrease to raglan on each side of each A.5 as follows: Decrease 1 stitch after A.5 as follows: Slip the last stitch in A.5, knit 1, pass the slipped stitch over the knitted stitch (= 1 stitch decreased). Decrease 1 stitch before A.5 as follows: Work until there is 1 stitch left before A.5, knit the next 2 stitches together (= 1 stitch decreased). In other words you decrease 2 stitches by each A.5 and a total of 8 stitches on the round. ------------------------------------------------------- START THE PIECE HERE: ------------------------------------------------------- SWEATER - SHORT OVERVIEW OF THE PIECE: The piece is worked in the round with circular needle, bottom up. The sleeves are worked with short circular needle/double pointed needles. The pieces are placed together and the yoke is worked in the round. BODY: Cast on 260-288-316-344-376-400 stitches with circular needle size 3.5 mm / US 4 and light oak. Work rib (= knit 2 / purl 2) for 5 cm / 2". Change to circular needle size 4.5 mm / US 7 and knit 1 round where you decrease 44-48-52-56-64-64 stitches evenly on round – read DECREASE TIP = 216-240-264-288-312-336 stitches. Knit 1 round as follows: Insert 1 marker in the first stitch, knit 107-119-131-143-155-167 stitches, insert 1 marker in the next stitch, knit to end of round. The markers mark the sides of the piece. Then work A.1 over all stitches (= 18-20-22-24-26-28 repeats of 12 stitches). REMEMBER THE GAUGE! When A.1 has been worked 1 time in height, insert 1 marker in the middle of the round (you will measure from this marker later). Then work A.2 over A.1- read KNITTING TIP-1. When A.2 has been worked 1 time in height, work A.3 over A.2. When you have worked as far as the arrow in A.3 (see arrow for your size) work the next round in A.3 as follows: bind off 4 stitches, work the next 101-113-125-137-149-161 stitches as before, bind off the next 7 stitches, work the next 101-113-125-137-149-161 stitches as before, bind off the last 3 stitches. The piece measures approx. 32-29-32-32-31-30 cm / 12 ½"-11⅜"-12 ½"-12 ½"-12⅛"-11 ¾" from the marker (approx. 43-40-45-45-46-45 cm / 16⅞"-15 ¾"-17⅝"-17⅝"-18"-17⅝" whole length). Lay the piece to one side and work the sleeves. SLEEVES: The piece is worked in the round with double pointed needles; change to short circular needle when necessary. Cast on 48-52-52-56-56-60 stitches with double pointed needles size 3.5 mm / US 4 and light oak. Work rib (= knit 2 / purl 2) for 5 cm / 2". Change to double pointed needles size 4.5 mm / US 7 and knit 1 round where you decrease 8-10-8-10-8-10 stitches evenly on round = 40-42-44-46-48-50 stitches. READ THE WHOLE SECTION BEFORE CONTINUING: You work a pattern of approx. 8-8-5-5-4-4 cm / 3⅛"-3⅛"-1⅞"-1⅞"-1 ½"-1 ½", if you wish to adjust the length of the sleeve, do it now – see below. Then work the same pattern stripe as on the body (from the marker to the armhole = approx. 32-29-32-32-31-30 cm / 12 ½"-11⅜"-12 ½"-12 ½"-12⅛"-11 ¾"), i.e. the whole sleeve should measure approx. 45-42-42-42-40-39 cm / 17⅝"-16 ½"-16 ½"-16 ½"-15 ¾"-15 ¼". Work as follows: Insert 1 marker thread at the beginning of the round (= mid under sleeve). Work 1 round in stockinette stitch, then work the next round as follows: Work A.4a (= 2-3-4-5-0-1 stitches), A.4b (= 12 stitches) a total of 3-3-3-3-4-4 times in width, A.4c (= 2-3-4-5-0-1 stitches). Continue until A.4 has been worked 1 time in height – NOTE: if you would like a longer sleeve, repeat the 2 rows marked with a star to desired length before continuing with the next round in A.4. If you would like a shorter sleeve, just work the desired number of rounds of A.4, but work a minimum of 1 of the purled rounds. – AT THE SAME TIME when the piece measures 10-9-9-10-12-12 cm / 3⅞"-3 ½"-3 ½"-3⅞"-4⅝"-4⅝" increase 1 stitch on each side of the marker thread (= 2 stitches increased) – read INCREASE TIP! Increase like this every 2-1½-1½-1½-1-1 cm a total of 16-21-20-19-24-23 times = 72-84-84-84-96-96 stitches. The stitches in A.4a and A.4c and the increased stitches are worked into pattern A.4b as you go. When A.4 has been worked 1 time in height, work A.2 (= 12 stitches) over all stitches – A.2 is worked over A.4b and is adjusted out to each side; the increased stitches are worked into the pattern as you go. When A.2 has been worked 1 time in height, work A.3 (= 12 stitches) over A.2. When all the stitches under the sleeve are increased, work A.3 a total of 6-7-7-7-8-8 times in width. When you have worked as far as the arrow in A.3, work the next round as follows: bind off 4 stitches, work the next 65-77-77-77-89-89 stitches as before, bind off the last 3 stitches. The sleeve measures approx. 45-42-42-42-40-39 cm / 17⅝"-16 ½"-16 ½"-16 ½"-15 ¾"-15 ¼". Work 1 more sleeve in the same way. YOKE: Place the sleeves on the same circular needle as the body, where you bind off stitches for the armholes = 332-380-404-428-476-500 stitches. Start the round in the transition between right sleeve and back piece. Work as follows: * A.5 (= 2 stitches, raglan line), continue with A.3 as before over the next 97-109-121-133-145-157 stitches (= front/back piece), A.5 (= 2 stitches, raglan line), work pattern A.3 as before over the next 65-77-77-77-89-89 stitches (= sleeve) *, work from *-* a total of 2 times – read KNITTING TIP-2. Continue this pattern and decrease to RAGLAN – read description above, every 2nd round a total of 27-31-32-33-37-39 times. When A.3 has been completed in height, work A.6 (= 12 stitches) over A.3. After the last decrease to raglan there are 116-132-148-164-180-188 stitches on the round. Continue until A.6 has been completed. The yoke measures approx. 20-23-24-25-27-28 cm / 7⅞"-9"-9⅜"-9 ¾"-10⅝"-11". You can now work an elevation in the back of the neck so that the yoke is slightly higher at the back. This elevation can be left out; the neck is then the same both front and back. Work elevation in back of neck or go straight to working neck if you do not want an elevation. ELEVATION IN BACK OF NECK: Skip this section if you do not want an elevation. Insert 1 marker at the beginning of the round (this marks the start of the round after the elevation has been worked). Continue with light oak and knit to mid back, insert 1 marker. Start from the right side and knit as far as 30-30-34-34-40-40 stitches past the marker, turn, tighten the strand and purl 60-60-68-68-80-80 stitches back. Turn, tighten the strand and knit 54-54-61-61-72-72 stitches, turn, tighten the strand and purl 48-48-54-54-64-64 stitches back. Turn, tighten the strand and knit 42-42-48-48-56-56 stitches, turn, tighten the strand and purl 36-36-42-42-48-48 stitches back. Turn, tighten the strand and knit 30-30-35-35-40-40 stitches, turn, tighten the strand and purl 24-24-28-28-32-32 stitches, turn, tighten the strand and knit to mid back. Cut the strand. The round now starts at the marker, i.e. the transition between right sleeve and back piece. NECK: Continue with light oak and work the next round with decreases as follows: Knit * 40-46-54-58-66-70 stitches and decrease 0-6-12-13-19-22 stitches evenly over these stitches – remember DECREASE TIP, knit together the next 18-20-20-24-24-24 stitches 2 and 2 (= 9-10-10-12-12-12 stitches decreased) *, work from *-* a total of 2 times = 98-100-104-114-118-120 stitches. Change to circular needle size 3.5 mm / US 4 and work the next round as follows: * Knit 2, purl 2, knit 1, 1 yarn over (= 1 stitch increased), purl 2, knit 2, 1 yarn over (= 1 stitch increased), purl 1 *, work from *-* until there are 8-0-4-4-8-0 stitches left, work rib (= knit 2 / purl 2) over the remaining stitches = 116-120-124-136-140-144 stitches. The yarn overs are worked twisted in rib (i.e. knit 2 / purl 2) on the next round to avoid holes. Bind off with knit over knit and purl over purl when the rib measures 3 cm / 1". ASSEMBLY: Sew the openings under the sleeves in the outermost loop of the outermost stitch. |
||||||||||||||||
Diagram explanations |
||||||||||||||||
|
||||||||||||||||
|
||||||||||||||||
|
||||||||||||||||

|
||||||||||||||||
|
||||||||||||||||

|
||||||||||||||||
|
Have you made this or any other of our designs? Tag your pictures in social media with #dropsdesign so we can see them! Do you need help with this pattern?You'll find tutorial videos, a Comments/Questions area and more by visiting the pattern on garnstudio.com. © 1982-2024 DROPS Design A/S. We reserve all rights. This document, including all its sub-sections, has copyrights. Read more about what you can do with our patterns at the bottom of each pattern on our site. |
||||||||||||||||


With over 40 years in knitting and crochet design, DROPS Design offers one of the most extensive collections of free patterns on the internet - translated to 17 languages. As of today we count 304 catalogs and 11422 patterns - 11417 of which are translated into English (US/in).
We work hard to bring you the best knitting and crochet have to offer, inspiration and advice as well as great quality yarns at incredible prices! Would you like to use our patterns for other than personal use? You can read what you are allowed to do in the Copyright text at the bottom of all our patterns. Happy crafting!
Comments / Questions (203)
Hej! Stickar denna tröja i storlek Large. Har kommit upp till A6 och undrar om A2 dvs raglanmaskorna ska stickas i mönsterfärgen eller fortsätta vara i grundfärgen? Har försökt att placera mönstret ovanför föregående mönsterfärg o fortsätta med minskningarna före och efter A5 men tycker inte att det blir snyggt med något av alternativen
22.03.2019 - 07:55DROPS Design answered:
Hei Margareta. Det er A.5 (2 masker) som er raglanlinjen, og denne strikkes i bunnfargen. Når du setter ermene og bolen inn på samme pinne fortsettes med A.3 over forstykket, bakstykket og ermene, og du strikker A.5 i hver raglanlinje. Når A.3 er ferdig i høyden strikkes A.6 over A.3. Du fortsetter med A.5 i raglanlinjen. God fornøyelse
26.03.2019 - 14:52Thank you sooOOOOooo much for this pattern! I have been knitting for many many years, but could never change colours. This pattern made me practice and practice until I could do it, and it was so much easier than I thought it would be! I have also never knitted in round. I made this sweater in just over 5 weeks. It is beautiful! I found the instructions so easy to follow. I wish I could share a picture! Thank you again.
15.03.2019 - 04:14Warum gibt es bei dem Muster A4 für die Ärmel A,B und C? Warum ist das nicht wie bei den anderen Mustern angegeben?
02.03.2019 - 21:24DROPS Design answered:
Liebe Sigrun, wenn man A.4 strickt wird man mit Teil-A anfangen, Teil-B wiederholen und mit Teil-C enden, deshalb braucht man 3 verschiedenen Mustern. Viel Spaß beim stricken!
04.03.2019 - 09:21Guten Abend, auf welcher Nadelstärke basiert die Maschenprobe. Ich habe mit 3,5 tatsächlich eine Punktlandung, frage mich aber gerade ob das so korrekt ist, oder ob die Probe auf Nadelstärke 4,5 basiert. Danke, Suse
27.02.2019 - 22:28DROPS Design answered:
Liebe Suse, die Maschenprobe wird mit den grösseren Nadeln gestrickt, dh Nr 4,5 (oder mit den passenden Nadeln, um diese Maschenprobe zu haben). Viel Spaß beim stricken!
28.02.2019 - 09:38Hello. I am almost finisched with My weater in size s. I bought the amount of wool described in the pattern. But I dont have enough. Mvg erika
18.02.2019 - 11:05DROPS Design answered:
Dear Erika, did you get and keep the correct tension in width and in height? We haven't get similar feedback yet. Thank you. Happy knitting!
18.02.2019 - 13:18Bonjour. Quel beau pull. Je tricote la taille M et je suis rendue à la flèche de la section À.3. C’est à dire que j’ai tricoté les 2 rangs 27 et 28 . Au rang suivant (29) on dit de rabattre les 4 premières mailles puis de tricoter les 125 prochaines mailles “ comme avant” . Que veut dire “comme avant”? J’ attends votre réponse avant de poursuivre. Merci de votre aide.
17.02.2019 - 17:57DROPS Design answered:
Bonjour Mme Gravel, au rang après la flèche pour votre taille, vous tricotez le rang suivant de A.3 comme indiqué dans le diagramme, et, en même temps, vous rabattez les mailles des emmanchures. Bon tricot!
18.02.2019 - 10:14Hei! Jeg er godt i gang med genseren, som jeg tror blir veldig fin! Jeg er ferdig med bolen, og er i gang med armene. Jeg skjønner ikke helt hvordan jeg skal strikke mønsteret mot slutten av omgangen når jeg strikker mønsteret A2. For det er ikke nok masker å fullføre mønsteret etter hvert som jeg øker med 2 masker hver 1,5cm.
08.02.2019 - 07:11DROPS Design answered:
Hei Charlotte. Du øker på begge sider av merkretråden = på starten og slutten av omgangen. Neste omgang må den første og siste masken på omgangen strikkes som siste/første masken i en ny rapport av A.2. Altså på starten av omgangen strikkes den første masken på omgangen som den siste masken i A.2, neste gang du øker vil du strikke de 2 første maskene som de 2 siste i A.2. Altså det vokser ut en ny rapport på hver side av merketråden oppover ermet. God fornøyelse
11.02.2019 - 12:06Hemen başlıyorum umarım güzel olur \r\nModel güzel gözüküyor
06.02.2019 - 21:56De pattern doesnt seem right. I einded A4 a b and c. And maken more stiches every 2 cm. I only Made 4 more stiches. Can you expans this part of the pattern beter? IT doesnt work hoe its written now. Mvg erika
04.02.2019 - 20:39DROPS Design answered:
Dear Erika, when pattern A.4a, b and c are worked once in height, continue working A.2 over all sts, then work A.3 over A.2 at the same time, work and continue increases mid under sleeve. When all sts have been increased for sleeve, work A.3 to the arrrow then bind off the 7 middle sts as explained. Happy knitting!
05.02.2019 - 08:44I am knitting the sleeves. Now I have to make more stiches. Do I have to mesure horizontal or verticaal 2 cm? I am knitting size s. I have to make 2 more stiches. Vertical mesuring looks not right. Can you help me?
04.02.2019 - 19:08DROPS Design answered:
Dear Erika, when you have to increase 2 sts mid under sleeve, you will increase as explained under INCREASE TIP (sleeves), measuring sleeve in height, ie in size S you increase first stitch when piece measures 10 cm, then repeat the increases when sleeve measures 12 cm, 14 cm, 16 cm and so on. Happy knitting!
05.02.2019 - 08:26