
Popular categories
Looking for a yarn?


|
|||||||
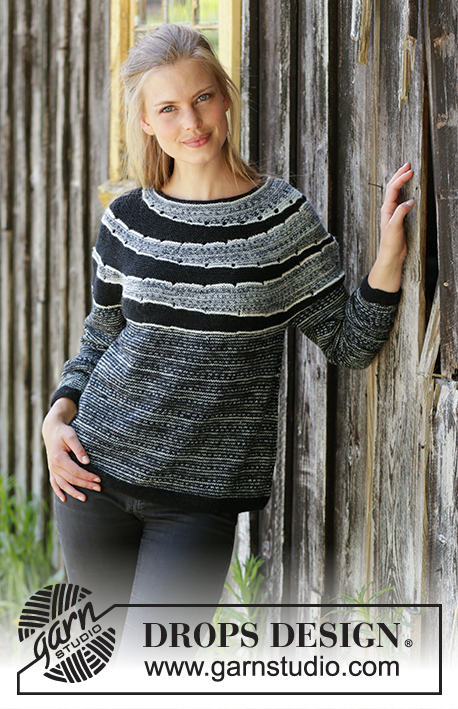
Fading Circles |
|||||||
 |
 |
||||||
Knitted jumper with round yoke in DROPS Fabel. The piece is worked top down with garter stitch, stripes and short rows. Sizes S - XXXL.
DROPS 195-3 |
|||||||
|
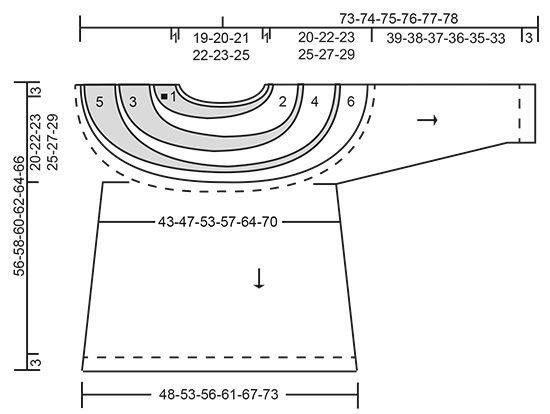
EXPLANATIONS FOR THE PATTERN: ------------------------------------------------------- RIDGE/GARTER STITCH (worked in the round): 1 ridge = 2 rounds. Knit 1 round and purl 1 round. RIDGE/GARTER STITCH (worked back and forth): 1 ridge = Knit 2 rows. INCREASE TIP-1 (evenly spaced): To work out how to increase evenly, count the total number of stitches on the needle (e.g. 106 stitches) and divide by the number of increases to be made (e.g. 14) = 7.57. In this example, increase by making a yarn over after alternately each 7th and each 8th stitch (approx.). On the next round work the yarn overs twisted to avoid holes. INCREASE TIP-2 (for the sides of the body): Work until there are 4 stitches left before the marker thread, 1 yarn over, knit 2 (the marker thread sits in the middle of these 4 stitches), 1 yarn over. Increase like this at both marker threads (= 4 stitches increased). On the next round, knit the yarn overs twisted to avoid holes. Then work the new stitches in stocking stitch. STRIPES: Knit 1 round with black. Knit 1 round with winter. Repeat these 2 rounds. DECREASE TIP (for sleeves): Decrease 1 stitch on each side of the marker thread as follows: Work until there are 3 stitches left before the marker thread, knit 2 together, knit 2 (the marker thread sits in the middle of these 2 stitches), slip 1 stitch as if to knit, knit 1, pass the slipped stitch over the knitted stitch (= 2 stitches decreased). ------------------------------------------------------- START THE PIECE HERE: ------------------------------------------------------- JUMPER – SHORT OVERVIEW OF THE PIECE: The piece is worked top down. The neck is worked in the round with circular needle. Then you continue with garter stitch and short rows, back and forth in sections; you increase in each section. You work 1 ridge in the round with off white between each section. There are a total of 6 sections. The yoke is divided for sleeves and body which are completed separately. The body is worked in the round with circular needle. The sleeves are worked in the round with double pointed needles. NECK: Cast on 106-110-115-122-127-134 stitches with circular needle size 3 mm and black. Work 2 RIDGES in the round – read description above. Change to circular needle size 3.5 mm. Work 1 ridge in the round with off white and increase 14-15-15-8-13-16 stitches evenly on the first round (= the knitted round) – read INCREASE TIP-1 = 120-125-130-130-140-150 stitches. YOKE: The yoke is continued in sections, back and forth with short rows and in the round with garter stitch as follows: SECTION 1: Continue with winter as follows: Work 2-2-3-4-4-4 ridges in the round. Insert 1 marker at the beginning of the round. Now work section 1 with short rows back and forth in GARTER STITCH – read description above, as follows: ROW 1 (= right side): Knit until there are 5 stitches left before the marker (= 115-120-125-125-135-145 stitches), turn, tighten the strand. ROW 2 (= wrong side): Knit until there are 5 stitches left before the marker (= 110-115-120-120-130-140 stitches), turn, tighten the strand. ROW 3 (= right side): Knit until there are 10 stitches left before the marker (= 105-110-115-115-125-135 stitches), turn, tighten the strand. ROW 4 (= wrong side): Knit until there are 10 stitches left before the marker (= 100-105-110-110-120-130 stitches), turn, tighten the strand. ROW 5 (= right side): Knit until there are 15 stitches left before the marker (= 95-100-105-105-115-125 stitches), turn, tighten the strand. ROW 6 (= wrong side): Knit until there are 15 stitches left before the marker (= 90-95-100-100-110-120 stitches), turn, tighten the strand. Continue like this, i.e. work 5 fewer stitches each time you turn, until you have worked 1 row over the last 10-15-10-10-10-10 stitches from the wrong side (= 11-11-12-12-13-14 ridges). Cut the strand. Continue working in the round with off white as follows: Start at the marker (= start of the round). ROUND 1: * Knit 5 stitches, 1 yarn over (i.e. make 1 yarn over where the short row turned) * work from *-* to end of round (= 24-25-26-26-28-30 stitches increased) = 144-150-156-156-168-180 stitches. ROUND 2: Purl all stitches (the yarn overs are not purled twisted; there will be holes). REMEMBER THE KNITTING TENSION! SECTION 2: Move the marker 72-75-78-78-84-90 stitches (i.e. the beginning of the round is displaced 72-75-78-78-84-90 stitches and section 2 is now worked, starting at the marker). Continue with black as follows: Work 2-2-3-4-4-4 ridges in the round AT THE SAME TIME as you increase 24-25-52-52-56-60 stitches on the first round (= knitted round) i.e. increase with 1 yarn over after every 6th-6th-3rd-3rd-3rd-3rd stitch. The yarn overs are worked twisted on the next round to avoid holes = 168-175-208-208-224-240 stitches. Now work section 2 with short rows, back and forth in garter stitch as follows: ROW 1 (= right side): Knit until there are 7-7-8-8-8-8 stitches left before the marker (= 161-168-200-200-216-232 stitches), turn, tighten the strand. ROW 2 (= wrong side): Knit until there are 7-7-8-8-8-8 stitches before the marker (= 154-161-192-192-208-224 stitches), turn, tighten the strand. ROW 3 (= right side): Knit until there are 14-14-16-16-16-16 stitches left before the marker (= 147-154-184-184-200-216 stitches), turn, tighten the strand. ROW 4 (= wrong side): Knit until there are 14-14-16-16-16-16 stitches left before the marker (= 140-147-176-176-192-208 stitches), turn, tighten the strand. ROW 5 (= right side): Knit until there are 21-21-24-24-24-24 stitches left before the marker (= 133-140-168-168-184-200 stitches), turn, tighten the strand. ROW 6 (= wrong side): Knit until there are 21-21-24-24-24-24 stitches left before the marker (= 126-133-160-160-176-192 stitches), turn, tighten the strand. Continue like this, i.e. work 7-7-8-8-8-8 fewer stitches each time you turn until you have worked 1 row over the last 14-21-16-16-16-16 stitches from the wrong side (= 11-11-12-12-13-14 ridges). Cut the strand. Continue in the round with off white as follows: Start at the marker (= start of the round). ROUND 1: Knit * 7-7-8-8-8-8 stitches, 1 yarn over (i.e. make 1 yarn over where the short row turned) * work from *-* to end of round (= 24-25-26-26-28-30 stitches increased) = 192-200-234-234-252-270 stitches. ROUND 2: Purl all stitches (the yarn overs are not purled twisted, there will be holes). SECTION 3: Move the marker 96-100-117-117-126-135 stitches (i.e. the beginning of the round is displaced by 96-100-117-117-126-135 stitches, section 3 is worked starting at the marker). Continue with winter as follows: Work 2-2-3-4-4-4 ridges in the round AT THE SAME TIME as you increase 24-25-26-26-28-30 stitches evenly on the first round (= knitted round); i.e. increase by making 1 yarn over after every 8th-8th-9th-9th-9th-9th stitch. The yarn overs are worked twisted on the next round to avoid holes = 216-225-260-260-280-300 stitches. Now work section 3 with short rows back and forth in garter stitch as follows: ROW 1 (= right side): Knit until there are 9-9-10-10-10-10 stitches left before the marker (= 207-216-250-250-270-290 stitches), turn, tighten the strand. ROW 2 (= wrong side): Knit until there are 9-9-10-10-10-10 stitches left before the marker (= 198-207-240-240-260-280 stitches), turn, tighten the strand. ROW 3 (= right side): Knit until there are 18-18-20-20-20-20 stitches before the marker (= 189-198-230-230-250-270 stitches), turn, tighten the strand. ROW 4 (= wrong side): Knit until there are 18-18-20-20-20-20 stitches left before the marker (= 180-189-220-220-240-260 stitches), turn, tighten the strand. ROW 5 (= right side): Knit until there are 27-27-30-30-30-30 stitches left before the marker (= 171-180-210-210-230-250 stitches), turn, tighten the strand. ROW 6 (= wrong side): Knit until there are 27-27-30-30-30-30 stitches left before the marker (= 162-171-200-200-220-240 stitches), turn, tighten the strand. Continue like this, i.e. work 9-9-10-10-10-10 fewer stitches each time you turn until you have worked 1 row over the last 18-27-20-20-20-20 stitches from the wrong side (= 11-11-12-12-13-14 ridges). Cut the strand. Continue in the round with off white: Start at the marker (= start of the round). ROUND 1: Knit * 9-9-10-10-10-10 stitches, 1 yarn over (i.e. you make 1 yarn over where the short row turned) * work from *-* to end of round (= 24-25-26-26-28-30 stitches increased) = 240-250-286-286-308-330 stitches. ROUND 2: Purl all stitches (the yarn overs are not purled twisted, there will be holes). SECTION 4: Move the marker 120-125-143-143-154-165 stitches (i.e. the beginning of the round is now displaced by 120-125-143-143-154-165 stitches, section 4 starts from the marker). Continue working with black as follows: Work 2-2-3-4-4-4 ridges in the round AT THE SAME TIME as you increase 24-25-26-26-28-30 stitches evenly spaced on the first round (= the knitted round); i.e. you increase with 1 yarn over after every 10th-10th-11th-11th-11th-11th stitch. The yarn overs are worked twisted on the next round to avoid holes = 264-275-312-312-336-360 stitches. Now work section 4 with short rows back and forth in garter stitch as follows: ROW 1 (= right side): Knit until there are 11-11-12-12-12-12 stitches left before the marker (= 253-264-300-300-324-348 stitches), turn, tighten the strand. ROW 2 (= wrong side): Knit until there are 11-11-12-12-12-12 stitches left before the marker (= 242-253-288-288-312-336 stitches), turn, tighten the strand. ROW 3 (= right side): Knit until there are 22-22-24-24-24-24 stitches left before the marker (= 231-242-276-276-300-324 stitches), turn, tighten the strand. ROW 4 (= wrong side): Knit until there are 22-22-24-24-24-24 stitches left before the marker (= 220-231-264-264-288-312 stitches), turn, tighten the strand. ROW 5 (= right side): Knit until there are 33-33-36-36-36-36 stitches left before the marker (= 209-220-252-252-276-300 stitches), turn, tighten the strand. ROW 6 (= wrong side): Knit until there are 33-33-36-36-36-36 stitches left before the marker (= 198-209-240-240-264-288 stitches), turn, tighten the strand. Continue like this, i.e. you work 11-11-12-12-12-12 fewer stitches each time you turn, until you have worked 1 row over the last 22-33-24-24-24-24 stitches from the wrong side (= 11-11-12-12-13-14 ridges). Cut the strand. Continue working in the round with off white as follows: Start at the marker (= the start of the round). ROUND 1: Knit * 11-11-12-12-12-12 stitches, 1 yarn over (i.e. you make 1 yarn over where the short row turned) * work from *-* to end of round (= 24-25-26-26-28-30 stitches increased) = 288-300-338-338-364-390 stitches. ROUND 2: Purl all stitches (the yarn overs are not purled twisted, there will be holes). SECTION 5: Move the marker 144-150-169-169-182-195 stitches (i.e. the start of the round is now displaced by 144-150-169-169-182-195 stitches, section 5 starts from the marker). Continue in winter as follows: Work 2-2-3-4-4-4 ridges in the round AT THE SAME TIME as you increase 0-25-26-26-28-30 stitches evenly spaced on the first round (the knitted round) i.e. you increase with 1 yarn over after every 0-12th-13th-13th-13th.-13th stitch. The yarn overs are worked twisted on the next round to avoid holes = 288-325-364-364-392-420 stitches. Now work section 5 with short rows back and forth in garter stitch as follows: ROW 1 (= right side): Knit until there are 12-13-14-14-14-14 stitches left before the marker (= 276-312-350-350-378-406 stitches), turn, tighten the strand. ROW 2 (= wrong side): Knit until there are 12-13-14-14-14-14 stitches left before the marker (= 264-299-336-336-364-392 stitches), turn, tighten the strand. ROW 3 (= right side): Knit until there are 24-26-28-28-28-28 stitches left before the marker (= 252-286-322-322-350-378 stitches), turn, tighten the strand. ROW 4 (= wrong side): Knit until there are 24-26-28-28-28-28 stitches left before the marker (= 240-273-308-308-336-364 stitches), turn, tighten the strand. ROW 5 (= right side): Knit until there are 36-39-42-42-42-42 stitches left before the marker (= 228-260-294-294-322-350 stitches), turn, tighten the strand. ROW 6 (= wrong side): Knit until there are 36-39-42-42-42-42 stitches left before the marker (= 216-247-280-280-308-336 stitches), turn, tighten the strand. Continue like this, i.e. you work 12-13-14-14-14-14 fewer stitches each time you turn, until you have worked 1 row over the last 24-39-28-28-28-28 stitches from the wrong side (= 11-11-12-12-13-14 ridges). Cut the strand. Continue in the round with off white as follows: Start at the marker (= the start of the round). ROUND 1: Knit * 12-13-14-14-14-14 stitches, 1 yarn over (i.e. you make 1 yarn over where the short row turned) * work from *-* to end of round (= 24-25-26-26-28-30 stitches increased) = 312-350-390-390-420-450 stitches. ROUND 2: Purl all stitches (the yarn overs are not purled twisted, there will be holes). SECTION 6: Move the marker 156-175-195-195-210-225 stitches (i.e. the start of the round is now displaced by 156-175-195-195-210-225 stitches, section 6 starts at the marker). Continue with black as follows: Work 2-2-3-4-4-4 ridges in the round AT THE SAME TIME as you increase 0-0-0-26-28-30 stitches evenly spaced on the first round (= the knitted round); i.e. you increase with 1 yarn over after every 0-0-0-15th-15th-15th stitch. The yarn overs are worked twisted on the next round to avoid holes = 312-350-390-416-448-480 stitches. Now work section 6 with short rows back and forth in garter stitch as follows: ROW 1 (= right side): Knit until there are 13-14-15-16-16-16 stitches left before the marker (= 299-336-375-400-432-464 stitches), turn, tighten the strand. ROW 2 (= wrong side): Knit until there are 13-14-15-16-16-16 stitches left before the marker (= 286-322-360-384-416-448 stitches), turn, tighten the strand. ROW 3 (= right side): Knit until there are 26-28-30-32-32-32 stitches left before the marker (= 273-308-345-368-400-432 stitches), turn, tighten the strand. ROW 4 (= wrong side): Knit until there are 26-28-30-32-32-32 stitches left before the marker (= 260-294-330-352-384-416 stitches), turn, tighten the strand. ROW 5 (= right side): Knit until there are 39-42-45-48-48-48 stitches left before the marker (= 247-280-315-336-368-400 stitches), turn, tighten the strand. ROW 6 (= wrong side): Knit until there are 39-42-45-48-48-48 stitches left before the marker (= 234-266-300-320-352-384 stitches), turn, tighten the strand. Continue like this, i.e. you work 13-14-15-16-16-16 fewer stitches each time you turn, until you have worked 1 row over the last 26-42-30-32-32-32 stitches from the wrong side (= 11-11-12-12-13-14 ridges). Cut the strand. Continue in the round with off white as follows: Start at the marker (= the start of the round). ROUND 1: Knit. ROUND 2: Purl. Cut the strand. There are now 312-350-390-416-448-480 stitches on the needle. Displace the round by 33-37-41-43-44-46 stitches forward (i.e. slip the first 33-37-41-43-44-46 stitches (= half of the sleeve) over on the right needle, place a marker here = start of the round). Now continue in the round in STRIPES – read description above. When the piece measures 21-23-24-26-28-30 cm from the cast-on edge, divide the piece as follows: Work the first 90-101-113-122-136-148 stitches (= back piece), place the next 66-74-82-86-88-92 stitches on a thread for the sleeve and cast on 8-8-10-10-12-12 stitches under the sleeve, work the next 90-101-113-122-136-148 stitches (= front piece), place the next 66-74-82-86-88-92 stitches on a thread for the sleeve and cast on 8-8-10-10-12-12 stitches under the sleeve = 196-218-246-264-296-320 stitches. Insert 1 marker thread in the middle of the 8-8-10-10-12-12 new stitches under each sleeve and move the start of the round to one of these markers. BODY: Continue in the round in stripes. When the piece measures 3 cm from where the sleeves were divided from the body, increase 1 stitch on each side of each marker thread - read INCREASE TIP-2. Increase like this every 4-4-8-6-8-6 cm a total of 6-6-3-4-3-4 times = 220-242-258-280-308-336 stitches. Continue with stocking stitch and stripes until the body measures 30-30-31-31-31-31 cm from where the sleeves were divided from the body. Change to circular needle size 3 mm. Now continue in garter stitch with black until the piece measures 33-33-34-34-34-34 cm from where the body and sleeves were divided. Cast off with knit; make sure the cast-off edge is not tight; you can use a size larger needle if this is a problem. SLEEVE: Place the 66-74-82-86-88-92 stitches from the thread on the one side of the piece on double pointed needles size 3.5 mm and knit up 1 stitch in each of the 8-8-10-10-12-12 stitches cast on under the sleeve = 74-82-92-96-100-104 stitches. Insert 1 marker thread in the middle of the 8-8-10-10-12-12 stitches under the sleeve. Continue with stocking stitch and stripes. When the piece measures 1 cm from where the sleeves were divided from the body, decrease 1 stitch on each side of the marker thread - read DECREASE TIP. Decrease like this every 2½-2-1½-1½-1½-1 cm a total of 13-16-20-20-21-22 times = 48-50-52-56-58-60 stitches. When the sleeve measures 39-38-37-36-35-33 cm from where the sleeves were divided from the body, change to double pointed needles size 3 mm. Now continue with garter stitch and black until the sleeve measures 42-41-40-39-38-36 cm from where it was divided from the body. Cast off with knit; make sure the cast-off edge is not tight, you can use a size larger needle if this is a problem. |
|||||||
Diagram explanations |
|||||||
|
|||||||
|
|||||||
|
Have you made this or any other of our designs? Tag your pictures in social media with #dropsdesign so we can see them! Do you need help with this pattern?You'll find tutorial videos, a Comments/Questions area and more by visiting the pattern on garnstudio.com. © 1982-2024 DROPS Design A/S. We reserve all rights. This document, including all its sub-sections, has copyrights. Read more about what you can do with our patterns at the bottom of each pattern on our site. |
|||||||


With over 40 years in knitting and crochet design, DROPS Design offers one of the most extensive collections of free patterns on the internet - translated to 17 languages. As of today we count 304 catalogues and 11422 patterns - 11422 of which are translated into English (UK/cm).
We work hard to bring you the best knitting and crochet have to offer, inspiration and advice as well as great quality yarns at incredible prices! Would you like to use our patterns for other than personal use? You can read what you are allowed to do in the Copyright text at the bottom of all our patterns. Happy crafting!
Comments / Questions (70)
Hallo. Werden die Streifen in Runden oder in Hin-und Rückreihen gestrickt? Gruß Uta
12.08.2018 - 07:10DROPS Design answered:
Liebe Frau Große, die Streifen mit Natur werden in der Runde gestrickt (= 1 Runde rechts, 1 Runde links). Viel Spaß beim stricken!
13.08.2018 - 10:27Vielen Dank für das schöne Muster. Habe den Pullover in Groesse XL gestrickt. Mit den angegebenen Maschenzahlen bin ich auch auf die entsprechenden Maße in der Skizze gekommen. Passt alles prima. Ein Tipp zum Materialverbrauch: von Natur reichen 50 g, dafuer sollten es von Schwarz 250 g sein.
11.08.2018 - 22:28Bonjour, Pour le choix des aiguilles vous écrivez si vous avez trop de mailles pour 10cm prendre une taille d aiguilles au dessus. Ne serait ce pas plutôt une taille en dessous ? Le modèle est vraiment intéressant et me plaît beaucoup. Je vais le tricoter cet automne
10.08.2018 - 19:08DROPS Design answered:
Bonjour Denise, si vous avez trop de mailles pour 10 cm, c'est que vous tricotez plus serré que l'échantillon, il vous faudra alors des aiguilles plus grosses pour diminuer votre nombre de mailles pour 10 cm - cf également notre vidéo. Pensez également à laver et à faire sécher votre échantillon dans les mêmes conditions que vous laverez ensuite votre pull, mesurez-le après séchage et recommencez en ajustant la taille des aiguilles si besoin. Bon tricot!
13.08.2018 - 09:02I am on Section one. I placed the marker at the beginning of the round, completed the short rows; cut the yarn. Now I am starting the white. It states to start at the marker however when I complete the short rows I am not at the marker. So am I to knit across until I hit the marker? Sorry, I find it confusing and no stores really close to me that sells this yarn for me to get help. I order on line...via UK.
10.08.2018 - 14:55DROPS Design answered:
Dear Heather, slip the sts from left needle to right needle until marker from beg of round and start round with off white there. (Remember your DROPS store will also be able to answer you either on telephone or per mail). Happy knitting!
10.08.2018 - 15:27Skal der forskydes til venstre?
18.07.2018 - 10:09DROPS Design answered:
Hei Charlotte. Det har ikke noe å si hvilken vei du forskyver det, for alle bitene begynner på nøyaktig motsatt side av starten/slutten av omgangen på forrige bit. For eksempel, etter bit 1 har du 144-150-156-156-168-180 masker. Første omgang på bit 2 forskyves med 72-75-78-78-84-90 masker er nøyaktig halvparten av masketallet. Uansett hvilken vei du flytter markøren skal den settes på samme sted. God fornøyelse.
19.07.2018 - 09:59Hallo, ich habe die 1. Zacke fertig bis zur Rückrunde mit 15 Maschen, dann soll ich mit Farbe Natur am Markierer/Rundenbeginn weitermachen mit Zunahmen. Meine Nadeln sind aber in der Mitte des Strickstücks, soll ich nun die Runde dort beginnen mit Natur oder diese Runde beenden mit Winter bis zum Markieren, Das erschließt sich mit nicht ganz. Sonst müsste ich ja entweder die Maschen bis zum Markierer abheben oder eine neue Nadel nehmen. Bitte um zeitnahe Antwort, vielen lieben Dank, Elke
17.07.2018 - 08:22DROPS Design answered:
Liebe Elke, die Krausrippe mit Natur fängt am Markierer (= Rundenbeginn), dh, die Maschen auf der Nadel bis Markierer abheben (ohne Sie zu stricken) und hier die 1. Runde mit natur wie beschrieben beginnen. Viel Spaß beim stricken!
17.07.2018 - 09:31Elaine Stark wrote:
Thank you so much for including this patterns . Cannot wait for the wool to start it
16.07.2018 - 18:03Minna wrote:
Wau, super
14.07.2018 - 20:49Mandy Fell wrote:
Can you give a measurement guide please. You have the sizes written S - XXL but nothing to indicate at the start of the pattern the measurements like bust size to work out sizing. With only this info I can guess & hope I am a Small but hey, maybe I am XXL! I won't know. Please advise & include that in your pattern. Mandy
14.07.2018 - 13:28DROPS Design answered:
Dear Mrs Fell, you will find a measurement chart at th e bottom of the page including all measurements in each size taken flat from side to side (= in cm). Compare these to a similar garment you have and like the shape to find out the matching size. Read more about sizing here. Happy knitting!
16.07.2018 - 08:25Super,dass die Anleitung online ist. Ich habe eine Frage zu den vorgeschlagenen Farben. Ich finde die Farbe 913 Winter nicht. Es gibt nur die Nummer 913p mit der Bezeichnung chiaroscuro. Ist sie damit gemeint? LG
14.07.2018 - 11:41DROPS Design answered:
Liebe Gisela, stimmt, die Farbenummer stimmt immer, manchmal wird die Farbename angepasst. Viel Spaß beim stricken!
16.07.2018 - 08:21