DROPS Paris
DROPS Paris
100% Cotton
from 0.75 £ /50g
Get the yarn to make this pattern from 7.50£.

The yarn cost is calculated from the pattern’s smallest size and the yarn’s cheapest product type. Looking for an even better price? You might find it on the DROPS Deals!

DROPS Super Sale

Summer Treasure

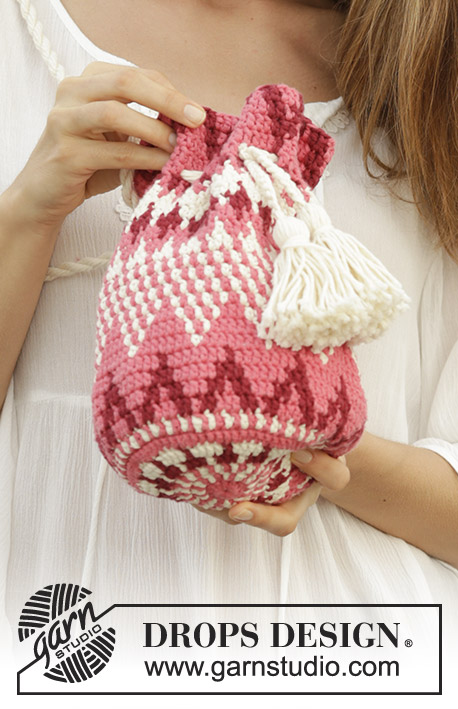
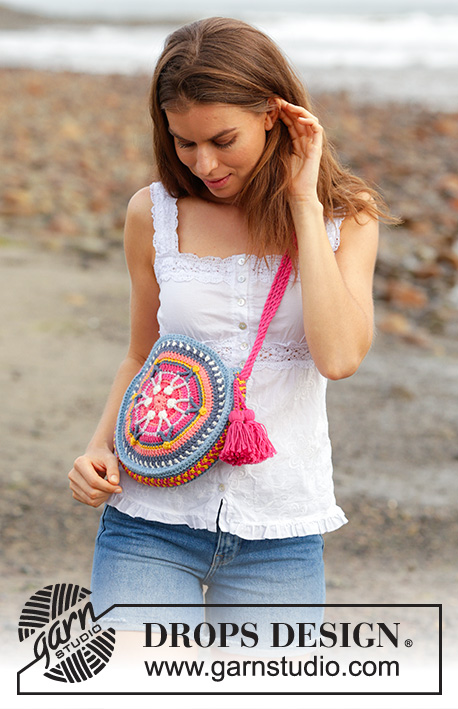
Crocheted bag with stripes, worked in the round from the centre and outwards. Piece is crocheted in DROPS Paris.

DROPS 186-10
DROPS design: Pattern w-720
Yarn group C or A + A
----------------------------------------------------------
Measurements:
Diameter circle (after assembly): approx. 20 cm
Width in the side (after assembly): approx. 4 cm
Materials:
DROPS PARIS from Garnstudio (belongs to yarn group C)
100 g colour 06, shocking pink
50 g colour 01, apricot
50 g colour 38, raspberry
50 g colour 17, off white
50 g colour 58, powder pink
50 g colour 07, heather
50 g colour 103, dark wash
50 g colour 41, mustard
50 g colour 102, spray blue
NOTE: Bag worked with one colour = 200 g Paris.

Piece can also be crocheted with yarn from:
“Alternative yarn (yarn group C)” - see link below.

DROPS CROCHET HOOK SIZE 3.5 mm - or size needed to get 18 treble crochets x 10.5 rows = 10 cm in width and 10 cm vertically.
----------------------------------------------------------
Categories:
Women Accessories Bags Small Bags
Keywords:
bobble circle

-------------------------------------------------------

Alternative Yarn – See how to change yarns here
Yarn Groups A to F – Use the same pattern and change the yarn here
Yarn usage using an alternative yarn – Use our yarn converter here

-------------------------------------------------------

DROPS Paris
DROPS Paris
100% Cotton
from 0.75 £ /50g
Get the yarn to make this pattern from 7.50£.

The yarn cost is calculated from the pattern’s smallest size and the yarn’s cheapest product type. Looking for an even better price? You might find it on the DROPS Deals!

DROPS Super Sale

SAVE 30% on 6 cotton favourites!
Valid until 12.04.2024

Pattern instructions

NOTE: This pattern is written in British English. All measurements in charts are in cm. For conversion from cm to inches - click here. There are different terms for crocheting in British and American English. If this pattern includes crochet, click for "crochet terms" here. For this pattern in American English, please click here.
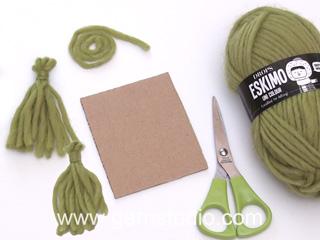
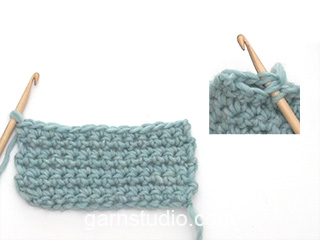
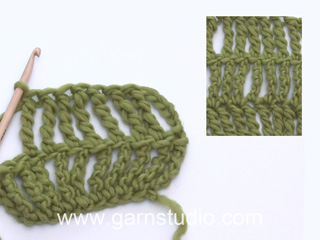
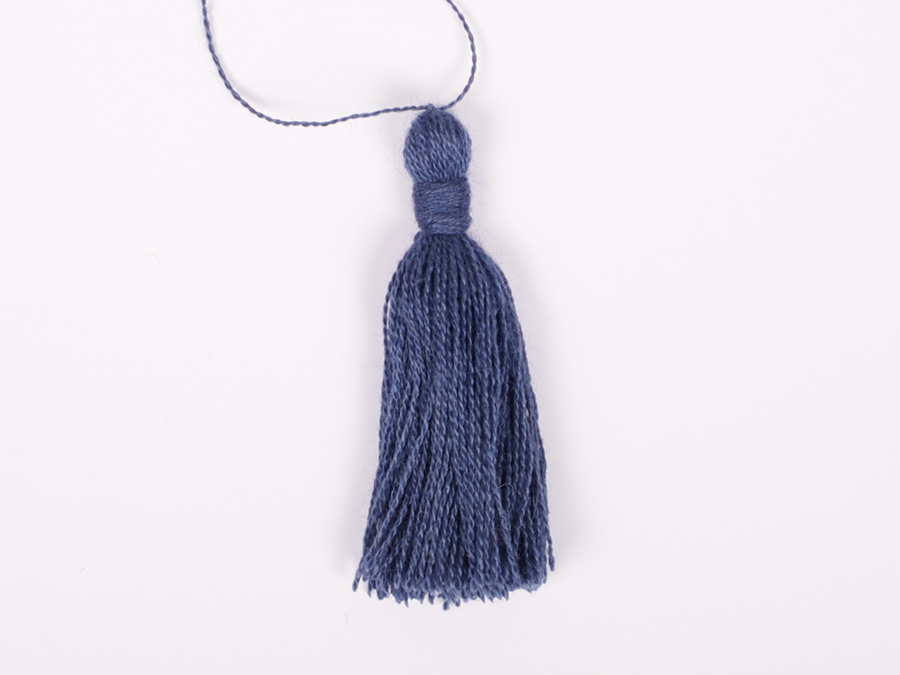
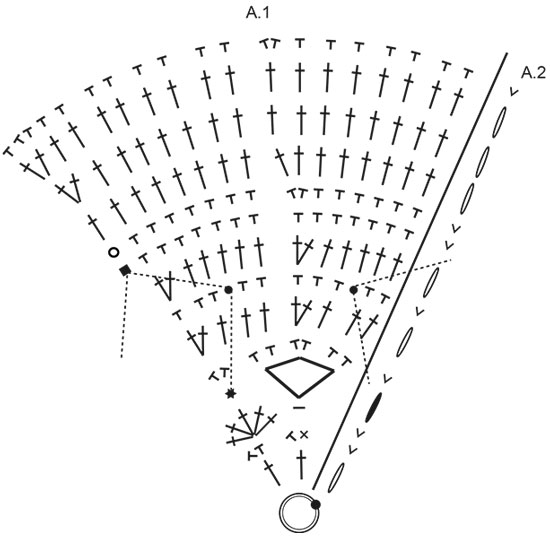
INFORMATION FOR PATTERN:

PATTERN:
See diagrams A.1 and A.2. (A.2 shows how round begins and ends).

COLOUR PATTERN:
When switching colour at the beginning of a round, work slip stitch at the end of previous round with the new colour.
When working with 2 colours on a row work as follows: Work last treble crochet with first colour but wait with last pull through, switch to next colour and work last pull through, then work next treble crochet. When working with two colours on a round place strand for the colour not worked over stitches from previous round, work around the strand so that it is hidden and follows in the round.

STRIPES (circle):
Cast on + ROUND 1: apricot
ROUND 2: raspberry
ROUND 3: off white
ROUND 4: raspberry
ROUND 5: apricot
ROUND 6: shocking pink
ROUND 7: powder pink
ROUND 8: heather
ROUND 9: dark wash
ROUND 10: mustard
ROUND 11: apricot
ROUND 12: dark wash
ROUND 13: * 1 treble crochet with dark wash, 1 treble crochet with off white *, work from *-* the entire round.
ROUND 14: spray blue
----------------------------------------------------------

BAG:
Worked in the round from the centre and outwards. Work 2 circles, the work
the side of bag back and forth. Then work the side and circles together.

CIRCLE:
Work 6 chain stitches on hook size 3.5 mm with apricot and form a ring with 1 slip stitch in first chain stitch made. Work STRIPES (circle) and COLOUR PATTERN - see explanation above and pattern A.1 6 times in total on round (A.2 shown how round begins and ends). REMEMBER THE CROCHET TENSION!
On 7th and 9th round work as follows:
ROUND 7: Work 1 chain stitch, 1 double crochet in each of the next 2 treble crochets, 1
QUADRUPLE TREBLE CROCHET - symbol explanation - around LAST double crochet from
4th round, 1 double crochet in each of the next 5 treble crochets, 1 quadruple crochet around
first double crochet from 4th round, * 1 double crochet in each of the next 5 treble crochets, 1
quadruple treble crochet around same double crochet as previous quadruple treble crochet, 1 double crochet in each of the next 5 treble crochets, work 1 quadruple treble crochet around next double crochet from
4th round, *, work from *-* 4 times in total, work 1 double crochet in each of the next
5 treble crochets, 1 quadruple treble crochet around same quadruple treble crochet as previous quadruple treble crochet,
1 double crochet in each of the next 5 treble crochets, 1 quadruple crochet around same
double crochet as FIRST quadruple treble crochet on round, 1 double crochet in each of the next 3 treble crochets, finish with 1 slip stitch in 1st chain stitch at beginning of
round = 12 quadruple treble crochets and 5 double crochets between each.
ROUND 9: Work 1 chain stitch, * 1 double crochet in each of the first/next 14 treble crochets, 2 TRIPLE TREBLE CROCHETS TOGETHER - see symbol explanation *, work from *-* 6 times in total (work last triple treble crochet around first quadruple treble crochet on round), finish with 1 slip stitch in 1st chain stitch at beginning of round = 6 triple treble crochet together and 14 double crochets between each crochet together.
When entire diagrams A.1 and A.2 have been worked, there are 120 double crochets on round and piece measures approx. 20 cm in diameter. Fasten off. Work another circle the same way.

SIDE ON BAG:
Work 78 chain stitches on hook size 3.5 mm with spray blue. Chain stitch row should measure 43 cm. Then work stripes and pattern as follows:
ROW 1: Work with spray blue: 1 chain stitch to turn with, work 1 double crochet in every chain stitch (= 78 double crochets + 1 chain stitch).
ROW 2: Work with dark wash: 1 chain stitch to turn with, work 1 double crochet in every double crochet.
ROW 3: Work with heather: 3 chain stitches to turn with, work 1 treble crochet in next double crochet, 1 chain stitch, skip 1 stitch, * work 1 treble crochet with mustard in next double crochet, 1 treble crochet with heather in next double crochet *, work from *-* until 2 double crochets remain on row. Switch to mustard and work 1 chain stitch, skip 1 double crochet, 1 treble crochet in last double crochet. Thread the twined string through hole in each side later.
ROW 4: Work with heather: 3 chain stitches to turn with, work 1 treble crochet in next treble crochet, 1 chain stitch, skip 1 chain stitch, * work 1 treble crochet with mustard in next treble crochet, 1 treble crochet with heather in next treble crochet *, work from *-* until next chain stitch on row. Switch to mustard and work 1 chain stitch, skip 1 chain stitch, 1 treble crochet in last treble crochet. Thread the twined string through hole in each side later.
ROW 5: Work with dark wash: 1 chain stitch to turn with, 1 double crochet in every stitch (work 1 double crochet around the 2 chain stitches on row).
ROW 6: Work with spray blue: 1 chain stitch to turn with, 1 double crochet in every double crochet. Cut the yarn.

Work along one short side with spray blue as follows from right side: Fasten strand with 1 double crochet, work 3 chain stitches, work 7 treble crochet along the edge. Work the same way along the other short side. Fasten off.

CROCHET TOGETHER:
Use spray blue to crochet together. Now work the parts together through both layers in last round on circle and last row on the side of bag. Place the 2 parts together, wrong side against wrong side. Work from right side and begin with circle towards you: * Work 1 double crochet in first/next double crochet on circle and around the side on outermost treble crochet (worked in one end on the side of bag) *, work from *-* 3 times in total (i.e. there are 3 double crochets around same treble crochet and 1 double crochet in the first 3 double crochets on circle), then work 1 double crochet in next double crochet on circle and first/next double crochet on the side of bag. Work like this until next treble crochet in the other end on the side of bag. * Work 1 double crochet in next double crochet on circle and around the side on outermost treble crochet (worked in the other side of bag) *, work from *-* 3 times in total (i.e. there are 3 double crochets around same treble crochet and 1 double crochet in each of the next 3 double crochets on circle). All stitches along the side of bag have been worked, and 36 double crochets remain on circle. Continue with 1 double crochet in each of the remaining 36 double crochets on circle. Fasten off.

Work the other circle to bag the same way but now work in the first chain stitch row worked on the side of bag.
NOTE: Make sure that the 2 circles are placed symmetrical to each other, so that the pattern is the same in both sides of bag.

TWINED STRING AND TASSELS:
Cut 4 lengths of 2 metres each. Twine the strands tog until they resist, fold the strands double so that they twine. Make a knot at each end. Make 3 more twined strings = 4 twined strings.
Thread 2 strings from the outside and through one of the holes in one side of bag. Tie a big knot to fasten the strings on the inside of bag. Repeat in the other side, and fasten the last 2 twined strings the same way in the 2 other holes.

Make 1 large and dense tassel in each of the colours shocking pink and heather.
Cut 60 strands 18 cm long, tie one string (approx. 20 cm long) around the middle and fold the strands double at the knot, wrap a new strand (approx. 20 cm long) 3 times around all strands approx. 2 cm down from the middle. Tie the strand and insert strand into tassel, cut the yarn. Crochet with 2 strands as follows: Fasten strand with a double crochet around string at the top of tassel, work chain stitches for 6 cm. Cut the yarn.
Make the other tassel the same way. Fasten tassels to one side of bag by threading the chain stitch row through the bag and tie a knot.

Diagram

symbols = work 6 chain stitches and form a ring with 1 slip stitch in first chain stitch made
symbols = 1 chain stitch
symbols = 1 double crochet in stitch
symbols = 1 double crochet in stitch (insert a marker in this stitch to make it easier to see when this is worked in this double crochet on 4th round).
symbols = 1 double crochet in stitch (insert a marker in this stitch to make it easier to see when this is worked in this double crochet on 7th round)
symbols = 1 treble crochet in stitch/around chain stitch/chain stitch ring
symbols = work QUADRUPLE TREBLE CROCHET: Make 4 yarn overs on hook, insert hook down and around double crochet to be worked, get the yarn, * 1 yarn over on hook, pull yarn through the next 2 loops on hook *, work from *-* 5 times in total = 1 loop on hook.
symbols = Work 2 TRIPLE TREBLE CROCHETS TOGETHER: Work 1 triple treble crochet around first/next quadruple treble crochet from 7th round, but wait with last yarn over and pull through, work 1 triple treble crochet around next quadruple treble crochet the same way, but now pull last yarn over through all loops on hook = 1 triple treble crochet. 1 TRIPLE TREBLE CROCHET: Make 3 yarn overs on hook, insert hook down and around first/next quadruple treble crochet on 7th round, get the yarn, * 1 yarn over on hook, pull yarn through the next 2 loops on hook *, work from *-* 4 times in total = 1 loop on hook.
symbols = work BOBLE: Work 2 double treble crochet and 1 double crochet into 1 stitch as follows: Work 1 double treble crochet but wait with last yarn over and pull through, work 1 more double treble crochet the same way, work 1 double crochet in same stitch but now pull last yarn over through all loops on hook = 1 stitch.
symbols = (1 double treble crochet, 3 treble crochet, 1 double treble crochet) in double crochet marked as a cross in 2nd round (work around chain stitch from 3rd round)
symbols = shows direction on stitch worked around another stitch
symbols = round begins with 1 chain stitches and finishes with 1 slip stitch in 1st chain stitch at beginning of round
symbols = round begins with 3 chain stitches and finishes with 1 slip stitch in 3rd chain stitch at beginning of round
symbols = round begins with 4 chain stitches and finishes with 1 slip stitch in 4th chain stitch at beginning of round
diagram
Do you have a question? See a list of frequently asked questions (FAQ)

Knitting tension is what determines the final measurements of your work, and is usually measured per 10 x 10 cm. It is provided like so: number of stitches in width x number of rows in height - eg: 19 stitches x 26 rows = 10 x 10 cm.

The knitting tension is very individual; some people knit/crochet loosely while others work tightly. You adjust the knitting tension with the needle size, which is why the suggested needle size is only meant as a guide! You need to adjust this (up or down) to ensure that YOUR knitting tension matches the knitting tension provided in the pattern. If you work with a different knitting tension than provided you will have a different yarn consumption, and your work will have different measurements than what the pattern suggests.

The knitting tension also determines which yarns can replace each other. As long as you achieve the same knitting tension you can replace one yarn with another.

See DROPS lesson: How to measure your tension/gauge

See DROPS video: How to make a gauge tension swatch

The required amount of yarn is provided in grams, eg: 450 g. To calculate how many balls you’ll need you first need to know how many grams are in 1 ball (25g, 50g or 100g). This information is available if you click on the individual yarn quality on our pages. Divide the amount required with the amount of each ball. For example, if each ball is 50g (the most common amount), the calculation will be as follows: 450 / 50 = 9 balls.

The important thing when changing from one yarn to another is that the knitting/crochet tension remains the same. This is so that the measurements of the finished piece will be the same as on the sketch provided. It is easier to achieve the same knitting tension using yarns from the same yarn group. It is also possible to work with multiple strands of a thinner yarn to achieve the knitting tension of a thicker one. Please try our yarn converter. We recommend you to always work a test swatch.

Please NOTE: when changing yarn the garment might have a different look and feel to the garment in the photo, due to individual properties and qualities of each yarn.

See DROPS lesson: Can I use a different yarn than the one mentioned in the pattern?

All our yarns are categorised into yarn groups (from A to F) according to thickness and knitting tension – group A contains the thinnest yarns and group F the thickest. This makes it easier for you to find alternative yarns to our patterns, should you wish to switch yarn. All yarns within the same group have a similar knitting tension and can easily replace each other. However, different yarn qualities have different structures and properties which will give the finished work a unique look and feel.

Click here for an overview of the yarns in each yarn group

At the top of all our patterns you’ll find a link to our yarn calculator, which is a helpful tool should you wish to use a different yarn than suggested. By filling in the yarn quality you wish to replace, the amount (in your size) and number of strands, the calculator will present good alternative yarns with the same knitting tension. Additionally it will tell you how much you’ll require in the new qualities and whether you’ll need to work with multiple strands. Most skeins are 50g (some are 25g or 100g).

If the pattern is worked with multiple colours, every colour will have to be calculated separately. Similarly, if the pattern is worked with several strands of different yarns (for example 1 strand Alpaca and 1 strand Kid-Silk) you will have to find alternatives for each, individually.

Click here to see our yarn calculator

Since different yarns have different qualities and textures we have chosen to keep the original yarn in our patterns. However, you can easily find options among our available qualities by using our yarn calculator, or simply pick a yarn from the same yarn group.

It is possible that some retailers still have discontinued yarns in stock, or that someone has a few skeins at home that they would like to find patterns for.

The yarn calculator will provide both alternative yarn as well as required amount in the new quality.

If you think it's hard to decide what size to make, it can be a good idea to measure a garment you own already and like the size of. Then you can pick the size by comparing those measures with the ones available in the pattern's size chart.

You'll find the size chart at the bottom of the pattern.

See DROPS lesson: How to read size chart

The needle size provided in the pattern serves only as a guide, the important thing is to follow the knitting tension. And since knitting tension is very individual, you will have to adjust the needle size to ensure that YOUR tension is the same as in the pattern – maybe you’ll have to adjust 1, or even 2 needle sizes, up or down to achieve the correct tension. For this, we recommend that you work test swatches.

Should you work with a different knitting tension than the one provided, the measurements of the finished garment might deviate from the measurement sketch.

See DROPS lesson: How to measure your tension/gauge

See DROPS video: How to make a tension/gauge swatch

Working a garment top-down provides more flexibility and room for personal adjustment. For example it is easier to try the garment on while working, as well as making adjustments to length of yoke and shoulder caps.

The instructions are carefully explaining every step, in the correct order. Diagrams are adjusted to the knitting direction and are worked as usual.

The diagram depicts all rows/rounds, and every stitch seen from the right side. It is read from bottom to top, from right to left. 1 square = 1 stitch.

When working back and forth, every other row is worked from the right side and every other row is worked from the wrong side. When working from the wrong side, the diagram will have to be worked reversed: from left to right, knit stitches are purled, purl stitches are knit etc.

When working in the round every round is worked from the right side and the diagram are worked from right to left on all rounds.

See DROPS lesson: How to read knitting diagrams

The diagram depicts all rows/rounds, and every stitch seen from the right side. It is worked from bottom to top, from right to left.

When working back and forth every other row is worked from the right side: from right to left and every other row is worked from the wrong side: from left to right.

When working in the round, every row in the diagram are worked from the right side, from right to left.

When working a circular diagram you start in the middle and work your way outwards, counter clockwise, row by row.

The rows usually start with a given number of chain stitches (equivalent to the height of the following stitch), this will either be depicted in the diagram or explained in the pattern.

See DROPS lesson: How to read crochet diagrams

Instructions for working several diagrams after each other on the same row/round, will often be written like so: “work A.1, A.2, A.3 a total of 0-0-2-3-4 times". This means you work A.1 once, then A.2 is worked once, and A.3 is repeated (in width) the number of times provided for your size – in this case like so: S = 0 times, M = 0 times, L=2 times, XL= 3 times and XXL = 4 times.

The diagrams are worked as usual: begin with the first row in A.1, then work the first row in A.2 etc.

See DROPS lesson: How to read knitting diagrams

See DROPS lesson: How to read crochet diagrams

The total width of the garment (from wrist-to-wrist) will be larger in the larger sizes, despite the actual sleeves being shorter. The larger sizes have longer sleeve caps and wider shoulders, so there will be a good fit in all sizes.

The measurement sketch/schematic drawing provides information regarding the full length of the garment. If it’s a jumper or a jacket the length is measured from the highest point on the shoulder closest to the neckline, and straight down to the bottom of the garment. It is NOT measured from the tip of shoulder. Similarly, the length of yoke is measured from the highest point on the shoulder and down to where yoke is split into body and sleeves.

On a jacket measures are never taken along bands, unless specifically stated. Always measure inside band stitches when measuring the length.

See DROPS lesson: How to read a schematic drawing

Diagrams are often repeated on the round or in height. 1 repeat is the diagram the way it appears in the pattern. If it says to work 5 repeats of A.1 in the round, then you work A.1 a total of 5 times after/next to each other in the round. If it says to work 2 repeats of A.1 vertically/in height you work the entire diagram once, then begin again at the start and work the entire diagram one more time.

Chain stitches are slightly narrower than other stitches and to avoid working the cast-on edge too tight, we simply chain more stitches to begin with. The stitch count will be adjusted on the following row to fit the pattern and measurement sketch.

The rib edge is more elastic and will contract slightly compared to, for example, stocking stitch. By increasing before the rib edge, you avoid a visible difference in width between the rib edge and the rest of the body.

It’s very easy to cast off too tightly, and by making yarn overs while casting off (and simultaneously casting these off) you avoid a too tight cast off edge.

See DROPS video: How to bind off with yarn overs (yo)

To achieve an even increase (or decrease) you can increase on, for example: every 3rd and 4th row alternately, like so: work 2 rows and increase on the 3rd row, work 3 rows and increase on the 4th. Repeat this until the increase is complete.

See DROPS lesson: Increase or decrease 1 st on every 3rd and 4th row alternately

Should you prefer to work in the round instead of back and forth, you may of course adjust the pattern. You’ll need to add steeks mid-front (usually 5 stitches), and follow the instructions. When you would normally turn and work from the wrong side, simply work across the steek and continue in the round. At the end you’ll cut the piece open, pick up stitches to work bands, and cover the cut edges.

See DROPS video: How to knit steeks and cut open

Should you prefer to work back and forth instead of in the round, you may of course adjust the pattern so you work the pieces separately and then assemble them at the end. Divide the stitches for the body in 2, add 1 edge stitch in each side (for sewing) and work the front and back pieces separately.

See DROPS lesson: Can I adapt a pattern for circular needles into straight needles?

Pattern repeats can vary slightly in the different sizes, in order to get the correct proportions. If you’re not working the exact same size as the garment in the photo, yours might deviate slightly. This has been carefully developed and adjusted so that the complete impression of the garment is the same in all sizes.

Make sure to follow instructions and diagrams for your size!

If you have found a pattern you like which is available in women’s size it’s not very difficult to convert it to men’s size. The biggest difference will be the length of sleeves and body. Start working on the women size that you think would fit across the chest. The additional length will be worked right before you cast off for the armhole/sleeve cap. If the pattern is worked top-down you can add the length right after the armhole or before the first decrease on sleeve.

Regarding additional yarn amount, this will depend on how much length you add, but it is better with a skein too many than too few.

All yarns will have excess fibres (from production) that might come off as lint or shedding. Brushed yarns (ie hairier yarns) have more of these loose, excess fibres, causing more shedding.

Shedding also depends on what is worn under or over the garment, and whether this pulls at the yarn fibres. It’s therefore not possible to guarantee that there will be no shedding

Below are some tips on how to get the best result when working with hairier yarns:

1. When the garment is finished (before you wash it) shake it vigorously so the looser hairs come off. NOTE: do NOT use a lint roller, brush or any method that pulls at the yarn.

2. Place the garment in a plastic bag and put it in your freezer - the temperature will cause the fibres to become less attached to each other, and excess fibres will come off easier.

3. Leave in the freezer for a few hours before taking it out and shaking it again.

4. Wash the garment according to the instructions on the yarn label.

Pilling is a natural process that happens to even the most exclusive of fibers. It's a natural sign of wear and tear that is hard to avoid, and that is most visible in high friction areas of your garment like a sweater's arms and cuffs.

You can make your garment look as new by removing the pilling, using a fabric comb or a pill/lint remover.

Still can't find the answer you need? Then scroll down and leave your question so one of our experts can try to help you. This will be done normally within 5 to 10 working days.
In the meantime, you can read the questions and answers that others have left to this pattern or join the DROPS Workshop on Facebook to get help from fellow knitters/crocheters!

You might also like...

Post a comment to pattern DROPS 186-10

We would love to hear what you have to say about this pattern!

If you want to leave a question, please make sure you select the correct category in the form below, to speed up the answering process. Required fields are marked *.

Comments / Questions (32)

country flag Dolfin wrote:

Bonjour, J'ai fait l'échantillon et j'obtiens toujours plus que 10 cm, même avec un crochet 3 je suis à 12,5 cm de large... je ne comprends pas pourquoi j'ai autant d'écart. Pouvez-vous m'aider parce que du coup mon sac va être, encore une fois, trop grand.

11.11.2023 - 18:10

DROPS Design answered:

Bonjour Mme Dolfin, essayez avec un crochet 2,5 et/ou bien essayez de resserrer vos mailles un peu plus, on a toutes une façon différente de crocheter, mais si vous n'avez pas l'échantillon, vous ne pourrez pas avoir les bonnes mesures finales, et votre sac sera toujours trop grand (pensez à vérifier la hauteur aussi, essayez de "tirer" un peu moins vos brides en hauteur si c'est un problème). Bon crochet!

13.11.2023 - 07:44

country flag Dolfin wrote:

Bonjour, J'utilise la même laine et le même crochet qu'indiqués et mon cercle fait 26cm et non pas 20, cela me semble un gros écart. Le sac fait-il vraiment 20 cm ? Mon échantillon est bon. Merci pour votre réponse.

15.09.2023 - 07:46

DROPS Design answered:

Bonjour Mme Dolfin, aviez-vous bien le bon échantillon? Vous devez avoir 18 brides en largeur et 10,5 rangs de brides en hauteur pour 10 x 10 cm - pensez à bien resserrer vos mailles en hauteur ou essayez de moins les étirer si besoin. Bon crochet!

15.09.2023 - 08:32

country flag Loretta wrote:

Buongiorno volevo chiedere se le prime tre catenelle sostituiscono la prima magia alta e una catenella sostituisce la prima maglia bassa dei giri.grazie

06.06.2023 - 22:45

DROPS Design answered:

Buongiorno Loretta, se necessario, queste indicazioni vengono riportate direttamente nelle spiegazioni. Buon lavoro!

07.06.2023 - 08:23

country flag Loretta wrote:

Buongiorno non capisco il giro 4 dove devo lavorare le 5 maglie nel punto basso segnalato nel rigo 2 o attorno alle catenelle del rigo 3 e allora perché ho messo un segnapunti nel rigo 2. Grazie

05.06.2023 - 16:39

DROPS Design answered:

Buongiorno Loretta, nel giro 3 deve lavorare 5 maglie nella magliadel giro precedente; il segnapunti al giro 2 serve ad indicare dove lavorare il simbolo a "rombo" del giro 4. Buon lavoro!

07.06.2023 - 08:32

country flag Marie wrote:

Merci pour tous ces tutos très bien expliqués, votre site est une mine d'or. Jusqu'ici je suis parvenue à venir à bout de toutes les difficultés mais j'ai un problème avec le rang 7 du côté du sac. Si je suis les explications écrites, il ne me reste que 2 mailles serrées à la fin du rang et non 3. Si on compte la 1ere en l'air au début, ne faut-il pas faire 1 seule maille serrée et non 2 avant la 1ere quadruple bride ?

03.06.2022 - 19:01

DROPS Design answered:

Bonjour Marie, le 7ème tour est le même que celui dessiné dans le diagramme; chaque diagramme à répéter commence par 2 mailles serrées et se termine par 3 mailles serrées, autrement dit, vous devez toujours avoir 5 mailles serrées entre les quadruples brides: 2 ms au début du tour, 5 ms entre chaque et 3 ms à la fin du tour, avant la maille coulée. Peut-être que ce rang sur le diagramme pourra mieux vous aider? Bonne continuation!

07.06.2022 - 08:07

country flag Anna Maria wrote:

Non capisco bene il giro 4.ho capito che devo fare 5 punti alti nella m. bassa segnata nel secondo giro, ma cosa significa anche di lavorare attorno alla catenella del terzo giro? Grazie

21.12.2021 - 16:09

DROPS Design answered:

Buonasera Anna Maria, in quel punto deve lavorare ATTORNO alla maglia e non NELLA maglia. Buon lavoro!

05.03.2022 - 22:22

country flag Luna wrote:

Ik kan het patroon niet meer vinden van de tas, hoe moet ik dit nu doen?

16.03.2021 - 07:51

DROPS Design answered:

Je kunt het patroon uitprinten met de knop 'Afdrukken' onderaan de materialenlijst. (p.s.: Vorige week was er een probleem met het laden van afbeeldingen op de site, wellicht was dat de reden dat je het patroon even niet kon vinden...)

22.03.2021 - 20:58

country flag Sara wrote:

Scusatemi, ho capito come fare. Non occorre rispondere alla mia domanda precedente. Grazie

03.01.2021 - 10:13

country flag Sara wrote:

Non capisco il giro 4: in particolare, nella descrizione dice di lavorare le varie maglie nella maglia indicata nel secondo giro (capisco di lavorare le 5 maglie indicate tutte in questa maglia del secondo giro) , ma poi dice anche di lavorare attorno alla catenella del terzo giro: cosa vuol dire in termini pratici? Cosa devo lavorare attorno alla catenella del terzo giro? Grazie.

03.01.2021 - 08:30

country flag Anke wrote:

Die Kordel sind fertig und von der Aussenseite gefädelt und verknotet. Aber was mache ich mit den anderen Ende der Kordel,werden diese auch verknotet?

25.11.2020 - 21:14

DROPS Design answered:

Liebe Anke, die Anleitung wurde soeben etwas umformuliert, um es deutlicher zu machen, wie die Kordeln befestigt werden. Sie haben ja pro Seite 2 Löcher. Es werden jeweils 2 Kordeln pro Loch von außen nach innen durchgefädelt und auf der Innenseite verknotet. Das machen Sie an beiden Seiten der Tasche. Viel Spaß mit dieser schönen Tasche!

27.11.2020 - 09:02