DROPS Belle
DROPS Belle
53% Cotton, 33% Viscose, 14% Linen
from 2.20 € /50g
Get the yarn to make this pattern from 13.20€.

The yarn cost is calculated from the pattern’s smallest size and the yarn’s cheapest product type. Looking for an even better price? You might find it on the DROPS Deals!

DROPS SS24

Cherelyn

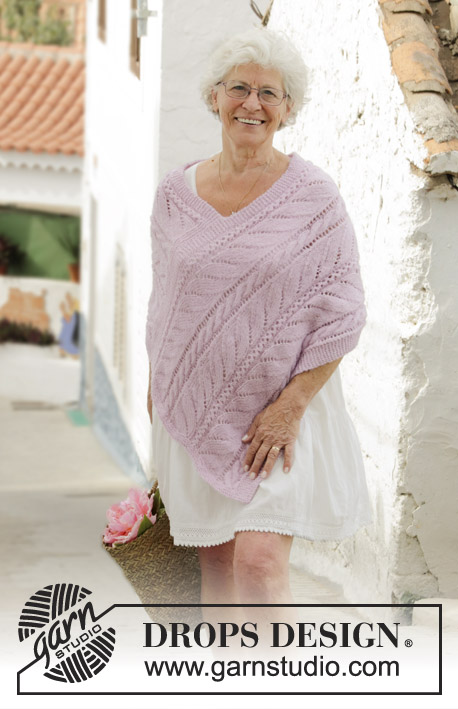
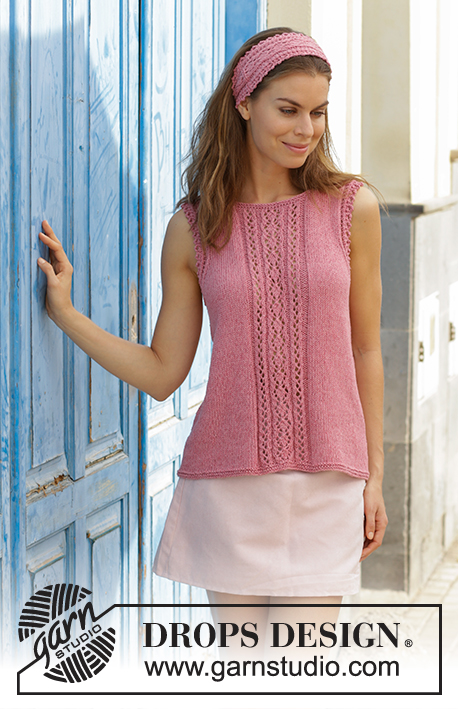
Set consists of: Knitted top with lace pattern, picot edges and A-shape. Size: S - XXXL Knitted head band with lace pattern and picot edges. Set is knitted in DROPS Belle.

DROPS 191-16
DROPS design: Pattern vs-042
Yarn group B
----------------------------------------------------------

FOR THE ENTIRE SET USE:
Size: S - M - L - XL - XXL - XXXL
Materials:
DROPS BELLE from Garnstudio (belongs to yarn group B)
300-350-350-400-450-500 g colour no 11, old pink

Piece can also be knitted with yarn from:
“Alternative yarn (yarn group B)” - see link below.

DROPS CIRCULAR NEEDLE (80 cm) SIZE 4 mm – or size needed to get 21 stitches and 28 rows in stocking stitch = width 10 cm and 10 cm vertically.

DROPS NEEDLES AND CIRCULAR NEEDLE (40 cm) SIZE 3 mm.
----------------------------------------------------------

TOP:
Size: S - M - L - XL - XXL - XXXL
Materials:
DROPS BELLE from Garnstudio (belongs to yarn group B)
300-300-350-350-400-450 g colour no 11, old pink

Piece can also be knitted with yarn from:
“Alternative yarn (yarn group B)” - see link below.

DROPS CIRCULAR NEEDLE (80 cm) SIZE 4 mm – or size needed to get 21 stitches and 28 rows in stocking stitch = width 10 cm and 10 cm vertically.

DROPS CIRCULAR NEEDLE (40 cm) SIZE 3 mm – for neck edge.
----------------------------------------------------------

HEAD BAND:
Size: One-size
Measurements: Approx. 9 x 48 cm
Materials:
DROPS BELLE from Garnstudio (belongs to yarn group B)
50 g colour 11, old pink

Piece can also be knitted with yarn from:
“Alternative yarn (yarn group B)” - see link below.

DROPS STRAIGHT NEEDLES SIZE 3 mm – or size needed to get 23 stitches and 32 rows in stocking stitch = width 10 cm and 10 cm vertically.
----------------------------------------------------------

-------------------------------------------------------

Alternative Yarn – See how to change yarns here
Yarn Groups A to F – Use the same pattern and change the yarn here
Yarn usage using an alternative yarn – Use our yarn converter here

-------------------------------------------------------

DROPS Belle
DROPS Belle
53% Cotton, 33% Viscose, 14% Linen
from 2.20 € /50g
Get the yarn to make this pattern from 13.20€.

The yarn cost is calculated from the pattern’s smallest size and the yarn’s cheapest product type. Looking for an even better price? You might find it on the DROPS Deals!

Pattern instructions

NOTE: This pattern is written in British English. All measurements in charts are in cm. For conversion from cm to inches - click here. There are different terms for crocheting in British and American English. If this pattern includes crochet, click for "crochet terms" here. For this pattern in American English, please click here.
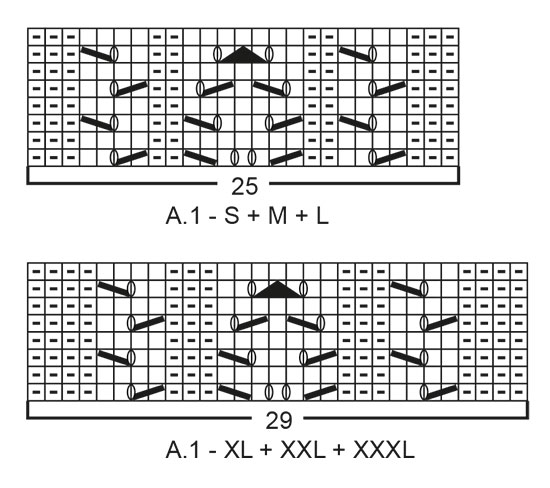
INFORMATION FOR PATTERN:

GARTER STITCH (worked in the round):
1 ridge = 2 rounds. Knit 1 round and purl 1 round.

PATTERN:
Top: See diagrams A.1 to A.3. Choose diagram for your size (applies to A.1).
Head band: See diagrams A.2 to A.4.
Diagrams show all rows in pattern seen from the right side.

DECREASE TIP-1 (applies to sides of body):
Begin 3 stitches before marker thread and knit 2 together, knit 2 (marker thread is between these stitches), slip 1 stitch knitwise, knit 1, pass slipped stitch over stitch worked (= 2 stitches decreased).

DECREASE TIP-2 (applies to armholes):
Decrease inside A.2/A.3 in each side. All decreases are done from the right side.
Decrease as follows before A.3: Begin 3 stitches before A.3: Knit 2 together and knit 1.
Decrease as follows after A.2: Begin after A.2, knit 1, slip next stitch knitwise, knit next stitch, pass slipped stitch over stitch worked
----------------------------------------------------------

TOP:
Worked in the round on circular needle up to armholes, then work front and back piece back and forth separately.

BODY:
Cast on 194-214-230-250-274-302 stitches on circular needle size 4 mm with Belle. Work 2 ridges in GARTER STITCH - see explanation above. Then knit 1 round.
Work next round as follows: Insert 1 marker at the beginning of round (= in the side), * work 36-41-45-48-54-61 stitches in stocking stitch, A.1 (= 25-25-25-29-29-29 stitches), 36-41-45-48-54-61 stitches in stocking stitch *, insert 1 marker thread (= in the side) and work from *-* one more time. Continue pattern in the round like this. REMEMBER THE KNITTING TENSION!
When piece measures 6-6-6-8-8-8 cm, decrease 1 stitch on each side of both marker threads - read DECREASE TIP-1 (= 4 stitches decreased). Decrease like this every 6 cm 6 times in total in each side = 170-190-206-226-250-278 stitches.
When piece measures 38-39-40-41-42-43 cm, work in garter stitch over 20-22-26-28-30-32 stitches in each side (i.e. 10-11-13-14-15-16 stitches in garter stitch on each side of both marker threads), continue the remaining stitches in stocking stitch and A.1 as before. When 2 ridges have been worked in each side, work next round as follows: Cast off the first 3-4-6-7-8-9 stitches at the beginning of round for armhole, work the next 79-87-91-99-109-121 stitches as before, cast off the next 6-8-12-14-16-18 stitches for armhole, work the next 79-87-91-99-109-121 stitches as before and cast off the last 3-4-6-7-8-9 stitches for armhole. Cut the yarn. Work front and back piece back and forth separately.

BACK PIECE:
= 79-87-91-99-109-121 stitches. Continue as follows, i.e. work first row from wrong side: Work A.3 (= 7 stitches - NOTE: Begin on 2nd row in diagram and read diagram from left to right), work 20-24-26-28-33-39 stitches in stocking stitch, A.1 (= 25-25-25-29-29-29 stitches), 20-24-26-28-33-39 stitches in stocking stitch and finish with A.2 (= 7 stitches – NB: Begin on 2nd row in diagram and read diagram from left to right). Continue pattern like this.
AT THE SAME TIME on first row from right side decrease 1 stitch in each side for armhole inside A.2 and A.3 - read DECREASE TIP-2 (= 2 stitches decreased). Decrease as follows in S, M, L and XL: Every 4th row (i.e. every other row from right side) 2-5-6-9 times in total in each side and in XXL and XXXL: Every other row (i.e. every row from right side) 13-18 times in total in each side = 75-77-79-81-83-85 stitches.
When piece measures 53-55-57-59-61-63 cm (decreases for armholes are now done), cast off the middle 35-35-37-37-39-39 stitches for neck and finish each shoulder separately. Continue to cast off for neck at beginning of every row from neck as follows: Cast off 1 stitch 2 times = 18-19-19-20-20-21 stitches remain on shoulder. Continue until piece measures 56-58-60-62-64-66 cm and cast off by knitting from right side. Work the other shoulder the same way.

FRONT PIECE:
= 79-87-91-99-109-121 stitches. Continue as follows, i.e. work first row from wrong side: Work A.3 (= 7 stitches - NOTE: Begin on 2nd row in diagram and read diagram from left to right), work 20-24-26-28-33-39 stitches in stocking stitch, A.1 (= 25-25-25-29-29-29 stitches), 20-24-26-28-33-39 stitches in stocking stitch and finish with A.2 (= 7 stitches – NB: Begin on 2nd row in diagram and read diagram from left to right). Continue pattern like this.
AT THE SAME TIME on first row from right side decrease 1 stitch in each side for armhole inside A.2 and A.3 - read DECREASE TIP-2 (= 2 stitches decreased). Decrease as follows in S, M, L and XL: Every 4th row 2-5-6-9 times in total in each side and in XXL and XXXL: Every other row 13-18 times in total in each side = 75-77-79-81-83-85 stitches.
When piece measures 50-52-54-56-56-58 cm, slip the middle 25-25-23-23-23-23 stitches on a stitch holder for neck and finish each shoulder separately. Continue to cast off for neck at beginning of every row from neck as follows: Cast off 2 stitches 2-2-3-3-3-3 times and 1 stitch 3-3-3-3-4-4 times = 18-19-19-20-20-21 stitches remain on shoulder. Continue until piece measures 56-58-60-62-64-66 cm and cast off by knitting from right side. Work the other shoulder the same way.

ASSEMBLY:
Sew shoulder seams inside cast-off edge in each side.

NECK EDGE: 
Pick up approx. 96 to 114 stitches around the neck (including stitches on stitch holder at front) on a short circular needle size 3 mm. Work 2 ridges in the round and cast off by knitting.
----------------------------------------------------------

HEAD BAND:
Worked back and forth on needle to desired length and sew together mid back.
Cast on 21 stitches on needle size 3 mm with Belle. Knit 1 row (= wrong side). Work next row as follows from right side: Work A.2 (= 7 stitches), A.4 (= 7 stitches) and A.3 (= 7 stitches). Continue pattern back and forth like this. REMEMBER THE KNITTING TENSION! When piece measures approx. 48 cm (or desired length – subtract approx. 6-8 cm from head circumference), knit 1 row from wrong side. Cast off knitting from right side.

ASSEMBLY:
Sew seam mid back inside cast-off edge.

Diagram

symbols = knit from the right side, purl from the wrong side
symbols = purl from the right side, knit from the wrong side
symbols = between 2 stitches make 1 yarn over
symbols = between 2 stitches make 2 yarn overs on needle, on next row knit one yarn over and knit the other yarn over twisted (= 1 stitch increased)
symbols = knit 2 stitches in 1 stitch by knitting 1 stitch in front and back loop of same stitch (= 1 stitch increased)
symbols = cast off 1 stitch
symbols = stitch is already on right needle after casting off stitches, i.e. skip this and move to next square in diagram
symbols = knit yarn over twisted both when symbol is worked from right and wrong side
symbols = knit 2 twisted together both when symbol is worked from right and wrong side
symbols = slip 1 stitch knitwise, knit 1, pass slipped stitch over stitch worked
symbols = slip 1 stitch knitwise, knit 2 stitches together, pass slipped stitch over stitches worked together
diagram
diagram
diagram

Each of our patterns has specific tutorial videos to help you.

Do you have a question? See a list of frequently asked questions (FAQ)

Knitting tension is what determines the final measurements of your work, and is usually measured per 10 x 10 cm. It is provided like so: number of stitches in width x number of rows in height - eg: 19 stitches x 26 rows = 10 x 10 cm.

The knitting tension is very individual; some people knit/crochet loosely while others work tightly. You adjust the knitting tension with the needle size, which is why the suggested needle size is only meant as a guide! You need to adjust this (up or down) to ensure that YOUR knitting tension matches the knitting tension provided in the pattern. If you work with a different knitting tension than provided you will have a different yarn consumption, and your work will have different measurements than what the pattern suggests.

The knitting tension also determines which yarns can replace each other. As long as you achieve the same knitting tension you can replace one yarn with another.

See DROPS lesson: How to measure your tension/gauge

See DROPS video: How to make a gauge tension swatch

The required amount of yarn is provided in grams, eg: 450 g. To calculate how many balls you’ll need you first need to know how many grams are in 1 ball (25g, 50g or 100g). This information is available if you click on the individual yarn quality on our pages. Divide the amount required with the amount of each ball. For example, if each ball is 50g (the most common amount), the calculation will be as follows: 450 / 50 = 9 balls.

The important thing when changing from one yarn to another is that the knitting/crochet tension remains the same. This is so that the measurements of the finished piece will be the same as on the sketch provided. It is easier to achieve the same knitting tension using yarns from the same yarn group. It is also possible to work with multiple strands of a thinner yarn to achieve the knitting tension of a thicker one. Please try our yarn converter. We recommend you to always work a test swatch.

Please NOTE: when changing yarn the garment might have a different look and feel to the garment in the photo, due to individual properties and qualities of each yarn.

See DROPS lesson: Can I use a different yarn than the one mentioned in the pattern?

All our yarns are categorised into yarn groups (from A to F) according to thickness and knitting tension – group A contains the thinnest yarns and group F the thickest. This makes it easier for you to find alternative yarns to our patterns, should you wish to switch yarn. All yarns within the same group have a similar knitting tension and can easily replace each other. However, different yarn qualities have different structures and properties which will give the finished work a unique look and feel.

Click here for an overview of the yarns in each yarn group

At the top of all our patterns you’ll find a link to our yarn calculator, which is a helpful tool should you wish to use a different yarn than suggested. By filling in the yarn quality you wish to replace, the amount (in your size) and number of strands, the calculator will present good alternative yarns with the same knitting tension. Additionally it will tell you how much you’ll require in the new qualities and whether you’ll need to work with multiple strands. Most skeins are 50g (some are 25g or 100g).

If the pattern is worked with multiple colours, every colour will have to be calculated separately. Similarly, if the pattern is worked with several strands of different yarns (for example 1 strand Alpaca and 1 strand Kid-Silk) you will have to find alternatives for each, individually.

Click here to see our yarn calculator

Since different yarns have different qualities and textures we have chosen to keep the original yarn in our patterns. However, you can easily find options among our available qualities by using our yarn calculator, or simply pick a yarn from the same yarn group.

It is possible that some retailers still have discontinued yarns in stock, or that someone has a few skeins at home that they would like to find patterns for.

The yarn calculator will provide both alternative yarn as well as required amount in the new quality.

If you think it's hard to decide what size to make, it can be a good idea to measure a garment you own already and like the size of. Then you can pick the size by comparing those measures with the ones available in the pattern's size chart.

You'll find the size chart at the bottom of the pattern.

See DROPS lesson: How to read size chart

The needle size provided in the pattern serves only as a guide, the important thing is to follow the knitting tension. And since knitting tension is very individual, you will have to adjust the needle size to ensure that YOUR tension is the same as in the pattern – maybe you’ll have to adjust 1, or even 2 needle sizes, up or down to achieve the correct tension. For this, we recommend that you work test swatches.

Should you work with a different knitting tension than the one provided, the measurements of the finished garment might deviate from the measurement sketch.

See DROPS lesson: How to measure your tension/gauge

See DROPS video: How to make a tension/gauge swatch

Working a garment top-down provides more flexibility and room for personal adjustment. For example it is easier to try the garment on while working, as well as making adjustments to length of yoke and shoulder caps.

The instructions are carefully explaining every step, in the correct order. Diagrams are adjusted to the knitting direction and are worked as usual.

The diagram depicts all rows/rounds, and every stitch seen from the right side. It is read from bottom to top, from right to left. 1 square = 1 stitch.

When working back and forth, every other row is worked from the right side and every other row is worked from the wrong side. When working from the wrong side, the diagram will have to be worked reversed: from left to right, knit stitches are purled, purl stitches are knit etc.

When working in the round every round is worked from the right side and the diagram are worked from right to left on all rounds.

See DROPS lesson: How to read knitting diagrams

The diagram depicts all rows/rounds, and every stitch seen from the right side. It is worked from bottom to top, from right to left.

When working back and forth every other row is worked from the right side: from right to left and every other row is worked from the wrong side: from left to right.

When working in the round, every row in the diagram are worked from the right side, from right to left.

When working a circular diagram you start in the middle and work your way outwards, counter clockwise, row by row.

The rows usually start with a given number of chain stitches (equivalent to the height of the following stitch), this will either be depicted in the diagram or explained in the pattern.

See DROPS lesson: How to read crochet diagrams

Instructions for working several diagrams after each other on the same row/round, will often be written like so: “work A.1, A.2, A.3 a total of 0-0-2-3-4 times". This means you work A.1 once, then A.2 is worked once, and A.3 is repeated (in width) the number of times provided for your size – in this case like so: S = 0 times, M = 0 times, L=2 times, XL= 3 times and XXL = 4 times.

The diagrams are worked as usual: begin with the first row in A.1, then work the first row in A.2 etc.

See DROPS lesson: How to read knitting diagrams

See DROPS lesson: How to read crochet diagrams

The total width of the garment (from wrist-to-wrist) will be larger in the larger sizes, despite the actual sleeves being shorter. The larger sizes have longer sleeve caps and wider shoulders, so there will be a good fit in all sizes.

The measurement sketch/schematic drawing provides information regarding the full length of the garment. If it’s a jumper or a jacket the length is measured from the highest point on the shoulder closest to the neckline, and straight down to the bottom of the garment. It is NOT measured from the tip of shoulder. Similarly, the length of yoke is measured from the highest point on the shoulder and down to where yoke is split into body and sleeves.

On a jacket measures are never taken along bands, unless specifically stated. Always measure inside band stitches when measuring the length.

See DROPS lesson: How to read a schematic drawing

Diagrams are often repeated on the round or in height. 1 repeat is the diagram the way it appears in the pattern. If it says to work 5 repeats of A.1 in the round, then you work A.1 a total of 5 times after/next to each other in the round. If it says to work 2 repeats of A.1 vertically/in height you work the entire diagram once, then begin again at the start and work the entire diagram one more time.

Chain stitches are slightly narrower than other stitches and to avoid working the cast-on edge too tight, we simply chain more stitches to begin with. The stitch count will be adjusted on the following row to fit the pattern and measurement sketch.

The rib edge is more elastic and will contract slightly compared to, for example, stocking stitch. By increasing before the rib edge, you avoid a visible difference in width between the rib edge and the rest of the body.

It’s very easy to cast off too tightly, and by making yarn overs while casting off (and simultaneously casting these off) you avoid a too tight cast off edge.

See DROPS video: How to bind off with yarn overs (yo)

To achieve an even increase (or decrease) you can increase on, for example: every 3rd and 4th row alternately, like so: work 2 rows and increase on the 3rd row, work 3 rows and increase on the 4th. Repeat this until the increase is complete.

See DROPS lesson: Increase or decrease 1 st on every 3rd and 4th row alternately

Should you prefer to work in the round instead of back and forth, you may of course adjust the pattern. You’ll need to add steeks mid-front (usually 5 stitches), and follow the instructions. When you would normally turn and work from the wrong side, simply work across the steek and continue in the round. At the end you’ll cut the piece open, pick up stitches to work bands, and cover the cut edges.

See DROPS video: How to knit steeks and cut open

Should you prefer to work back and forth instead of in the round, you may of course adjust the pattern so you work the pieces separately and then assemble them at the end. Divide the stitches for the body in 2, add 1 edge stitch in each side (for sewing) and work the front and back pieces separately.

See DROPS lesson: Can I adapt a pattern for circular needles into straight needles?

Pattern repeats can vary slightly in the different sizes, in order to get the correct proportions. If you’re not working the exact same size as the garment in the photo, yours might deviate slightly. This has been carefully developed and adjusted so that the complete impression of the garment is the same in all sizes.

Make sure to follow instructions and diagrams for your size!

If you have found a pattern you like which is available in women’s size it’s not very difficult to convert it to men’s size. The biggest difference will be the length of sleeves and body. Start working on the women size that you think would fit across the chest. The additional length will be worked right before you cast off for the armhole/sleeve cap. If the pattern is worked top-down you can add the length right after the armhole or before the first decrease on sleeve.

Regarding additional yarn amount, this will depend on how much length you add, but it is better with a skein too many than too few.

All yarns will have excess fibres (from production) that might come off as lint or shedding. Brushed yarns (ie hairier yarns) have more of these loose, excess fibres, causing more shedding.

Shedding also depends on what is worn under or over the garment, and whether this pulls at the yarn fibres. It’s therefore not possible to guarantee that there will be no shedding

Below are some tips on how to get the best result when working with hairier yarns:

1. When the garment is finished (before you wash it) shake it vigorously so the looser hairs come off. NOTE: do NOT use a lint roller, brush or any method that pulls at the yarn.

2. Place the garment in a plastic bag and put it in your freezer - the temperature will cause the fibres to become less attached to each other, and excess fibres will come off easier.

3. Leave in the freezer for a few hours before taking it out and shaking it again.

4. Wash the garment according to the instructions on the yarn label.

Pilling is a natural process that happens to even the most exclusive of fibers. It's a natural sign of wear and tear that is hard to avoid, and that is most visible in high friction areas of your garment like a sweater's arms and cuffs.

You can make your garment look as new by removing the pilling, using a fabric comb or a pill/lint remover.

Still can't find the answer you need? Then scroll down and leave your question so one of our experts can try to help you. This will be done normally within 5 to 10 working days.
In the meantime, you can read the questions and answers that others have left to this pattern or join the DROPS Workshop on Facebook to get help from fellow knitters/crocheters!

You might also like...

Post a comment to pattern DROPS 191-16

We would love to hear what you have to say about this pattern!

If you want to leave a question, please make sure you select the correct category in the form below, to speed up the answering process. Required fields are marked *.

Comments / Questions (18)

country flag Christina wrote:

Tack har hittat alla delarna nu!

20.03.2024 - 17:03

country flag Christina wrote:

Cherelyn DROPS 191-16: Var hittar jag beskrivningen till picotkanten för topp och pannband? Tack på förhand!

20.03.2024 - 16:47

country flag Britt Mari Knudseth wrote:

Bakstykket/ forstykket. Skal begynnelsen på pinnen både på rettsiden og vrangsiden starte med A3? Rad 2 og 4 på vr,1 og 3 på r siden. Skal likeså alle pinner slutte med A2?

02.07.2023 - 02:30

DROPS Design answered:

Hei Britt Mari Ja, første pinne strikkes fra vrangen (både bakstykket og forstykket) og det startes med diagram A.3 og sluttes med A.2. Tråden ble klippet da bolen var ferdig strikket. Rad 2 + 4 i diagrammene er fra vrangen og leses fra venstre mot høyre, mens rad 1+ 3 er fra retten og leses fra høyre mot venstre. mvh DROPS Design

03.07.2023 - 10:59

country flag Torunn Mikkelsen wrote:

Hva er forklaring på opp/ned trekanten i sidene på A2 og A3 - jeg strikker pannebånd.

18.01.2023 - 20:32

DROPS Design answered:

Hei Torunn, Det symbolet er en 'v' og betyr felle av en maske. God fornøyelse!

22.01.2023 - 12:45

country flag Irene wrote:

Buongiorno ho bisogno di aiuto per i diagrammi A2 e A3 non capisco il simbolo del triangolo con la punta in basso come faccio ad intrecciare una maglia? Vi riferite alle diminuzioni degli scalfi o invece vanno accavallate le due maglie in una lavorate al giro precedente e se si come faccio passo una maglia senza lavorare, lavoro la secona e accavallo la prima? Grazie

15.07.2022 - 09:55

DROPS Design answered:

Buonasera Irene, deve proseguire come indicato e intrecciare le maglie. Buon lavoro!

10.08.2022 - 22:41

country flag Lagler Tünde wrote:

Üdvözlöm! A MINTALEÍRÁSBAN az áll, hogy "LUSTAKÖTÉS (körben kötve): 1 borda = két kör 1 kör sima szemekkel, 1 kör fordított szemekkel." A TESTRÉSZNÉL meg az, hogy "Kössünk 2 bordányit (= 8 sor / kör) LUSTAKÖTÉSSEL- olvassuk el a fenti magyarázatot. Ezután 1 kört kötünk sima szemekkel." Szerintem, ha 1 borda = 2 kör, akkor 2 borda = 4 kör és nem 8. Most milyen széles a minta 4 vagy 8 kör?

08.07.2022 - 12:54

country flag Margoth Hansson wrote:

Jag stickar just nu Cherelyn och har kommit så långt att jag maskat av för ärmhål MEN då förstår jag inte förklaringen på diagrammet. det är inte översatt fr norska. snälla, kan ngn ge en översättning så jag får mitt linne färdigt

30.06.2022 - 09:12

DROPS Design answered:

Hej! Nu är diagramsymbolerna översatta till svenska, tack för info! Mvh DROPS Design

30.06.2022 - 12:00

country flag Carolyn Gonzalez wrote:

Hello! This looks like a lovely pattern. I am trying to follow diagrams b4 I start. I cannot get A2 and A3 to work out. So, always from left to right? (instead of R-L). Since now flat reverse stitch for r2 and 4 or R1 and 3? And when I get to "knit YO twisted" I do not have a YO from the previous row. Can you perhaps write out instead of diagram? I have tried multiple times and just can't figure out where it should be backwards.... Help please!!! Thanks much! :-)

03.03.2021 - 17:58

DROPS Design answered:

Dear Mrs Gonzalez, on first row on back piece work from WS: A.3 (starting with row 2 and reading L-R), and finish with A.2 (work row 2 and read L-R), turn and n ow work from RS: A.2 (= row 3, read R-L), and finish with A.3 (row 3 = read R-L) and continue like this, ie from WS read diagrams from L-R and from RS from R-L. Happy knitting!

04.03.2021 - 07:39

country flag Edith wrote:

Je suis en train de réaliser ce beau modèle. J'ai un souci avec la taille. Bien que l'échantillon corresponde au modèle, la taille est beaucoup trop grande !!! Je fais habituellement un XL et ici le L est encore beaucoup trop grand. Y a t'il d'autres personnes dans mon cas ? Merci !

04.08.2020 - 22:32

DROPS Design answered:

Bonjour Edith, pensez à vérifier les mesures indiquées par le schéma pour choisir la taille, si votre échantillon/tension sont justes, alors vous obtiendrez les mesures indiquées pour la taille choisie dans le schéma. Bon tricot!

05.08.2020 - 08:00

country flag Jaqueline wrote:

Estoy con dificultad para entender los diagramas A2 y A3. ¿Por qué son distintos? ¿No va a quedar un lado diferente del otro? La blusa es muy bonita, pero esta parte me está costando bastante.

01.07.2020 - 00:29

DROPS Design answered:

Hola Jaqueline. Trabajamos los dos diagramas para que el patrón quede simétrico.

01.07.2020 - 20:45