DROPS Paris
DROPS Paris
100% Cotton
from 1.10 £ /50g
Get the yarn to make this pattern from 24.20£.

The yarn cost is calculated from the pattern’s smallest size and the yarn’s cheapest product type. Looking for an even better price? You might find it on the DROPS Deals!

DROPS SS24

Spider Dance

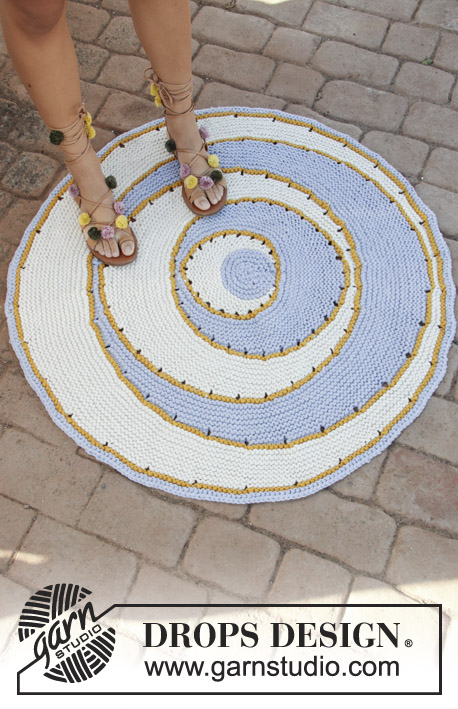
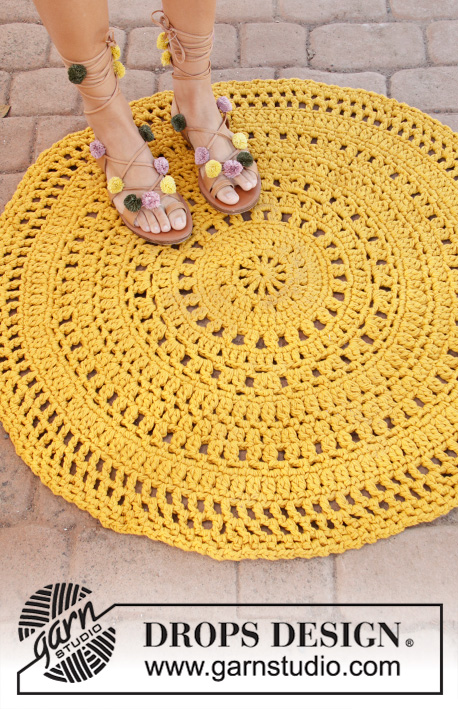
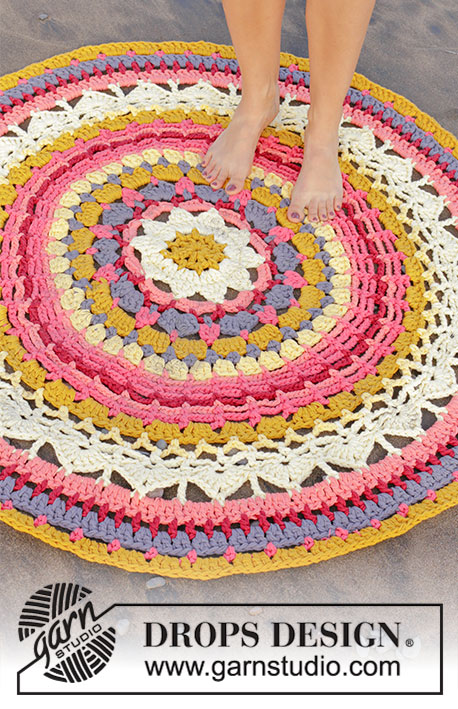
Carpet with lace pattern, crocheted from centre and outwards in a circle. Piece is crocheted in 3 strands DROPS Paris.

DROPS 189-7
DROPS design: Pattern w-709
Yarn group C+C+C
----------------------------------------------------------
Measurements: Diameter: approx. 99 cm
Materials:
DROPS PARIS from Garnstudio (belongs to yarn group C)
1100 g colour no 06, shocking pink

Piece can also be crocheted with yarn from:
“Alternative yarn (yarn group C)” - see link below.

DROPS CROCHET HOOK SIZE 9 mm - or size needed to get 8 treble crochets x 4.5 rows with 3 strands = 10 cm in width and 10 cm vertically.
----------------------------------------------------------

-------------------------------------------------------

Alternative Yarn – See how to change yarns here
Yarn Groups A to F – Use the same pattern and change the yarn here
Yarn usage using an alternative yarn – Use our yarn converter here

-------------------------------------------------------

DROPS Paris
DROPS Paris
100% Cotton
from 1.10 £ /50g
Get the yarn to make this pattern from 24.20£.

The yarn cost is calculated from the pattern’s smallest size and the yarn’s cheapest product type. Looking for an even better price? You might find it on the DROPS Deals!

Pattern instructions

NOTE: This pattern is written in British English. All measurements in charts are in cm. For conversion from cm to inches - click here. There are different terms for crocheting in British and American English. If this pattern includes crochet, click for "crochet terms" here. For this pattern in American English, please click here.
INFORMATION FOR PATTERN:

PATTERN:
See diagrams A.1 to A.6 (A.1, A.3 and A.5 show how rounds begin and end).
----------------------------------------------------------

CARPET:
Piece is worked in the round from centre and outwards with 3 strands Paris.

Work 4 chain stitches on hook size 9 mm with 3 strands Paris and form a ring with 1 slip stitch in first chain stitch made. Work A.1 (shows how round begins and ends), A.2 6 times in total on round. REMEMBER THE CROCHET TENSION! From round marked with black star work 15 repetitions on round. On last round in A.2 increase in addition 6 treble crochets evenly = 156 treble crochets. Piece measures approx. 50 cm in diameter.
Work from round with arrow as follows: Work A.3 (shows how round begins and ends), work A.4 13 times in total on round. When A.3 and A.4 have been worked vertically, there are 260 stitches on round. Piece measures approx. 89 cm in diameter.
Work from round with arrow as follows: Work A.5 (shows how round begins and ends), work A.6 over every repetition of A.4. When A.5 and A.6 have been worked, the carpet is done. Piece measures approx. 99 cm in diameter. Fasten off.

Diagram

symbols = work 4 chain stitches and form a ring with 1 slip stitch in first chain stitch made Black dot is beginning of round
symbols = 1 chain stitch
symbols = 4 chain stitches
symbols = 7 chain stitches
symbols = 1 double crochet around chain stitch/chain space
symbols = 1 double crochet in stitch
symbols = 1 treble crochet around chain stitch ring/chain space
symbols = 1 treble crochet in stitch
symbols = 1 double treble crochet in stitch
symbols = 1 slip stitch in stitch
symbols = at beginning of round replace first treble crochet with 3 chain stitches, finish round with 1 slip stitch in 3rd chain stitch at beginning of round
symbols = at beginning of round work 1 chain stitch (does not replace first stitch), finish round with 1 slip stitch in 1st chain stitch at beginning of round
symbols = at beginning of round replace first double treble crochet with 4 chain stitches, finish round with 1 slip stitch in 4th chain stitch at beginning of round
symbols = begin on this round, previous round has already been worked
symbols = from here work 15 repetitions on round
symbols = on this round increase 6 stitches evenly = 156 stitches
diagram
diagram
diagram
Do you have a question? See a list of frequently asked questions (FAQ)

Knitting tension is what determines the final measurements of your work, and is usually measured per 10 x 10 cm. It is provided like so: number of stitches in width x number of rows in height - eg: 19 stitches x 26 rows = 10 x 10 cm.

The knitting tension is very individual; some people knit/crochet loosely while others work tightly. You adjust the knitting tension with the needle size, which is why the suggested needle size is only meant as a guide! You need to adjust this (up or down) to ensure that YOUR knitting tension matches the knitting tension provided in the pattern. If you work with a different knitting tension than provided you will have a different yarn consumption, and your work will have different measurements than what the pattern suggests.

The knitting tension also determines which yarns can replace each other. As long as you achieve the same knitting tension you can replace one yarn with another.

See DROPS lesson: How to measure your tension/gauge

See DROPS video: How to make a gauge tension swatch

The required amount of yarn is provided in grams, eg: 450 g. To calculate how many balls you’ll need you first need to know how many grams are in 1 ball (25g, 50g or 100g). This information is available if you click on the individual yarn quality on our pages. Divide the amount required with the amount of each ball. For example, if each ball is 50g (the most common amount), the calculation will be as follows: 450 / 50 = 9 balls.

The important thing when changing from one yarn to another is that the knitting/crochet tension remains the same. This is so that the measurements of the finished piece will be the same as on the sketch provided. It is easier to achieve the same knitting tension using yarns from the same yarn group. It is also possible to work with multiple strands of a thinner yarn to achieve the knitting tension of a thicker one. Please try our yarn converter. We recommend you to always work a test swatch.

Please NOTE: when changing yarn the garment might have a different look and feel to the garment in the photo, due to individual properties and qualities of each yarn.

See DROPS lesson: Can I use a different yarn than the one mentioned in the pattern?

All our yarns are categorised into yarn groups (from A to F) according to thickness and knitting tension – group A contains the thinnest yarns and group F the thickest. This makes it easier for you to find alternative yarns to our patterns, should you wish to switch yarn. All yarns within the same group have a similar knitting tension and can easily replace each other. However, different yarn qualities have different structures and properties which will give the finished work a unique look and feel.

Click here for an overview of the yarns in each yarn group

At the top of all our patterns you’ll find a link to our yarn calculator, which is a helpful tool should you wish to use a different yarn than suggested. By filling in the yarn quality you wish to replace, the amount (in your size) and number of strands, the calculator will present good alternative yarns with the same knitting tension. Additionally it will tell you how much you’ll require in the new qualities and whether you’ll need to work with multiple strands. Most skeins are 50g (some are 25g or 100g).

If the pattern is worked with multiple colours, every colour will have to be calculated separately. Similarly, if the pattern is worked with several strands of different yarns (for example 1 strand Alpaca and 1 strand Kid-Silk) you will have to find alternatives for each, individually.

Click here to see our yarn calculator

Since different yarns have different qualities and textures we have chosen to keep the original yarn in our patterns. However, you can easily find options among our available qualities by using our yarn calculator, or simply pick a yarn from the same yarn group.

It is possible that some retailers still have discontinued yarns in stock, or that someone has a few skeins at home that they would like to find patterns for.

The yarn calculator will provide both alternative yarn as well as required amount in the new quality.

If you think it's hard to decide what size to make, it can be a good idea to measure a garment you own already and like the size of. Then you can pick the size by comparing those measures with the ones available in the pattern's size chart.

You'll find the size chart at the bottom of the pattern.

See DROPS lesson: How to read size chart

The needle size provided in the pattern serves only as a guide, the important thing is to follow the knitting tension. And since knitting tension is very individual, you will have to adjust the needle size to ensure that YOUR tension is the same as in the pattern – maybe you’ll have to adjust 1, or even 2 needle sizes, up or down to achieve the correct tension. For this, we recommend that you work test swatches.

Should you work with a different knitting tension than the one provided, the measurements of the finished garment might deviate from the measurement sketch.

See DROPS lesson: How to measure your tension/gauge

See DROPS video: How to make a tension/gauge swatch

Working a garment top-down provides more flexibility and room for personal adjustment. For example it is easier to try the garment on while working, as well as making adjustments to length of yoke and shoulder caps.

The instructions are carefully explaining every step, in the correct order. Diagrams are adjusted to the knitting direction and are worked as usual.

The diagram depicts all rows/rounds, and every stitch seen from the right side. It is read from bottom to top, from right to left. 1 square = 1 stitch.

When working back and forth, every other row is worked from the right side and every other row is worked from the wrong side. When working from the wrong side, the diagram will have to be worked reversed: from left to right, knit stitches are purled, purl stitches are knit etc.

When working in the round every round is worked from the right side and the diagram are worked from right to left on all rounds.

See DROPS lesson: How to read knitting diagrams

The diagram depicts all rows/rounds, and every stitch seen from the right side. It is worked from bottom to top, from right to left.

When working back and forth every other row is worked from the right side: from right to left and every other row is worked from the wrong side: from left to right.

When working in the round, every row in the diagram are worked from the right side, from right to left.

When working a circular diagram you start in the middle and work your way outwards, counter clockwise, row by row.

The rows usually start with a given number of chain stitches (equivalent to the height of the following stitch), this will either be depicted in the diagram or explained in the pattern.

See DROPS lesson: How to read crochet diagrams

Instructions for working several diagrams after each other on the same row/round, will often be written like so: “work A.1, A.2, A.3 a total of 0-0-2-3-4 times". This means you work A.1 once, then A.2 is worked once, and A.3 is repeated (in width) the number of times provided for your size – in this case like so: S = 0 times, M = 0 times, L=2 times, XL= 3 times and XXL = 4 times.

The diagrams are worked as usual: begin with the first row in A.1, then work the first row in A.2 etc.

See DROPS lesson: How to read knitting diagrams

See DROPS lesson: How to read crochet diagrams

The total width of the garment (from wrist-to-wrist) will be larger in the larger sizes, despite the actual sleeves being shorter. The larger sizes have longer sleeve caps and wider shoulders, so there will be a good fit in all sizes.

The measurement sketch/schematic drawing provides information regarding the full length of the garment. If it’s a jumper or a jacket the length is measured from the highest point on the shoulder closest to the neckline, and straight down to the bottom of the garment. It is NOT measured from the tip of shoulder. Similarly, the length of yoke is measured from the highest point on the shoulder and down to where yoke is split into body and sleeves.

On a jacket measures are never taken along bands, unless specifically stated. Always measure inside band stitches when measuring the length.

See DROPS lesson: How to read a schematic drawing

Diagrams are often repeated on the round or in height. 1 repeat is the diagram the way it appears in the pattern. If it says to work 5 repeats of A.1 in the round, then you work A.1 a total of 5 times after/next to each other in the round. If it says to work 2 repeats of A.1 vertically/in height you work the entire diagram once, then begin again at the start and work the entire diagram one more time.

Chain stitches are slightly narrower than other stitches and to avoid working the cast-on edge too tight, we simply chain more stitches to begin with. The stitch count will be adjusted on the following row to fit the pattern and measurement sketch.

The rib edge is more elastic and will contract slightly compared to, for example, stocking stitch. By increasing before the rib edge, you avoid a visible difference in width between the rib edge and the rest of the body.

It’s very easy to cast off too tightly, and by making yarn overs while casting off (and simultaneously casting these off) you avoid a too tight cast off edge.

See DROPS video: How to bind off with yarn overs (yo)

To achieve an even increase (or decrease) you can increase on, for example: every 3rd and 4th row alternately, like so: work 2 rows and increase on the 3rd row, work 3 rows and increase on the 4th. Repeat this until the increase is complete.

See DROPS lesson: Increase or decrease 1 st on every 3rd and 4th row alternately

Should you prefer to work in the round instead of back and forth, you may of course adjust the pattern. You’ll need to add steeks mid-front (usually 5 stitches), and follow the instructions. When you would normally turn and work from the wrong side, simply work across the steek and continue in the round. At the end you’ll cut the piece open, pick up stitches to work bands, and cover the cut edges.

See DROPS video: How to knit steeks and cut open

Should you prefer to work back and forth instead of in the round, you may of course adjust the pattern so you work the pieces separately and then assemble them at the end. Divide the stitches for the body in 2, add 1 edge stitch in each side (for sewing) and work the front and back pieces separately.

See DROPS lesson: Can I adapt a pattern for circular needles into straight needles?

Pattern repeats can vary slightly in the different sizes, in order to get the correct proportions. If you’re not working the exact same size as the garment in the photo, yours might deviate slightly. This has been carefully developed and adjusted so that the complete impression of the garment is the same in all sizes.

Make sure to follow instructions and diagrams for your size!

If you have found a pattern you like which is available in women’s size it’s not very difficult to convert it to men’s size. The biggest difference will be the length of sleeves and body. Start working on the women size that you think would fit across the chest. The additional length will be worked right before you cast off for the armhole/sleeve cap. If the pattern is worked top-down you can add the length right after the armhole or before the first decrease on sleeve.

Regarding additional yarn amount, this will depend on how much length you add, but it is better with a skein too many than too few.

All yarns will have excess fibres (from production) that might come off as lint or shedding. Brushed yarns (ie hairier yarns) have more of these loose, excess fibres, causing more shedding.

Shedding also depends on what is worn under or over the garment, and whether this pulls at the yarn fibres. It’s therefore not possible to guarantee that there will be no shedding

Below are some tips on how to get the best result when working with hairier yarns:

1. When the garment is finished (before you wash it) shake it vigorously so the looser hairs come off. NOTE: do NOT use a lint roller, brush or any method that pulls at the yarn.

2. Place the garment in a plastic bag and put it in your freezer - the temperature will cause the fibres to become less attached to each other, and excess fibres will come off easier.

3. Leave in the freezer for a few hours before taking it out and shaking it again.

4. Wash the garment according to the instructions on the yarn label.

Pilling is a natural process that happens to even the most exclusive of fibers. It's a natural sign of wear and tear that is hard to avoid, and that is most visible in high friction areas of your garment like a sweater's arms and cuffs.

You can make your garment look as new by removing the pilling, using a fabric comb or a pill/lint remover.

Still can't find the answer you need? Then scroll down and leave your question so one of our experts can try to help you. This will be done normally within 5 to 10 working days.
In the meantime, you can read the questions and answers that others have left to this pattern or join the DROPS Workshop on Facebook to get help from fellow knitters/crocheters!

You might also like...

Post a comment to pattern DROPS 189-7

We would love to hear what you have to say about this pattern!

If you want to leave a question, please make sure you select the correct category in the form below, to speed up the answering process. Required fields are marked *.

Comments / Questions (10)

country flag Anita Keereweer wrote:

Ik heb het 3 keer nagekeken en uitgehaald maar naar mijn idee moeten dit na de meerdering van 6 steken geen 156 steken zijn maar 146

19.11.2023 - 20:34

country flag Cathy Feunekes wrote:

Hallo Ik wil graag dit patroon uitprinten,maar dat lukt niet Ik wil hem graag op papier hebben,i p v steeds op mijn kleine tel te moeten kijken voor het patroon Hoe kan ik hem uitprinten of op papier van jullie ontvangen misschien Graag hoor ik van u M vr gr Cathy feunekes Goudvink 31 7827 dl emmen

21.04.2020 - 13:24

DROPS Design answered:

Dag Cathy,

Onder de lijst met materialen vind je een knop 'Afdrukken'. Als je daarop klikt, kies je vervolgens 'Patroon'. Er opent een nieuw scherm en dan klik je rechts bovenaan in beeld op 'Het patroon afdrukken'.

28.04.2020 - 20:40

country flag Christiane wrote:

Sehr schönes Modell. Leider stimmt die Garnmenge nicht. Ich habe schon 1200 g verwendet, trotzdem fehlt mir das Garn für 3/4 der letzten Runde, also bestimmt noch weitere 100 g. Meine Maschenprobe entspricht der angegebenen.

27.07.2019 - 23:54

DROPS Design answered:

Liebe Christiane, wir können die Garnmenge noch einmal überprüfen. Wichtig für den Garnverbrauch ist tatsächlich, dass die Maschenprobe eingehalten wird, eine auch nur etwas zu große Maschenprobe wirkt sich bei so einem dreifädigen Modell direkt spürbar auf den Garnverbrauch aus.

29.07.2019 - 09:13

country flag Olga wrote:

Hallo, ein schöner Teppich! Aber die Angabe, dass man ihn für 1,88 Euro häkeln kann, stimmt sicherlich nicht... Viele Grüße

09.04.2019 - 05:54

DROPS Design answered:

Liebe Olga, oops richtig, die Garnmenge wurde korrigiert, jetzt simmt der Preis. Danke für den Hinweis. Viel Spaß beim häkeln!

09.04.2019 - 10:22

country flag Lisa Anna wrote:

Ich habe hierzu direkt schon in der ersten Reihe eine Frage, wieviele Stäbchen müssen nach dem Anschlag um den Luftmaschenring gehäkelt werden? Bitte um Antwort. Danke!

11.07.2018 - 13:59

DROPS Design answered:

Liebe Lisa Anna, A.2 wird 6 Mal in der Runde wiederholt, A.2 = 2 Stb in A.2 x 6 = 12 Stb + die 3 Lm in A.1. Viel Spaß beim häkeln!

11.07.2018 - 15:49

country flag Gloria wrote:

Would you have this in a written patter because I can not understand graphs,I love this rug and would love to make it if it was in a pattern

08.07.2018 - 03:31

DROPS Design answered:

Dear Gloria, unfortunately we do not have a witten out pattern for this design. Reading the chart is not that difficult, it is well worth the time to figure out once, especially as theer are detailed descriptions of each symbol and some videos to help you along. Also do not forget, that if you still have problems, you can alwaysask for help in person, in the store you bought your DROPS yarn from. Happy Crafting!

08.07.2018 - 12:42

country flag Nancy Grove wrote:

This is beautiful. Love it.

08.07.2018 - 01:30

country flag Alessia wrote:

Lavorato con 3 capi vuol dire che unisco 3 fili per dare maggiore spessore? Grarzie

06.07.2018 - 11:02

DROPS Design answered:

Buongiorno Alessia, sì esattamente, questo tappeto è lavorato con 3 fili di Paris. Buon lavoro!

06.07.2018 - 11:31

Zuzana wrote:

Would this pattern work also if I work it only with one strand?

03.07.2018 - 19:18

DROPS Design answered:

Dear Zuzana, yes, this pattern you could make with only one strand, but the measurements and whole size of garment will then be different, smaller. Happy crocheting! Hana

03.07.2018 - 21:26

country flag Martha wrote:

Diesen Teppich würde ich zu gerne häkeln.

23.12.2017 - 18:00