DROPS Safran
DROPS Safran
100% Cotton
from 2.05 $ /50g
Get the yarn to make this pattern from 10.25$.

The yarn cost is calculated from the pattern’s smallest size and the yarn’s cheapest product type. Looking for an even better price? You might find it on the DROPS Deals!

DROPS SS24

Beach Comfort

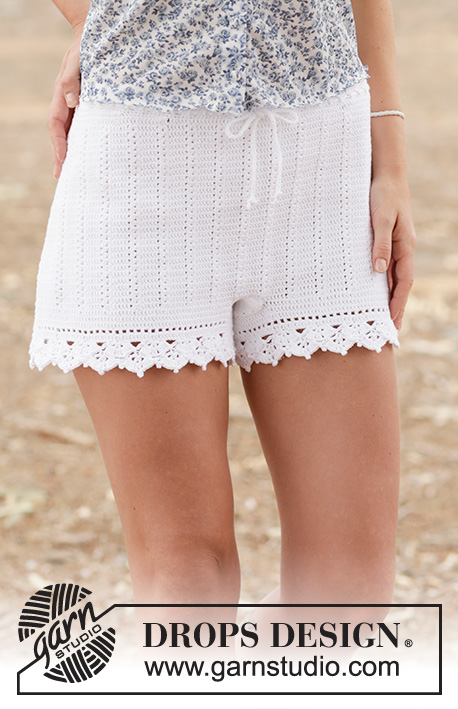
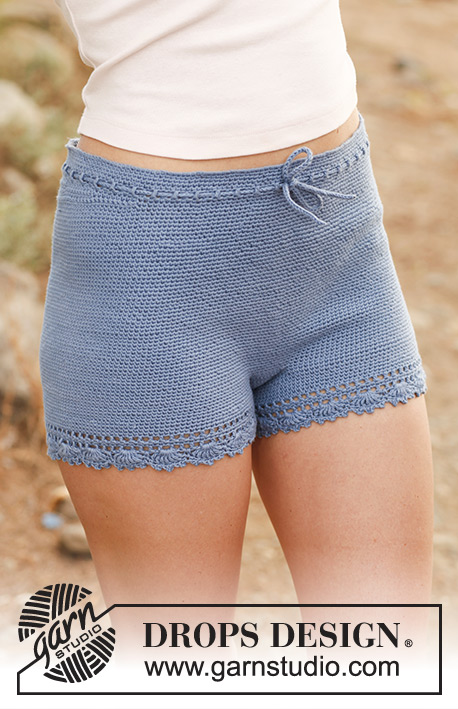
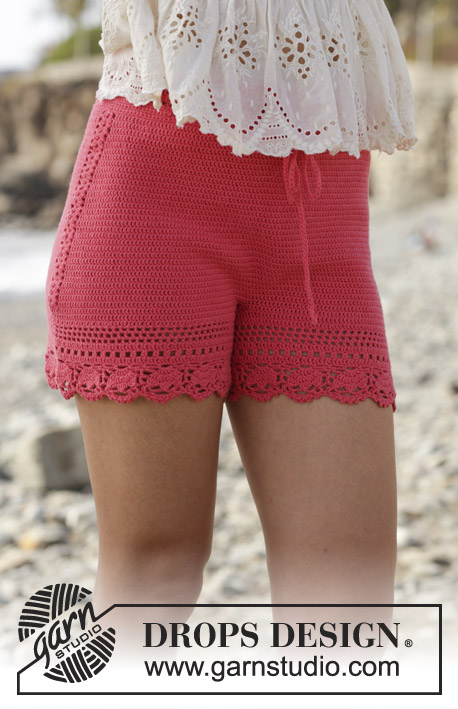
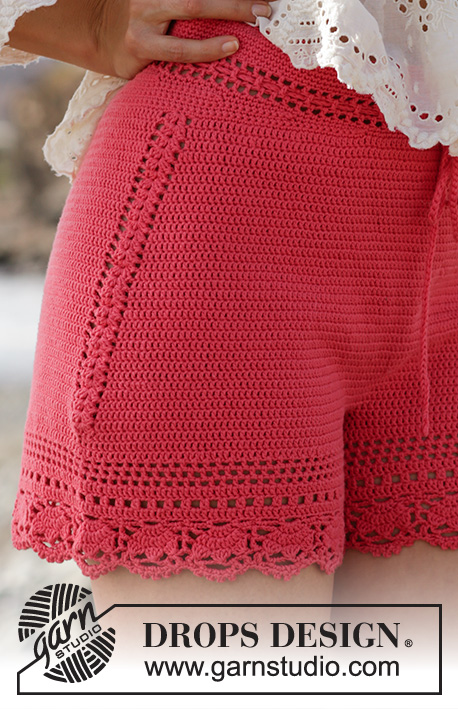
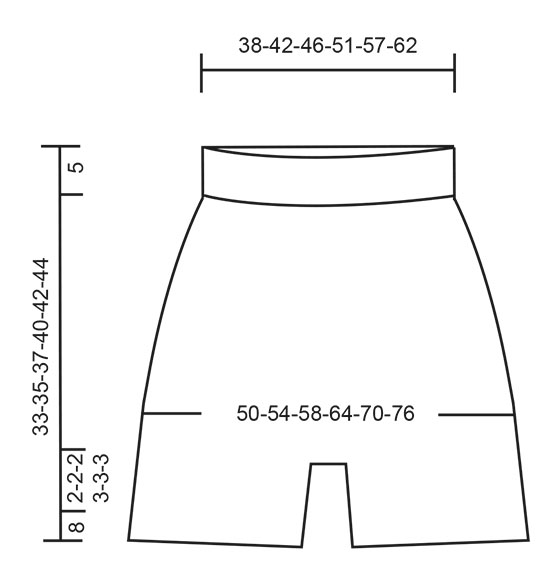
Crocheted shorts with lace pattern. Size: S - XXXL Piece is crocheted in DROPS Safran.

DROPS 190-25
DROPS design: Pattern e-276
Yarn group A
----------------------------------------------------------
Size: S - M - L - XL - XXL - XXXL
Materials:
DROPS SAFRAN from Garnstudio (belongs to yarn group A)
250-250-300-300-350-400 g color 13, raspberry

Piece can also be crocheted with yarn from:
"Alternative yarn (yarn group A)" - see link below.

DROPS CROCHET HOOK SIZE 2.5 mm/C - or size needed to get 26 double crochets x 16 rows = 10 cm / 4" in width and 10 cm / 4" vertically.

-------------------------------------------------------

Alternative Yarn – See how to change yarns here
Yarn Groups A to F – Use the same pattern and change the yarn here
Yarn usage using an alternative yarn – Use our yarn converter here

-------------------------------------------------------

More like this:
Women Trousers & Shortslace
DROPS Safran
DROPS Safran
100% Cotton
from 2.05 $ /50g
Get the yarn to make this pattern from 10.25$.

The yarn cost is calculated from the pattern’s smallest size and the yarn’s cheapest product type. Looking for an even better price? You might find it on the DROPS Deals!

Pattern instructions

NOTE: This pattern is written in American English. All measurements in charts are in cm. For conversion from inches to cm - click here. There are different terms for crocheting in American and British English. If this pattern includes crochet, click for "crochet terms" here. For this pattern in British English, please click here.
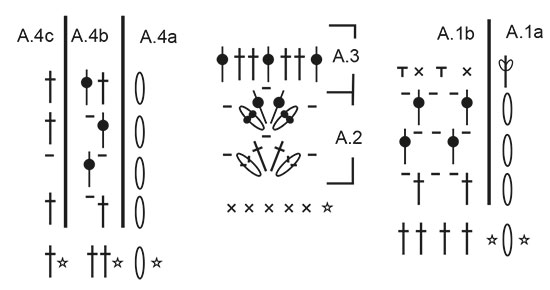
INFORMATION FOR PATTERN:

PATTERN:
See diagrams A.1 to A.5.

CROCHET INFORMATION:
On every round with single crochets replace first single crochet with 1 chain stitch. Finish round with 1 slip stitch in 1st chain stitch from beginning of round.
At beginning of every round with double crochets replace first double crochet with 3 chain stitches. Finish round with 1 slip stitch in 3rd chain stitch from beginning of round.

INCREASE TIP-1 (applies to sides):
Work until 1 double crochet remains before A.2, work 2 double crochets in next double crochet, work A.2 and 2 double crochets in next double crochet (= 2 double crochets increased). Repeat in the other side (= 4 double crochets increased on round).

INCREASE TIP-2 (applies to mid back):
Increase 2 double crochets as follows:
Work until 2 double crochets remain before marker, work 2 double crochets in first double crochet, 1 double crochet in each of the next 2 double crochets (marker is in the middle of these double crochets) and 2 double crochets in next double crochet (= 2 double crochets increased).
Increase 4 double crochets as follows:
Work until 4 double crochets remain before marker, work 2 double crochets in first double crochet, 1 double crochet in next double crochet, 2 double crochets in next double crochet, 1 double crochet in each of the next 2 double crochets (marker is in the middle of these double crochets) and 2 double crochets in next double crochet, 1 double crochet in next double crochet, 2 double crochets in next double crochet (= 4 double crochets increased).

INCREASE TIP-3:
Increase 1 double crochet by working 2 double crochets in same stitch.
----------------------------------------------------------

SHORTS:
Work in the round top down.

Work 244-274-299-329-369-404 chain stitches with Safran on hook size 2.5 mm and form a ring with 1 slip stitch in first chain stitch. Insert 1 marker thread at beginning of round = mid back.
Work first round as follows: Work 1 chain stitch (= 1 single crochet) - read CROCHET INFO, 1 single crochet in each of the first 3 chain stitches, * skip 1 chain stitch, 1 single crochet in each of the next 4 chain stitches *, work from *-* 48-54-59-65-73-80 times in total = 196-220-240-264-296-324 single crochets. Then work 1 single crochet in every single crochet until piece measures 2 cm / ¾". REMEMBER THE CROCHET GAUGE!
Now work in the round according to diagram A.1 as follows: Work A.1a (shows how rounds begin and end and is worked in addition to A.1b), work A.1b 49-55-60-66-74-81 times in total in width. Continue until A.1a/b have been worked vertically.

Then work the shorts higher in the back as follows: Work 10-11-12-13-14-15 single crochets past the marker thread mid back, turn and work 1 slip stitch in first stitch, then 1 single crochet in each of the next 19-21-23-25-27-29 single crochets, turn and work 1 slip stitch in first stitch, then 1 single crochet in each of the next 29-31-35-38-41-44 stitches (slip stitches are also worked). Continue like this by working 10-11-12-13-14-15 stitches more on every turn until a total of 140-154-192-208-224-240 stitches have been worked. Turn again and work until marker thread mid back.

Now work in the round as follows: Work 1 double crochet in each of the first 47-53-58-64-72-79 stitches (= half back piece), A.2 over the next 5 single crochets (= the side), work 1 double crochet in each of the next 92-104-114-126-142-156 stitches (= front piece), A.2 over the next 5 single crochets (= the side), work 1 double crochet in each of the last 47-53-58-64-72-79 stitches (= half back piece).
Continue pattern like this (then repeat last round in A.2) - AT THE SAME TIME increase in the sides and mid back as follows:
SIDES:
Increase on each side of A.1, in each side as follows - read INCREASE TIP-1! Increase like this every 3rd-4th-4th-4th-4th-4th round 9-8-8-9-9-10 times in total (= 36-32-32-36-36-40 double crochets increased).
MID BACK:
When piece measures 15-16-17-19-20-22 cm / 5⅞"-6 ¼"-6⅝"-7⅜"-7⅞"-8⅝" (measured mid front), increase mid back as follows – read INCREASE TIP-2. Increase like this with 2 double crochets mid back on every round 4-8-10-10-10-10 times in total, then increase 4 double crochets on every round 5-3-3-3-3-3 times in total (= 28-28-28-32-32-32 double crochets increased).
When all increases are done there are 260-280-300-332-364-396 double crochets on round. Continue with 1 double crochet in every double crochet until piece measures 22-24-26-28-30-32 cm / 8⅝"-9⅜"-10 ¼"-11"-11 ¾"-12 ½" mid front and 26-28-31-33-35-37 cm / 10 ¼"-11"-12⅛"-13"-13 ¾"-14 ½" mid back.

Now divide for legs as follows: Work 1 slip stitch in each of the first 5-5-6-6-6-7 double crochets on round, turn and work back over the first 10-10-12-12-12-14 double crochets (i.e. 5-5-6-6-6-7 double crochets on each side of marker thread mid back). These 10-10-12-12-12-14 double crochets = gusset. Work double crochets back and forth over these double crochets for 10-11-12-13-14-15 cm / 4"-4⅜"-4¾"-5⅛"-5½-6", cut the thread. Fasten gusset edge to edge to the middle 10-10-12-12-12-14 stitches towards mid front. Then work leg.

LEG:
Work 1 double crochet in each of the 115-125-133-149-165-179 double crochets around one leg, work in addition A.3 (= 7 double crochets) over A.2 and work 26-28-32-34-36-38 double crochet along gusset = 148-160-172-190-208-224 double crochets. Then work 2-2-3-3-4-4 rounds with double crochets - on last round increase 8-8-8-2-8-4 double crochets evenly – read INCREASE TIP-3 = 156-168-180-192-216-228 double crochets.
Now work in the round according to diagram A.4 as follows: Work A.4a (shows how rounds begin and end and is worked in addition to A.4b/c), work A.4b 77-83-89-95-107-113 times in total, A.1d. Continue until A.4a/b/c are done vertically = 156-168-180-192-216-228 double crochets.
Now work in the round according to diagram A.5 as follows: Work A.5a (shows how rounds begin and end and is worked in addition to A.5b/c), A.5b, A.5c 12-13-14-15-17-18 times in total, and A.5d. Continue until A.5a/b/c/d have been worked vertically. Fasten off. Work the other leg the same way.

TIE RIBBON:
Work 120-140-150-160-170-180 cm / 47 ¼"-55⅛"-59"-63"-66⅞"-70⅞" with LOOSE chain stitches, turn and work 1 slip stitch in every chain stitch. Thread the tie in the middle row with eyelet holes at the top of shorts – start mid front.

Diagram

All measurements in charts are in cm.

symbols = 1 chain stitch
symbols = 2 chain stitches
symbols = 3 chain stitches
symbols = 4 chain stitches
symbols = 6 chain stitches
symbols = 7 chain stitches
symbols = single crochet in stitch
symbols = single crochet around chain space
symbols = double crochet in stitch
symbols = double around chain stitch/chain space
symbols = 2 DOUBLE CROCHETS WORKED TOGETHER: = work 2 double crochets in next stitch but wait with last yarn over and pull through on both these double crochets, make 1 yarn over and pull yarn over through all 3 loops on hook
symbols = 2 DOUBLE CROCHETS WORKED TOGETHER: Work 2 double crochets around chain stitch but wait with last yarn over and pull through on both these double crochets, make 1 yarn over and pull yarn over through all 3 loops on hook
symbols = 4 DOUBLE CROCHETS WORKED TOGETHER: Work 1 double crochet in each of the next 4 stitches but wait with last yarn over and pull through on all these double crochets, make 1 yarn over and pull yarn over trough all 5 loops on hook
symbols = 3 chain stitches, 1 slip stitch in first chain stitch
symbols = shows previous round, round has already been worked. Begin on next round.
symbols = round begins with 1 chain stitch and finishes with 1 slip stitch in 1st chain stitch at beginning of round
symbols = round begins with 3 chain stitches and finishes with 1 slip stitch in 3rd chain stitch at beginning of round
symbols = round begins with 4 chain stitches and finishes with 1 slip stitch in 4th chain stitch at beginning of round
diagram
diagram
diagram
Do you have a question? See a list of frequently asked questions (FAQ)

Knitting tension is what determines the final measurements of your work, and is usually measured per 10 x 10 cm. It is provided like so: number of stitches in width x number of rows in height - eg: 19 stitches x 26 rows = 10 x 10 cm.

The knitting tension is very individual; some people knit/crochet loosely while others work tightly. You adjust the knitting tension with the needle size, which is why the suggested needle size only serve as a guide! You need to adjust this (up or down) to ensure that YOUR knitting tension matches the knitting tension provided in the pattern. If you work with a different knitting tension than provided you will have a different yarn consumption, and your work will have different measurements than what the pattern suggests.

The knitting tension also determines which yarns can replace each other. As long as you achieve the same knitting tension you can replace one yarn with another.

See DROPS lesson: How to measure your tension/gauge

See DROPS video: How to make a gauge tension swatch

The required amount of yarn is provided in grams, eg: 450 g. To calculate how many balls you’ll need you first need to know how many grams are in 1 ball (25g, 50g or 100g). This information is available if you click on the individual yarn quality on our pages. Divide the amount required with the amount of each ball. For example, if each ball is 50g (the most common amount), the calculation will be as follows: 450 / 50 = 9 balls.

The important thing when changing from one yarn to another is that the knitting/crochet tension remains the same. This is so that the measurements of the finished piece will be the same as on the sketch provided. It is easier to achieve the same knitting tension using yarns from the same yarn group. It is also possible to work with multiple strands of a thinner yarn to achieve the knitting tension of a thicker one. Please try our yarn converter. We recommend you to always work a test swatch.

Please NOTE: when changing yarn the garment might have a different look and feel to the garment in the photo, due to individual properties and qualities of each yarn.

See DROPS lesson: Can I use a different yarn than the one mentioned in the pattern?

All our yarns are categorised into yarn groups (from A to F) according to thickness and knitting tension – group A contains the thinnest yarns and group F the thickest. This makes it easier for you to find alternative yarns to our patterns, should you wish to switch yarn. All yarns within the same group have a similar knitting tension and can easily replace each other. However, different yarn qualities have different structures and properties which will give the finished work a unique look and feel.

Click here for an overview of the yarns in each yarn group

At the top of all our patterns you’ll find a link to our yarn converter, which is a helpful tool should you wish to use a different yarn than suggested. By filling in the yarn quality you wish to replace, the amount (in your size) and number of strands, the converter will present good alternative yarns with the same knitting tension. Additionally it will tell you how much you’ll require in the new qualities and whether you’ll need to work with multiple strands. Most skeins are 50g (some are 25g or 100g).

If the pattern is worked with multiple colours, every colour will have to be converted separately. Similarly, if the pattern is worked with several strands of different yarns (for example 1 strand Alpaca and 1 strand Kid-Silk) you will have to find alternatives for each, individually.

Click here to see our yarn converter

Since different yarns have different qualities and textures we have chosen to keep the original yarn in our patterns. However, you can easily find options among our available qualities by using our yarn converter, or simply pick a yarn from the same yarn group.

It is possible that some retailers still have discontinued yarns in stock, or that someone has a few skeins at home that they would like to find patterns for.

The yarn converter will provide both alternative yarn as well as required amount in the new quality.

If you think it's hard to decide what size to make, it can be a good idea to measure a garment you own already and like the size of. Then you can pick the size by comparing those measures with the ones available in the pattern's size chart.

You'll find the size chart at the bottom of the pattern.

See DROPS lesson: How to read size chart

The needle size provided in the pattern serves only as a guide, the important thing is to follow the knitting tension. And since knitting tension is very individual, you will have to adjust the needle size to ensure that YOUR tension is the same as in the pattern – maybe you’ll have to adjust 1, or even 2 needle sizes, up or down to achieve the correct tension. For this, we recommend that you work test swatches.

Should you work with a different knitting tension than the one provided, the measurements of the finished garment might deviate from the measurement sketch.

See DROPS lesson: How to measure your tension/gauge

See DROPS video: How to make a gauge tension swatch

Working a garment top-down provides more flexibility and room for personal adjustment. For example it is easier to try the garment on while working, as well as making adjustments to length of yoke and shoulder caps.

The instructions are carefully explaining every step, in the correct order. Diagrams are adjusted to the knitting direction and are worked as usual.

The diagram depicts all rows/rounds, and every stitch seen from the right side. It is read from bottom to top, from right to left. 1 square = 1 stitch.

When working back and forth, every other row is worked from the right side and every other row is worked from the wrong side. When working from the wrong side, the diagram will have to be worked reversed: from left to right, knit stitches are purled, purl stitches are knit etc.

When working in the round every round is worked from the right side and the diagram are worked from right to left on all rounds.

See DROPS lesson: How to read knitting diagrams

The diagram depicts all rows/rounds, and every stitch seen from the right side. It is worked from bottom to top, from right to left.

When working back and forth every other row is worked from the right side: from right to left and every other row is worked from the wrong side: from left to right.

When working in the round, every row in the diagram are worked from the right side, from right to left.

When working a circular diagram you start in the middle and work your way outwards, counter clockwise, row by row.

The rows usually start with a given number of chain stitches (equivalent to the height of the following stitch), this will either be depicted in the diagram or explained in the pattern.

See DROPS lesson: How to read crochet diagrams

Instructions for working several diagrams after each other on the same row/round, will often be written like so: “work A.1, A.2, A.3 a total of 0-0-2-3-4 times". This means you work A.1 once, then A.2 is worked once, and A.3 is repeated (in width) the number of times provided for your size – in this case like so: S = 0 times, M = 0 times, L=2 times, XL= 3 times and XXL = 4 times.

The diagrams are worked as usual: begin with the first row in A.1, then work the first row in A.2 etc.

See DROPS lesson: How to read knitting diagrams

See DROPS lesson: How to read crochet diagrams

The total width of the garment (from wrist-to-wrist) will be larger in the larger sizes, despite the actual sleeves being shorter. The larger sizes have longer sleeve caps and wider shoulders, so there will be a good fit in all sizes.

The measurement sketch/schematic drawing provides information regarding the full length of the garment. If it’s a jumper or a jacket the length is measured from the highest point on the shoulder (usually closest to the neckline), and straight down to the bottom of the garment. It is NOT measured from the tip of shoulder. Similarly, the length of yoke is measured from the highest point on the shoulder and down to where yoke is split into body and sleeves.

See DROPS lesson: How to read a schematic drawing

Diagrams are often repeated on the round or in height. 1 repeat is the diagram the way it appears in the pattern. If it says to work 5 repeats of A.1 in the round, then you work A.1 a total of 5 times after/next to each other in the round. If it says to work 2 repeats of A.1 vertically/in height you work the entire diagram once, then begin again at the start and work the entire diagram one more time.

Chain stitches are slightly narrower than other stitches and to avoid working the cast-on edge too tight, we simply chain more stitches to begin with. The stitch count will be adjusted on the following row to fit the pattern and measurement sketch.

The rib edge is more elastic and will contract slightly compared to, for example, stocking stitch. By increasing before the rib edge, you avoid a visible difference in width between the rib edge and the rest of the body.

It’s very easy to cast off too tightly, and by making yarn overs while casting off (and simultaneously casting these off) you avoid a too tight cast off edge.

See DROPS video: How to bind off with yarn overs (yo)

To achieve an even increase (or decrease) you can increase on, for example: every 3rd and 4th row alternately, like so: work 2 rows and increase on the 3rd row, work 3 rows and increase on the 4th. Repeat this until the increase is complete.

See DROPS lesson: Increase or decrease 1 st on every 3rd and 4th row alternately

Should you prefer to work in the round instead of back and forth, you may of course adjust the pattern. You’ll need to add steeks mid-front (usually 5 stitches), and follow the instructions. When you would normally turn and work from the wrong side, simply work across the steek and continue in the round. At the end you’ll cut the piece open, pick up stitches to work bands, and cover the cut edges.

See DROPS video: How to knit steeks and cut open

Should you prefer to work back and forth instead of in the round, you may of course adjust the pattern so you work the pieces separately and then assemble them at the end. Divide the stitches for the body in 2, add 1 edge stitch in each side (for sewing) and work the front and back pieces separately.

See DROPS lesson: Can I adapt a pattern for circular needles into straight needles?

Pattern repeats can vary slightly in the different sizes, in order to get the correct proportions. If you’re not working the exact same size as the garment in the photo, yours might deviate slightly. This has been carefully developed and adjusted so that the complete impression of the garment is the same in all sizes.

Make sure to follow instructions and diagrams for your size!

If you have found a pattern you like which is available in women’s size it’s not very difficult to convert it to men’s size. The biggest difference will be the length of sleeves and body. Start working on the women size that you think would fit across the chest. The additional length will be worked right before you cast off for the armhole/sleeve cap. If the pattern is worked top-down you can add the length right after the armhole or before the first decrease on sleeve.

Regarding additional yarn amount, this will depend on how much length you add, but it is better with a skein too many than too few.

All yarns will have excess fibres (from production) that might come off as lint or shedding. Brushed yarns (ie hairier yarns) have more of these loose, excess fibres, causing more shedding.

Shedding also depends on what is worn under or over the garment, and whether this pulls at the yarn fibres. It’s therefore not possible to guarantee that there will be no shedding

Below are some tips on how to get the best result when working with hairier yarns:

1. When the garment is finished (before you wash it) shake it vigorously so the looser hairs come off. NOTE: do NOT use a lint roller, brush or any method that pulls at the yarn.

2. Place the garment in a plastic bag and put it in your freezer - the temperature will cause the fibres to become less attached to each other, and excess fibres will come off easier.

3. Leave in the freezer for a few hours before taking it out and shaking it again.

4. Wash the garment according to the instructions on the yarn label.

Pilling is a natural process that happens to even the most exclusive of fibers. It's a natural sign of wear and tear that is hard to avoid, and that is most visible in high friction areas of your garment like a sweater's arms and cuffs.

You can make your garment look as new by removing the pilling, using a fabric comb or a pill/lint remover.

Still can't find the answer you need? Then scroll down and leave your question so one of our experts can try to help you. This will be done normally within 5 to 10 working days.
In the meantime, you can read the questions and answers that others have left to this pattern or join the DROPS Workshop on Facebook to get help from fellow knitters/crocheters!

You might also like...

Post a comment to pattern DROPS 190-25

We would love to hear what you have to say about this pattern!

If you want to leave a question, please make sure you select the correct category in the form below, to speed up the answering process. Required fields are marked *.

Comments / Questions (49)

country flag Allene wrote:

Thank you, Anjana! I read that chart the exact same way. Should it maybe be an x in place of the small oval in row five of chart A5?

28.06.2021 - 02:32

DROPS Design answered:

Dear Allene, diagram is correct as it is, on row 5 crochet A.5 (= 4 chains), 1 tr in the 4th ch from previous row, 2 tr in next 2 tr, 2 chains (small oval) (= A.5b), then work: 1 tr around the 2-ch on previous row, 2 ch, 2 tr in each of the next 5 tr, 2 ch (= A.5c), 1 tr around the next 2 -ch-space, 2 ch, 2 tr in each of the next 2 tr, 1 tr in the 4th ch from beg of previous round (= A.5d). Hope this will help. Happy crocheting!

28.06.2021 - 07:48

country flag Gea wrote:

Ik begrijp de zesde/ zevende zin van de pijp niet. Er staat Haak A.4b 77-83-89-95-107-113 keer in totaal , A1 d. Dat A1 d hoort niet bij een patroon en ik begrijp niet wat er bedoeld wordt.

19.06.2021 - 22:41

DROPS Design answered:

Dag Gea,

Dit is vermoedelijk een typefout, het moet waarschijnlijk A.4c zijn en niet A.1d. Ik zal het doorgeven aan de ontwerpafdeling ter correctie.

20.06.2021 - 12:19

country flag Valentina wrote:

Ciao! Scusate ma non riesco a capire, probabilmente sono tonta io .. comunque dovrei iniziare ad aumentare sul dietro ma lo schema dice "lavorare fino a quando rimangono 2 maglie alte prima del segno..ecc" ma quale segno?si inizia ogni giro con 3 catenelle , quando e dove dovrei mettere qst segno?grazie 1000

14.06.2021 - 21:19

DROPS Design answered:

Buonasera Valentina, il segno è il segnapunti di inizio giro. Buon lavoro!

14.06.2021 - 22:21

country flag Valentina wrote:

Buongiorno, Dopo aver fatto l'alzata sul dietro e arrivata a dover fare i primi aumenti su fianco e dietro,lo schema dice: aumentare da ciascun lato del diagramma a1 ma non capisco.. il diagramma a1 non e quello ke ho lavorato all'inizio? In quel punto non lavoro l'a1 ma l' a5 sui 2 lati è poi ho m.a normali... help ! Grazie

06.06.2021 - 15:41

DROPS Design answered:

Buonasera Valentina, probabilmente si fa riferimento al diagramma A.2, non A.1, in ogni caso abbiamo inoltrato la sua segnalazione al settore design. Se ci dovessero essere correzioni le troverà direttamente sul modello online. Buon lavoro!

06.06.2021 - 19:34

country flag Lizanne Van Stijn wrote:

Moet ik mijn werk voor iedere toer keren?

21.05.2021 - 09:39

DROPS Design answered:

Dag Lizanne,

Nee, volgens het patroon haak je het werk in de rondte zonder te keren.

21.05.2021 - 14:13

country flag Anjana wrote:

Hi Drops I am having issues with the A5 diagram. For the 4th row (begining with Ch4), can you confirm that I need to do this : - 2 DC in the 1st loop created the row before - Chain 8 (Ch3 in A5.b + Ch2 in A.5c + Ch3 in A.5c) - 5 DC in the 4th loop from begining of row My problem is that if I do so, I end up with big loops and the next row looks weird but I don't know how to interpret the diagram differently. Thanks!

02.04.2021 - 09:29

DROPS Design answered:

Dear Anjana, in the 4th row (that is the row flollowing the row of trebles (UK terms), start with a dc and 4 chain stitch and 1 dc in the 4th stitch, abd repeat. In the next (5th) row start with 4 chain stitch (replaces the fisrt tr), 2 tr in the first loop, 3 ch, and a dc in the nect dc. From here * (3 ch, 5 tr, 3 ch) in the loop and dc in the next dc* Repeat *-*. Happy crafting!

02.04.2021 - 10:06

country flag Luisa wrote:

Das s ist mir leider vzu gross, wieviele maschen könnte ich anschlagen dass die hose etwas kleiner wird, das Muster trotzdem noch umsetzbar ist?

17.03.2021 - 21:38

DROPS Design answered:

Liebe Luisa, leider können wir jeder Anleitung nach jedem individuellen Frage anpassen und einzelne Modelle auf individuellen Wunsch hin umrechnen. Wenn sie Hilfe damit brauchen, wenden Sie sich bitte an Ihrem DROPS Laden, dort hilft man Ihnen gerne weiter - auch telefonisch oder per E-Mail. Viel Spaß beim stricken!

18.03.2021 - 09:42

country flag Allene Lowrey wrote:

Hi. Just made it past the initial sc waistband in the US terms and got to A1.a/A1.b. Were the diagrams modified to account for the difference in terms, or should I do the mesh for the waist tie in US sc? Thanks!

23.10.2020 - 06:59

DROPS Design answered:

Dear Mrs Lowrey, if you are reading US-pattern the terms are right, you have to work A.1 one time in heigth (= mesh pattern = 3 rounds mesh with dc/2 chains and 1 round with sc - this is the eyelet round for the tie. Happy crocheting!

23.10.2020 - 09:09

country flag Jessica wrote:

Hello! Can I get additional explanation on working the back higher? First, after the slip stitch from A1, do you ch1 to begin the back panel? After the first 10, when you turn, do you ch1 and then ss in the first stitch? I missed something somewhere and was 11 stitches short after the first round post back panel. Any additional explanation is greatly appreciated, thanks!

07.09.2020 - 03:57

DROPS Design answered:

Dear Jessica, see Info crochet: each round with sc starts with 1 ch to replace 1st sc. This means this chain is included in the first 10 sc at the beg of short rows, then turn, and crochet as stated (with 1 sc in the chain at the beg of previous row). Happy crocheting!

07.09.2020 - 09:56

country flag Talina wrote:

I’m having trouble understanding the diagrams. For A1a/b are we coming from the bottom up? It’s doesn’t make sense to me working from the top to the bottom. Is my assumption correct?

19.07.2020 - 08:11

DROPS Design answered:

Hi Talina, Yes, the diagrams are read from bottom right to left and upwards. This is true whether you are working top down or bottom up. Happy crocheting!

20.07.2020 - 07:22