
Popular categories
Looking for a yarn?


|
||||||||||||||||||||||
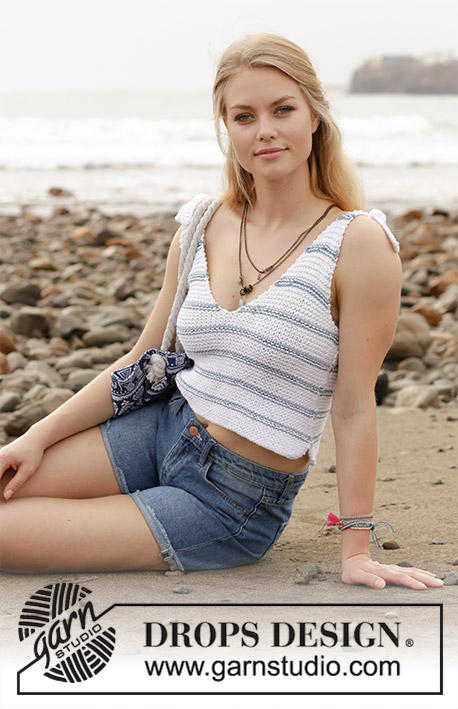
Waterfront Bikini |
||||||||||||||||||||||
 |
 |
|||||||||||||||||||||
Crocheted bikini with fan pattern. Sizes S - XXXL. The piece is worked in DROPS Safran.
DROPS 190-6 |
||||||||||||||||||||||
|
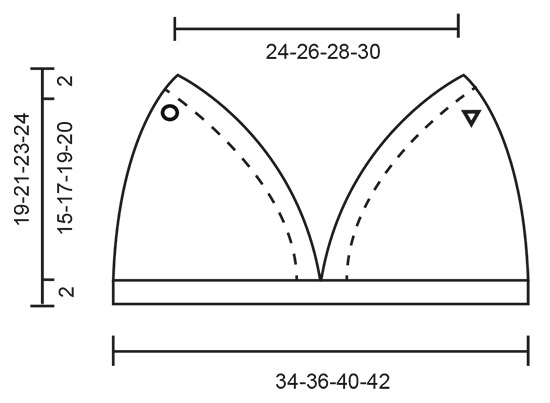
INFORMATION FOR THE PATTERN: PATTERN: See diagram A.1. CROCHET INFORMATION: At the beginning of each row of double crochets, work 1 chain stitch (the chain stitch does not replace the first double crochet). At the beginning of each row of treble crochets, work 3 chain stitches (the chain stitches does not replace the first treble crochet). PATTERN-1 (for panties): * 1 row of double crochets, 1 row of treble crochets *, work from *-* to finished length. DECREASE TIP (for panties): Decrease on a row of treble crochets as follows: * Work 1 treble crochet in each of the first 2 double crochets, but wait with the last yarn over and pull-through on both of these treble crochets, make 1 yarn over and pull it through all 3 loops on the hook *, work 1 treble crochet in each double crochet until there are 2 double crochets left, repeat from *-* (= 2 treble crochets decreased). Decrease on a row of double crochets as follows: * Work 1 double crochet in each of the first 2 treble crochets, but wait with the last yarn over and pull-through on both of these double crochets, make 1 yarn over and pull it through all 3 loops on the hook *, work 1 double crochet in each treble crochet until there are 2 treble crochets left, repeat from *-* (= 2 double crochets decreased) INCREASE TIP (for panties): Increase 2 treble crochets in each side of one row as follows: Work 3 treble crochets in the first double crochet, work 1 treble crochet in each double crochet until there is 1 double crochet left, work 3 treble crochets in the last double crochet. Increase 1 treble crochet in each side of one row as follows: Work 2 treble crochets in the first double crochet, work 1 treble crochet in each double crochet until there is 1 double crochet left, work 2 treble crochets in the last double crochet. ---------------------------------------------------------- BIKINI TOP: First work 2 loose cups. Then work the cups together. RIGHT CUP: First work a square, then continue back and forth along 2 sides of the square. SQUARE: Work 23-25-29-31 loose chain stitches with hook size 3 mm and Safran. Turn and work 1 double crochet in the 2nd chain stitch from the hook, work 1 double crochet in each of the remaining 21-23-27-29 chain stitches = 22-24-28-30 double crochets. Then continue working back and forth with 1 double crochet in each double crochet – read CROCHET INFORMATION. Work a total of 21-23-27-29 rows. The next row is worked as follows (= from the wrong side): Work 1 double crochet in each of the first 21-23-27-29 double crochets, 3 double crochets in the next double crochet, 1 double crochet around each of the next 21-23-27-29 rows = 45-49-57-61 double crochets. TOP: The next row is worked as follows (= from the right side): Work 1 double crochet in each of the first 22-24-28-30 double crochets, 2-3-3-3 double crochets in the next double crochet, 1 double crochet in each of the next 22-24-28-30 double crochets down the side = 46-51-59-63 double crochets. The next row is worked as follows (= from the wrong side): Work 1 double crochet in each of the first 23-26-29-31 double crochets, 0-0-3-3 double crochets in the next double crochet, 1 double crochet in each of the next 23-25-29-31 double crochets = 46-51-61-65 double crochets. The next row is worked as follows (= from the right side): Work 1 double crochet in each of the first 23-26-31-32 double crochets, 0-0-0-2 double crochets in the next double crochet, 1 double crochet in each of the next 23-25-30-32 double crochets = 46-51-61-66 double crochets. Then continue working back and forth with 1 double crochet in each double crochet. Work a total of 14-16-18-20 rows. The next row is worked as follows (= from the wrong side): Work A.1a, A.1b a total of 8-9-11-12 times in width, A.1c and A.1d. Continue until A.1 has been completed in height. Cut and fasten the strand. LEFT CUP: Work in the same way as for right cup, but all rows from right side = wrong side and all rows from wrong side = right side. EDGE: Now work the 2 cups together. NOTE: Make sure you work over both cups from the right side! Start in the corner of the right cup – see circle on sketch. Work 1 double crochet around the first row, * 3 chain stitches, skip 3 rows, 1 double crochet around the next row *, work from *-* along the whole side, insert 1 marker in this corner, continue along the bottom of the cup and work 1 double crochet in each of the 22-24-28-30 double crochets, 1 double crochet around each of the 14-16-18-20 rows, 4 double crochets around the outermost row of the lace pattern. Then continue over the left cup, work 4 double crochets around the outermost row of the lace pattern, work 1 double crochet around each of the 14-16-18-20 rows, 1 double crochet in each of the 22-24-28-30 double crochets, insert 1 marker here, continue along the side of the cup and work 1 double crochet around the first row, * 3 chain stitches, skip 3 rows, 1 double crochet around the next row *, work from *-* along the whole side, continue up to the corner of the left cup – see triangle on the sketch. Cut and fasten strand. Now work over the double crochets from marker to marker (= 80-88-100-108 double crochets); work as follows starting from the wrong side: Work 1 double crochet in each double crochet AT THE SAME TIME as the number of stitches is adjusted to 81-86-96-101 double crochets. Turn and work 1 double crochet in each double crochet. The next row is worked as follows (= from the wrong side): A.1a, A.1c, A.1b a total of 15-16-18-19 times in width and A.1d. Continue until A.1 has been completed in height, cut and fasten strand. CORD: Work a row of chain stitches of approx. 120-130-150-160 cm. Fold the cord double, thread the loop through a chain-space in the top corner of the cup, pull the cord through the loop. Make another cord in the same way and fasten it to the other cup. Work a row of chain stitches of approx. 90-100-120-130 cm. Fold the cord double, thread the loop through a chain-space in the bottom corner of the cup, thread the cord through the loop. Make another cord in the same way and fasten it to the other cup. ---------------------------------------------------------- BIKINI PANTIES: The panties are worked in treble crochets and double crochets, with an edge on front and back pieces and ties in the sides. You start at the top of the front piece and work through to the back piece in one go. Work 78-90-95-113 chain stitches with hook size 3 mm and Safran. Turn and work 1 treble crochet in the 4th chain stitch from the hook, then work 1 treble crochet in each of the next 4-1-1-4 chain stitches, * skip 1 chain stitch, 1 treble crochet in each of the next 4 chain stitches *, work from *-* a total of 14-17-18-21 times = 61-70-74-89 treble crochets. Read CROCHET INFORMATION! Then work PATTERN-1 – see description above and on the next row decrease 1 treble crochet in each side – read DECREASE TIP. Decrease like this on every row of treble crochets a total of 16-18-19-21 times and every 3rd-3rd-2nd-2nd row of double crochets a total of 5-6-7-11 times = 19-22-22-25 treble crochets / double crochets. The piece measures approx. 18-20-22 cm – REMEMBER THE CROCHET TENSION! Continue with pattern-1 without increases until the piece measures 22-25-27-29 cm. On the next row with trebles increase 2 treble crochets in each side – read INCREASE TIP. Increase like this on every row of treble crochets a total of 11-14-16-17 times, then increase 1 treble crochet on each row of treble crochets a total of 9-6-5-4 times = 81-90-96-101 treble crochets. Continue with pattern-1 as before until the piece measures 45-49-51-54 cm – adjust so that the last row is worked with treble crochets. EDGE: Work 1 double crochet in each treble crochet AT THE SAME TIME as you increase 0-1-0-0 double crochets = 81-91-96-101 double crochets. The next row is worked as follows: Work A.1a, A.1b a total of 16-18-19-20 times in width, A.1c and A.1d. Continue until A.1 has been completed in height. Cut and fasten strand. Work an edge along the front piece in the same way – NOTE: You skip the chain stitches which have not been worked in. CORD: Work a row of chain stitches of approx. 70-90-100-110 cm. Fold the cord double, thread the loop through a chain-space in the top corner of the panties, pull the cord through the loop. Make a total of 4 cords and fasten at each corner. |
||||||||||||||||||||||
Diagram explanations |
||||||||||||||||||||||
|
||||||||||||||||||||||

|
||||||||||||||||||||||
|
||||||||||||||||||||||
|
Have you made this or any other of our designs? Tag your pictures in social media with #dropsdesign so we can see them! Do you need help with this pattern?You'll find tutorial videos, a Comments/Questions area and more by visiting the pattern on garnstudio.com. © 1982-2024 DROPS Design A/S. We reserve all rights. This document, including all its sub-sections, has copyrights. Read more about what you can do with our patterns at the bottom of each pattern on our site. |
||||||||||||||||||||||


With over 40 years in knitting and crochet design, DROPS Design offers one of the most extensive collections of free patterns on the internet - translated to 17 languages. As of today we count 304 catalogues and 11422 patterns - 11422 of which are translated into English (UK/cm).
We work hard to bring you the best knitting and crochet have to offer, inspiration and advice as well as great quality yarns at incredible prices! Would you like to use our patterns for other than personal use? You can read what you are allowed to do in the Copyright text at the bottom of all our patterns. Happy crafting!
Comments / Questions (30)
Buenas tardes, estoy empezando con la primera copa y estoy ya en la fila de 51 puntos bajos. Y veo que la forma no me esta quedando, es como si en cada lado en cuanto he empezado con esta parte y teniendo los puntos que decis, me queda mas ancho, uqedandome como dos puntas en ambos lados ( inicio y final) y lo que comento, tengo los 51 puntos para la talla L. Por qué puede ser? Como lo puedo solucionar? Puede ser que el punto quede mas largo que ancho? Gracias.
06.08.2020 - 17:14DROPS Design answered:
Hola Nuria, al final la copa no sera plana y fa forma debe ser apropiada. Buen trabajo!
18.01.2021 - 09:23Diesen Abschnitt der Anleitung verstehe ich nicht wo genau fängt man an ? Ich sehe auf dem Bild keine Reihe mit den 3 luftmaschen?\r\nIn der Ecke des rechten Brustcups beginnen – siehe Kreis in der Maßskizze. 1 feste Masche um die erste Reihe, * 3 Luftmaschen, 3 Reihen überspringen, 1 feste Masche um die nächste Reihe *, von *-* an der ganzen Seite entlanghäkeln,
26.07.2020 - 12:06DROPS Design answered:
Guten Tag, Sie beginnen oben am rechten Brustup, an der Spitze also. In der Skizze ist dies mit einem Kreis gekennzeichnet. Sie befestigen den Faden dort mit 1 festen Masche am Rand, d.h. um die erste Reihe oben in der Ecke. Dann häkeln Sie am senkrechten Rand nach unten entlang - also an den senkrechten Reihen entlang. Sie häkeln zuerst 3 Luftmaschen, dann zählen Sie 3 Reihen weiter und häkeln um den Rand der nächsten Reihe 1 feste Masche. Gutes Gelingen!
27.07.2020 - 10:51I am trying to crochet the bra, but I'm confused with the directions. Right after top directions, it says to crochet in 24 single crochets. Then 3 in the next. Then to sc around each of the next 23 crochet rows. What is meant by the last sentence? Do I skip the remaining sc? Do I crochet around the whole piece? I'm also confused about the next part too.
07.07.2020 - 23:16DROPS Design answered:
Dear Cropperhopper, you will now crochet in the stitches from previous row (where you worked 23 sc as before + 3 sc + 23 sc along the next side of piece = 49 sc), ie you work 1 sc in each of the first 23 sc + 1 in the first of the 3 sc, 3 sc in the next sc (the one in the middle of previous row), 1 sc in the next sc + 1 sc in each of the 23 sc = there are 24 sc + 3 sc in the same st + 24 sc = 51 sc. This means you now work along 2 sides of the piece. Happy crocheting!
08.07.2020 - 08:16Just finished making this. Haven't tested the panties in the water, but the top holds up really well. Made the top in XXXL because I am rather curvy. Had to modify how I attached the neck ties for comfort and add a cord to kind of lace up the middle so it would stay put. If anyone is interested, making the largest top and a size L for the bottoms, this still took just under 3 balls of Safran using a 3mm hook.
13.06.2020 - 14:31Hey klein vraagje ik zou graag eens proberen een bikini te breien, dit is mijn eerste keer dus ik weet niet heel goed welke wol ik moet gebruiken welke breinaalden en hoeveel bollen wol? alvast bedankt voor uw antwoordt Mvg Kato
25.05.2020 - 11:05DROPS Design answered:
Dag Kato,
What about cup D?
15.05.2020 - 13:19DROPS Design answered:
Dear Ewelina, it might be eeasy to make it bigger but we are very sorry we are unfortunately not able to adjust every pattern to every single request. You are welcome to contact your DROPS store or any crochet forum for further individual assistance. Happy crocheting!
15.05.2020 - 16:07Bonjour, J'ai tricoter tt le premier cote du bikini jusqu'au diagramme. Mais je bloque je n'arrive pas à le lire... comment suis-je procéder ? Le premier est rang du diagramme est composé d'une maille en l'air, puis une seconde ou bien une double bride dans une maille ? Quand je dois piquer dans une maille comment dois je faire pour savoir laquelle ? Merci pour votre aide.
12.04.2020 - 14:35DROPS Design answered:
Bonjour Mme Suchet, vous crochetez les diagrammes comme indiqué, autrement dit quand on commence par A.1a, on crochète 1 ml comme le montre le diagramme (= remplace 1 ms) on doit ensuite continuer par exemple avec 1 ml dans A.1c/A.1b. Cf comment lire un diagramme. Bon crochet!
14.04.2020 - 11:28Bonjour, c’est la première fois que je fais un bikini est j’aurais aimé savoir exactement combien fallait t’il que je commande en grammes de pelotes ? Pour faire le haut et le bas ? Svp Bien cordialement
22.03.2020 - 12:33DROPS Design answered:
Bonjour Mme Casanova, vous trouverez les quantités en fonction de la taille sous l'en-tête, autrement dit, 150 g DROPS Safran dans les 3 premières tailles et 200 g DROPS Safran dans la dernière taille. Bon crochet!
23.03.2020 - 10:22Being a curvy girl, I struggled with fit and support all my life, at a 36J , I was wearing a 38DDD, which was horrible, playing sports was blahvlah as well as formal events at school.
20.09.2019 - 00:31Bonjour, Quand on est dans la partie autour du carré initial, vous dites de crocheter 14 rangs (taille S/M). Vous comptez tous les rangs le long des 2 côtés ou uniquement ceux qui ne sont pas détaillés précédemment ? (Ça crée une différence de 4 rangs.) Merci.
03.07.2019 - 11:14DROPS Design answered:
Bonjour Anaïs, vous crochetez les 22 ms de la 1ère partie, puis 2 ms dans la suivante, et 1 ms le long du côté gauche de la 1ère partie (= à gauche, vu sur l'endroit, dans les fins de rangs), vous crochetez un total de 14 rangs, y compris les 3 premiers qui sont expliqués. Bon crochet!
03.07.2019 - 13:30