
Popular categories
Looking for a yarn?


|
||||||||||||||||||||||
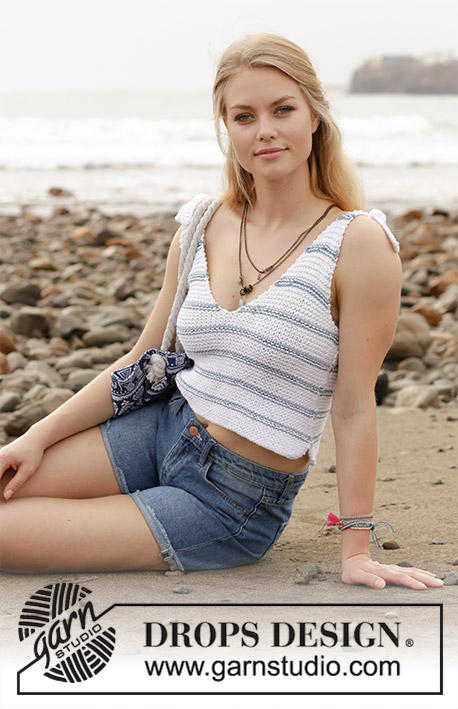
Waterfront Bikini |
||||||||||||||||||||||
 |
 |
|||||||||||||||||||||
Crocheted bikini with fan pattern. Sizes S - XXXL. The piece is worked in DROPS Safran.
DROPS 190-6 |
||||||||||||||||||||||
|
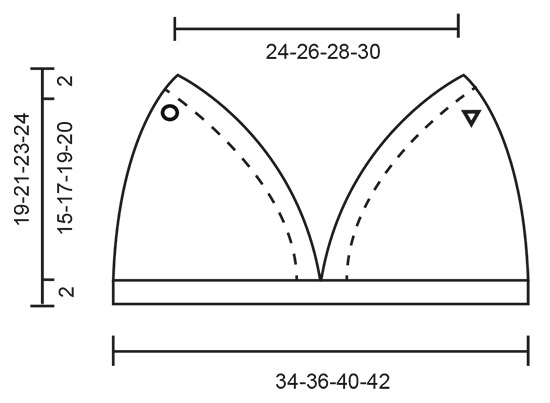
INFORMATION FOR THE PATTERN: PATTERN: See diagram A.1. CROCHET INFORMATION: At the beginning of each row of double crochets, work 1 chain stitch (the chain stitch does not replace the first double crochet). At the beginning of each row of treble crochets, work 3 chain stitches (the chain stitches does not replace the first treble crochet). PATTERN-1 (for panties): * 1 row of double crochets, 1 row of treble crochets *, work from *-* to finished length. DECREASE TIP (for panties): Decrease on a row of treble crochets as follows: * Work 1 treble crochet in each of the first 2 double crochets, but wait with the last yarn over and pull-through on both of these treble crochets, make 1 yarn over and pull it through all 3 loops on the hook *, work 1 treble crochet in each double crochet until there are 2 double crochets left, repeat from *-* (= 2 treble crochets decreased). Decrease on a row of double crochets as follows: * Work 1 double crochet in each of the first 2 treble crochets, but wait with the last yarn over and pull-through on both of these double crochets, make 1 yarn over and pull it through all 3 loops on the hook *, work 1 double crochet in each treble crochet until there are 2 treble crochets left, repeat from *-* (= 2 double crochets decreased) INCREASE TIP (for panties): Increase 2 treble crochets in each side of one row as follows: Work 3 treble crochets in the first double crochet, work 1 treble crochet in each double crochet until there is 1 double crochet left, work 3 treble crochets in the last double crochet. Increase 1 treble crochet in each side of one row as follows: Work 2 treble crochets in the first double crochet, work 1 treble crochet in each double crochet until there is 1 double crochet left, work 2 treble crochets in the last double crochet. ---------------------------------------------------------- BIKINI TOP: First work 2 loose cups. Then work the cups together. RIGHT CUP: First work a square, then continue back and forth along 2 sides of the square. SQUARE: Work 23-25-29-31 loose chain stitches with hook size 3 mm and Safran. Turn and work 1 double crochet in the 2nd chain stitch from the hook, work 1 double crochet in each of the remaining 21-23-27-29 chain stitches = 22-24-28-30 double crochets. Then continue working back and forth with 1 double crochet in each double crochet – read CROCHET INFORMATION. Work a total of 21-23-27-29 rows. The next row is worked as follows (= from the wrong side): Work 1 double crochet in each of the first 21-23-27-29 double crochets, 3 double crochets in the next double crochet, 1 double crochet around each of the next 21-23-27-29 rows = 45-49-57-61 double crochets. TOP: The next row is worked as follows (= from the right side): Work 1 double crochet in each of the first 22-24-28-30 double crochets, 2-3-3-3 double crochets in the next double crochet, 1 double crochet in each of the next 22-24-28-30 double crochets down the side = 46-51-59-63 double crochets. The next row is worked as follows (= from the wrong side): Work 1 double crochet in each of the first 23-26-29-31 double crochets, 0-0-3-3 double crochets in the next double crochet, 1 double crochet in each of the next 23-25-29-31 double crochets = 46-51-61-65 double crochets. The next row is worked as follows (= from the right side): Work 1 double crochet in each of the first 23-26-31-32 double crochets, 0-0-0-2 double crochets in the next double crochet, 1 double crochet in each of the next 23-25-30-32 double crochets = 46-51-61-66 double crochets. Then continue working back and forth with 1 double crochet in each double crochet. Work a total of 14-16-18-20 rows. The next row is worked as follows (= from the wrong side): Work A.1a, A.1b a total of 8-9-11-12 times in width, A.1c and A.1d. Continue until A.1 has been completed in height. Cut and fasten the strand. LEFT CUP: Work in the same way as for right cup, but all rows from right side = wrong side and all rows from wrong side = right side. EDGE: Now work the 2 cups together. NOTE: Make sure you work over both cups from the right side! Start in the corner of the right cup – see circle on sketch. Work 1 double crochet around the first row, * 3 chain stitches, skip 3 rows, 1 double crochet around the next row *, work from *-* along the whole side, insert 1 marker in this corner, continue along the bottom of the cup and work 1 double crochet in each of the 22-24-28-30 double crochets, 1 double crochet around each of the 14-16-18-20 rows, 4 double crochets around the outermost row of the lace pattern. Then continue over the left cup, work 4 double crochets around the outermost row of the lace pattern, work 1 double crochet around each of the 14-16-18-20 rows, 1 double crochet in each of the 22-24-28-30 double crochets, insert 1 marker here, continue along the side of the cup and work 1 double crochet around the first row, * 3 chain stitches, skip 3 rows, 1 double crochet around the next row *, work from *-* along the whole side, continue up to the corner of the left cup – see triangle on the sketch. Cut and fasten strand. Now work over the double crochets from marker to marker (= 80-88-100-108 double crochets); work as follows starting from the wrong side: Work 1 double crochet in each double crochet AT THE SAME TIME as the number of stitches is adjusted to 81-86-96-101 double crochets. Turn and work 1 double crochet in each double crochet. The next row is worked as follows (= from the wrong side): A.1a, A.1c, A.1b a total of 15-16-18-19 times in width and A.1d. Continue until A.1 has been completed in height, cut and fasten strand. CORD: Work a row of chain stitches of approx. 120-130-150-160 cm. Fold the cord double, thread the loop through a chain-space in the top corner of the cup, pull the cord through the loop. Make another cord in the same way and fasten it to the other cup. Work a row of chain stitches of approx. 90-100-120-130 cm. Fold the cord double, thread the loop through a chain-space in the bottom corner of the cup, thread the cord through the loop. Make another cord in the same way and fasten it to the other cup. ---------------------------------------------------------- BIKINI PANTIES: The panties are worked in treble crochets and double crochets, with an edge on front and back pieces and ties in the sides. You start at the top of the front piece and work through to the back piece in one go. Work 78-90-95-113 chain stitches with hook size 3 mm and Safran. Turn and work 1 treble crochet in the 4th chain stitch from the hook, then work 1 treble crochet in each of the next 4-1-1-4 chain stitches, * skip 1 chain stitch, 1 treble crochet in each of the next 4 chain stitches *, work from *-* a total of 14-17-18-21 times = 61-70-74-89 treble crochets. Read CROCHET INFORMATION! Then work PATTERN-1 – see description above and on the next row decrease 1 treble crochet in each side – read DECREASE TIP. Decrease like this on every row of treble crochets a total of 16-18-19-21 times and every 3rd-3rd-2nd-2nd row of double crochets a total of 5-6-7-11 times = 19-22-22-25 treble crochets / double crochets. The piece measures approx. 18-20-22 cm – REMEMBER THE CROCHET TENSION! Continue with pattern-1 without increases until the piece measures 22-25-27-29 cm. On the next row with trebles increase 2 treble crochets in each side – read INCREASE TIP. Increase like this on every row of treble crochets a total of 11-14-16-17 times, then increase 1 treble crochet on each row of treble crochets a total of 9-6-5-4 times = 81-90-96-101 treble crochets. Continue with pattern-1 as before until the piece measures 45-49-51-54 cm – adjust so that the last row is worked with treble crochets. EDGE: Work 1 double crochet in each treble crochet AT THE SAME TIME as you increase 0-1-0-0 double crochets = 81-91-96-101 double crochets. The next row is worked as follows: Work A.1a, A.1b a total of 16-18-19-20 times in width, A.1c and A.1d. Continue until A.1 has been completed in height. Cut and fasten strand. Work an edge along the front piece in the same way – NOTE: You skip the chain stitches which have not been worked in. CORD: Work a row of chain stitches of approx. 70-90-100-110 cm. Fold the cord double, thread the loop through a chain-space in the top corner of the panties, pull the cord through the loop. Make a total of 4 cords and fasten at each corner. |
||||||||||||||||||||||
Diagram explanations |
||||||||||||||||||||||
|
||||||||||||||||||||||

|
||||||||||||||||||||||
|
||||||||||||||||||||||
|
Have you made this or any other of our designs? Tag your pictures in social media with #dropsdesign so we can see them! Do you need help with this pattern?You'll find tutorial videos, a Comments/Questions area and more by visiting the pattern on garnstudio.com. © 1982-2024 DROPS Design A/S. We reserve all rights. This document, including all its sub-sections, has copyrights. Read more about what you can do with our patterns at the bottom of each pattern on our site. |
||||||||||||||||||||||


With over 40 years in knitting and crochet design, DROPS Design offers one of the most extensive collections of free patterns on the internet - translated to 17 languages. As of today we count 304 catalogues and 11415 patterns - 11415 of which are translated into English (UK/cm).
We work hard to bring you the best knitting and crochet have to offer, inspiration and advice as well as great quality yarns at incredible prices! Would you like to use our patterns for other than personal use? You can read what you are allowed to do in the Copyright text at the bottom of all our patterns. Happy crafting!
Comments / Questions (30)
Hola, no entiendo los diagramas A1, habría alguna manera de verlos en vídeo o explicados por escrito? Muchas gracias!
01.04.2024 - 01:20DROPS Design answered:
Hola Irene, todas los videos relevantes para este patrón están en la sección vídeos en la parte superior del patrón. Para más información sobre cómo leer nuestros diagramas de ganchillo puedes leer la siguiente lección: https://www.garnstudio.com/lesson.php?id=69&cid=23
07.04.2024 - 22:28What are the final measures of the bikini? How should I know which size to make?
16.03.2024 - 09:52DROPS Design answered:
Dear Sonja, please take a look at the schematic drawing at the bottom of the pattern, and compare the measurments there to an existing piece that fits the intended wearer. Happy Knitting!
17.03.2024 - 10:41Hola, al terminar el cuadrado y cuando tenemos 51 puntos bajos, donde dice trabajar un punto bajo en cada uno de los 26 puntos, 0 en el siguiente y uno en los 25 siguientes significa que dejemos uno sin tejer? Si lo hago así al final de la vuelta tengo 50 puntos en lugar de 51....
26.02.2023 - 22:08DROPS Design answered:
Hola Esther, no, no lo dejas sin tejer, sino que pasas a la siguiente instrucción, en este caso, directamente 1 punto bajo en los 25 siguientes. Trabajas sobre 26+25 = 51 pts.
26.02.2023 - 23:21I am doing the bikini panties right now and i don't know why only one side of them is wavy (i did the chain before every row and didn't use it as a replacement for the first crochet in a row) or is it supposed to be like that. I also struggle with this the first part on the edge. It says that i should work 1 single crochet in each single crochet but didn't i end with a row of double crochets? I am not that experienced with crocheting so i struggle a little. Thanks in advance.
13.02.2023 - 16:36DROPS Design answered:
Dear Clara, this should be "double crochet" instead, pattern will be edited, thanks for noticing. Happy crocheting!
10.05.2023 - 14:56Non capisco nei diagrammi A1a-A1d come interpretare la riga più bassa indicata con X e stellina. La stellina corrisponde a \"questa riga è già stata lavorata - Iniziare dalla riga successiva !\" ma a me pare la la stellina si riferisca ad una maglia, non ad una riga. Dalla risposta ad Angela (in inglese) capisco che si deve cominciare dai simboli sopra questa riga (catenella, catenella, saltare una maglia, maglia doppia ecc) ma quindi non capisco il significato della stellina. Grazie
15.05.2022 - 22:23DROPS Design answered:
Buonasera Sara, la stellina indica la prima riga di tutti i diagrammi indicati: si inizia a lavorare dalla riga sopra quella con le stelline. Buon lavoro!
17.05.2022 - 19:12I am quite an experienced crocheter but am struggling with the instructions here “ The next row is worked as follows (= from the wrong side): Work A.1a, A.1b a total of 8-9-11-12 times in width, A.1c and A.1d. Continue until A.1 has been completed in height”. I understand the symbols but not the order of stitches. Please can you give instructions for this in writing without a chart, just for this part? Then I will be able to work out the rest of the pattern from this. Many thanks.
29.03.2022 - 00:25DROPS Design answered:
Dear Angela, you start the row from RS with A.1a (= 1 chain on first row), then repeat 8 to 12 times (see size) A.1b (= *1 chain, skip 1 st, 1 tr in next st, 3 ch, 1 tr in next st, 1 ch, skip 1 st, 1 dc in next st*, repeat from *-*), then work A.1c (=1 chain, skip 1 st, 1 tr in next st, 3 ch, 1 tr in next st, 1 ch, skip 1 st) and end with A.1d (= 1 dc in last stitch). From WS read now from left towards the right: A.1d, work A.1c, repeat A.1b and finish with A.1a. Read more about diagrams here. Happy crocheting!
29.03.2022 - 09:15Zweite Frage: (sorry bin häkel-ungeübt, ich stricke mehr) wie soll ich das gegengleich häkeln für den zweiten brustcup verstehen? muss man da jeweils eine reihe mehr oder weniger häkeln damit man das richtig hinbekommt?
30.06.2021 - 19:45DROPS Design answered:
Liebe Lilia, die Hin-Reihen beim rechten Quadrat/Cup sollen Rückreihen beim linken Quadrat/Cup sein, und die Rückreihen beim rechten Quadrat/Cup sollen Hinreihen beim linken Quadrat/Cup sein, so werden Sie beide spiegelverkehr. Viel Spaß beim häkeln!
01.07.2021 - 08:56Beim quadrat und oberteil, " Insgesamt 21-23-27-29 Reihen häkeln." und "Hin und zurück weiterhäkeln, mit 1 festen Masche in jede feste Masche. Insgesamt 14-16-18-20 Reihen häkeln.": ist hier jeweils gemeint, insgesamt mitsamt den zuvor in der art gehäkelten reihen? oder soll man nach der ersten reihe feste maschen bzw. den beschriebenen reihen die um die ecke gehen neu zählen?
30.06.2021 - 19:42DROPS Design answered:
Liebe Lilia, die 21-23-27-29 Reihen sind von der Luftmaschenkette gezählt und die 14-16-18-20 Reihen sind ab 1. Reihe vom OBERTEIL gezählt. Viel Spaß beim häkeln!
01.07.2021 - 08:54Hej Jeg forsøger at følge diagrammet for mønsteret, men jeg har nogle spørgsmål. 1. Mellem fm i bunden af diagrammet er der ind i mellem nogle mellemrum. Betyder det at man skal springe en maske over? 2. Hvad vil det sige, at rækken allerede er hæklet? Skal man springe stjernemarkøren over og dermed en maske ift forrige række fra bh-skålen? Håber i kan hjælpe Karoline
29.04.2021 - 11:21DROPS Design answered:
Hei Karoline. Mellomrommet har ingen betydning. For at det skal være enklere å se hvor man skal hekle / i hvilken maske, er forrige rad tegnet inn i diagrammet. Når du skal starte med A.1a ser du at luftmasken du skal hekle er over en fastmaske fra forrige rad. Når du skal hekle A.1b, hekler du 1 luftmaske, hopp over 1 fastmaske fra forrige rad, 1 stav i neste fastmaske (stjernen viser bare at dette er forrige rad), 3 luftmasker, 1 stav i neste fastmaske, hopp over i fastmaske, 1 luftmaske og 1 fastmaske i neste fastmaske (fra forrige rad) osv. mvh DROPS design
03.05.2021 - 13:32Salve, non riesco a capire come fare la coppa sinistra, potete spiegarmi meglio grazie mille !
06.04.2021 - 23:22DROPS Design answered:
Buongiorno Clara, deve lavorare la coppa sinistra come la destra, lavorando al contrario, cioè le righe sul diritto del lavoro saranno sul rovescio e viceversa. Buon lavoro!
07.04.2021 - 14:13