DROPS Paris
DROPS Paris
100% Cotton
from 1.10 $ /50g
Get the yarn to make this pattern from 3.30$.

The yarn cost is calculated from the pattern’s smallest size and the yarn’s cheapest product type. Looking for an even better price? You might find it on the DROPS Deals!

DROPS Super Sale

Seashore Memories

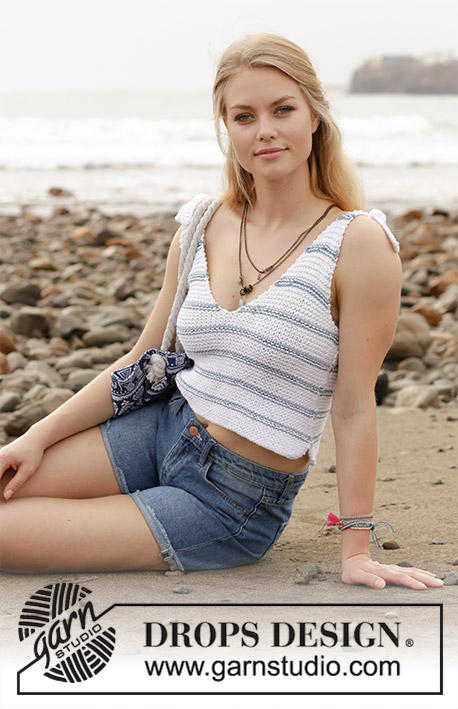
Crocheted bikini top with fans, worked top down. Sizes S - XXXL. The piece is worked in DROPS Paris.

DROPS 190-23
DROPS Design: Pattern no w-692
Yarn group C or A + A
-----------------------------------------------------------
Sizes: S - M - L - XL - XXL - XXXL
Materials:
DROPS PARIS from Garnstudio (belongs to yarn group C)
150-150-200-200-200-250 g color 48, petrol

The piece can also be crocheted with yarn from:
"Alternative yarn (Yarn group C)" – see link below.

DROPS CROCHET HOOK SIZE 4.5 MM/US 7 – or the size needed to get 16 treble crochets/single crochets and 9 rows of pattern-2 on 10 cm / 4'' in width and 10 cm / 4'' in height.

DROPS MOTHER OF PEARL BUTTONS, Round (blue) NO 621: 5-5-5-6-6-7 items.

-------------------------------------------------------

Alternative Yarn – See how to change yarns here
Yarn Groups A to F – Use the same pattern and change the yarn here
Yarn usage using an alternative yarn – Use our yarn converter here

-------------------------------------------------------

DROPS Paris
DROPS Paris
100% Cotton
from 1.10 $ /50g
Get the yarn to make this pattern from 3.30$.

The yarn cost is calculated from the pattern’s smallest size and the yarn’s cheapest product type. Looking for an even better price? You might find it on the DROPS Deals!

DROPS Super Sale

SAVE 30% on 6 cotton favorites!
Valid until 04.12.2024

Pattern instructions

NOTE: This pattern is written in American English. All measurements in charts are in cm. For conversion from inches to cm - click here. There are different terms for crocheting in American and British English. If this pattern includes crochet, click for "crochet terms" here. For this pattern in British English, please click here.
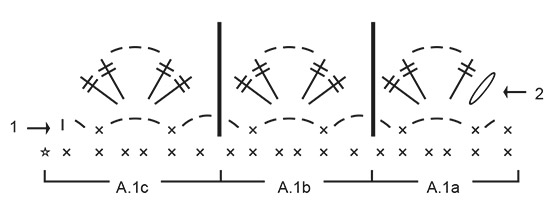
INFORMATION FOR THE PATTERN:

PATTERN:
See diagrams A.1 and A.2. A.2 shows how the garment is worn.

PATTERN-2:
ROW 1 (= wrong side): 1 single crochet in each treble crochet.
ROW 2 (= right side): 1 treble crochet in each single crochet.
Repeat rows 1 and 2 onwards.

CROCHET INFORMATION:
At the beginning of each row of single crochets, replace the first single crochet with 1 chain stitch.
At the beginning of each row of treble crochets, replace the first treble crochet with 4 chain stitches.

INCREASE TIP:
Increase 1 treble crochet by working 2 treble crochets in the same single crochet.
Increase 1 single crochet by working 2 single crochets in the same treble crochet.
----------------------------------------------------------

BIKINI TOP:
The piece is worked back and forth, top down. First work 2 loose cups. Then work the 2 cups together. The top is closed mid back – see A.2.

CUP:
Work 4 chain stitches with hook size 4.5 mm/US 7 and Paris and form them into a ring with 1 slip stitch in the first chain stitch. Work 4-4-4-5-5-5 single crochets around the ring – read CROCHET INFORMATION. Turn and work 2 treble crochets in each single crochet = 8-8-8-10-10-10 treble crochets. Continue by working PATTERN-2 and at the same time increase 1 stitch crochet in each side – read INCREASE TIP. Increase like this every row a total of 11-13-14-16-18-20 times = 30-34-36-42-46-50 stitches – REMEMBER THE CROCHET GAUGE! The piece now measures approx. 12-14-16-18-20-22 cm / 7''-8''-8¾''. Continue back and forth without further increases until the piece measures 15-16-17-19-20-22 cm / 5 7/8"-6 ¼"-6 5/8"-7 3/8"-7 7/8"-8 5/8" – adjust so that you finish after a row of single crochets (= from the wrong side). Cut and fasten the strand. Work 1 more cup in the same way.

Now work the 2 cups together. NOTE: Make sure you work both cups from the right side!
Work 30-34-36-42-46-50 loose chain stitches, then work 1 single crochet in each of the 30-34-36-42-46-50 treble crochets at the bottom of each cup, work 1 single crochet in each of the 30-34-36-42-46-50 treble crochets at the bottom of the other cup, then work 30-34-36-42-46-50 loose chain stitches at the end of the row = 120-136-144-168-184-200 stitches.
Turn and work 1 treble crochet in each stitch, finish the row with 6 chain stitches (= loop for button) = 120-136-144-168-184-200 treble crochets. Continue with pattern-2 as before, but finish each row of treble crochets with 6 chain stitches (for the loops) until you have worked a total of 4-4-4-5-5-6 loops). When all the loops have been worked, work a row of single crochets AT THE SAME TIME as you increase 0-2-0-0-2-4 single crochets evenly on the row = 120-138-144-168-186-204 single crochets. Cut the strand and start the next row from the wrong side.
The next row is worked as follows (= from the wrong side): Work A.1c, A.1b a total of 18-21-22-24-29-32 times in width and A.1a. Continue until A.1 has been completed in height. Cut and fasten the strand.
Then work an edge on each back piece (on top of back), work as follows on back piece with loops: Fasten the strand with 1 slip stitch in the first chain stitch, work 6 chain stitches (= loop), work 1 single crochet in the same chain stitch, continue with 1 single crochet in each of the remaining 29-33-35-41-45-49 chain stitches cast on. Cut and fasten strand. Work 1 single crochet in each of the 30-34-36-42-46-50 chain stitches on the other back piece. Cut and fasten the strand.

STRAP:
Work chain stitches until you have a cord of approx. 100 cm. Cut and fasten the strand, tie a knot in each end. Thread the cord through the chain stitch ring worked at the beginning of the piece. Make another cord and repeat on the other side of the top. Sew buttons onto the left side of the back.

This pattern has been corrected.

Updated online: 01.08.2018
adjust so that you finish after a row of treble crochets (= from the right side). (previously single crochets (= from the wrong side)

Diagram

All measurements in charts are in cm.

symbols = chain stitch
symbols = single crochet in stitch
symbols = treble crochet around chain-space
symbols = row already worked - Start on next row!
symbols = row 1 starts here
symbols = work slip stitches as far as the middle of the chain-space, then work 4 chain stitches
diagram
diagram
diagram
Do you have a question? See a list of frequently asked questions (FAQ)

Knitting tension is what determines the final measurements of your work, and is usually measured per 10 x 10 cm. It is provided like so: number of stitches in width x number of rows in height - eg: 19 stitches x 26 rows = 10 x 10 cm.

The knitting tension is very individual; some people knit/crochet loosely while others work tightly. You adjust the knitting tension with the needle size, which is why the suggested needle size only serve as a guide! You need to adjust this (up or down) to ensure that YOUR knitting tension matches the knitting tension provided in the pattern. If you work with a different knitting tension than provided you will have a different yarn consumption, and your work will have different measurements than what the pattern suggests.

The knitting tension also determines which yarns can replace each other. As long as you achieve the same knitting tension you can replace one yarn with another.

See DROPS lesson: How to measure your tension/gauge

See DROPS video: How to make a gauge tension swatch

The required amount of yarn is provided in grams, eg: 450 g. To calculate how many balls you’ll need you first need to know how many grams are in 1 ball (25g, 50g or 100g). This information is available if you click on the individual yarn quality on our pages. Divide the amount required with the amount of each ball. For example, if each ball is 50g (the most common amount), the calculation will be as follows: 450 / 50 = 9 balls.

The important thing when changing from one yarn to another is that the knitting/crochet tension remains the same. This is so that the measurements of the finished piece will be the same as on the sketch provided. It is easier to achieve the same knitting tension using yarns from the same yarn group. It is also possible to work with multiple strands of a thinner yarn to achieve the knitting tension of a thicker one. Please try our yarn converter. We recommend you to always work a test swatch.

Please NOTE: when changing yarn the garment might have a different look and feel to the garment in the photo, due to individual properties and qualities of each yarn.

See DROPS lesson: Can I use a different yarn than the one mentioned in the pattern?

All our yarns are categorised into yarn groups (from A to F) according to thickness and knitting tension – group A contains the thinnest yarns and group F the thickest. This makes it easier for you to find alternative yarns to our patterns, should you wish to switch yarn. All yarns within the same group have a similar knitting tension and can easily replace each other. However, different yarn qualities have different structures and properties which will give the finished work a unique look and feel.

Click here for an overview of the yarns in each yarn group

At the top of all our patterns you’ll find a link to our yarn converter, which is a helpful tool should you wish to use a different yarn than suggested. By filling in the yarn quality you wish to replace, the amount (in your size) and number of strands, the converter will present good alternative yarns with the same knitting tension. Additionally it will tell you how much you’ll require in the new qualities and whether you’ll need to work with multiple strands. Most skeins are 50g (some are 25g or 100g).

If the pattern is worked with multiple colours, every colour will have to be converted separately. Similarly, if the pattern is worked with several strands of different yarns (for example 1 strand Alpaca and 1 strand Kid-Silk) you will have to find alternatives for each, individually.

Click here to see our yarn converter

Since different yarns have different qualities and textures we have chosen to keep the original yarn in our patterns. However, you can easily find options among our available qualities by using our yarn converter, or simply pick a yarn from the same yarn group.

It is possible that some retailers still have discontinued yarns in stock, or that someone has a few skeins at home that they would like to find patterns for.

The yarn converter will provide both alternative yarn as well as required amount in the new quality.

If you think it's hard to decide what size to make, it can be a good idea to measure a garment you own already and like the size of. Then you can pick the size by comparing those measures with the ones available in the pattern's size chart.

You'll find the size chart at the bottom of the pattern.

See DROPS lesson: How to read size chart

The needle size provided in the pattern serves only as a guide, the important thing is to follow the knitting tension. And since knitting tension is very individual, you will have to adjust the needle size to ensure that YOUR tension is the same as in the pattern – maybe you’ll have to adjust 1, or even 2 needle sizes, up or down to achieve the correct tension. For this, we recommend that you work test swatches.

Should you work with a different knitting tension than the one provided, the measurements of the finished garment might deviate from the measurement sketch.

See DROPS lesson: How to measure your tension/gauge

See DROPS video: How to make a gauge tension swatch

Working a garment top-down provides more flexibility and room for personal adjustment. For example it is easier to try the garment on while working, as well as making adjustments to length of yoke and shoulder caps.

The instructions are carefully explaining every step, in the correct order. Diagrams are adjusted to the knitting direction and are worked as usual.

The diagram depicts all rows/rounds, and every stitch seen from the right side. It is read from bottom to top, from right to left. 1 square = 1 stitch.

When working back and forth, every other row is worked from the right side and every other row is worked from the wrong side. When working from the wrong side, the diagram will have to be worked reversed: from left to right, knit stitches are purled, purl stitches are knit etc.

When working in the round every round is worked from the right side and the diagram are worked from right to left on all rounds.

See DROPS lesson: How to read knitting diagrams

The diagram depicts all rows/rounds, and every stitch seen from the right side. It is worked from bottom to top, from right to left.

When working back and forth every other row is worked from the right side: from right to left and every other row is worked from the wrong side: from left to right.

When working in the round, every row in the diagram are worked from the right side, from right to left.

When working a circular diagram you start in the middle and work your way outwards, counter clockwise, row by row.

The rows usually start with a given number of chain stitches (equivalent to the height of the following stitch), this will either be depicted in the diagram or explained in the pattern.

See DROPS lesson: How to read crochet diagrams

Instructions for working several diagrams after each other on the same row/round, will often be written like so: “work A.1, A.2, A.3 a total of 0-0-2-3-4 times". This means you work A.1 once, then A.2 is worked once, and A.3 is repeated (in width) the number of times provided for your size – in this case like so: S = 0 times, M = 0 times, L=2 times, XL= 3 times and XXL = 4 times.

The diagrams are worked as usual: begin with the first row in A.1, then work the first row in A.2 etc.

See DROPS lesson: How to read knitting diagrams

See DROPS lesson: How to read crochet diagrams

The total width of the garment (from wrist-to-wrist) will be larger in the larger sizes, despite the actual sleeves being shorter. The larger sizes have longer sleeve caps and wider shoulders, so there will be a good fit in all sizes.

The measurement sketch/schematic drawing provides information regarding the full length of the garment. If it’s a jumper or a jacket the length is measured from the highest point on the shoulder (usually closest to the neckline), and straight down to the bottom of the garment. It is NOT measured from the tip of shoulder. Similarly, the length of yoke is measured from the highest point on the shoulder and down to where yoke is split into body and sleeves.

See DROPS lesson: How to read a schematic drawing

Diagrams are often repeated on the round or in height. 1 repeat is the diagram the way it appears in the pattern. If it says to work 5 repeats of A.1 in the round, then you work A.1 a total of 5 times after/next to each other in the round. If it says to work 2 repeats of A.1 vertically/in height you work the entire diagram once, then begin again at the start and work the entire diagram one more time.

Chain stitches are slightly narrower than other stitches and to avoid working the cast-on edge too tight, we simply chain more stitches to begin with. The stitch count will be adjusted on the following row to fit the pattern and measurement sketch.

The rib edge is more elastic and will contract slightly compared to, for example, stocking stitch. By increasing before the rib edge, you avoid a visible difference in width between the rib edge and the rest of the body.

It’s very easy to cast off too tightly, and by making yarn overs while casting off (and simultaneously casting these off) you avoid a too tight cast off edge.

See DROPS video: How to bind off with yarn overs (yo)

To achieve an even increase (or decrease) you can increase on, for example: every 3rd and 4th row alternately, like so: work 2 rows and increase on the 3rd row, work 3 rows and increase on the 4th. Repeat this until the increase is complete.

See DROPS lesson: Increase or decrease 1 st on every 3rd and 4th row alternately

Should you prefer to work in the round instead of back and forth, you may of course adjust the pattern. You’ll need to add steeks mid-front (usually 5 stitches), and follow the instructions. When you would normally turn and work from the wrong side, simply work across the steek and continue in the round. At the end you’ll cut the piece open, pick up stitches to work bands, and cover the cut edges.

See DROPS video: How to knit steeks and cut open

Should you prefer to work back and forth instead of in the round, you may of course adjust the pattern so you work the pieces separately and then assemble them at the end. Divide the stitches for the body in 2, add 1 edge stitch in each side (for sewing) and work the front and back pieces separately.

See DROPS lesson: Can I adapt a pattern for circular needles into straight needles?

Pattern repeats can vary slightly in the different sizes, in order to get the correct proportions. If you’re not working the exact same size as the garment in the photo, yours might deviate slightly. This has been carefully developed and adjusted so that the complete impression of the garment is the same in all sizes.

Make sure to follow instructions and diagrams for your size!

If you have found a pattern you like which is available in women’s size it’s not very difficult to convert it to men’s size. The biggest difference will be the length of sleeves and body. Start working on the women size that you think would fit across the chest. The additional length will be worked right before you cast off for the armhole/sleeve cap. If the pattern is worked top-down you can add the length right after the armhole or before the first decrease on sleeve.

Regarding additional yarn amount, this will depend on how much length you add, but it is better with a skein too many than too few.

All yarns will have excess fibres (from production) that might come off as lint or shedding. Brushed yarns (ie hairier yarns) have more of these loose, excess fibres, causing more shedding.

Shedding also depends on what is worn under or over the garment, and whether this pulls at the yarn fibres. It’s therefore not possible to guarantee that there will be no shedding

Below are some tips on how to get the best result when working with hairier yarns:

1. When the garment is finished (before you wash it) shake it vigorously so the looser hairs come off. NOTE: do NOT use a lint roller, brush or any method that pulls at the yarn.

2. Place the garment in a plastic bag and put it in your freezer - the temperature will cause the fibres to become less attached to each other, and excess fibres will come off easier.

3. Leave in the freezer for a few hours before taking it out and shaking it again.

4. Wash the garment according to the instructions on the yarn label.

Pilling is a natural process that happens to even the most exclusive of fibers. It's a natural sign of wear and tear that is hard to avoid, and that is most visible in high friction areas of your garment like a sweater's arms and cuffs.

You can make your garment look as new by removing the pilling, using a fabric comb or a pill/lint remover.

Still can't find the answer you need? Then scroll down and leave your question so one of our experts can try to help you. This will be done normally within 5 to 10 working days.
In the meantime, you can read the questions and answers that others have left to this pattern or join the DROPS Workshop on Facebook to get help from fellow knitters/crocheters!

You might also like...

Post a comment to pattern DROPS 190-23

We would love to hear what you have to say about this pattern!

If you want to leave a question, please make sure you select the correct category in the form below, to speed up the answering process. Required fields are marked *.

Comments / Questions (20)

country flag Hubert VOUILLOT wrote:

Bonjour. Je suis comme Madame Pasquet j'arrive avec plus de 20 cm au final avec échantillon correcte au départ ? Mais comment peut-on avoir 10 cm avec 16 doubles brides et 15 avec 34. Je ne comprends pas????? Merci pour vos conseils.

30.05.2021 - 17:19

DROPS Design answered:

Bonjour Mr Vouillot, je ne comprends pas votre question - ni de quels 15 cm vous parlez; pourriez-vous la reformuler? Merci pour votre compréhension.

31.05.2021 - 08:19

country flag Julia wrote:

Hallo, ich bin mir nicht sicher, wie ich die Häkelinformation hier umsetzen soll in Verbindung mit den Maschenzunahmen im Teil zum Brustcup. Wenn ich in 13 Reihen jedes mal 2x zunehme, aber die ersten Maschen jeweils durch Luftmaschen ersetze, habe ich doch nicht ausreichend Zunahmen um auf 34 Maschen zu kommen? Oder zählen eine Reihe fM und eine Reihe Doppelstäbchen zusammen als eine Reihe? Und nehme ich immer die zweite Masche von der Nadel aus zu, wenn ich die erste durch LM ersetze?

19.05.2021 - 13:59

DROPS Design answered:

Liebe Julia, am Anfang der Reihe haben Sie 4 Lm (= 1. Doppelstäbchen) + 1 Doppelstäbchen in die 1. Masche, am Ende der Reihe häkeln Sie 2 Doppelstäbchen in die letzte Masche = 8+2 Zunahmen = 10 Doppelstäbchen. Häkeln Sie weiter so, mit 2 Zunahmmen bei jeder der nächsten 12 Reihen = 10+24 Zunahmen = 34 Doppelstäbchen. Viel Spaß beim häkeln!

19.05.2021 - 15:41

country flag Lisa wrote:

Jeg forstår ikke hvordan diagrammet leses. Skal jeg starte med to luftmasker som ikke er festet til noe, og maske 3 er en fastmaske i fastmaskene som nettopp er fullført (da også nr 3)? Jeg forstår heller ikke «hekle A.1c, A.1b totalt c ganger i bredden og A.1a». Slik jeg ser det er det to rader nederst med mønster fra diagram A1, men jeg klarer ikke å lese det.

25.05.2020 - 10:33

DROPS Design answered:

Hei Lisa. Du har allerede heklet cupene og et stykke nedover, nå skal du hekle etter diagram A.1. 1. rad i diagrammet har du allerede heklet (markert med stjerne i diagrammet) og du skal starte ved 1.pil. Hekle 2 lm, 1 fm i 2. fm, 3 l, hopp over 2 m, 1 fm i neste m, 2 lm, hopp over 1 m (nå har du heklet A.1c. Nå skal du hekle A.2b 18 ganger (=1 lm, hopp over 1 m, 1 fm i neste m, 3 lm, hopp over 2 m, 1 fm i neste m, 2 lm, hopp over 1 m). Deretter hekles det A.1a slik: 1 lm, hopp over 1 m, 1 fm i neste m, 3 lm, hopp over 2 m, 1 fm i neste m, 1 lm, 1 fm i neste m. Så hekles det 2. rad av diagrammet. God Fornøyelse!

03.06.2020 - 10:03

country flag Jennifer wrote:

Danke! Ein wunderschönes und sehr einfach und schnell zu häkelndes Top. Ich werde es mit einem Höschen kombinieren, das ich bereits nach einer Anleitung von dieser Seite gehäkelt habe (178 74, Micaela). Für dieses Top habe ich mir auch das Originalgarn besorgt und es ist schön weich. Ein kleiner Tippfehler hat sich in der Maßskizze eingeschlichen: Der Abstand für die beiden Spitzen der Cups wird in Größe M mit 211 angegeben. Ich denke, da ist eine 1 zu viel gelandet. :)

11.01.2020 - 01:34

country flag Pirek wrote:

Hi! -It is hard to obtain the required row gauge, so I used treble (UK) instead of double treble (UK) -Working the cups together:the pattern calls for 1 dc in each of the 30-34-36-42-46-50 dtr crochets at the bottom of each cup, but this is the crochet count after 12-14-16-18-20-22 cm - after the required cup length the count is bigger as pattern suggests

19.07.2019 - 10:22

country flag Wiesje wrote:

Ja inderdaad heb ik niet goed gelezen. Bedankt voor je snelle reactie. Het komt nu vast helemaal goed.

19.03.2019 - 19:01

country flag Wiesje wrote:

Hoe kan het dat er zo'n groot verschil zit tussen de lengte en breedte die in de beschrijving staat. Ik kom uit op 28 cm!!!-ipv 12 cm bij 11 x meerderen en en 30 steken. Ik begrijp niet waar dit grote verschil in zit.

16.03.2019 - 21:42

DROPS Design answered:

Dag Wiesje,

Dat is meer dan 2 keer zo veel. als je patroon 2 volgt, moet je zowel op toer 1 als op toer 2 meerderen. Kan het zijn dat je per ongeluk het dubbele aantal toeren hebt gemaakt?

18.03.2019 - 14:10

country flag Pasquet Luce wrote:

… d'autre part vous dites que pour les augmentations dans le point fantaisie 2 il faut faire une augmentation de chaque côté du rang de double-brides. Mais nous ne dites rien pour le rang des mailles serrée. Je suppose qu'il faut aussi faire une augm. de chaque côté du rang de mailles serrées.

13.07.2018 - 15:48

DROPS Design answered:

Bonjour Mme Pasquet, on augmente soit 1 double-bride (= sur les rangs de double-brides comme c'est le cas pour la 1ère augmentation), soit 1 ms (= sur les rangs de ms) comme indiqué sous AUGMENTATIONS, donc on augmente bien tous les rangs. Bon crochet!

13.07.2018 - 15:54

country flag PASQUET wrote:

Bjr, pour le modèle en taille S, je n'arrive pas à comprendre comment on peut arriver à 12 cm après avoir fait toutes les aug pour obtenir 30 doubles-brides. J'arrive à 20 cm. J'ai changé mon crochet et j'ai refait le même travail avec un cochet n° 4 et là au même endroit j'ai 16 cm. Impossible de diminuer encore la taille du crochet, le fil PARIS n'est pas facile à crocheter, il se dédouble constamment

13.07.2018 - 15:36

DROPS Design answered:

Bonjour Madame Pasquet, avez-vous fait votre échantillon? Vous devez avoir 16 double-brides/maillles serrées en largeur et 9 rangs du point fantaisie-2 en hauteur = 10 x 10 cm. N'hésitez pas à prendre un crochet plus petit si besoin. Bon crochet!

13.07.2018 - 15:50

country flag Veronica wrote:

Brystcupene avsluttes med en rad fastmasker.. Neste del av heklingen er å hekle sammen, men da står det at det skal hekles fastmasker i dobbelstavene nederst på cupen!? Skal det hekles fra vrangen isteden for fra retten? Da vil jo også hempene havne på andre siden?

03.07.2018 - 20:48

DROPS Design answered:

Hei Veronica. Du skal fortsette etter mønster 2 som før. Det ser ut som det er litt uklart forklart i oppskriften, og den er nå blitt sendt til designavdelingen for gjennomgang. Men for øyeblikket: om du avslutter med en rad dobbelstaver fra retten skal du hekle de 2 koppene sammen med en rad fastmasker fra vrangen – slik at mønster 2 fortsetter som vanlig. Om du ser nøye på bildet kan du se at det er slik det er gjort. Det som er viktig er at begge koppene er avsluttet etter samme rad, slik at de blir like. Takk for beskjed og god fornøyelse.

05.07.2018 - 09:42