DROPS Cotton Merino
DROPS Cotton Merino
50% Wool, 50% Cotton
from 3.55 £ /50g
Get the yarn to make this pattern from 71.00£.

The yarn cost is calculated from the pattern’s smallest size and the yarn’s cheapest product type. Looking for an even better price? You might find it on the DROPS Deals!

DROPS SS24

Magic Summer

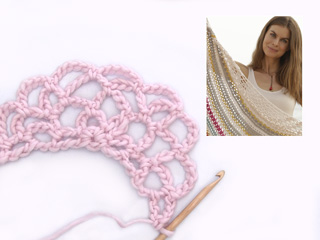
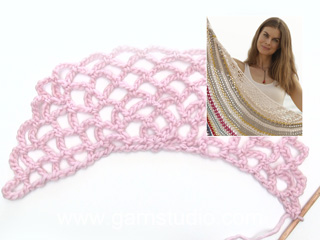
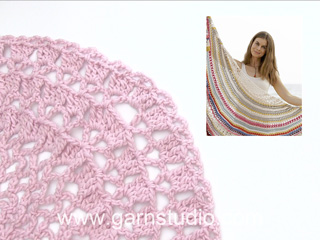
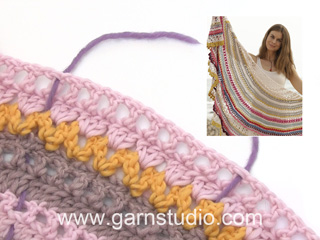
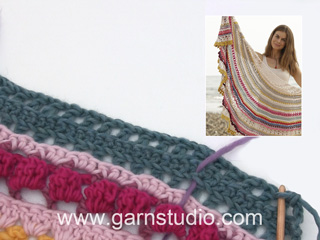
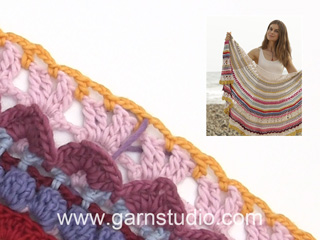
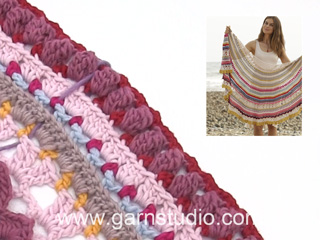
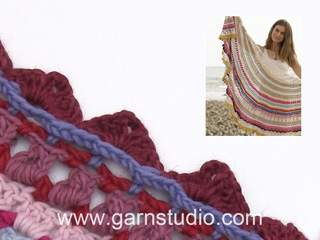
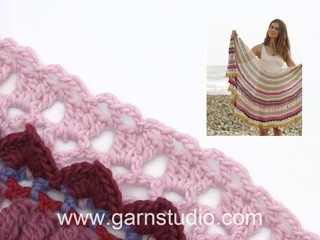
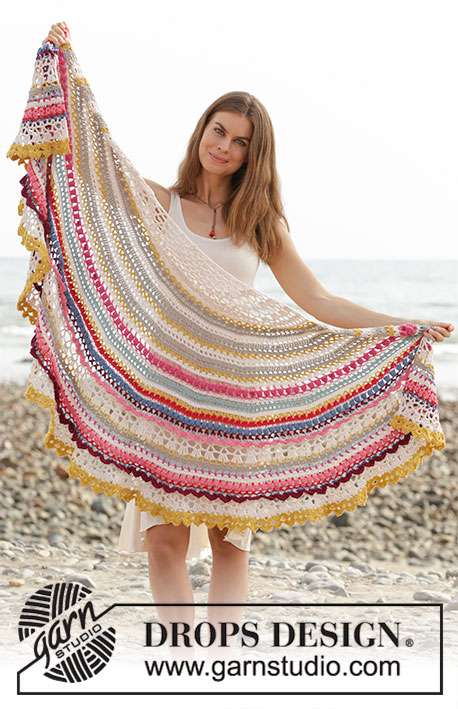
Crochet shawl with texture and stripes, worked top down. The piece is worked in DROPS Cotton Merino

DROPS 190-1
DROPS Design: Model cm-093
Yarn group B
-----------------------------------------------------------
Measurements:
Length in middle: approx. 76 cm
Width at top: approx. 180 cm
Materials:
DROPS COTTON MERINO from Garnstudio (belongs to yarn group B)
300 g colour 28, powder
150 g colour 15, mustard
100 g colour 13, coral
100 g colour 03, beige
100 g colour 16, jeans blue
50 g colour 06, red
50 g colour 14, cerise
50 g colour 29, sea green
50 g colour 09, ice blue
50 g colour 07, bordeaux

The piece can also be worked with yarn from:
"Alternative yarn (Yarn group B)" – see link below.

DROPS HOOK NR 4 – or size needed to get 18 treble crochets and 9 rows on 10 cm in width and 10 cm in height.
----------------------------------------------------------

-------------------------------------------------------

Alternative Yarn – See how to change yarns here
Yarn Groups A to F – Use the same pattern and change the yarn here
Yarn usage using an alternative yarn – Use our yarn converter here

-------------------------------------------------------

DROPS Cotton Merino
DROPS Cotton Merino
50% Wool, 50% Cotton
from 3.55 £ /50g
Get the yarn to make this pattern from 71.00£.

The yarn cost is calculated from the pattern’s smallest size and the yarn’s cheapest product type. Looking for an even better price? You might find it on the DROPS Deals!

Pattern instructions

NOTE: This pattern is written in British English. All measurements in charts are in cm. For conversion from cm to inches - click here. There are different terms for crocheting in British and American English. If this pattern includes crochet, click for "crochet terms" here. For this pattern in American English, please click here.
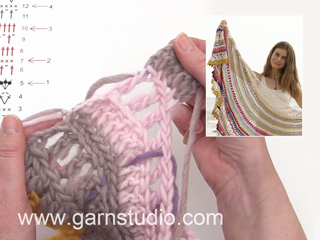
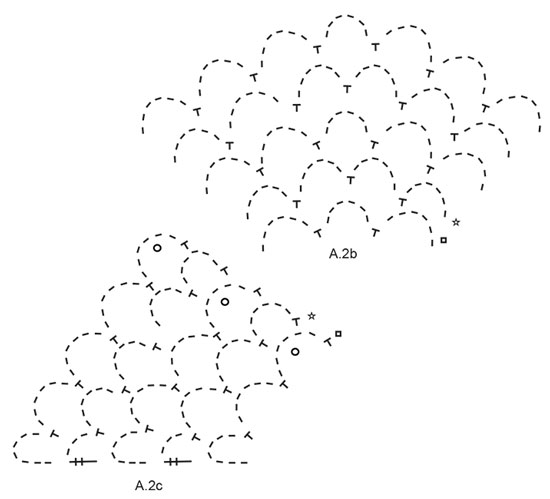
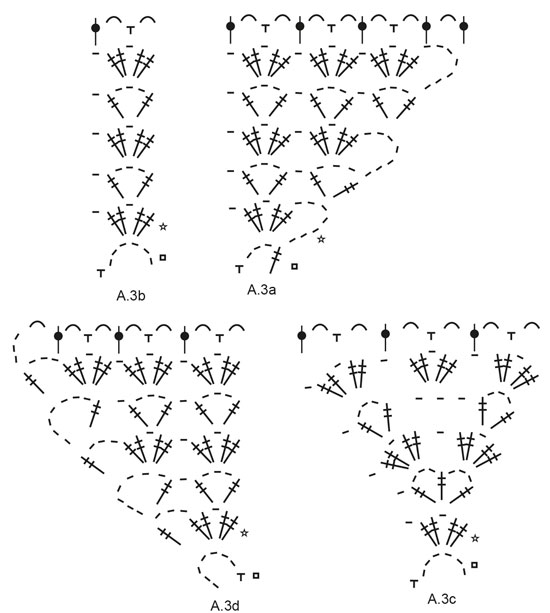
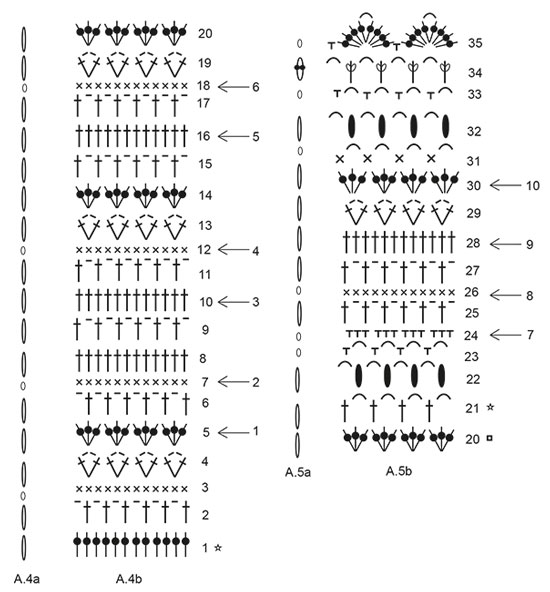
PATTERN INFORMATION:

PATTERN:
See diagram A.1 to A.7.
A.4a, A.5a, A.6a and A.7a show how the rows begins. NOTE: The beginning of the rows is drawn above each other in the same diagram as if they are worked in the right and left side of the shawl alternately and not above each other.

COLOUR CHANGE:
Work as follows when switching colours: Work the last stitch on row with the first colour, but wait with the last yarn over and pull through, switch to the next colour and work the last yarn over and pull through with this colour, then work the next row.

STRIPES:
The thread is cut after each row, unless the next row is in the same colour. Fasten the threads in the side at the end.
ROWS 1-3: powder
ROW 4: mustard
ROWS 5-7: beige
ROWS 8-9: powder
ROW 10-12: beige
ROW 13: mustard
ROWS 14-15: powder
ROWS 16-18: beige
ROW 19: mustard
ROW 20: powder
ROW 21: coral
ROW 22: cerise
ROW 23: coral
ROW 24: powder
ROWS 25-27: sea green
ROW 28: powder
ROW 29: mustard
ROW 30: red
ROW 31: powder.
ROW 32: jeans blue
ROW 33: bordeaux
ROW 34: ice blue.
ROW 35: coral
ROW 36 (worked in row 34– see explanation in pattern): ice blue.
ROWS 37-39: powder
ROW 40: mustard
ROW 41: beige
ROW 42: ice blue
ROW 43: cerise
ROW 44: powder
ROW 45: red
ROW 46: coral
ROW 47: red
ROW 48: jeans blue
ROW 49: bordeaux
ROW 50 (worked in row 48– see explanation in pattern): jeans blue
ROWS 51-54: powder
ROWS 55-56: mustard
----------------------------------------------------------

SHAWL:
The piece is worked back and forth and top down.

Work 5 chain stitches on hook size 4 in powder and make a ring with 1 slip stitch in the first chain stitch made. Start on the row with a star and work PATTERN – see explanation above, according to diagram A.1. Continue working as follows when the diagram has been worked: A.2a, A.2b and A.2c. There are 17 chain stitch spaces on row when the diagram has been worked in height. The piece measures approx. 10 cm from the first chain stitch ring, measured in the middle of the shawl. REMEMBER THE TENSION!
Now work according to the pattern as follows: Work A.3a around the first chain stitch space, A.3b around each of the 7 next chain stitch spaces, A.3c around the next chain stitch space (= the midmost chain stitch space on the shawl), A.3b around each of the 7 next chain stitch spaces, A.3d around the last chain stitch space. There are 48 chain stitch spaces on row when the diagrams have been worked in height. The piece measures approx. 19 cm from the start and down to the midmost point of the shawl.

Continue working in STRIPES – see explanation above, and pattern A.4b (A.4a shows how each row starts and is worked in addition to the stitches in A.4b. Read COLOUR CHANGE! Note: To more easily see which row are being worked in the pattern and stripes, place a marker in this row and the next row are named row 1. Meaning the first row in A.4b = row 1 in stripes.
ROW 1 (= right side): Work* 2 treble crochets around the first/next chain stitch space, 3 treble crochets around the next chain stitch space *, work from *-* entire row = 120 treble crochets.
Without working, add 12 marker threads into the piece as follows: add a marker thread after the first 5 treble crochets, then add the next 11 marker threads with 10 stitches between each marker thread, there is now 5 treble crochets on the row after the last marker thread.
The marker threads follows along while working the piece!
Continue from row 2 in stripes and row 2 A.4a/A.4b, AT THE SAME TIME increase on each side of the marker threads, on rows with arrow as follows:
ARROW-1 (=row 5): Increase 1 treble crochet on each side of the marker threads by working 1 treble crochet extra around the chain stitch space (= 24 stitches increased) = 144 treble crochets.
ARROW-2 (=row 7): Increase 1 double crochet on each side of the marker threads by working 2 double crochets in the same stitch (= 24 stitches increased) = 168 double crochets.
ARROW-3 (= row 10): Increase 1 treble crochet on each side of the marker threads by working 2 treble crochets in 1 stitch (= 24 stitches) = 192 treble crochets.
ARROW-4 (= row 12): Increase 1 double crochet on each side of the marker threads by working 2 double crochets in 1 stitch (= 24 stitches increased) = 216 double crochets.
ARROW-5 (= row 16): Increase 1 treble crochet on each side of the marker threads by working 2 treble crochets in 1 stitch (= 24 stitches increased) = 240 treble crochets.
ARROW-6 (= row 18): Increase 1 double crochet on each side of the marker threads by working 2 double crochets in 1 stitch on each side of the marker thread (= 24 stitches increased) = 264 double crochets.
Work the remaining rows in diagrams A.4a/A.4b. When row 20 has been worked the piece measures approx. 39 cm from the first chain stitch ring, measured in the middle of the shawl.

Continue working stripes and pattern A.5b (A.5a shows how each row starts and is worked in addition to the stitches in A.5b)
ARROW-7 (= row 24): Increase 1 double crochet on each side of the marker threads by working 1 double crochet extra around the chain stitch space (= 24 stitches increased) = 288 double crochets.
ARROW-8 (= row 26): Increase 1 double crochet on each side of the marker threads by working 2 double crochets in 1 stitch (= 24 stitches increased) = 312 double crochets.
ARROW-9 (= row 28): Increase 1 treble crochet on each side of the marker threads by working 2 treble crochets in 1 stitch (= 24 stitches increased) = 336 treble crochets.
ARROW-10 (= row 30): Increase 1 treble crochet on each side of the marker threads by working 1 treble crochet extra around the chain stitch space (= 24 stitches increased) = 360 treble crochets.
Work the remaining rows in the diagrams.
When row 35 is completed in height, the piece measures approx. 55 cm from the first chain stitch ring, measured in the middle of the shawl. There are now 60 fans (= 30 repeats of A.5b) on row.

Now work A.6b (A.6a shows how row start and is worked in addition to A.6b):
ROW 36 is worked from the wrong side: Fold row 35 (row with coral fans) so the right side is touching the right side and work around row 34 (ice blue row) from the back side of the shawl as follows: 4 chain stitches, 1 double crochet around the first half treble crochet, work (4 chain stitches, 1 double crochet around the next half treble crochet), work like this along the whole shawl and end with 1 double crochet around the last half treble crochet on row = 120 chain stitch spaces.
Work row 37, then once again add marker threads without working into the piece, as follows: Add the first marker thread after 15 stitches, add each of the next 11 marker threads with 30 stitches between each marker thread, there are now 15 stitches left on row after the last marker thread. Continue with rows 38 and 39. Cut the thread and work row 40 from the right side, so both rows 39 and 40 are worked from the right side. Start row 40 with 1 slip stitch in the 4th chain stitch from the previous row. Continue as before and increase on rows with arrows as follows:
ARROW 11 (= row 41): Increase 1 treble crochet on each side of the marker threads by working 1 treble crochet extra around the chain stitch space (= 24 stitches increased) = 384 stitches.
ARROW 12 (= row 44): Increase 1 treble crochet on each side of the marker threads by working 1 treble crochet extra around the chain stitch space (= 24 stitches increased) = 408 stitches.
Continue until row 48 is completed. Cut the thread after row 48 and work row 49 from the right side, so both rows 48 and 49 are worked from the right side. Start row 49 with 1 slip stitch into the 2nd chain stitch from the previous row. There are 68 fans (= 34 repeats of A.6b) when row 49 is completed. The piece measures approx. 69 cm from the first chain stitch ring, measured in the middle of the shawl.

Now work A.7b (A.7a shows how each row starts and is worked in addition to A.7b).
ROW 50 is worked from the wrong side as follows: Fold row 49 (row with bordeaux fans) so the right side is touching the right side and work around row 48 (jeans blue row) from the back side of the shawl as follows: 4 chain stitches, 1 double crochet around first half treble crochet, (4 chain stitches, 1 double crochet around next half treble crochet), work like this along the whole shawl and finish with 1 double crochet around the last half treble crochet on row = 136 chain stitch spaces.
ARROW 13 (row 51): Increase 2 stitches (= 1 chain stitch+ 1 treble crochet) around the 2 chain stitch spaces before every marker thread and increase 2 stitches (= 1 chain stitch + 1 treble crochet) around each of the 2 chain stitch spaces after every marker thread (= 48 chain stitch spaces increased) = 252 chain stitches + 252 treble crochets on row.
Cut thread when rows 52 and 53 are completed and work row 54 from the right side, so both rows 53 and 54 are worked from the right side. Start row 54 with 1 slip stitch into the 4th chain stitch from the previous row. When A.7a and A.7b have been worked in height the piece is finished. Cut and fasten the threads. The shawl measures approx. 76 cm from the start.

Diagram

symbols = work 5 chain stitches and make a ring with 1 slip stitch into the first chain stitch worked. Black dot is the beginning of row
symbols = 1 chain stitch
symbols = 3 chain stitches
symbols = 1 double crochet around the chain stitch ring/chain stitch space/chain stitch. NOTE: On row 36. and 50. work around the half treble crochets - see explanation in pattern!
symbols = from the right side: 1 double crochet in back loop of stitch. From the wrong side: 1 double crochet in front loop of stitch
symbols = 1 half treble crochet around the chain stitch space
symbols = 1 treble crochet around the chain stitch/chain stitch space
symbols = from the right side: 1 treble crochet in back loop of stitch. From the wrong side: 1 treble crochet in front loop of stitch
symbols = 1 double treble crochet around the chain stitch/chain stitch space
symbols = Work a bubble around the chain stitch space as follows: work 1 treble crochet, but wait with the last yarn over and pull through, work 3 double treble crochets around the same chain stitch space, but wait with the last yarn over and pull through on each of the treble crochets, work 1 treble crochet around the same chain stitch space, but when making the last pull through, pull the thread though all loops on the hook
symbols = increase 1 chain stitch space around this chain stitch space by working 2 chain stitch spaces as shown in diagram
symbols = from the right side: (1 treble crochet, 2 chain stitches, 1 treble crochet) in back loop of the same stitch. From the wrong side: (1 treble crochet, 2 chain stitches, 1 treble crochet) in front loop of the same stitch
symbols = start on this row, previous row has already been worked
symbols = increase on both sides of the marker thread on rows with arrow – see explanation in pattern!
symbols = work 3 chain stitches on beginning of row
symbols = work 1 chain stitch on beginning of row
symbols = work 4 chain stitches on beginning of row. Row ends with 1 double treble crochet in the last stitch on row
symbols = Work 2 chain stitches on beginning of row
symbols = 4 chain stitches
diagram
diagram
diagram
diagram
diagram

Each of our patterns has specific tutorial videos to help you.

Do you have a question? See a list of frequently asked questions (FAQ)

Knitting tension is what determines the final measurements of your work, and is usually measured per 10 x 10 cm. It is provided like so: number of stitches in width x number of rows in height - eg: 19 stitches x 26 rows = 10 x 10 cm.

The knitting tension is very individual; some people knit/crochet loosely while others work tightly. You adjust the knitting tension with the needle size, which is why the suggested needle size is only meant as a guide! You need to adjust this (up or down) to ensure that YOUR knitting tension matches the knitting tension provided in the pattern. If you work with a different knitting tension than provided you will have a different yarn consumption, and your work will have different measurements than what the pattern suggests.

The knitting tension also determines which yarns can replace each other. As long as you achieve the same knitting tension you can replace one yarn with another.

See DROPS lesson: How to measure your tension/gauge

See DROPS video: How to make a gauge tension swatch

The required amount of yarn is provided in grams, eg: 450 g. To calculate how many balls you’ll need you first need to know how many grams are in 1 ball (25g, 50g or 100g). This information is available if you click on the individual yarn quality on our pages. Divide the amount required with the amount of each ball. For example, if each ball is 50g (the most common amount), the calculation will be as follows: 450 / 50 = 9 balls.

The important thing when changing from one yarn to another is that the knitting/crochet tension remains the same. This is so that the measurements of the finished piece will be the same as on the sketch provided. It is easier to achieve the same knitting tension using yarns from the same yarn group. It is also possible to work with multiple strands of a thinner yarn to achieve the knitting tension of a thicker one. Please try our yarn converter. We recommend you to always work a test swatch.

Please NOTE: when changing yarn the garment might have a different look and feel to the garment in the photo, due to individual properties and qualities of each yarn.

See DROPS lesson: Can I use a different yarn than the one mentioned in the pattern?

All our yarns are categorised into yarn groups (from A to F) according to thickness and knitting tension – group A contains the thinnest yarns and group F the thickest. This makes it easier for you to find alternative yarns to our patterns, should you wish to switch yarn. All yarns within the same group have a similar knitting tension and can easily replace each other. However, different yarn qualities have different structures and properties which will give the finished work a unique look and feel.

Click here for an overview of the yarns in each yarn group

At the top of all our patterns you’ll find a link to our yarn calculator, which is a helpful tool should you wish to use a different yarn than suggested. By filling in the yarn quality you wish to replace, the amount (in your size) and number of strands, the calculator will present good alternative yarns with the same knitting tension. Additionally it will tell you how much you’ll require in the new qualities and whether you’ll need to work with multiple strands. Most skeins are 50g (some are 25g or 100g).

If the pattern is worked with multiple colours, every colour will have to be calculated separately. Similarly, if the pattern is worked with several strands of different yarns (for example 1 strand Alpaca and 1 strand Kid-Silk) you will have to find alternatives for each, individually.

Click here to see our yarn calculator

Since different yarns have different qualities and textures we have chosen to keep the original yarn in our patterns. However, you can easily find options among our available qualities by using our yarn calculator, or simply pick a yarn from the same yarn group.

It is possible that some retailers still have discontinued yarns in stock, or that someone has a few skeins at home that they would like to find patterns for.

The yarn calculator will provide both alternative yarn as well as required amount in the new quality.

If you think it's hard to decide what size to make, it can be a good idea to measure a garment you own already and like the size of. Then you can pick the size by comparing those measures with the ones available in the pattern's size chart.

You'll find the size chart at the bottom of the pattern.

See DROPS lesson: How to read size chart

The needle size provided in the pattern serves only as a guide, the important thing is to follow the knitting tension. And since knitting tension is very individual, you will have to adjust the needle size to ensure that YOUR tension is the same as in the pattern – maybe you’ll have to adjust 1, or even 2 needle sizes, up or down to achieve the correct tension. For this, we recommend that you work test swatches.

Should you work with a different knitting tension than the one provided, the measurements of the finished garment might deviate from the measurement sketch.

See DROPS lesson: How to measure your tension/gauge

See DROPS video: How to make a tension/gauge swatch

Working a garment top-down provides more flexibility and room for personal adjustment. For example it is easier to try the garment on while working, as well as making adjustments to length of yoke and shoulder caps.

The instructions are carefully explaining every step, in the correct order. Diagrams are adjusted to the knitting direction and are worked as usual.

The diagram depicts all rows/rounds, and every stitch seen from the right side. It is read from bottom to top, from right to left. 1 square = 1 stitch.

When working back and forth, every other row is worked from the right side and every other row is worked from the wrong side. When working from the wrong side, the diagram will have to be worked reversed: from left to right, knit stitches are purled, purl stitches are knit etc.

When working in the round every round is worked from the right side and the diagram are worked from right to left on all rounds.

See DROPS lesson: How to read knitting diagrams

The diagram depicts all rows/rounds, and every stitch seen from the right side. It is worked from bottom to top, from right to left.

When working back and forth every other row is worked from the right side: from right to left and every other row is worked from the wrong side: from left to right.

When working in the round, every row in the diagram are worked from the right side, from right to left.

When working a circular diagram you start in the middle and work your way outwards, counter clockwise, row by row.

The rows usually start with a given number of chain stitches (equivalent to the height of the following stitch), this will either be depicted in the diagram or explained in the pattern.

See DROPS lesson: How to read crochet diagrams

Instructions for working several diagrams after each other on the same row/round, will often be written like so: “work A.1, A.2, A.3 a total of 0-0-2-3-4 times". This means you work A.1 once, then A.2 is worked once, and A.3 is repeated (in width) the number of times provided for your size – in this case like so: S = 0 times, M = 0 times, L=2 times, XL= 3 times and XXL = 4 times.

The diagrams are worked as usual: begin with the first row in A.1, then work the first row in A.2 etc.

See DROPS lesson: How to read knitting diagrams

See DROPS lesson: How to read crochet diagrams

The total width of the garment (from wrist-to-wrist) will be larger in the larger sizes, despite the actual sleeves being shorter. The larger sizes have longer sleeve caps and wider shoulders, so there will be a good fit in all sizes.

The measurement sketch/schematic drawing provides information regarding the full length of the garment. If it’s a jumper or a jacket the length is measured from the highest point on the shoulder closest to the neckline, and straight down to the bottom of the garment. It is NOT measured from the tip of shoulder. Similarly, the length of yoke is measured from the highest point on the shoulder and down to where yoke is split into body and sleeves.

On a jacket measures are never taken along bands, unless specifically stated. Always measure inside band stitches when measuring the length.

See DROPS lesson: How to read a schematic drawing

Diagrams are often repeated on the round or in height. 1 repeat is the diagram the way it appears in the pattern. If it says to work 5 repeats of A.1 in the round, then you work A.1 a total of 5 times after/next to each other in the round. If it says to work 2 repeats of A.1 vertically/in height you work the entire diagram once, then begin again at the start and work the entire diagram one more time.

Chain stitches are slightly narrower than other stitches and to avoid working the cast-on edge too tight, we simply chain more stitches to begin with. The stitch count will be adjusted on the following row to fit the pattern and measurement sketch.

The rib edge is more elastic and will contract slightly compared to, for example, stocking stitch. By increasing before the rib edge, you avoid a visible difference in width between the rib edge and the rest of the body.

It’s very easy to cast off too tightly, and by making yarn overs while casting off (and simultaneously casting these off) you avoid a too tight cast off edge.

See DROPS video: How to bind off with yarn overs (yo)

To achieve an even increase (or decrease) you can increase on, for example: every 3rd and 4th row alternately, like so: work 2 rows and increase on the 3rd row, work 3 rows and increase on the 4th. Repeat this until the increase is complete.

See DROPS lesson: Increase or decrease 1 st on every 3rd and 4th row alternately

Should you prefer to work in the round instead of back and forth, you may of course adjust the pattern. You’ll need to add steeks mid-front (usually 5 stitches), and follow the instructions. When you would normally turn and work from the wrong side, simply work across the steek and continue in the round. At the end you’ll cut the piece open, pick up stitches to work bands, and cover the cut edges.

See DROPS video: How to knit steeks and cut open

Should you prefer to work back and forth instead of in the round, you may of course adjust the pattern so you work the pieces separately and then assemble them at the end. Divide the stitches for the body in 2, add 1 edge stitch in each side (for sewing) and work the front and back pieces separately.

See DROPS lesson: Can I adapt a pattern for circular needles into straight needles?

Pattern repeats can vary slightly in the different sizes, in order to get the correct proportions. If you’re not working the exact same size as the garment in the photo, yours might deviate slightly. This has been carefully developed and adjusted so that the complete impression of the garment is the same in all sizes.

Make sure to follow instructions and diagrams for your size!

If you have found a pattern you like which is available in women’s size it’s not very difficult to convert it to men’s size. The biggest difference will be the length of sleeves and body. Start working on the women size that you think would fit across the chest. The additional length will be worked right before you cast off for the armhole/sleeve cap. If the pattern is worked top-down you can add the length right after the armhole or before the first decrease on sleeve.

Regarding additional yarn amount, this will depend on how much length you add, but it is better with a skein too many than too few.

All yarns will have excess fibres (from production) that might come off as lint or shedding. Brushed yarns (ie hairier yarns) have more of these loose, excess fibres, causing more shedding.

Shedding also depends on what is worn under or over the garment, and whether this pulls at the yarn fibres. It’s therefore not possible to guarantee that there will be no shedding

Below are some tips on how to get the best result when working with hairier yarns:

1. When the garment is finished (before you wash it) shake it vigorously so the looser hairs come off. NOTE: do NOT use a lint roller, brush or any method that pulls at the yarn.

2. Place the garment in a plastic bag and put it in your freezer - the temperature will cause the fibres to become less attached to each other, and excess fibres will come off easier.

3. Leave in the freezer for a few hours before taking it out and shaking it again.

4. Wash the garment according to the instructions on the yarn label.

Pilling is a natural process that happens to even the most exclusive of fibers. It's a natural sign of wear and tear that is hard to avoid, and that is most visible in high friction areas of your garment like a sweater's arms and cuffs.

You can make your garment look as new by removing the pilling, using a fabric comb or a pill/lint remover.

Still can't find the answer you need? Then scroll down and leave your question so one of our experts can try to help you. This will be done normally within 5 to 10 working days.
In the meantime, you can read the questions and answers that others have left to this pattern or join the DROPS Workshop on Facebook to get help from fellow knitters/crocheters!

You might also like...

Post a comment to pattern DROPS 190-1

We would love to hear what you have to say about this pattern!

If you want to leave a question, please make sure you select the correct category in the form below, to speed up the answering process. Required fields are marked *.

Comments / Questions (24)

country flag Mari Cruz wrote:

Hola,muchas gracias por dar la oportunidad de hacer vuestras maravillas en crochet,me gustaría si puede ser que me mandarais el patrón del chal Drop 190 todo junto,me es muy difícil sacarlo todo por separado,os agradecería enormemente si me pudierais poner el patrón entero del chal o bien me lo enviarais yo lo pagaría,el porte,muchas gracias y un abrazo,espero vuestra contestación.

22.03.2019 - 02:43

DROPS Design answered:

Hola Mari Cruz. No hacemos envíos personalizados. Puedes acudir a una tienda especializada de la marca Drops para que te ayuden con los diagramas.

13.04.2019 - 21:00

country flag Tina wrote:

Ik wil deze omslagdoek maken in 1 kleur. Kun je mij zeggen hoeveel garen ik dan nodig heb. Alvast bedankt

16.02.2019 - 20:48

DROPS Design answered:

Dag Tina,

Dat is niet precies bekend, maar op basis van andere omslagdoeken van vergelijkbaar garen schat ik in dat je ongeveer 500 gram nodig hebt als je hem in één kleur maakt.

17.02.2019 - 19:24

country flag Yolande wrote:

Dank u voor het patroon, ik wil het graag maken in wol, voor de winter met dezelfde haaknaald dikte moet ik dan ergens rekening mee houden tijdens het maken? Vriendelijke groet yolande

02.11.2018 - 20:46

DROPS Design answered:

Dag Yolande,

Deze omslagdoek kan ook prima met wol gemaakt worden. DROPS Karisma of DROPS Lima is hier bijvoorbeeld wel geschikt voor want dit heeft ongeveer dezelfde garendikte.

04.11.2018 - 20:18

country flag Hengie Hengelmann wrote:

Bonjour tout au début des explis il est indiqué de commencer le rang par une étoile je ne comprends pas ce que ça veut dire merci pour votre aide

04.10.2018 - 12:53

DROPS Design answered:

Bonjour Mme Hengelmann, vous commencez les diagrammes par le rang avec une étoile = en bas à droite des diagrammes, et vous lisez le diagramme de droite à gauche sur l'endroit (de gauche à droite sur l'envers). Retrouvez ici en images et en vidéos comment crocheter ce châle. Bon crochet!

04.10.2018 - 13:13

country flag 🇪🇸 Eva wrote:

Estoy de acuerdo con el primer comentario. El diseño es precioso pero muy complicado para seguir. Pasa lo mismo con cualquiera de vuestros diseños, por favor, cambiar el sistema. Gracias

01.09.2018 - 18:11

Noa wrote:

Hi, although this is a lovely shawl and I am an experienced crochetier, all your patterns are so difficult to follow. Dividing the pattern diagram vertically instead of horizontally just makes it hard for no reason!

17.08.2018 - 09:05

Silvia wrote:

Preciosismo!!!!

28.07.2018 - 21:36

country flag Veronica wrote:

Termine de hacerlo hace un dia y estoy encantada de como ha quedado!!!!! La textura y el tamaño lo hacen único!!!!!! Felicitaciones al equipo de diseño por hacer prendas tan originales!!!!!

27.07.2018 - 18:47

country flag Dehorter wrote:

Très joli

05.01.2018 - 14:55

country flag Michelle wrote:

Love the different colors and stitches. Great way to use up left over yarns.

29.12.2017 - 04:37