DROPS Cotton Light
DROPS Cotton Light
50% Cotton, 50% Polyester
from 1.15 £ /50g
Get the yarn to make this pattern from 6.90£.

The yarn cost is calculated from the pattern’s smallest size and the yarn’s cheapest product type. Looking for an even better price? You might find it on the DROPS Deals!

DROPS SS24

Ipanema

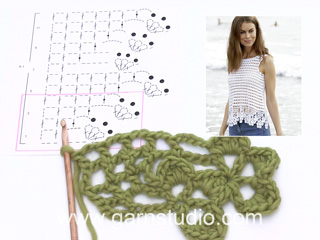
Crocheted top with clover and lace pattern. The piece is worked in DROPS Cotton Light. Sizes S - XXXL.

DROPS 190-2
DROPS Design: Pattern no cl-085
Yarn group B
----------------------------------------------------------
Sizes: S - M - L - XL - XXL - XXXL
Materials:
DROPS COTTON LIGHT from Garnstudio
300-350-400-400-450-500 g colour 02, white

The piece can also be crocheted with yarn from:
"Alternative yarn (Yarn group B)" – see link below.

DROPS CROCHET HOOK SIZE 3.5 MM – or the size needed to get 20 treble crochets on 10 cm in width and 10 rows on 10 cm in height.

DROPS MOTHER OF PEARL BUTTONS, Arched (white) NO 521:1 item in all sizes.
---------------------------------------------------------

-------------------------------------------------------

Alternative Yarn – See how to change yarns here
Yarn Groups A to F – Use the same pattern and change the yarn here
Yarn usage using an alternative yarn – Use our yarn converter here

-------------------------------------------------------

DROPS Cotton Light
DROPS Cotton Light
50% Cotton, 50% Polyester
from 1.15 £ /50g
Get the yarn to make this pattern from 6.90£.

The yarn cost is calculated from the pattern’s smallest size and the yarn’s cheapest product type. Looking for an even better price? You might find it on the DROPS Deals!

Pattern instructions

NOTE: This pattern is written in British English. All measurements in charts are in cm. For conversion from cm to inches - click here. There are different terms for crocheting in British and American English. If this pattern includes crochet, click for "crochet terms" here. For this pattern in American English, please click here.
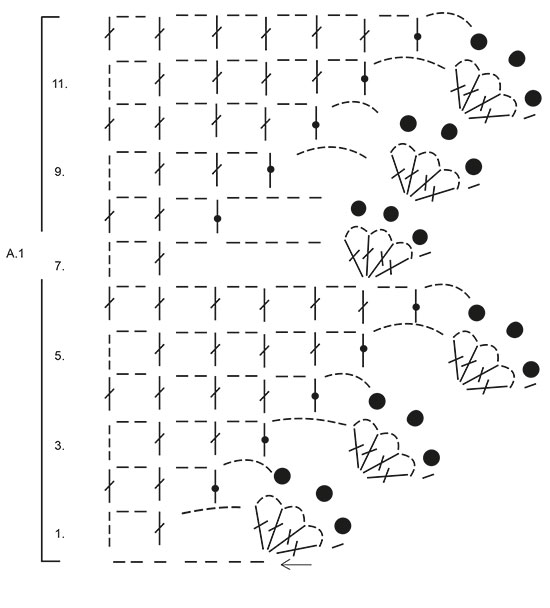
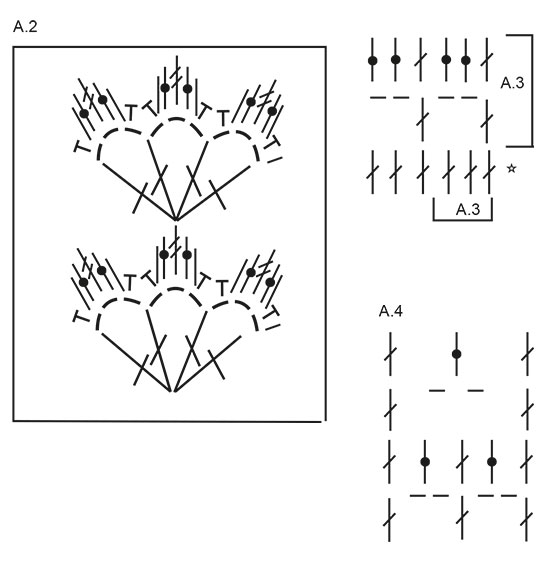
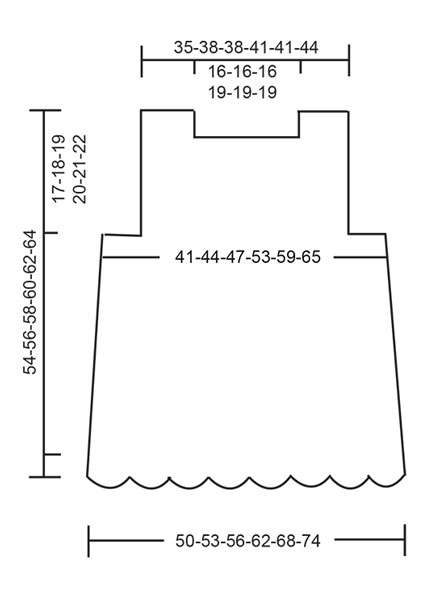
INFORMATION FOR THE PATTERN:

PATTERN:
See diagrams A.1 to A.4.

CROCHET INFO-1:
The first row on each clover leaf (= 1 treble crochet, 3 chain stitches, 1 treble crochet, 3 chain stitches, 1 treble crochet, 3 chain stitches, 1 treble crochet in the same treble crochet) is worked in the middle double treble crochet of the previous clover leaf - see A.2.

CROCHET INFO-2:
The first treble crochet at the beginning of the row/round is replaced by 3 chain stitches. Finish the row/round with 1 slip stitch in the 3rd chain stitch at the beginning of the row/round. The first double crochet at the beginning of the row is replaced by 1 chain stitch.
----------------------------------------------------------

TOP:
First the clover pattern is worked from side to side at the bottom, then the top is worked upwards in the round as far as the armholes. Here the piece is divided and the front and back pieces are worked separately.

Work 12 chain stitches (including 5 chain stitches to turn) with Cotton Light and hook size 3.5 mm. Read CROCHET INFO-1! Continue by working according to A.1 until you have worked 1 repeat in height. Then repeat rows 7-12 until the piece measures approx. 100-106-112-124-136-148 cm – finish after row 12. Sew the clover edge together to make a ring (seam = side of the top).

Then continue working upwards in the round, THE PIECE IS NOW MEASURED FROM HERE! Crochet up 198-210-222-246-270-294 treble crochets around the treble crochets from the long-side in A.1. Then work according to A.3 – read CROCHET INFO-2. Continue this pattern upwards. Insert 2 marker threads in the piece, 1 at the beginning of the round and 1 after 99-105-111-123-135-147 treble crochets (= sides). When the piece measures 2 cm decrease 1 treble crochet group (= 3 treble crochets or 1 treble crochet + 2 chain stitches) in each side, decrease before both marker threads. Diagram A.4 shows how to decrease in the pattern. Repeat the decrease upwards every 4 cm; decrease alternately before and after the marker threads in the sides, i.e. the first time you decrease 1 treble crochet group before the marker threads, the second time you decrease 1 treble crochet group after both marker threads. Decrease a total of 6 times in each side of the top = 162-174-186-210-234-258 treble crochets/chain stitches.

When the piece measures 25-26-27-28-29-30 cm, adjust so that the next round to be worked is the first round in A.3, divide the piece for the front and back pieces. Cut the strand.

FRONT PIECE:
Skip the first 6-6-9-12-18-21 treble crochets, work A.3 over the next 70-76-76-82-82-88 treble crochets (= 23-25-25-27-27-29 repeats of A.3 + 1 treble crochet). Turn and work back. Continue this pattern upwards. When the piece measures 36-38-40-42-44-46 cm work over just the first 19-22-22-22-22-25 treble crochets/chain stitches on the row = right shoulder. Continue until the piece measures 42-44-46-48-50-52 cm, cut and fasten the strand. Work the left shoulder in the same way, i.e. work over just the last 19-22-22-22-22-25 treble crochets/chain stitches on the row. The 32-32-32-38-38-38 treble crochets/chain stitches not worked = neck. The piece measures a total of 54-56-58-60-62-64 cm.

BACK PIECE:
Skip the first 11-11-17-23-35-41 treble crochets after the front piece, work A.3 over the next 70-76-76-82-82-88 treble crochets (= 23-25-25-27-27-29 repeats of A.3 + 1 treble crochet). Turn and work back (there are now 11-11-17-23-35-41 treble crochets in each side which are not worked (= armholes). Continue A.3 upwards. When the piece measures 30-32-34-36-38-40 cm divide the back piece so that you have a split mid back.

RIGHT BACK PIECE:
Now work over just the first 35-38-38-41-41-44 treble crochets; work A.3 over the first 33-36-36-39-39-42 treble crochets/chain stitches and finish with 2 treble crochets towards mid back. When the piece measures 36-38-40-42-44-46 cm work over just the first 19-22-22-22-22-25 treble crochets/chain stitches on the row = right shoulder. The 16-16-16-19-19-19 treble crochets not worked = neck. Continue until the piece measures 42-44-46-48-50-52 cm, cut and fasten the strand.

LEFT BACK PIECE:
Now work over just the last 35-38-38-41-41-44 treble crochets; work 1 treble crochet towards mid back, work A.3 over the next 33-36-36-39-39-42 treble crochets/chain stitches and finish with 1 treble crochet towards the side. When the piece measures 36-38-40-42-44-46 cm work over just the last 19-22-22-22-22-25 treble crochets/chain stitches on the row = left shoulder. The 16-16-16-19-19-19 treble crochets not worked = neck. Continue until the piece measures 42-44-46-48-50-52 cm, cut and fasten the strand.

ASSEMBLY:
Sew the shoulder seams.

CROCHET EDGE AROUND THE ARMHOLES: 
Start at bottom of armhole. Work 1 double crochet,* skip forward approx. 2 cm, work 7 treble crochets around the next treble crochet, skip forward approx. 2 cm, work 1 double crochet around the next treble crochet *, repeat from *-* and finish with 1 slip stitch in the double crochet at the beginning of the round. Work in the same way around the other armhole.

CROCHET EDGE AROUND THE NECK:
Start mid back. Work 1 double crochet, * 3 chain stitches, skip forward approx. 1 cm, work 1 double crochet *, repeat from *-*.

ASSEMBLY -2:
Sew a button to the top of the split mid back; the button is buttoned through 2 treble crochets.

Diagram

symbols = chain stitch
symbols = treble crochet in the treble crochet/chain stitch
symbols = around the chain-space work as follows: 1 double crochet, 1 half treble crochet, 1 treble crochet, 1 double treble crochet, 1 treble crochet, 1 half treble crochet, 1 double crochet
symbols = half treble crochet around the chain-space
symbols = double treble crochet around the chain-space
symbols = double crochet around the chain-space
symbols = treble crochet around the chain-space
symbols = this round has already been worked
diagram
diagram
diagram
Do you have a question? See a list of frequently asked questions (FAQ)

Knitting tension is what determines the final measurements of your work, and is usually measured per 10 x 10 cm. It is provided like so: number of stitches in width x number of rows in height - eg: 19 stitches x 26 rows = 10 x 10 cm.

The knitting tension is very individual; some people knit/crochet loosely while others work tightly. You adjust the knitting tension with the needle size, which is why the suggested needle size is only meant as a guide! You need to adjust this (up or down) to ensure that YOUR knitting tension matches the knitting tension provided in the pattern. If you work with a different knitting tension than provided you will have a different yarn consumption, and your work will have different measurements than what the pattern suggests.

The knitting tension also determines which yarns can replace each other. As long as you achieve the same knitting tension you can replace one yarn with another.

See DROPS lesson: How to measure your tension/gauge

See DROPS video: How to make a gauge tension swatch

The required amount of yarn is provided in grams, eg: 450 g. To calculate how many balls you’ll need you first need to know how many grams are in 1 ball (25g, 50g or 100g). This information is available if you click on the individual yarn quality on our pages. Divide the amount required with the amount of each ball. For example, if each ball is 50g (the most common amount), the calculation will be as follows: 450 / 50 = 9 balls.

The important thing when changing from one yarn to another is that the knitting/crochet tension remains the same. This is so that the measurements of the finished piece will be the same as on the sketch provided. It is easier to achieve the same knitting tension using yarns from the same yarn group. It is also possible to work with multiple strands of a thinner yarn to achieve the knitting tension of a thicker one. Please try our yarn converter. We recommend you to always work a test swatch.

Please NOTE: when changing yarn the garment might have a different look and feel to the garment in the photo, due to individual properties and qualities of each yarn.

See DROPS lesson: Can I use a different yarn than the one mentioned in the pattern?

All our yarns are categorised into yarn groups (from A to F) according to thickness and knitting tension – group A contains the thinnest yarns and group F the thickest. This makes it easier for you to find alternative yarns to our patterns, should you wish to switch yarn. All yarns within the same group have a similar knitting tension and can easily replace each other. However, different yarn qualities have different structures and properties which will give the finished work a unique look and feel.

Click here for an overview of the yarns in each yarn group

At the top of all our patterns you’ll find a link to our yarn calculator, which is a helpful tool should you wish to use a different yarn than suggested. By filling in the yarn quality you wish to replace, the amount (in your size) and number of strands, the calculator will present good alternative yarns with the same knitting tension. Additionally it will tell you how much you’ll require in the new qualities and whether you’ll need to work with multiple strands. Most skeins are 50g (some are 25g or 100g).

If the pattern is worked with multiple colours, every colour will have to be calculated separately. Similarly, if the pattern is worked with several strands of different yarns (for example 1 strand Alpaca and 1 strand Kid-Silk) you will have to find alternatives for each, individually.

Click here to see our yarn calculator

Since different yarns have different qualities and textures we have chosen to keep the original yarn in our patterns. However, you can easily find options among our available qualities by using our yarn calculator, or simply pick a yarn from the same yarn group.

It is possible that some retailers still have discontinued yarns in stock, or that someone has a few skeins at home that they would like to find patterns for.

The yarn calculator will provide both alternative yarn as well as required amount in the new quality.

If you think it's hard to decide what size to make, it can be a good idea to measure a garment you own already and like the size of. Then you can pick the size by comparing those measures with the ones available in the pattern's size chart.

You'll find the size chart at the bottom of the pattern.

See DROPS lesson: How to read size chart

The needle size provided in the pattern serves only as a guide, the important thing is to follow the knitting tension. And since knitting tension is very individual, you will have to adjust the needle size to ensure that YOUR tension is the same as in the pattern – maybe you’ll have to adjust 1, or even 2 needle sizes, up or down to achieve the correct tension. For this, we recommend that you work test swatches.

Should you work with a different knitting tension than the one provided, the measurements of the finished garment might deviate from the measurement sketch.

See DROPS lesson: How to measure your tension/gauge

See DROPS video: How to make a tension/gauge swatch

Working a garment top-down provides more flexibility and room for personal adjustment. For example it is easier to try the garment on while working, as well as making adjustments to length of yoke and shoulder caps.

The instructions are carefully explaining every step, in the correct order. Diagrams are adjusted to the knitting direction and are worked as usual.

The diagram depicts all rows/rounds, and every stitch seen from the right side. It is read from bottom to top, from right to left. 1 square = 1 stitch.

When working back and forth, every other row is worked from the right side and every other row is worked from the wrong side. When working from the wrong side, the diagram will have to be worked reversed: from left to right, knit stitches are purled, purl stitches are knit etc.

When working in the round every round is worked from the right side and the diagram are worked from right to left on all rounds.

See DROPS lesson: How to read knitting diagrams

The diagram depicts all rows/rounds, and every stitch seen from the right side. It is worked from bottom to top, from right to left.

When working back and forth every other row is worked from the right side: from right to left and every other row is worked from the wrong side: from left to right.

When working in the round, every row in the diagram are worked from the right side, from right to left.

When working a circular diagram you start in the middle and work your way outwards, counter clockwise, row by row.

The rows usually start with a given number of chain stitches (equivalent to the height of the following stitch), this will either be depicted in the diagram or explained in the pattern.

See DROPS lesson: How to read crochet diagrams

Instructions for working several diagrams after each other on the same row/round, will often be written like so: “work A.1, A.2, A.3 a total of 0-0-2-3-4 times". This means you work A.1 once, then A.2 is worked once, and A.3 is repeated (in width) the number of times provided for your size – in this case like so: S = 0 times, M = 0 times, L=2 times, XL= 3 times and XXL = 4 times.

The diagrams are worked as usual: begin with the first row in A.1, then work the first row in A.2 etc.

See DROPS lesson: How to read knitting diagrams

See DROPS lesson: How to read crochet diagrams

The total width of the garment (from wrist-to-wrist) will be larger in the larger sizes, despite the actual sleeves being shorter. The larger sizes have longer sleeve caps and wider shoulders, so there will be a good fit in all sizes.

The measurement sketch/schematic drawing provides information regarding the full length of the garment. If it’s a jumper or a jacket the length is measured from the highest point on the shoulder closest to the neckline, and straight down to the bottom of the garment. It is NOT measured from the tip of shoulder. Similarly, the length of yoke is measured from the highest point on the shoulder and down to where yoke is split into body and sleeves.

On a jacket measures are never taken along bands, unless specifically stated. Always measure inside band stitches when measuring the length.

See DROPS lesson: How to read a schematic drawing

Diagrams are often repeated on the round or in height. 1 repeat is the diagram the way it appears in the pattern. If it says to work 5 repeats of A.1 in the round, then you work A.1 a total of 5 times after/next to each other in the round. If it says to work 2 repeats of A.1 vertically/in height you work the entire diagram once, then begin again at the start and work the entire diagram one more time.

Chain stitches are slightly narrower than other stitches and to avoid working the cast-on edge too tight, we simply chain more stitches to begin with. The stitch count will be adjusted on the following row to fit the pattern and measurement sketch.

The rib edge is more elastic and will contract slightly compared to, for example, stocking stitch. By increasing before the rib edge, you avoid a visible difference in width between the rib edge and the rest of the body.

It’s very easy to cast off too tightly, and by making yarn overs while casting off (and simultaneously casting these off) you avoid a too tight cast off edge.

See DROPS video: How to bind off with yarn overs (yo)

To achieve an even increase (or decrease) you can increase on, for example: every 3rd and 4th row alternately, like so: work 2 rows and increase on the 3rd row, work 3 rows and increase on the 4th. Repeat this until the increase is complete.

See DROPS lesson: Increase or decrease 1 st on every 3rd and 4th row alternately

Should you prefer to work in the round instead of back and forth, you may of course adjust the pattern. You’ll need to add steeks mid-front (usually 5 stitches), and follow the instructions. When you would normally turn and work from the wrong side, simply work across the steek and continue in the round. At the end you’ll cut the piece open, pick up stitches to work bands, and cover the cut edges.

See DROPS video: How to knit steeks and cut open

Should you prefer to work back and forth instead of in the round, you may of course adjust the pattern so you work the pieces separately and then assemble them at the end. Divide the stitches for the body in 2, add 1 edge stitch in each side (for sewing) and work the front and back pieces separately.

See DROPS lesson: Can I adapt a pattern for circular needles into straight needles?

Pattern repeats can vary slightly in the different sizes, in order to get the correct proportions. If you’re not working the exact same size as the garment in the photo, yours might deviate slightly. This has been carefully developed and adjusted so that the complete impression of the garment is the same in all sizes.

Make sure to follow instructions and diagrams for your size!

If you have found a pattern you like which is available in women’s size it’s not very difficult to convert it to men’s size. The biggest difference will be the length of sleeves and body. Start working on the women size that you think would fit across the chest. The additional length will be worked right before you cast off for the armhole/sleeve cap. If the pattern is worked top-down you can add the length right after the armhole or before the first decrease on sleeve.

Regarding additional yarn amount, this will depend on how much length you add, but it is better with a skein too many than too few.

All yarns will have excess fibres (from production) that might come off as lint or shedding. Brushed yarns (ie hairier yarns) have more of these loose, excess fibres, causing more shedding.

Shedding also depends on what is worn under or over the garment, and whether this pulls at the yarn fibres. It’s therefore not possible to guarantee that there will be no shedding

Below are some tips on how to get the best result when working with hairier yarns:

1. When the garment is finished (before you wash it) shake it vigorously so the looser hairs come off. NOTE: do NOT use a lint roller, brush or any method that pulls at the yarn.

2. Place the garment in a plastic bag and put it in your freezer - the temperature will cause the fibres to become less attached to each other, and excess fibres will come off easier.

3. Leave in the freezer for a few hours before taking it out and shaking it again.

4. Wash the garment according to the instructions on the yarn label.

Pilling is a natural process that happens to even the most exclusive of fibers. It's a natural sign of wear and tear that is hard to avoid, and that is most visible in high friction areas of your garment like a sweater's arms and cuffs.

You can make your garment look as new by removing the pilling, using a fabric comb or a pill/lint remover.

Still can't find the answer you need? Then scroll down and leave your question so one of our experts can try to help you. This will be done normally within 5 to 10 working days.
In the meantime, you can read the questions and answers that others have left to this pattern or join the DROPS Workshop on Facebook to get help from fellow knitters/crocheters!

You might also like...

Post a comment to pattern DROPS 190-2

We would love to hear what you have to say about this pattern!

If you want to leave a question, please make sure you select the correct category in the form below, to speed up the answering process. Required fields are marked *.

Comments / Questions (40)

country flag Barbara E Goldstein wrote:

I am having difficulty with the A.1 pattern. I have done the first set of crochets but don\'t know where to go from here. Is there a better way to describe how this area is crocheted?\r\nThanks

08.08.2018 - 20:07

DROPS Design answered:

Dear Mrs Goldstein, after you have worked A.1 one time in height (= to row 12 included), start again with row 7 (read row 7 from the left towards the right) and repeat row 7 to 12 until measurement for your size, but make sure to finish after a row 12. Happy crocheting!

09.08.2018 - 08:36

country flag Marian wrote:

Haciéndolo así pasamos de 7 puntos a 3, es decir, se disminuyen 4 puntos no 3. Al hacer esto 6 veces a cada lado disminuimos 48 en total y nos quedamos con 174 puntos una vez finalizamos las disminuciones no 186 como dice. Algo no está correcto o no acabo de entenderlo.

31.07.2018 - 12:52

DROPS Design answered:

Hola Marian. Mandé tu pregunta al departamento de diseño para que revisen el diagrama. Cuando, por ejemplo, te toca disminuir en la fila de 1 punto alto + 2 puntos de cadeneta tienes que saltar 5 puntos altos de la vuelta anterior, es decir, trabajas 1 punto alto en el punto alto de la vuelta anterior + 2 puntos de cadeneta, saltas 5 puntos altos ( 3 puntos altos de un grupo y 2 puntos altos que sustituyen 2 puntos de cadeneta ) y trabajas el siguiente punto alto en el sig punto alto. El arco queda más grande por eso se hacen las disminuciones a cada lado en modo alterno.

07.08.2018 - 21:16

country flag Marian wrote:

Buenos días: No entiendo cómo hacer las disminuciones. El gráfico no está nada claro ya que no disminuye grupos de 3 punto o 1 punto y 2 cadenetas. ¿Me lo puedes aclarar? Muchas gracias

23.07.2018 - 11:55

DROPS Design answered:

Hola Marian. El diagrama A.4 te muestra como se trabajan las disminuciones: Fila 1: 1 p.a., 2 p.de cad., 1 p.a., 2 p.de cad. 1 p.a.(= 7 pts) Fila 2: 5 p.a. (= 5 pts) Fila 3: 1p.a., 2 p.de cad., 1 p.a. (= 4 pts) Fila 4: 3 p.a. (= 3 pts)

31.07.2018 - 12:28

country flag Gunvor Madsen wrote:

Det drejer sig om hvordan man laver indtagningerne. På diagram A4 er der kun vist 2 masker i dtaget på række nr 2. Skal man så bare tage 1 maske ind de sidste 3 gange man hækler A3 inden siden? Hvad så hvis man laver en række med luftmaske buer, skal man så springe 3 masker over de sidste 3 gange man hækler A3 inden siden? A4 synes jeg man starter med 2 “huller” og ,an slutter med 2 “huller”. Der er ikke taget noget ind.....det er nok mig der forstår diagrammet forkert :-)

18.07.2018 - 19:24

country flag Severina Baini wrote:

Scusa voglio chiedere se i numeri che ci sono sul modello si riferiscono ai punti e di conseguenza anche alle taglie S,M,L ecc. \r\nGrazie

05.07.2018 - 11:49

DROPS Design answered:

Buongiorno Severina, i numeri separati dal trattino indicano le maglie per le diverse taglie. Buon lavoro!

05.07.2018 - 12:00

country flag Lone Bak Jensen wrote:

Har i denne opskrift der skal strikkes? På forhånd tak.

04.07.2018 - 10:30

DROPS Design answered:

Hei Lone. Nei, denne oppskriften finnes bare heklet dessverre. Om du vil ha strikkete topper med hullmønster kan du se på for eksempel 170-24 eller 188-22. Du kan også søke spesifikt med «hullmønster» for å få opp alle plaggene med dette. God fornøyelse.

06.07.2018 - 09:15

country flag Laura wrote:

Quanti gomitoli bisogna ordinare x una taglia m

29.06.2018 - 16:44

DROPS Design answered:

Buonasera Laura, per una taglia M servono 350g. Ogni gomitolo di Cotton Light è di 50g, per cui ne servono circa 7. Buon lavoro!

29.06.2018 - 21:12

country flag Maribel Muñoz wrote:

¿Realmente este modelo está tejido con Cotton Light? Estoy intentando hacerlo y es imposible conseguir la tensión indicada con este hilo, es demasiado grueso. He tratado de hacerlo con un ganchillo más fino, pero es muy difícil, el hilo se abre en hebras y se engancha todo el tiempo. ¿No sería Muskat, por ejemplo, un hilo más adecuado? Gracias.

18.06.2018 - 22:28

DROPS Design answered:

Hola Maribel. La tensión y el número de ganchillo son solo una recomendación. Tienes que hacer pruebas para encontrar la tensión adecuada para el modelo. Es cierto que este hilo tiene la tendencia a separarse debido a las características suaves y sedosas de las hebras y hay que tener cuidado trabajando con ganchillo. Si, puedes trabajar este modelo con Muskat. Los dos son del misma grupo de lanas y se sustituyen fácilmente.

23.06.2018 - 20:12

Camelia wrote:

Love this tank! Probably name it "Flower Lace Tank"?

28.12.2017 - 13:03

country flag Rumpelstiltzchen wrote:

Very nice combination of geometric and floral elements.

28.12.2017 - 11:20