DROPS Nepal
DROPS Nepal
65% Wool, 35% Alpaca
from 2.40 £ /50g
Get the yarn to make this pattern from 16.80£.

The yarn cost is calculated from the pattern’s smallest size and the yarn’s cheapest product type. Looking for an even better price? You might find it on the DROPS Deals!

DROPS SS24

Let's Party

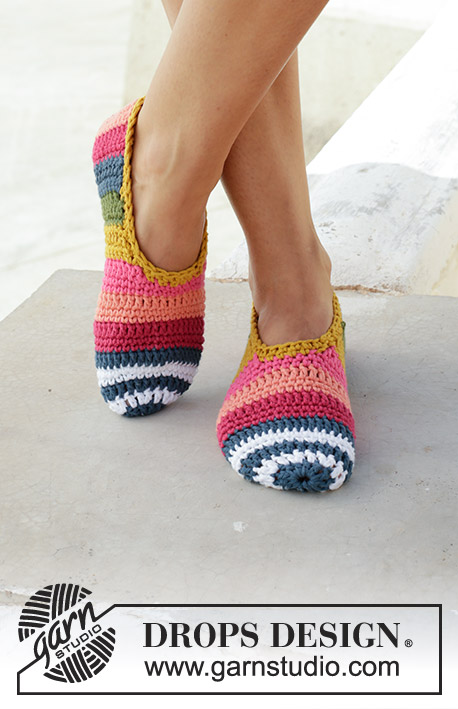
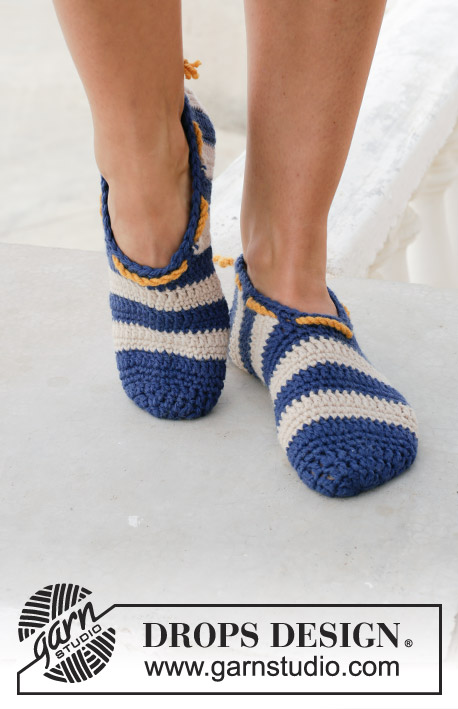
Crocheted slippers with multi-coloured pattern, fringes and pompoms. Size 35 to 43 Piece is crocheted in DROPS Nepal.

DROPS 189-35
DROPS design: Pattern ne-268
Yarn group C or A + A
----------------------------------------------------------
Size: 35/37 - 38/40 - 41/43
Foot length: 22 - 24 - 27 cm
Materials:
DROPS NEPAL from Garnstudio (belongs to yarn group C)
100-100-100 g colour 0206, light beige
50-50-50 g colour 2920, orange
50-50-50 g colour 2923, goldenrod
50-50-50 g colour 3620, red
50-50-50 g colour 8908, aqua blue
50-50-50 g colour 8909, coral

Piece can also be crocheted with yarn from:
“Alternative yarn (yarn group C)” - see link below.

DROPS HOOK SIZE 3.5 mm - or size needed to get 18 double crochets x approx. 20 rows = 10 cm in width and 10 cm vertically.
----------------------------------------------------------

-------------------------------------------------------

Alternative Yarn – See how to change yarns here
Yarn Groups A to F – Use the same pattern and change the yarn here
Yarn usage using an alternative yarn – Use our yarn converter here

-------------------------------------------------------

DROPS Nepal
DROPS Nepal
65% Wool, 35% Alpaca
from 2.40 £ /50g
Get the yarn to make this pattern from 16.80£.

The yarn cost is calculated from the pattern’s smallest size and the yarn’s cheapest product type. Looking for an even better price? You might find it on the DROPS Deals!

Pattern instructions

NOTE: This pattern is written in British English. All measurements in charts are in cm. For conversion from cm to inches - click here. There are different terms for crocheting in British and American English. If this pattern includes crochet, click for "crochet terms" here. For this pattern in American English, please click here.
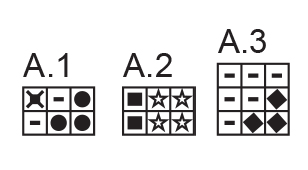
INFORMATION FOR PATTERN:

COLOUR PATTERN:
See diagrams A.1 to A.3.
Work diagrams in double crochets, i.e. 1 square in diagram = 1 double crochet.

COLOUR CHANGE:
When changing colour work as follows: Work last double crochet with first colour but wait with last pull through, switch to next colour and work last pull through with the new colour, then work next double crochet.
When working with two colours place strands for the colour not worked over stitches from previous round, work around the strands so that they are hidden inside the stitches, the strand will then follow in the round.

CROCHET INFO:
Replace first double crochet on round with 1 chain stitch, finish round with 1 slip stitch in first chain stitch
When working double crochets back and forth, replace first double crochet on row with 1 chain stitch, finish row with 1 double crochet in chain stitch from beginning of previous row.

DECREASE TIP:
Work 1 double crochet but wait with last pull through (= 2 loops on hook), then work next double crochet but on last pull through, pull thread through all 3 loops on hook = 1 double crochet decreased.
----------------------------------------------------------

SLIPPER:
Piece is worked in the round from toe and back to instep, then work back and forth to mid back on heel.

Work 4 chain stitches on hook size 3.5 mm with light beige and form 1 ring with 1 slip stitch in first chain stitch.
Then work as explained in the different sizes - read CROCHET INFO and REMEMBER THE CROCHET TENSION:

35/37:
ROUND 1: Work 6 double crochets in ring.
ROUND 2: Work 2 double crochets in every double crochet = 12 double crochets.
ROUND 3: Work 1 double crochet in every double crochet.
ROUND 4: * 1 double crochet in first double crochet, 2 double crochets in next double crochet *, repeat from *-* 6 times in total = 18 double crochets.
ROUND 5: * 1 double crochet in each of the first/next 2 double crochets, 2 double crochets in next double crochet *, repeat from *-* 6 times in total = 24 double crochets.
ROUND 6: Read COLOUR CHANGE and work A.1 with 1 double crochet in every double crochet (= 8 repetitions of 3 stitches).
ROUND 7: Work 2nd round in A.1. At the end of round there is 32 double crochets. Switch to light beige.
ROUND 8: Work 1 double crochet in every stitch.
ROUND 9: * 1 double crochet in each of the first/next 7 double crochets, 2 double crochets in next double crochet *, repeat from *-* 4 times in total = 36 double crochets. Increases are now done.
ROUND 10: Work 1 double crochet in every double crochet.
ROUNDS 11-12: Work A.2 with 1 double crochet in every double crochet (= 12 repetitions of 3 stitches). Switch to light beige when A.2 has been worked.
ROUNDS 13-15: Work 1 double crochet in every double crochet with light beige.
ROUNDS 16-18: Work A.3 with 1 double crochet in every double crochet (= 12 repetitions of 3 stitches). then work back and forth as explained below ALL SIZES.

38/40:
ROUND 1: Work 6 double crochets in ring.
ROUND 2: Work 2 double crochets in every double crochet = 12 double crochets.
ROUND 3: Work 1 double crochet in every double crochet.
ROUND 4: * 1 double crochet in first double crochet, 2 double crochets in next double crochet *, repeat from *-* 6 times in total = 18 double crochets.
ROUND 5: Work 1 double crochet in every double crochet.
ROUND 6: * 1 double crochet in each of the first/next 2 double crochets, 2 double crochets in next double crochet *, repeat from *-* 6 times in total = 24 double crochets.
ROUND 7: Work 1 double crochet in every double crochet.
ROUND 8: Read COLOUR CHANGE and work A.1 with 1 double crochet in every double crochet (= 8 repetitions of 3 stitches).
ROUND 9: Work 2nd round in A.1. At the end of round there is 32 double crochets. Switch to light beige.
ROUND 10: Work 1 double crochet in every stitch.
ROUND 11: * 1 double crochet in each of the first/next 7 double crochets, 2 double crochets in next double crochet *, repeat from *-* 4 times in total = 36 double crochets.
ROUND 12: Work 1 double crochet in every double crochet.
ROUND 13: * 1 double crochet in each of the first/next 5 double crochets, 2 double crochets in next double crochet *, repeat from *-* 6 times in total = 42 double crochets.
Increases are now done.
ROUNDS 14-15: Work A.2 with 1 double crochet in every double crochet (= 14 repetitions of 3 stitches). Switch to light beige when A.2 has been worked.
ROUNDS 16-19: Work 1 double crochet in every double crochet with light beige.
ROUNDS 20-22: Work A.3 with 1 double crochet in every double crochet (= 14 repetitions of 3 stitches). then work back and forth as explained below ALL SIZES.

41/43:
ROUND 1: Work 5 double crochets in ring.
ROUND 2: Work 2 double crochets in every double crochet = 10 double crochets.
ROUND 3: Work 1 double crochet in every double crochet.
ROUND 4: * 1 double crochet in first double crochet, 2 double crochets in next double crochet *, repeat from *-* 5 times in total = 15 double crochets.
ROUND 5: Work 1 double crochet in every double crochet.
ROUND 6: * 1 double crochet in each of the first/next 2 double crochets, 2 double crochets in next double crochet *, repeat from *-* 5 times in total = 20 double crochets.
ROUND 7: Work 1 double crochet in every double crochet, but work 2 double crochets in last double crochet on round = 21 double crochets.
ROUND 8: Read COLOUR CHANGE and work A.1 with 1 double crochet in every double crochet (= 7 repetitions of 3 stitches).
ROUND 9: Work 2nd round in A.1. At the end of round there is 28 double crochets. Switch to light beige.
ROUND 10: Work 1 double crochet in every stitch.
ROUND 11: * 1 double crochet in each of the first/next 6 double crochets, 2 double crochets in next double crochet *, repeat from *-* 4 times in total = 32 double crochets.
ROUND 12: Work 1 double crochet in every double crochet.
ROUND 13: * 1 double crochet in each of the first/next 3 double crochets, 2 double crochets in next double crochet *, repeat from *-* 8 times in total = 40 double crochets.
ROUND 14: Work 1 double crochet in every double crochet.
ROUND 15: * 1 double crochet in each of the first/next 7 double crochets, 2 double crochets in next double crochet *, repeat from *-* 5 times in total = 45 double crochets.
Increases are now done.
ROUNDS 16-17: Work A.2 with 1 double crochet in every double crochet (= 15 repetitions of 3 stitches). Switch to light beige when A.2 has been worked.
ROUNDS 18-23: Work 1 double crochet in every double crochet with light beige.
ROUNDS 24-26: Work A.3 with 1 double crochet in every double crochet (= 15 repetitions of 3 stitches). then work back and forth as explained below ALL SIZES.

ALL SIZES:
There are now 36-42-45 double crochets on round and piece measures approx. 9-11-13 cm. If the piece measures less than this, work in the round with coral and 1 double crochet in every double crochet until correct measurements. Beginning of round = mid under foot. Fasten off.
Now work double crochets back and forth with light beige over the first 12-15-16 double crochets and last 12-15-16 double crochets on round (i.e. work over 24-30-32 double crochets in total and do not work over the remaining 12-12-13 middle double crochets on top of foot) - remember CROCHET INFO.
When slipper measures 20-22-25 cm (i.e. approx. 11-11-12 cm from where it is divided), insert 1 marker in the middle of row (between the 24-30-32 stitches). On next row decrease 1 double crochet on each side of marker, i.e. begin 2 stitches before marker and work the next 4 double crochets together 2 by 2 – READ DECREASE TIP (= 2 double crochets decreased). Work 1 row without decrease. Repeat decrease on next row (= 2 double crochets decreased) = 20-26-28 double crochets on row. Work 1 row without decrease, place slipper double and work together mid back with a row of slip stitches through both layers. Slipper measures approx. 22-24-27 cm from toe to heel. Fasten off.

EDGE:
Work a chain of 25 chain stitches on hook size 3.5 mm with coral, then work 1 double crochet in first double crochet after it was worked together mid back on slipper (without cutting the yarn after chain stitch row), then work around the opening on slipper as follows: * 1 chain stitch, skip approx. ½ cm, 1 double crochet in next stitch *, repeat from *-* the entire round, but finish round with 1 double crochet in last stitch before it was worked together mid back, then work 25 chain stitches again. Fasten off. Tie a little bow mid back with chain stitch rows.

FRINGES:
Fasten 6 small fringes mid on top of slipper in the last row with light beige before A.2.
1 fringe = cut 2 strands goldenrod of 6 cm each. Place the strand together and then double, pull loop around a double crochet on slipper and pull ends through loop, tighten. Cut fringes to desired length. There are 2 double crochets between each fringe.

POMPOMS:
Make 2 mini pompoms with coral and 3 mini pompoms with aqua blue. Each pompom measures approx. 2 cm in diameter. Fasten pompoms on a row in the middle of the light beige section before A.3.

Work the other slipper the same way.

Diagram

symbols = red
symbols = coral
symbols = Work 2 double crochets with coral in the same stitch (= 1 stitch increased)
symbols = goldenrod
symbols = orange
symbols = aqua blue
diagram
Do you have a question? See a list of frequently asked questions (FAQ)

Knitting tension is what determines the final measurements of your work, and is usually measured per 10 x 10 cm. It is provided like so: number of stitches in width x number of rows in height - eg: 19 stitches x 26 rows = 10 x 10 cm.

The knitting tension is very individual; some people knit/crochet loosely while others work tightly. You adjust the knitting tension with the needle size, which is why the suggested needle size is only meant as a guide! You need to adjust this (up or down) to ensure that YOUR knitting tension matches the knitting tension provided in the pattern. If you work with a different knitting tension than provided you will have a different yarn consumption, and your work will have different measurements than what the pattern suggests.

The knitting tension also determines which yarns can replace each other. As long as you achieve the same knitting tension you can replace one yarn with another.

See DROPS lesson: How to measure your tension/gauge

See DROPS video: How to make a gauge tension swatch

The required amount of yarn is provided in grams, eg: 450 g. To calculate how many balls you’ll need you first need to know how many grams are in 1 ball (25g, 50g or 100g). This information is available if you click on the individual yarn quality on our pages. Divide the amount required with the amount of each ball. For example, if each ball is 50g (the most common amount), the calculation will be as follows: 450 / 50 = 9 balls.

The important thing when changing from one yarn to another is that the knitting/crochet tension remains the same. This is so that the measurements of the finished piece will be the same as on the sketch provided. It is easier to achieve the same knitting tension using yarns from the same yarn group. It is also possible to work with multiple strands of a thinner yarn to achieve the knitting tension of a thicker one. Please try our yarn converter. We recommend you to always work a test swatch.

Please NOTE: when changing yarn the garment might have a different look and feel to the garment in the photo, due to individual properties and qualities of each yarn.

See DROPS lesson: Can I use a different yarn than the one mentioned in the pattern?

All our yarns are categorised into yarn groups (from A to F) according to thickness and knitting tension – group A contains the thinnest yarns and group F the thickest. This makes it easier for you to find alternative yarns to our patterns, should you wish to switch yarn. All yarns within the same group have a similar knitting tension and can easily replace each other. However, different yarn qualities have different structures and properties which will give the finished work a unique look and feel.

Click here for an overview of the yarns in each yarn group

At the top of all our patterns you’ll find a link to our yarn calculator, which is a helpful tool should you wish to use a different yarn than suggested. By filling in the yarn quality you wish to replace, the amount (in your size) and number of strands, the calculator will present good alternative yarns with the same knitting tension. Additionally it will tell you how much you’ll require in the new qualities and whether you’ll need to work with multiple strands. Most skeins are 50g (some are 25g or 100g).

If the pattern is worked with multiple colours, every colour will have to be calculated separately. Similarly, if the pattern is worked with several strands of different yarns (for example 1 strand Alpaca and 1 strand Kid-Silk) you will have to find alternatives for each, individually.

Click here to see our yarn calculator

Since different yarns have different qualities and textures we have chosen to keep the original yarn in our patterns. However, you can easily find options among our available qualities by using our yarn calculator, or simply pick a yarn from the same yarn group.

It is possible that some retailers still have discontinued yarns in stock, or that someone has a few skeins at home that they would like to find patterns for.

The yarn calculator will provide both alternative yarn as well as required amount in the new quality.

If you think it's hard to decide what size to make, it can be a good idea to measure a garment you own already and like the size of. Then you can pick the size by comparing those measures with the ones available in the pattern's size chart.

You'll find the size chart at the bottom of the pattern.

See DROPS lesson: How to read size chart

The needle size provided in the pattern serves only as a guide, the important thing is to follow the knitting tension. And since knitting tension is very individual, you will have to adjust the needle size to ensure that YOUR tension is the same as in the pattern – maybe you’ll have to adjust 1, or even 2 needle sizes, up or down to achieve the correct tension. For this, we recommend that you work test swatches.

Should you work with a different knitting tension than the one provided, the measurements of the finished garment might deviate from the measurement sketch.

See DROPS lesson: How to measure your tension/gauge

See DROPS video: How to make a tension/gauge swatch

Working a garment top-down provides more flexibility and room for personal adjustment. For example it is easier to try the garment on while working, as well as making adjustments to length of yoke and shoulder caps.

The instructions are carefully explaining every step, in the correct order. Diagrams are adjusted to the knitting direction and are worked as usual.

The diagram depicts all rows/rounds, and every stitch seen from the right side. It is read from bottom to top, from right to left. 1 square = 1 stitch.

When working back and forth, every other row is worked from the right side and every other row is worked from the wrong side. When working from the wrong side, the diagram will have to be worked reversed: from left to right, knit stitches are purled, purl stitches are knit etc.

When working in the round every round is worked from the right side and the diagram are worked from right to left on all rounds.

See DROPS lesson: How to read knitting diagrams

The diagram depicts all rows/rounds, and every stitch seen from the right side. It is worked from bottom to top, from right to left.

When working back and forth every other row is worked from the right side: from right to left and every other row is worked from the wrong side: from left to right.

When working in the round, every row in the diagram are worked from the right side, from right to left.

When working a circular diagram you start in the middle and work your way outwards, counter clockwise, row by row.

The rows usually start with a given number of chain stitches (equivalent to the height of the following stitch), this will either be depicted in the diagram or explained in the pattern.

See DROPS lesson: How to read crochet diagrams

Instructions for working several diagrams after each other on the same row/round, will often be written like so: “work A.1, A.2, A.3 a total of 0-0-2-3-4 times". This means you work A.1 once, then A.2 is worked once, and A.3 is repeated (in width) the number of times provided for your size – in this case like so: S = 0 times, M = 0 times, L=2 times, XL= 3 times and XXL = 4 times.

The diagrams are worked as usual: begin with the first row in A.1, then work the first row in A.2 etc.

See DROPS lesson: How to read knitting diagrams

See DROPS lesson: How to read crochet diagrams

The total width of the garment (from wrist-to-wrist) will be larger in the larger sizes, despite the actual sleeves being shorter. The larger sizes have longer sleeve caps and wider shoulders, so there will be a good fit in all sizes.

The measurement sketch/schematic drawing provides information regarding the full length of the garment. If it’s a jumper or a jacket the length is measured from the highest point on the shoulder closest to the neckline, and straight down to the bottom of the garment. It is NOT measured from the tip of shoulder. Similarly, the length of yoke is measured from the highest point on the shoulder and down to where yoke is split into body and sleeves.

On a jacket measures are never taken along bands, unless specifically stated. Always measure inside band stitches when measuring the length.

See DROPS lesson: How to read a schematic drawing

Diagrams are often repeated on the round or in height. 1 repeat is the diagram the way it appears in the pattern. If it says to work 5 repeats of A.1 in the round, then you work A.1 a total of 5 times after/next to each other in the round. If it says to work 2 repeats of A.1 vertically/in height you work the entire diagram once, then begin again at the start and work the entire diagram one more time.

Chain stitches are slightly narrower than other stitches and to avoid working the cast-on edge too tight, we simply chain more stitches to begin with. The stitch count will be adjusted on the following row to fit the pattern and measurement sketch.

The rib edge is more elastic and will contract slightly compared to, for example, stocking stitch. By increasing before the rib edge, you avoid a visible difference in width between the rib edge and the rest of the body.

It’s very easy to cast off too tightly, and by making yarn overs while casting off (and simultaneously casting these off) you avoid a too tight cast off edge.

See DROPS video: How to bind off with yarn overs (yo)

To achieve an even increase (or decrease) you can increase on, for example: every 3rd and 4th row alternately, like so: work 2 rows and increase on the 3rd row, work 3 rows and increase on the 4th. Repeat this until the increase is complete.

See DROPS lesson: Increase or decrease 1 st on every 3rd and 4th row alternately

Should you prefer to work in the round instead of back and forth, you may of course adjust the pattern. You’ll need to add steeks mid-front (usually 5 stitches), and follow the instructions. When you would normally turn and work from the wrong side, simply work across the steek and continue in the round. At the end you’ll cut the piece open, pick up stitches to work bands, and cover the cut edges.

See DROPS video: How to knit steeks and cut open

Should you prefer to work back and forth instead of in the round, you may of course adjust the pattern so you work the pieces separately and then assemble them at the end. Divide the stitches for the body in 2, add 1 edge stitch in each side (for sewing) and work the front and back pieces separately.

See DROPS lesson: Can I adapt a pattern for circular needles into straight needles?

Pattern repeats can vary slightly in the different sizes, in order to get the correct proportions. If you’re not working the exact same size as the garment in the photo, yours might deviate slightly. This has been carefully developed and adjusted so that the complete impression of the garment is the same in all sizes.

Make sure to follow instructions and diagrams for your size!

If you have found a pattern you like which is available in women’s size it’s not very difficult to convert it to men’s size. The biggest difference will be the length of sleeves and body. Start working on the women size that you think would fit across the chest. The additional length will be worked right before you cast off for the armhole/sleeve cap. If the pattern is worked top-down you can add the length right after the armhole or before the first decrease on sleeve.

Regarding additional yarn amount, this will depend on how much length you add, but it is better with a skein too many than too few.

All yarns will have excess fibres (from production) that might come off as lint or shedding. Brushed yarns (ie hairier yarns) have more of these loose, excess fibres, causing more shedding.

Shedding also depends on what is worn under or over the garment, and whether this pulls at the yarn fibres. It’s therefore not possible to guarantee that there will be no shedding

Below are some tips on how to get the best result when working with hairier yarns:

1. When the garment is finished (before you wash it) shake it vigorously so the looser hairs come off. NOTE: do NOT use a lint roller, brush or any method that pulls at the yarn.

2. Place the garment in a plastic bag and put it in your freezer - the temperature will cause the fibres to become less attached to each other, and excess fibres will come off easier.

3. Leave in the freezer for a few hours before taking it out and shaking it again.

4. Wash the garment according to the instructions on the yarn label.

Pilling is a natural process that happens to even the most exclusive of fibers. It's a natural sign of wear and tear that is hard to avoid, and that is most visible in high friction areas of your garment like a sweater's arms and cuffs.

You can make your garment look as new by removing the pilling, using a fabric comb or a pill/lint remover.

Still can't find the answer you need? Then scroll down and leave your question so one of our experts can try to help you. This will be done normally within 5 to 10 working days.
In the meantime, you can read the questions and answers that others have left to this pattern or join the DROPS Workshop on Facebook to get help from fellow knitters/crocheters!

You might also like...

Let's Party

Soňa, Slovakia

Let's Party

Annisa, Indonesia

Post a comment to pattern DROPS 189-35

We would love to hear what you have to say about this pattern!

If you want to leave a question, please make sure you select the correct category in the form below, to speed up the answering process. Required fields are marked *.

Comments / Questions (2)

country flag Annelie wrote:

Hej Jag ser inte rapport A1, eller rättare sagt jag ser inga rapporter i mönstret. Var ser jag dom? MVH Annelie

05.10.2021 - 11:07

DROPS Design answered:

Hej Annelie. Diagram A.1, A.2 och A.3 hittar du längst ner på mönstret. Testa att uppdatera sidan (ev. prova en annan webläsare) om du inte kan se dem. Mvh DROPS Design

05.10.2021 - 13:55

country flag Joanita wrote:

Hallo, ik heb een vraagje. Ik gebruik haaknaald 3 voor de goede stekenverhouding (18 st. 20 t voor 10 x 10 cm) maar als ik aan de eerste kleurenwissel begin in toer 8 heb ik een stukje dat net over de eerste twee tenen past. Op de foto is de kleurwissel een heel stuk verder. Wat gaat er mis? Alvast bedankt! Groetjes Joanita

14.08.2018 - 12:07

DROPS Design answered:

Dag Joanita, Volgens mij klopt dat wel hoor. Bij de kleinste maat wissel je al bij toer 6 en 20 toeren is 10 cm in de hoogte. Dus op ongeveer 4 cm wissel je al van kleur.

23.08.2018 - 20:39