
Popular categories
Looking for a yarn?


|
||||||||||||||||||||||||||||||||||||||||||||||||||||||||||
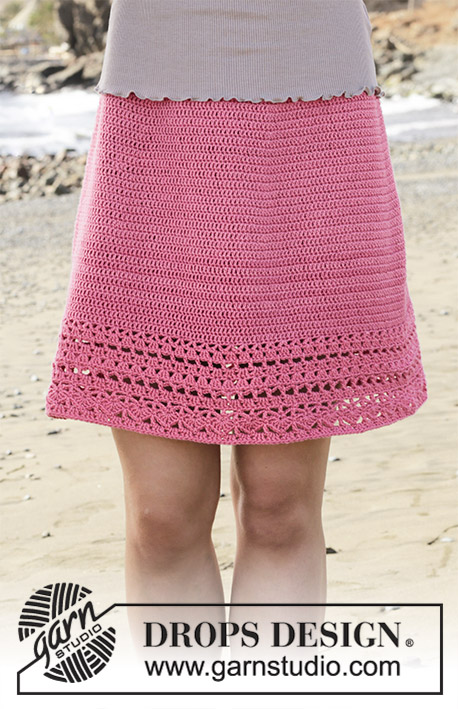
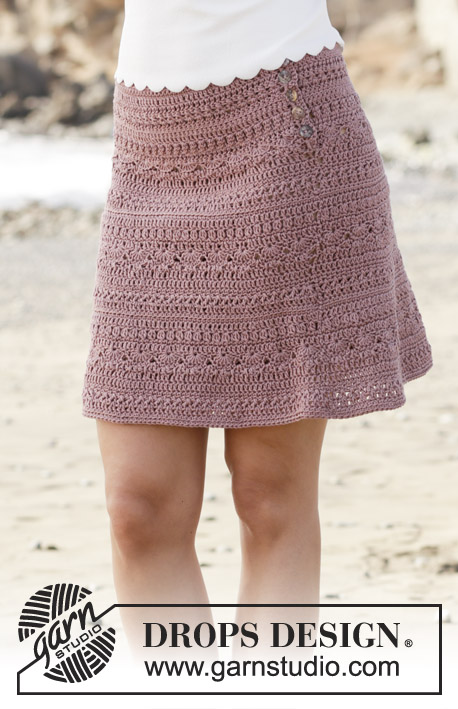
Queensland Skirt |
||||||||||||||||||||||||||||||||||||||||||||||||||||||||||
|
|
||||||||||||||||||||||||||||||||||||||||||||||||||||||||||
Skirt with lace pattern, crocheted top down. Size: S - XXXL Piece is crocheted in DROPS Safran.
DROPS 190-29 |
||||||||||||||||||||||||||||||||||||||||||||||||||||||||||
|
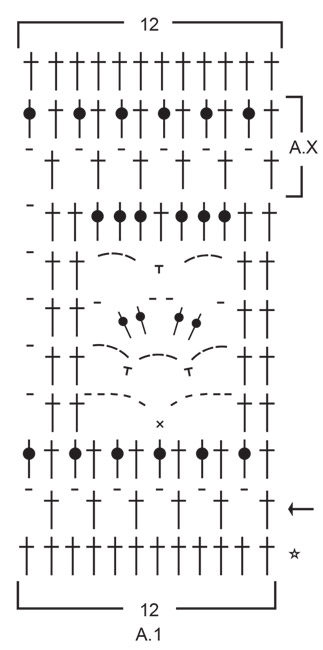
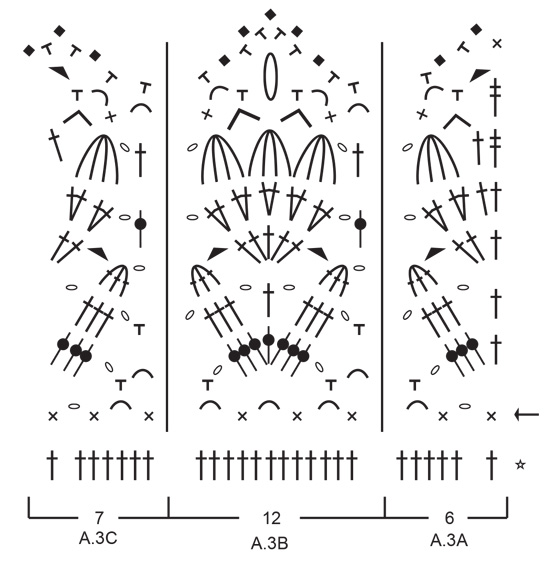
INFORMATION FOR PATTERN: CROCHET INFO: At beginning of every row/round with double crochets replace first double crochet with 3 chain stitches. Finish row with 1 double crochet in 3rd chain stitch from previous row when piece is worked back and forth and finish round with 1 slip stitch in 3rd chain stitch from beginning of round when working in the round. INCREASE TIP-1: Increase 1 double crochet by working 2 double crochets in same stitch. INCREASE TIP-2 (evenly): To calculate how to increase evenly, use the total number of stitches on round (e.g. 212 stitches) and divide stitches by number of increases to be done (e.g. 40) = 5.3. In this example increase by working 2 double crochets in approx. every 5th stitch. PATTERN: See diagrams A.1 to A.3. ---------------------------------------------------------- SKIRT: Piece is worked back and forth, top down until vent in the side is done, then work in the round until finished measurements. SKIRT: Work 186-209-232-258-279-305 chain stitches (including 3 chain stitches to turn with) on hook size 3.5 mm/E/4 with Safran. Work first row as follows: Work 1 double crochet in 4th chain stitch from hook, 1 double crochet in each of the next 4 chain stitches, * skip 1 chain stitch, 1 double crochet in each of the next 6 chain stitches *, work from *-* until 3-5-7-5-5-3 chain stitches remain, skip 1 chain stitch and finish with 1 double crochet in each of the last 2-4-6-4-4-2 chain stitches = 158-178-198-220-238-260 double crochets. Then work back and forth with 1 double crochet in every double crochet - read CROCHET INFO and REMEMBER CROCHET GAUGE. When 5 rows have been worked vertically, insert 6 markers in the piece as follows: Insert first marker after the first 14-14-16-20-21-22 double crochet, then insert the next 5 markers 26-30-33-36-39-43 double crochets apart. After last marker 14-14-17-20-22-23 double crochets remain on row. On next row increase 1 double crochet before all markers – read INCREASE TIP-1! Increase like this every other row 9-9-10-11-12-13 times in total - NOTE: Increase alternately before and after markers = 212-232-258-286-310-338 double crochets. AT THE SAME TIME when 12 rows in total have been worked vertically, vent in the side is finished. Now work piece in the round, begin round in the side - remember CROCHET INFO! When piece measures 25-26-27-28-29-30 cm / 9¾''-10¼''-10 5/8''-11''-11 3/8''-11¾'', increase 40-44-30-26-26-34 double crochets evenly - read INCREASE TIP-2 = 252-276-288-312-336-372 double crochets. Work A.1 in the round (= 21-23-24-26-28-31 repetitions of 12 stitches). AT THE SAME TIME on last round in A.1 increase 52-60-64-72-64-60 double crochets evenly = 304-336-352-384-400-432 double crochets. Work A.2 in the round (= 19-21-22-24-25-27 repetitions of 16 stitches). When entire A.2 has been worked, there are 475-525-550-600-625-675 double crochets on round. Now work A.X as shown in A.1 (= 2 rounds). AT THE SAME TIME on last round increase 30-28-39-25-36-34 double crochets evenly = 505-553-589-625-661-709 double crochets. Work next round as follows: A.3A (= 6 stitches), work A.3B over the next 492-540-576-612-648-696 double crochets (= 41-45-48-51-54-58 repetitions of 12 stitches) and finish with A.3C (= 7 stitches). When A.3 is done, fasten off. Skirt measures approx. 56-57-58-59-60-61 cm from waist and down. BUTTONHOLE LOOPS: Along the side with vent that belongs to front piece work buttonhole loops as follows (begin from wrong side at the top of waist at the vent): Work 2 single crochets around first double crochet, 3 chain stitches, skip 1 double crochet, * work 2 single crochets around each of the next 2 double crochets, 3 chain stitches, skip 1 double crochet *, work from *-* 3 times in total and finish with 2 single crochets in last double crochets at the bottom of vent. Turn and work as follows from right side: Work 1 single crochet in every single crochet and 3 single crochets around every chain space. Fasten off. BUTTON FOLDING EDGE: Along the other side of the vent work 5 rows with single crochets back and forth (on 1st row work 2 single crochets around every double crochet = 24 single crochets). Fasten off. Sew the buttons on to the button folding edge. EDGE: Work an edge at top of waist on skirt as follows: Begin from right side with 1 slip stitch in outermost stitch at the vent, work 1 chain stitch, * 1 chain stitch, skip 1 chain stitch, 1 single crochet in next chain stitch *, work from *-* along the entire edge at the top of skirt. Fasten off. |
||||||||||||||||||||||||||||||||||||||||||||||||||||||||||
Diagram explanations |
||||||||||||||||||||||||||||||||||||||||||||||||||||||||||
|
||||||||||||||||||||||||||||||||||||||||||||||||||||||||||
|
||||||||||||||||||||||||||||||||||||||||||||||||||||||||||

|
||||||||||||||||||||||||||||||||||||||||||||||||||||||||||
|
||||||||||||||||||||||||||||||||||||||||||||||||||||||||||

|
||||||||||||||||||||||||||||||||||||||||||||||||||||||||||
|
Have you made this or any other of our designs? Tag your pictures in social media with #dropsdesign so we can see them! Do you need help with this pattern?You'll find tutorial videos, a Comments/Questions area and more by visiting the pattern on garnstudio.com. © 1982-2024 DROPS Design A/S. We reserve all rights. This document, including all its sub-sections, has copyrights. Read more about what you can do with our patterns at the bottom of each pattern on our site. |
||||||||||||||||||||||||||||||||||||||||||||||||||||||||||


With over 40 years in knitting and crochet design, DROPS Design offers one of the most extensive collections of free patterns on the internet - translated to 17 languages. As of today we count 304 catalogs and 11422 patterns - 11417 of which are translated into English (US/in).
We work hard to bring you the best knitting and crochet have to offer, inspiration and advice as well as great quality yarns at incredible prices! Would you like to use our patterns for other than personal use? You can read what you are allowed to do in the Copyright text at the bottom of all our patterns. Happy crafting!
Comments / Questions (38)
How many cm is the small size waist. I am confused If I am calculating correctly it is 28 inches or 72 centimeters but that in the US is a XS and I wanted to double check. Thanks
16.08.2023 - 02:47DROPS Design answered:
Dear Constance, chart is in cm, this means 36 cm flat in the first size = 72 cm circumference, ca 30 inches - convert into inches here. Happy crocheting!
16.08.2023 - 09:13I have a question about the first row. It says " work from *-* until 3-5-7-5-5-3 chain stitches remain, skip 1 chain stitch and finish with 1 double crochet in each of the last 2-4-6-4-4-2 chain stitches" I don't understand what the numbers "3-5-7-5-5-3" and " 2-4-6-4-4-2" mean. I love this skirt and would like to make it, but I don't want to mess up the pattern because I don't understand. Thanks!
14.08.2023 - 23:55DROPS Design answered:
Hi Corrie, The series of numbers correspond to the different sizes, so if you are working size S you use the first number in each series, size M the second and so on. Happy crocheting!
15.08.2023 - 06:39Im A2 ab Reihe 8, meint das dritte Zeichen von rechts 2 Luftmaschen oder 7 Luftmaschen? In den nächsten Reihen taucht das Zeichen wieder auf wie viele Luftmaschen sind da jeweils gemeint? Viele Grüße Jomi
15.02.2023 - 20:07DROPS Design answered:
Liebe Jomi, hier sind es 2 Luftmaschen, das Symbol für die 7 Luftmaschen finden Sie in A.3. Viel Spaß beim häkeln!
16.02.2023 - 11:52This and many of your patterns are being sold on Etsy by the shop Fab Patterns
24.10.2022 - 13:22I just saw this pattern being sold on Etsy. DROPS Design has been so gracious in providing all of these stunning FREE patterns. It bugs me that someone else is trying to cash in on your generosity.
04.09.2022 - 22:01DROPS Design answered:
Hi Anne, thank you very much for noticing :)
05.09.2022 - 09:17Bonjour, A quoi correspond vraiment le ’nombre de cm? Est-ce pour 1 face ( et donc à multiplier par 2) ou pour le tour de taille entier... car 59 cm pour un tour de taille XXL Ce n’est pas possible....
16.07.2022 - 19:58DROPS Design answered:
Bonjour Mel, les mesures sont effectivement prises ouvrage (jupe en l'occurrence) posé à plat, et d'un côté à l'autre, autrement dit, le tour de taille en XXXL sera de 59x2 = 118 cm. Retrouvez ici plus d'infos sur les schémas. Bon crochet!
02.08.2022 - 11:11I didn’t know about this your free pattern. I just purchased this pattern on Etsy!
31.05.2022 - 09:03Is it possibly to buy this skirt already made from your site?
25.04.2022 - 18:07DROPS Design answered:
Dear Maggy, we don't sell crochet products; this site is only to read and print our patterns and showcase our yarns and where you can buy these. Happy crochetting!
25.04.2022 - 21:34Hi I was wondering how long it takes to crochet these? I'm a beginner crocheter with a couple of hours max spare time per day.
25.02.2022 - 17:08DROPS Design answered:
Dear Alisha, this pattern is not beginner-friendly, since it has many different patterns and diagrams. This means that it may take you much longer than an experienced crocheter, since you may need to redo some sections or read carefully over some instructions before working them. Happy crocheting!
27.02.2022 - 18:24Thank you for your prompt reply. I am now back on course.
23.07.2021 - 20:49