DROPS Cotton Merino
DROPS Cotton Merino
50% Wool, 50% Cotton
from 3.55 £ /50g
Get the yarn to make this pattern from 42.60£.

The yarn cost is calculated from the pattern’s smallest size and the yarn’s cheapest product type. Looking for an even better price? You might find it on the DROPS Deals!

DROPS SS24

Myosotis Cardigan

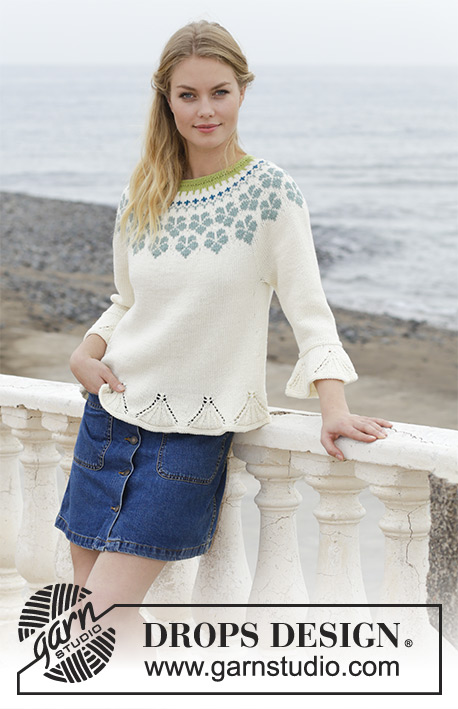
Jacket with round yoke, multi-coloured Norwegian pattern and ¾-sleeves with flounce, knitted top down. Size: S - XXXL Piece is knitted in DROPS Cotton Merino.

DROPS 191-36
DROPS design: Pattern cm-086
Yarn group B
----------------------------------------------------------
Size: S - M - L - XL - XXL - XXXL
Materials:
DROPS COTTON MERINO from Garnstudio (belongs to yarn group B)
450-450-500-550-650-700 g colour 01, off white
50-50-50-50-50-100 g colour 29, sea green
50-50-50-50-50-50 g colour 10, pistachio
50-50-50-50-50-50 g colour 26, storm blue

Piece can also be knitted with yarn from:
“Alternative yarn (yarn group B)” - see link below.

DROPS DOUBLE POINTED NEEDLES AND CIRCULAR NEEDLE (40 + 60 or 80 cm) SIZE 4 mm – or size needed to get 21 stitches and 28 rows in stocking stitch = width 10 cm and 10 cm vertically.

DROPS DOUBLE POINTED NEEDLES and CIRCULAR NEEDLE (60 cm) SIZE 3 mm - for edges in garter stitch.

DROPS MOTHER-OF-PEARL BUTTON ARCHED (white), NO 521: 7-7-7-8-8-8 pieces
-------------------------------------------------------

Colour combinations shown are:
A) DROPS Cotton Merino 01, 17, 29, 15.
B) DROPS Cotton Merino 16, 01, 21, 09.
-------------------------------------------------------

-------------------------------------------------------

Alternative Yarn – See how to change yarns here
Yarn Groups A to F – Use the same pattern and change the yarn here
Yarn usage using an alternative yarn – Use our yarn converter here

-------------------------------------------------------

DROPS Cotton Merino
DROPS Cotton Merino
50% Wool, 50% Cotton
from 3.55 £ /50g
Get the yarn to make this pattern from 42.60£.

The yarn cost is calculated from the pattern’s smallest size and the yarn’s cheapest product type. Looking for an even better price? You might find it on the DROPS Deals!

Pattern instructions

NOTE: This pattern is written in British English. All measurements in charts are in cm. For conversion from cm to inches - click here. There are different terms for crocheting in British and American English. If this pattern includes crochet, click for "crochet terms" here. For this pattern in American English, please click here.
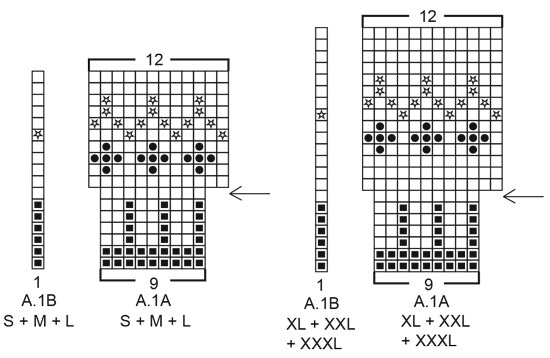
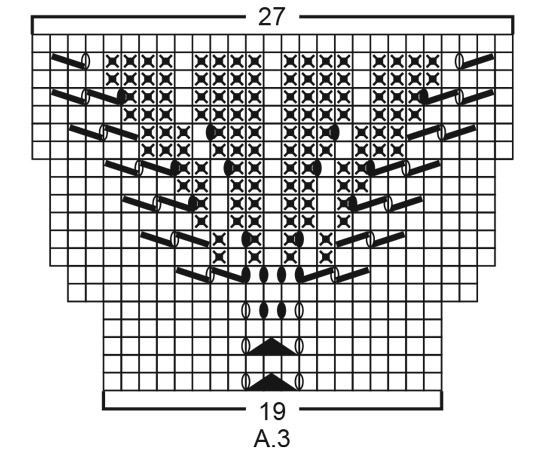
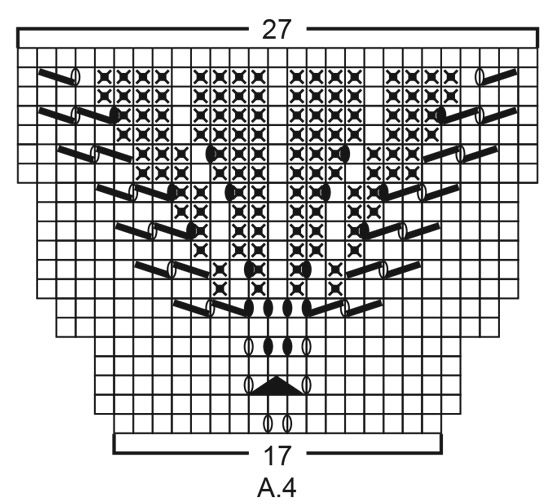
INFORMATION FOR PATTERN:

GARTER STITCH (back and forth):
1 ridge = knit 2 rows.

GARTER STITCH (worked in the round):
1 ridge = 2 rounds. Knit 1 round and purl 1 round.

INCREASE/DECREASE TIP (evenly):
To calculate how to increase/decrease evenly, use the total number of stitches on row (e.g. 110 stitches), minus bands (e.g. 10 stitches) and divide the remaining stitches by number of increases to be done (e.g. 36) = 2.8.
In this example increase by making 1 yarn over after approx. every 3rd stitch. On next row work yarn overs twisted to avoid holes. If decreasing knit approx. every other and 3rd. stitch together. Do not increase/decrease over bands.

INCREASE TIP (applies to sides of body):
All increases are done from the right side. Work until 8 stitches remain before marker thread, make 1 yarn over, knit 16 (marker thread in the side is in the middle of these 16 stitches), make 1 yarn over (= 2 stitches increased). On next row (wrong side) purl yarn overs twisted to avoid holes.

PATTERN:
See diagrams A.1 to A.4. Choose diagram for your size (applies to A.1). Diagrams show all rows in pattern seen from the right side.

KNITTING TIP-1 (applies to band):
On rows with pattern border on yoke work with base colour in pattern border also over the 5 band stitches in each side.

KNITTING TIP-2:
To avoid the knitting tension to tighten when working pattern, it is important not to tighten the strands on back side of piece. Use a larger needle size when working pattern if needed.

RAGLAN:
Increase for raglan on each side of the 4 marker threads in every transition between sleeves and body. All increases are done from the right side. Work until 1 stitch remains before marker thread, make 1 yarn over, knit 2 (marker thread is in the middle of these 2 stitches), make 1 yarn over (= 2 stitches increased). On next row (wrong side) purl yarn overs twisted to avoid holes.

DECREASE TIP (applies to mid under sleeve):
Begin 3 stitches before marker and knit 2 together, knit 2 (marker is between these 2 stitches), slip 1 stitch knitwise, knit 1, pass slipped stitch over stitch worked (= 2 stitches decreased).

BUTTONHOLES:
Decrease for buttonholes on right band (when garment is worn). 1 buttonhole = work from right side until 3 stitches remain on needle, make 1 yarn over, knit 2 together and finish by knitting 1. On next row (wrong side) knit the yarn over to make a hole. Decrease for first buttonhole on first row from right side after edge in garter stitch in neck. Then decrease the next 6-6-6-7-7-7 buttonholes approx. 7½-7½-8-7½-7½-8 cm apart.
----------------------------------------------------------

JACKET:
Work yoke and body back and forth on circular needle from mid front, work top down. Work sleeves in the round on double pointed needles/a short circular needle, top down.
An elevation in the back of neck can be worked to get a better fit so that yoke is somewhat higher in the neck. This elevation can be skipped, to make the neck the same at the front and back - see explanation on elevation in pattern.

NECK EDGE:
Cast on 110-116-120-126-130-136 stitches (including 5 band stitches in each side towards mid front) on circular needle size 3 mm with pistachio. Work 3 ridges in GARTER STITCH - see explanation above. Switch to circular needle size 4 mm and knit 1 row from right side while increasing 36-39-44-38-43-46 stitches evenly - read INCREASE/DECREASE TIP and remember BUTTONHOLES on right band - see explanation above = 146-155-164-164-173-182 stitches. Purl 1 row from wrong side (knit bands).
Now work elevation in the back of neck or start to work the yoke if you don’t want an elevation.

ELEVATION IN BACK OF NECK:
Skip this paragraph if you do not want an elevation.
Insert 1 marker in the middle of row (in S, L, XL and XXXL insert marker between the 2 middle stitches, in M and XXL insert marker in middle stitch = mid back).
Begin from right side with pistachio and knit 15-16-17-18-19-20 stitches past marker/stitch with marker, turn, tighten yarn and purl 30-33-34-36-39-40. Turn, tighten yarn and knit 45-49-51-54-58-60, turn, tighten yarn and purl 60-65-68-72-77-80. Turn, tighten yarn and knit 75-81-85-90-96-100, turn, tighten yarn and purl the rest of row (knit band).

YOKE:
= 146-155-164-164-173-182 stitches. Read KNITTING TIP-1 AND KNITTING TIP-2!
Work first row as follows from right side: 5 band stitches in garter stitch, work A.1A until 6 stitches remain on row (= 15-16-17-17-18-19 repetitions of 9 stitches), work A.1B (= 1 stitch) and finish with 5 band stitches in garter stitch. Continue pattern like this. REMEMBER THE KNITTING TENSION!
AT THE SAME TIME on row marked with arrow in A.1A increase 21-36-27-39-54-45 stitches evenly = 167-191-191-203-227-227 stitches. Work A.1 (there is now room for 13-15-15-16-18-18 repetitions of 12 stitches).
When A.1 is done, purl 1 row from wrong side with off white while increasing 4-0-0-8-4-4 stitches evenly = 171-191-191-211-231-231 stitches (work bands in garter stitch and do not increase over bands).
Work next row as follows from right side: 5 band stitches in garter stitch, work A.2A until 6 stitches remain on row (= 8-9-9-10-11-11 repetitions of 20 stitches), work A.2B (= 1 stitch) and finish with 5 band stitches in garter stitch. Continue pattern like this and increase as shown in A.2A. When A.2 has been worked, there are 251-281-281-311-341-341 stitches on needle. Then work with off white until finished measurements.
Knit 1 row from right side while increasing 7-1-9-11-1-9 stitches evenly = 258-282-290-322-342-350 stitches.
Work next row as follows from wrong side (purl with 5 stitches in garter stitch in each side): Work 41-44-46-51-56-59 stitches (= front piece), insert 1 marker thread, work 52-58-58-64-64-62 stitches (= sleeve), insert 1 marker thread, work 72-78-82-92-102-108 stitches (= back piece), insert 1 marker thread, work 52-58-58-64-64-62 stitches (= sleeve), insert 1 marker thread and work the remaining 41-44-46-51-56-59 stitches (= front piece). There are now 4 marker threads in the piece.
On next row (right side) increase for RAGLAN – see explanation above (= 8 stitches increased). Increase like this on every 4th row (i.e. every other row from right side) 4-5-7-7-8-9 times in total = 290-322-346-378-406-422 stitches.
Work until piece measures 22-24-26-28-30-32 cm from cast-on edge mid front. Work next row as follows from wrong side: Work 45-49-53-58-64-68 stitches as before (= front piece), slip the next 60-68-72-78-80-80 stitches on 1 stitch holder for sleeve, cast on 8-8-10-10-12-14 new stitches on row (= in the side under sleeve), work 80-88-96-106-118-126 stitches as before (= back piece), slip the next 60-68-72-78-80-80 stitches on 1 stitch holder for sleeve, cast on 8-8-10-10-12-14 new stitches on row (= in the side under sleeve) and work the 45-49-53-58-64-68 stitches as before (= front piece). Remove all markers/marker threads.
Finish body and sleeves separately. NOW MEASURE THE PIECE FROM HERE!

BODY:
= 186-202-222-242-270-290 stitches. Insert 1 marker thread 49-53-58-63-70-75 stitches in from each side = 88-96-106-116-130-140 stitches between marker threads on back piece. Work in stocking stitch back and forth with 5 band stitches in garter stitch in each side towards mid front - remember buttonholes on right band.
When piece measures 3 cm from division, increase 1 stitch on each side of both marker threads - read INCREASE TIP (= 4 stitches increased). Increase like this every 6 cm 4 times in total in each side = 202-218-238-258-286-306 stitches. Work until piece measures 26 cm from division.
Knit 1 row from right side while adjusting number of stitches to 200-219-238-257-295-314. Purl 1 row from wrong side inside 5 band stitches in garter stitch in each side.
Work next row as follows from right side: 5 band stitches in garter stitch, work A.3 until 5 stitches remain on row (= 10-11-12-13-15-16 repetitions of 19 stitches) and finish with 5 band stitches in garter stitch. Continue pattern like this. When A.3 has been worked, there are 280-307-334-361-415-442 stitches on needle. Work 2 ridges back and forth over all stitches. Cast off by knitting from right side - make sure to avoid a tight cast-off edge. Jacket measures approx. 56-58-60-62-64-66 cm from shoulder and down.

SLEEVE:
Slip the 60-68-72-78-80-80 stitches from stitch holder in one side of piece on a short circular needle size 4 mm and pick in addition up 1 stitch in each of the 8-8-10-10-12-14 stitches cast on under sleeve = 68-76-82-88-92-94 stitches. Insert 1 marker thread in the middle of the 8-8-10-10-12-14 stitches under sleeve and begin round at the marker thread.
Work in stocking stitch in the round. When piece measures 2 cm from division, decrease 2 stitches mid under sleeve - read DECREASE TIP. Decrease like this every 3-2-1½-1-1-1 cm 8-11-13-15-16-15 times in total = 52-54-56-58-60-64 stitches.
Continue until piece measures 25-23-22-20-19-17 cm from division (shorter measurements in the larger sizes because of wider neck and longer yoke). Switch to double pointed needles size 3 mm. Work 2 ridges in the round over all stitches. Then knit 2 rounds and increase AT THE SAME TIME 16-14-12-10-25-21 stitches evenly on first round = 68-68-68-68-85-85 stitches. Switch back to double pointed needles size 4 mm and work A.4 in the round (= 4-4-4-4-5-5 repetitions of 17 stitches). When A.4 has been worked, there are 108-108-108-108-135-135 stitches on needle. Work 2 ridges in the round. Cast off by knitting but make sure that the cast-off edge is not too tight.
Sleeve measures approx. 34-32-31-29-28-26 cm from division. Work the other sleeve the same way.

ASSEMBLY:
Sew the buttons on to the left band.

Diagram

symbols = knit from right side, purl from wrong side with off white
symbols = knit from right side, purl from wrong side with pistachio
symbols = knit from right side, purl from wrong side with sea green
symbols = knit from right side, purl from wrong side with storm blue
symbols = purl from right side, knit from wrong side with off white
symbols = between 2 stitches make 1 yarn over with off white, on next row (wrong side) work yarn over twisted to avoid holes
symbols = between 2 stitches make 1 yarn over with off white, on next row (wrong side) purl yarn over to make holes
symbols = knit 2 together with off white
symbols = slip 1 stitch knitwise, knit 1 with off white, pass slipped stitch over stitch worked
symbols = slip 1 stitch knitwise, knit 2 stitches together with off white, pass slipped stitch over stitches worked together
symbols = increase row
diagram
diagram
diagram
diagram
diagram

Each of our patterns has specific tutorial videos to help you.

Do you have a question? See a list of frequently asked questions (FAQ)

Knitting tension is what determines the final measurements of your work, and is usually measured per 10 x 10 cm. It is provided like so: number of stitches in width x number of rows in height - eg: 19 stitches x 26 rows = 10 x 10 cm.

The knitting tension is very individual; some people knit/crochet loosely while others work tightly. You adjust the knitting tension with the needle size, which is why the suggested needle size is only meant as a guide! You need to adjust this (up or down) to ensure that YOUR knitting tension matches the knitting tension provided in the pattern. If you work with a different knitting tension than provided you will have a different yarn consumption, and your work will have different measurements than what the pattern suggests.

The knitting tension also determines which yarns can replace each other. As long as you achieve the same knitting tension you can replace one yarn with another.

See DROPS lesson: How to measure your tension/gauge

See DROPS video: How to make a gauge tension swatch

The required amount of yarn is provided in grams, eg: 450 g. To calculate how many balls you’ll need you first need to know how many grams are in 1 ball (25g, 50g or 100g). This information is available if you click on the individual yarn quality on our pages. Divide the amount required with the amount of each ball. For example, if each ball is 50g (the most common amount), the calculation will be as follows: 450 / 50 = 9 balls.

The important thing when changing from one yarn to another is that the knitting/crochet tension remains the same. This is so that the measurements of the finished piece will be the same as on the sketch provided. It is easier to achieve the same knitting tension using yarns from the same yarn group. It is also possible to work with multiple strands of a thinner yarn to achieve the knitting tension of a thicker one. Please try our yarn converter. We recommend you to always work a test swatch.

Please NOTE: when changing yarn the garment might have a different look and feel to the garment in the photo, due to individual properties and qualities of each yarn.

See DROPS lesson: Can I use a different yarn than the one mentioned in the pattern?

All our yarns are categorised into yarn groups (from A to F) according to thickness and knitting tension – group A contains the thinnest yarns and group F the thickest. This makes it easier for you to find alternative yarns to our patterns, should you wish to switch yarn. All yarns within the same group have a similar knitting tension and can easily replace each other. However, different yarn qualities have different structures and properties which will give the finished work a unique look and feel.

Click here for an overview of the yarns in each yarn group

At the top of all our patterns you’ll find a link to our yarn calculator, which is a helpful tool should you wish to use a different yarn than suggested. By filling in the yarn quality you wish to replace, the amount (in your size) and number of strands, the calculator will present good alternative yarns with the same knitting tension. Additionally it will tell you how much you’ll require in the new qualities and whether you’ll need to work with multiple strands. Most skeins are 50g (some are 25g or 100g).

If the pattern is worked with multiple colours, every colour will have to be calculated separately. Similarly, if the pattern is worked with several strands of different yarns (for example 1 strand Alpaca and 1 strand Kid-Silk) you will have to find alternatives for each, individually.

Click here to see our yarn calculator

Since different yarns have different qualities and textures we have chosen to keep the original yarn in our patterns. However, you can easily find options among our available qualities by using our yarn calculator, or simply pick a yarn from the same yarn group.

It is possible that some retailers still have discontinued yarns in stock, or that someone has a few skeins at home that they would like to find patterns for.

The yarn calculator will provide both alternative yarn as well as required amount in the new quality.

If you think it's hard to decide what size to make, it can be a good idea to measure a garment you own already and like the size of. Then you can pick the size by comparing those measures with the ones available in the pattern's size chart.

You'll find the size chart at the bottom of the pattern.

See DROPS lesson: How to read size chart

The needle size provided in the pattern serves only as a guide, the important thing is to follow the knitting tension. And since knitting tension is very individual, you will have to adjust the needle size to ensure that YOUR tension is the same as in the pattern – maybe you’ll have to adjust 1, or even 2 needle sizes, up or down to achieve the correct tension. For this, we recommend that you work test swatches.

Should you work with a different knitting tension than the one provided, the measurements of the finished garment might deviate from the measurement sketch.

See DROPS lesson: How to measure your tension/gauge

See DROPS video: How to make a tension/gauge swatch

Working a garment top-down provides more flexibility and room for personal adjustment. For example it is easier to try the garment on while working, as well as making adjustments to length of yoke and shoulder caps.

The instructions are carefully explaining every step, in the correct order. Diagrams are adjusted to the knitting direction and are worked as usual.

The diagram depicts all rows/rounds, and every stitch seen from the right side. It is read from bottom to top, from right to left. 1 square = 1 stitch.

When working back and forth, every other row is worked from the right side and every other row is worked from the wrong side. When working from the wrong side, the diagram will have to be worked reversed: from left to right, knit stitches are purled, purl stitches are knit etc.

When working in the round every round is worked from the right side and the diagram are worked from right to left on all rounds.

See DROPS lesson: How to read knitting diagrams

The diagram depicts all rows/rounds, and every stitch seen from the right side. It is worked from bottom to top, from right to left.

When working back and forth every other row is worked from the right side: from right to left and every other row is worked from the wrong side: from left to right.

When working in the round, every row in the diagram are worked from the right side, from right to left.

When working a circular diagram you start in the middle and work your way outwards, counter clockwise, row by row.

The rows usually start with a given number of chain stitches (equivalent to the height of the following stitch), this will either be depicted in the diagram or explained in the pattern.

See DROPS lesson: How to read crochet diagrams

Instructions for working several diagrams after each other on the same row/round, will often be written like so: “work A.1, A.2, A.3 a total of 0-0-2-3-4 times". This means you work A.1 once, then A.2 is worked once, and A.3 is repeated (in width) the number of times provided for your size – in this case like so: S = 0 times, M = 0 times, L=2 times, XL= 3 times and XXL = 4 times.

The diagrams are worked as usual: begin with the first row in A.1, then work the first row in A.2 etc.

See DROPS lesson: How to read knitting diagrams

See DROPS lesson: How to read crochet diagrams

The total width of the garment (from wrist-to-wrist) will be larger in the larger sizes, despite the actual sleeves being shorter. The larger sizes have longer sleeve caps and wider shoulders, so there will be a good fit in all sizes.

The measurement sketch/schematic drawing provides information regarding the full length of the garment. If it’s a jumper or a jacket the length is measured from the highest point on the shoulder closest to the neckline, and straight down to the bottom of the garment. It is NOT measured from the tip of shoulder. Similarly, the length of yoke is measured from the highest point on the shoulder and down to where yoke is split into body and sleeves.

On a jacket measures are never taken along bands, unless specifically stated. Always measure inside band stitches when measuring the length.

See DROPS lesson: How to read a schematic drawing

Diagrams are often repeated on the round or in height. 1 repeat is the diagram the way it appears in the pattern. If it says to work 5 repeats of A.1 in the round, then you work A.1 a total of 5 times after/next to each other in the round. If it says to work 2 repeats of A.1 vertically/in height you work the entire diagram once, then begin again at the start and work the entire diagram one more time.

Chain stitches are slightly narrower than other stitches and to avoid working the cast-on edge too tight, we simply chain more stitches to begin with. The stitch count will be adjusted on the following row to fit the pattern and measurement sketch.

The rib edge is more elastic and will contract slightly compared to, for example, stocking stitch. By increasing before the rib edge, you avoid a visible difference in width between the rib edge and the rest of the body.

It’s very easy to cast off too tightly, and by making yarn overs while casting off (and simultaneously casting these off) you avoid a too tight cast off edge.

See DROPS video: How to bind off with yarn overs (yo)

To achieve an even increase (or decrease) you can increase on, for example: every 3rd and 4th row alternately, like so: work 2 rows and increase on the 3rd row, work 3 rows and increase on the 4th. Repeat this until the increase is complete.

See DROPS lesson: Increase or decrease 1 st on every 3rd and 4th row alternately

Should you prefer to work in the round instead of back and forth, you may of course adjust the pattern. You’ll need to add steeks mid-front (usually 5 stitches), and follow the instructions. When you would normally turn and work from the wrong side, simply work across the steek and continue in the round. At the end you’ll cut the piece open, pick up stitches to work bands, and cover the cut edges.

See DROPS video: How to knit steeks and cut open

Should you prefer to work back and forth instead of in the round, you may of course adjust the pattern so you work the pieces separately and then assemble them at the end. Divide the stitches for the body in 2, add 1 edge stitch in each side (for sewing) and work the front and back pieces separately.

See DROPS lesson: Can I adapt a pattern for circular needles into straight needles?

Pattern repeats can vary slightly in the different sizes, in order to get the correct proportions. If you’re not working the exact same size as the garment in the photo, yours might deviate slightly. This has been carefully developed and adjusted so that the complete impression of the garment is the same in all sizes.

Make sure to follow instructions and diagrams for your size!

If you have found a pattern you like which is available in women’s size it’s not very difficult to convert it to men’s size. The biggest difference will be the length of sleeves and body. Start working on the women size that you think would fit across the chest. The additional length will be worked right before you cast off for the armhole/sleeve cap. If the pattern is worked top-down you can add the length right after the armhole or before the first decrease on sleeve.

Regarding additional yarn amount, this will depend on how much length you add, but it is better with a skein too many than too few.

All yarns will have excess fibres (from production) that might come off as lint or shedding. Brushed yarns (ie hairier yarns) have more of these loose, excess fibres, causing more shedding.

Shedding also depends on what is worn under or over the garment, and whether this pulls at the yarn fibres. It’s therefore not possible to guarantee that there will be no shedding

Below are some tips on how to get the best result when working with hairier yarns:

1. When the garment is finished (before you wash it) shake it vigorously so the looser hairs come off. NOTE: do NOT use a lint roller, brush or any method that pulls at the yarn.

2. Place the garment in a plastic bag and put it in your freezer - the temperature will cause the fibres to become less attached to each other, and excess fibres will come off easier.

3. Leave in the freezer for a few hours before taking it out and shaking it again.

4. Wash the garment according to the instructions on the yarn label.

Pilling is a natural process that happens to even the most exclusive of fibers. It's a natural sign of wear and tear that is hard to avoid, and that is most visible in high friction areas of your garment like a sweater's arms and cuffs.

You can make your garment look as new by removing the pilling, using a fabric comb or a pill/lint remover.

Still can't find the answer you need? Then scroll down and leave your question so one of our experts can try to help you. This will be done normally within 5 to 10 working days.
In the meantime, you can read the questions and answers that others have left to this pattern or join the DROPS Workshop on Facebook to get help from fellow knitters/crocheters!

You might also like...

Post a comment to pattern DROPS 191-36

We would love to hear what you have to say about this pattern!

If you want to leave a question, please make sure you select the correct category in the form below, to speed up the answering process. Required fields are marked *.

Comments / Questions (8)

country flag Maritha wrote:

Hej Undrar var beskrivningen till den gula koftan finns? Något måste ha blivit fel. Mvh

06.09.2020 - 17:27

DROPS Design answered:

Hej Maritha. De färgerna du ser på bilden märkt med A är DROPS Cotton Merino 01, 17, 29, 15 (den första färgen ersätter den första färgen i mönstret under garnåtgång osv). Mvh DROPS Design

08.09.2020 - 08:37

country flag Marjan Van Riel wrote:

Aan het einde van de mouw moet ik patroon A4 breien, deze kan ik echter niet meer vinden bij het patroon, is A4 weggehaald?

06.06.2020 - 17:38

DROPS Design answered:

Dag Marjan,

Nee, hij staat er wel bij hoor, het is het onderste telpatroon, direct boven de maattekening. Misschien dat hij tijdelijk niet goed geladen werd...

07.06.2020 - 14:14

country flag Willa Strahle wrote:

There are no notations in how many inches for s-m-l, etc. Am ready to start but need to know that before I start. Thank you.

04.04.2019 - 21:54

DROPS Design answered:

Dear Mrs Strahle, all measurements in the chart are in cm - convert and read more about sizing here. Happy crocheting!

05.04.2019 - 09:53

country flag Jennie wrote:

Ska diagrammet verkligen se ut så? Likadant i diagrammet för den som är en pullover. I A2, så är den högra blomman väldigt skev jämfört med den vänstra. Ser inte ut så när man tittar på bilderna på den färdiga tröjan. Fler har kommenterat på detta i mönstret för pullover-varianten men ni har inte besvarat dem eller ändrat i mönstret.

12.05.2018 - 04:45

DROPS Design answered:

Hei Jennie. På grunn av økningen på den 19 omgangen av A.2a blir mønsteret forskjøvet med 1 maske fra omgang 20 og oppover - dette for at det skal gå opp med både masketall og mønster. Det blir pent og vil ikke virke skjevt på den ferdige genseren. God fornøyelse.

16.05.2018 - 09:49

country flag Guillaumond wrote:

Pourquoi faites vous les modèles tricotés de haut en bas sachant que le suivi du tricot est beaucoup plus difficile à contrôler de cette façon. Je tricote depuis très longtemps et je ne trouve pas que cette méthode soit un plus , pouvez-vous me dire quelles sont les raisons de cette méthode ?

18.04.2018 - 16:53

DROPS Design answered:

Bonjour Mme Guillaumond, cette technique est de plus en plus plébiscitée par nos utilisatrices, elle permet notamment de pouvoir essayer l'ouvrage au fur et à mesure et de faire des ajustements individuels (longueur par exemple). Bon tricot!

19.04.2018 - 09:17

country flag Montse Martínez wrote:

Precioso patrón, bonitos colores.

15.04.2018 - 22:48

country flag Gunilla Anttila wrote:

Fin den vill jag sticka.

02.01.2018 - 12:10

country flag Conny wrote:

Gelungene Kombination aus Blumenmotiv und Muschelmuster, die möchte ich nacharbeiten

18.12.2017 - 13:46