DROPS Air
DROPS Air
65% Alpaca, 28% Polyamide, 7% Wool
from 6.45 $ /50g
Get the yarn to make this pattern from 51.60$.

The yarn cost is calculated from the pattern’s smallest size and the yarn’s cheapest product type. Looking for an even better price? You might find it on the DROPS Deals!

DROPS SS24

Wayfarer

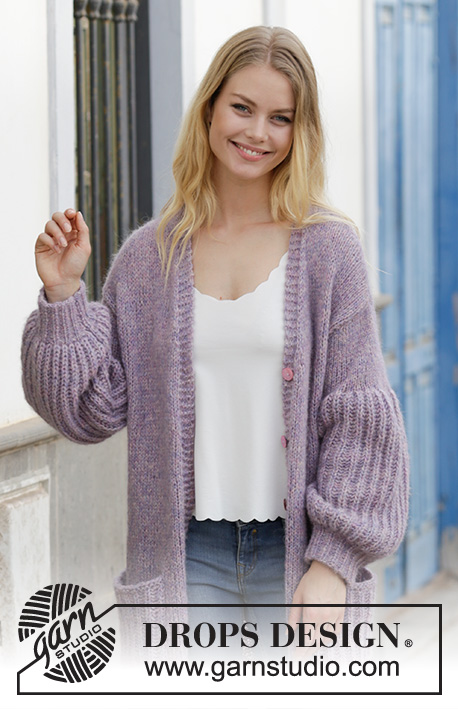
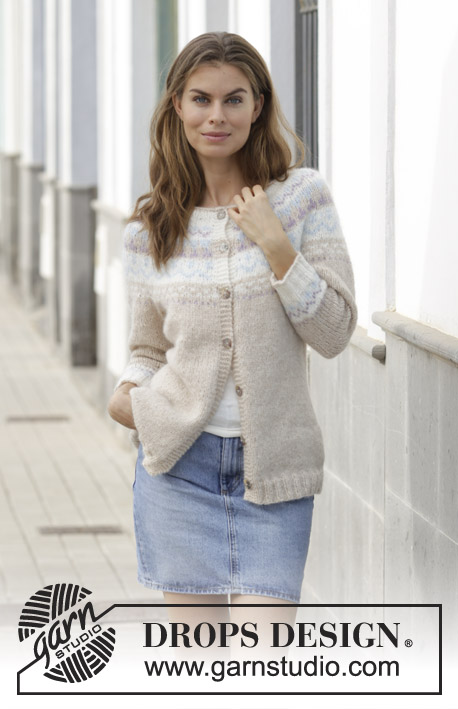
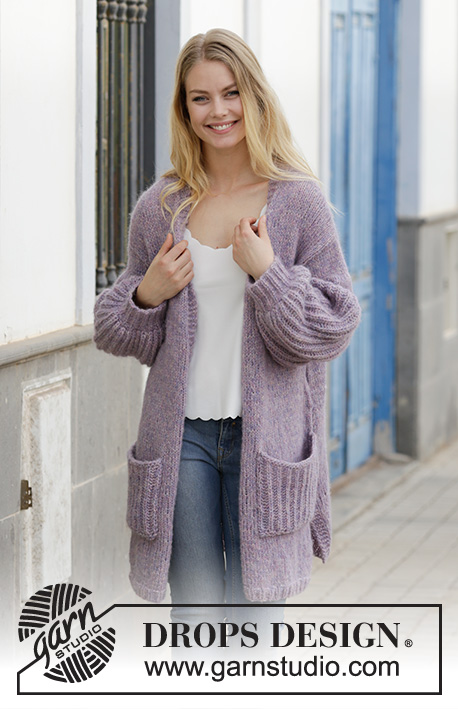
Knitted jacket with English rib, stockinette stitch and pockets. Sizes S - XXXL. The piece is worked in DROPS Air.

DROPS 191-18
DROPS Design: Pattern no ai-109
Yarn group C or A + A
-----------------------------------------------------------
Sizes: S - M - L - XL - XXL - XXXL
Materials:
DROPS AIR from Garnstudio (belongs to yarn group C)
400-450-500-550-600-650 g color 15, purple haze

The piece can also be knitted with yarn from:
"Alternative yarn (Yarn group C)" – see link below.

DROPS CIRCULAR NEEDLE (60 or 80 cm / 24" or 32") size 7 mm / US 10.75 – or the size needed to get 12 stitches of English rib on 10 cm / 4" in width and 14 stitches and 17 rows stockinette stitch on 10 cm / 4" in width and 10 cm / 4" in height.

DROPS CIRCULAR NEEDLE (60 or 80 cm / 24" or 32") SIZE 4 mm/US 6 for the rib on sleeves – or the size needed to get 19 stitches and 26 rows stockinette stitch on 10 cm / 4" in width and 10 cm / 4" in height.

DROPS MOTHER OF PEARL BUTTONS, Round (pink) NO 608: 6 items in all sizes.

-------------------------------------------------------

Alternative Yarn – See how to change yarns here
Yarn Groups A to F – Use the same pattern and change the yarn here
Yarn usage using an alternative yarn – Use our yarn converter here

-------------------------------------------------------

DROPS Air
DROPS Air
65% Alpaca, 28% Polyamide, 7% Wool
from 6.45 $ /50g
Get the yarn to make this pattern from 51.60$.

The yarn cost is calculated from the pattern’s smallest size and the yarn’s cheapest product type. Looking for an even better price? You might find it on the DROPS Deals!

Pattern instructions

NOTE: This pattern is written in American English. All measurements in charts are in cm. For conversion from inches to cm - click here. There are different terms for crocheting in American and British English. If this pattern includes crochet, click for "crochet terms" here. For this pattern in British English, please click here.
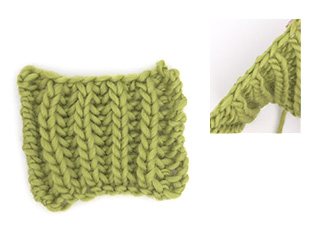
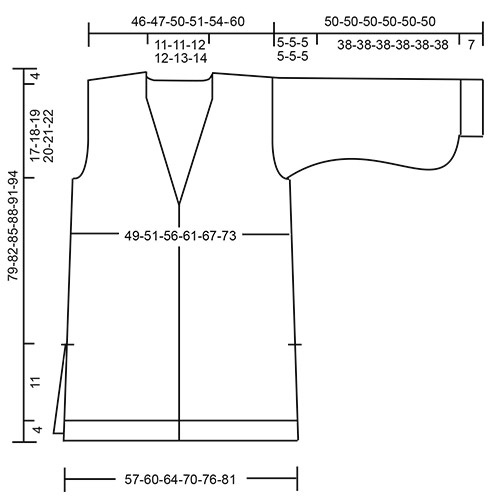
INFORMATION FOR THE PATTERN:

RIDGE/GARTER STITCH (worked back and forth):
1 ridge = Knit 2 rows.

ENGLISH RIB (back and forth on needle, including 1 edge stitch in each side):
ROW 1: 1 stitch garter stitch, * knit 1, 1 yarn over, slip 1 stitch as if to purl *, work from *-* until there are 2 stitches left, finish with knit 1, 1 stitch garter stitch.
ROW 2: 1 stitch garter stitch, * 1 yarn over, slip 1 stitch as if to purl, knit the yarn over and the slipped stitch together *, work from *-* until there are 2 stitches left, finish with 1 yarn over, slip 1 stitch as if to purl, 1 stitch garter stitch.
ROW 3: 1 stitch garter stitch, * knit the yarn over and the slipped stitch together, 1 yarn over, slip 1 stitch as if to purl *, work from *-* until there are 3 stitches left, knit the yarn over and slipped stitch together, 1 stitch garter stitch.
Repeat rows 2 and 3 upwards.

DECREASE TIP -1 (= for the sides):
All decreases are made from the right side!
At the beginning of the row: Decrease 1 stitch after 2 stitches as follows: Slip 1 stitch as if to knit, knit 1, pass the slipped stitch over (= 1 stitch decreased).
At the end of the row: Decrease 1 stitch before 2 stitches as follows: Knit 2 together (= 1 stitch decreased).

DECREASE TIP -2 (for neck):
All decreases are made from the right side!
Decrease 1 stitch after the 5 band stitches as follows (applies to right front piece): Work 5 band stitches in garter stitch, slip 1 stitch as if to knit, knit 1, pass the slipped stitch over (= 1 stitch decreased).
Decrease 1 stitch before the 5 band stitches as follows (applies to left front piece): Work until there are 7 stitches left, knit 2 together (= 1 stitch decreased), work 5 band stitches in garter stitch.

BUTTONHOLES:
Work buttonholes on the right band. 1 BUTTONHOLE = knit together the 3rd and 4th stitch from the edge and make 1 yarn over. On the next row knit the yarn over = hole.
Work buttonholes when the piece measures:
S: 14, 22, 31, 40, 49 and 58 cm
M: 14, 23, 32, 41, 50 and 60 cm
L: 14, 23, 32, 42, 52 and 62 cm
XL: 14, 24, 34, 44, 54 and 64 cm
XXL: 14, 24, 34, 44, 54 and 65 cm
XXXL: 14, 24, 34, 45, 56 and 67 cm

INCREASE TIP: (for sleeves)
Increase by making 1 yarn over between 2 stitches; on the next row from the wrong side purl the yarn over twisted to avoid a hole.
----------------------------------------------------------

JACKET:
The jacket is worked back and forth with circular needle, bottom up. The back piece and front pieces are worked separately and sewn together to finish. Then the sleeves are worked and sewn to the body.

BACK PIECE:
The piece is worked back and forth with circular needle. Cast on 81-84-90-99-105-114 stitches with circular needle size 7 mm / US 10.75 and Air. Work 4 stitches garter stitch, * knit 1, purl 2 *, work from *-* until there are 5 stitches left, finish with knit 1 and 4 stitches garter stitch.
Work 6 rows like this. Then continue in stockinette stitch with 4 stitches garter stitch in each side, AT THE SAME TIME on the first row of stockinette stitch adjust the number of stitches to 80-84-90-98-106-114 stitches. REMEMBER THE GAUGE! When the piece measures 14 cm / 5½" cast on 1 edge stitch at the end of the next 2 rows (= 1 new stitch in each side of the piece) = 82-86-92-100-108-116 stitches. Then continue working stockinette stitch with 1 edge stitch in garter stitch in each side of the piece. When the piece measures 15 cm / 6" decrease 1 stitch inside the 2 stitches in each side of the piece – read DECREASE TIP-1 = 2 stitches decreased. Decrease like this every 8-8-8½-9-9½-10 cm / 4" a total of 6 times = 70-74-80-88-96-104 stitches. When the piece measures 58-60-62-64-66-68 cm / 22¾"-23⅝"-24⅜"-25¼"-26"-26¾" bind off 3-4-4-5-5-6 stitches for the armholes at the start of the next 2 rows = 64-66-72-78-86-92 stitches. Then bind off 1 stitch in each side every 2nd row a total of 0-0-1-3-5-7 times = 64-66-70-72-76-78 stitches. When the piece measures 75-78-81-84-87-90 cm / 29 ½"-30⅝"-31⅞"-33"-34 ¼"-35⅜" bind off the middle 16-18-20-20-22-22 stitches for neck = 24-24-25-26-27-28 stitches left on each shoulder. Then bind off stitches for diagonal shoulders at the beginning of each row towards the neck - i.e. at the beginning of each row from the right side on the right shoulder (when the garment is worn) and the beginning of each row from the wrong side on the left shoulder (when the garment is worn). Bind off for diagonal shoulders as follows: 6 stitches 3 times, then bind off the remaining 6-6-7-8-9-10 stitches. Repeat on the other side. The piece measures a total of 79-82-85-88-91-94 cm / 31"-32¼"-33½"-34⅝"-35¾"-37".

RIGHT FRONT PIECE:
Cast on 46-49-49-55-58-61 stitches (including 5 band stitches) with circular needle size 7 mm / US 10.75 and Air. Work as follows from the right side: 5 band stitches in garter stitch, * knit 1, purl 2 *, work from *-* until there are 5 stitches left, finish with knit 1 and 4 stitches in garter stitch. Work 6 rows like this. Then continue working from the right side as follows: 5 band stitches in garter stitch, work stockinette stitch until there are 4 stitches left, finish with 4 stitches in garter stitch, AT THE SAME TIME on the first row of stockinette stitch adjust the number of stitches to 45-47-50-54-58-62 stitches. When the piece measures 14 cm / 5½", adjust to match the back piece, cast on 1 edge stitch at the end of the next row from the right side = 46-48-51-55-59-63 stitches. Then continue with stockinette stitch and 5 band stitches in garter stitch towards mid front as before and 1 edge stitch in garter stitch towards the side. Work BUTTONHOLES on the band – see description above. When the piece measures 15 cm / 6", decrease 1 stitch inside the 2 stitches in the side at the end of the next row from the right side. Decrease like this every 8-8-8½-9-9½-10 cm / 4" a total of 6 times = 40-42-45-49-53-57 stitches. When the piece measures 58-60-62-64-66-68 cm / 22¾"-23⅝"-24⅜"-25¼"-26"-26¾" bind off for the armhole in the side as for the back piece = 37-38-40-41-43-44 stitches. AT THE SAME TIME when the piece measures 59-61-63-65-66-68 cm / 23⅛"-24"-24 ¾"-25 ½"-26"-26 ¾" decrease for the neck inside the 5 band stitches – read DECREASE TIP-2. Decrease like this every 4th row a total of 8-9-10-10-11-11 times = 29-29-30-31-32-33 stitches left when the neck decreases are finished. When the piece measures 75-78-81-84-87-90 cm / 29 ½"-30⅝"-31⅞"-33"-34 ¼"-35⅜" bind off for diagonal shoulder at the beginning of each row from the wrong side as follows: 6 stitches 3 times, 6-6-7-8-9-10 stitches 1 time = 5 band stitches left on the needle. Work garter stitch over the band stitches until the band measures approx. 10-11-11-12-13-13 cm / 3⅞"-4 ¼"-4 ¼"-4⅝"-5⅛"-5⅛" from the last bind off stitch on the shoulder (this will be sewn to the neck on the back piece).

LEFT FRONT PIECE:
Work as for the right front piece but reversed. Do not work buttonholes.

SLEEVES:
The sleeves are worked back and forth with circular needle.
Cast on 44-47-47-50-50-53 stitches (including 1 edge stitch in each side of the piece) with circular needle size 4 mm / US 6 and Air. Work rib (= knit 1, purl 2) with 1 edge stitch in garter stitch in each side of the piece. When the rib measures 7-7-7-7-7-7 cm / 2 ¾"-2 ¾"-2 ¾"-2 ¾"-2 ¾"-2 ¾", adjust so that the next row is worked from the right side, work 1 row of rib as before AT THE SAME TIME as you increase 11-12-12-13-13-14 stitches evenly on row – read INCREASE TIP! = 55-59-59-63-63-67 stitches. Purl 1 row. Change to circular needle size 7 mm / US 10.75 and work ENGLISH RIB – see description above. Continue until the piece measures 37-37-37-37-37-37 cm / 14 ½"-14 ½"-14 ½"-14 ½"-14 ½"-14 ½" and then continue with stockinette stitch with 1 edge stitch in garter stitch in each side of the piece AT THE SAME TIME as you decrease 8-9-6-7-4-6 stitches evenly on the first row = 47-50-53-56-59-61 stitches. Continue with stockinette stitch until the piece measures 45-45-45-45-45-45 cm / 17⅝"-17⅝"-17⅝"-17⅝"-17⅝"-17⅝". Now bind off 4 stitches in each side, bind off in each side every 2nd row a total of 4 times = 15-18-21-24-27-29 stitches. Bind off the remaining stitches, the sleeve measures 50-50-50-50-50-50 cm / 19⅝"-19⅝"-19⅝"-19⅝"-19⅝"-19⅝". Work the other sleeve in the same way.

POCKETS:
Cast on 25 stitches with circular needle size 7 mm / US 10.75 and Air. Work 2 ridges then work ENGLISH RIB with 1 stitch in garter stitch in each side. When the piece measures 16 cm work 1 ridge, then bind off. Work one more pocket in the same way.

ASSEMBLY:
Sew the side seams inside the 1 edge stitch in garter stitch, sew down to the split (= 14 cm / 5½" split). Sew shoulder seams and sew the neck from the front pieces together and sew it to the neck on the back piece. Sew the sleeve seams inside the 1 edge stitch in each side, then sew the sleeves to the body. Sew buttons onto the left band. Sew a pocket onto each front piece – approx. 14 cm / 5½" from the bottom edge and 8 cm / 3⅛" from mid front – see photo.

This pattern has been corrected.

Updated online: 19.08.2019
It should be 60 cm = 23 5/8", not 40 cm = 15 3/4" on the chart (width of shoulders) in the largest size.

Diagram

All measurements in charts are in cm.

diagram measurements

Each of our patterns has specific tutorial videos to help you.

Do you have a question? See a list of frequently asked questions (FAQ)

Knitting tension is what determines the final measurements of your work, and is usually measured per 10 x 10 cm. It is provided like so: number of stitches in width x number of rows in height - eg: 19 stitches x 26 rows = 10 x 10 cm.

The knitting tension is very individual; some people knit/crochet loosely while others work tightly. You adjust the knitting tension with the needle size, which is why the suggested needle size only serve as a guide! You need to adjust this (up or down) to ensure that YOUR knitting tension matches the knitting tension provided in the pattern. If you work with a different knitting tension than provided you will have a different yarn consumption, and your work will have different measurements than what the pattern suggests.

The knitting tension also determines which yarns can replace each other. As long as you achieve the same knitting tension you can replace one yarn with another.

See DROPS lesson: How to measure your tension/gauge

See DROPS video: How to make a gauge tension swatch

The required amount of yarn is provided in grams, eg: 450 g. To calculate how many balls you’ll need you first need to know how many grams are in 1 ball (25g, 50g or 100g). This information is available if you click on the individual yarn quality on our pages. Divide the amount required with the amount of each ball. For example, if each ball is 50g (the most common amount), the calculation will be as follows: 450 / 50 = 9 balls.

The important thing when changing from one yarn to another is that the knitting/crochet tension remains the same. This is so that the measurements of the finished piece will be the same as on the sketch provided. It is easier to achieve the same knitting tension using yarns from the same yarn group. It is also possible to work with multiple strands of a thinner yarn to achieve the knitting tension of a thicker one. Please try our yarn converter. We recommend you to always work a test swatch.

Please NOTE: when changing yarn the garment might have a different look and feel to the garment in the photo, due to individual properties and qualities of each yarn.

See DROPS lesson: Can I use a different yarn than the one mentioned in the pattern?

All our yarns are categorised into yarn groups (from A to F) according to thickness and knitting tension – group A contains the thinnest yarns and group F the thickest. This makes it easier for you to find alternative yarns to our patterns, should you wish to switch yarn. All yarns within the same group have a similar knitting tension and can easily replace each other. However, different yarn qualities have different structures and properties which will give the finished work a unique look and feel.

Click here for an overview of the yarns in each yarn group

At the top of all our patterns you’ll find a link to our yarn converter, which is a helpful tool should you wish to use a different yarn than suggested. By filling in the yarn quality you wish to replace, the amount (in your size) and number of strands, the converter will present good alternative yarns with the same knitting tension. Additionally it will tell you how much you’ll require in the new qualities and whether you’ll need to work with multiple strands. Most skeins are 50g (some are 25g or 100g).

If the pattern is worked with multiple colours, every colour will have to be converted separately. Similarly, if the pattern is worked with several strands of different yarns (for example 1 strand Alpaca and 1 strand Kid-Silk) you will have to find alternatives for each, individually.

Click here to see our yarn converter

Since different yarns have different qualities and textures we have chosen to keep the original yarn in our patterns. However, you can easily find options among our available qualities by using our yarn converter, or simply pick a yarn from the same yarn group.

It is possible that some retailers still have discontinued yarns in stock, or that someone has a few skeins at home that they would like to find patterns for.

The yarn converter will provide both alternative yarn as well as required amount in the new quality.

If you think it's hard to decide what size to make, it can be a good idea to measure a garment you own already and like the size of. Then you can pick the size by comparing those measures with the ones available in the pattern's size chart.

You'll find the size chart at the bottom of the pattern.

See DROPS lesson: How to read size chart

The needle size provided in the pattern serves only as a guide, the important thing is to follow the knitting tension. And since knitting tension is very individual, you will have to adjust the needle size to ensure that YOUR tension is the same as in the pattern – maybe you’ll have to adjust 1, or even 2 needle sizes, up or down to achieve the correct tension. For this, we recommend that you work test swatches.

Should you work with a different knitting tension than the one provided, the measurements of the finished garment might deviate from the measurement sketch.

See DROPS lesson: How to measure your tension/gauge

See DROPS video: How to make a gauge tension swatch

Working a garment top-down provides more flexibility and room for personal adjustment. For example it is easier to try the garment on while working, as well as making adjustments to length of yoke and shoulder caps.

The instructions are carefully explaining every step, in the correct order. Diagrams are adjusted to the knitting direction and are worked as usual.

The diagram depicts all rows/rounds, and every stitch seen from the right side. It is read from bottom to top, from right to left. 1 square = 1 stitch.

When working back and forth, every other row is worked from the right side and every other row is worked from the wrong side. When working from the wrong side, the diagram will have to be worked reversed: from left to right, knit stitches are purled, purl stitches are knit etc.

When working in the round every round is worked from the right side and the diagram are worked from right to left on all rounds.

See DROPS lesson: How to read knitting diagrams

The diagram depicts all rows/rounds, and every stitch seen from the right side. It is worked from bottom to top, from right to left.

When working back and forth every other row is worked from the right side: from right to left and every other row is worked from the wrong side: from left to right.

When working in the round, every row in the diagram are worked from the right side, from right to left.

When working a circular diagram you start in the middle and work your way outwards, counter clockwise, row by row.

The rows usually start with a given number of chain stitches (equivalent to the height of the following stitch), this will either be depicted in the diagram or explained in the pattern.

See DROPS lesson: How to read crochet diagrams

Instructions for working several diagrams after each other on the same row/round, will often be written like so: “work A.1, A.2, A.3 a total of 0-0-2-3-4 times". This means you work A.1 once, then A.2 is worked once, and A.3 is repeated (in width) the number of times provided for your size – in this case like so: S = 0 times, M = 0 times, L=2 times, XL= 3 times and XXL = 4 times.

The diagrams are worked as usual: begin with the first row in A.1, then work the first row in A.2 etc.

See DROPS lesson: How to read knitting diagrams

See DROPS lesson: How to read crochet diagrams

The total width of the garment (from wrist-to-wrist) will be larger in the larger sizes, despite the actual sleeves being shorter. The larger sizes have longer sleeve caps and wider shoulders, so there will be a good fit in all sizes.

The measurement sketch/schematic drawing provides information regarding the full length of the garment. If it’s a jumper or a jacket the length is measured from the highest point on the shoulder (usually closest to the neckline), and straight down to the bottom of the garment. It is NOT measured from the tip of shoulder. Similarly, the length of yoke is measured from the highest point on the shoulder and down to where yoke is split into body and sleeves.

See DROPS lesson: How to read a schematic drawing

Diagrams are often repeated on the round or in height. 1 repeat is the diagram the way it appears in the pattern. If it says to work 5 repeats of A.1 in the round, then you work A.1 a total of 5 times after/next to each other in the round. If it says to work 2 repeats of A.1 vertically/in height you work the entire diagram once, then begin again at the start and work the entire diagram one more time.

Chain stitches are slightly narrower than other stitches and to avoid working the cast-on edge too tight, we simply chain more stitches to begin with. The stitch count will be adjusted on the following row to fit the pattern and measurement sketch.

The rib edge is more elastic and will contract slightly compared to, for example, stocking stitch. By increasing before the rib edge, you avoid a visible difference in width between the rib edge and the rest of the body.

It’s very easy to cast off too tightly, and by making yarn overs while casting off (and simultaneously casting these off) you avoid a too tight cast off edge.

See DROPS video: How to bind off with yarn overs (yo)

To achieve an even increase (or decrease) you can increase on, for example: every 3rd and 4th row alternately, like so: work 2 rows and increase on the 3rd row, work 3 rows and increase on the 4th. Repeat this until the increase is complete.

See DROPS lesson: Increase or decrease 1 st on every 3rd and 4th row alternately

Should you prefer to work in the round instead of back and forth, you may of course adjust the pattern. You’ll need to add steeks mid-front (usually 5 stitches), and follow the instructions. When you would normally turn and work from the wrong side, simply work across the steek and continue in the round. At the end you’ll cut the piece open, pick up stitches to work bands, and cover the cut edges.

See DROPS video: How to knit steeks and cut open

Should you prefer to work back and forth instead of in the round, you may of course adjust the pattern so you work the pieces separately and then assemble them at the end. Divide the stitches for the body in 2, add 1 edge stitch in each side (for sewing) and work the front and back pieces separately.

See DROPS lesson: Can I adapt a pattern for circular needles into straight needles?

Pattern repeats can vary slightly in the different sizes, in order to get the correct proportions. If you’re not working the exact same size as the garment in the photo, yours might deviate slightly. This has been carefully developed and adjusted so that the complete impression of the garment is the same in all sizes.

Make sure to follow instructions and diagrams for your size!

If you have found a pattern you like which is available in women’s size it’s not very difficult to convert it to men’s size. The biggest difference will be the length of sleeves and body. Start working on the women size that you think would fit across the chest. The additional length will be worked right before you cast off for the armhole/sleeve cap. If the pattern is worked top-down you can add the length right after the armhole or before the first decrease on sleeve.

Regarding additional yarn amount, this will depend on how much length you add, but it is better with a skein too many than too few.

All yarns will have excess fibres (from production) that might come off as lint or shedding. Brushed yarns (ie hairier yarns) have more of these loose, excess fibres, causing more shedding.

Shedding also depends on what is worn under or over the garment, and whether this pulls at the yarn fibres. It’s therefore not possible to guarantee that there will be no shedding

Below are some tips on how to get the best result when working with hairier yarns:

1. When the garment is finished (before you wash it) shake it vigorously so the looser hairs come off. NOTE: do NOT use a lint roller, brush or any method that pulls at the yarn.

2. Place the garment in a plastic bag and put it in your freezer - the temperature will cause the fibres to become less attached to each other, and excess fibres will come off easier.

3. Leave in the freezer for a few hours before taking it out and shaking it again.

4. Wash the garment according to the instructions on the yarn label.

Pilling is a natural process that happens to even the most exclusive of fibers. It's a natural sign of wear and tear that is hard to avoid, and that is most visible in high friction areas of your garment like a sweater's arms and cuffs.

You can make your garment look as new by removing the pilling, using a fabric comb or a pill/lint remover.

Still can't find the answer you need? Then scroll down and leave your question so one of our experts can try to help you. This will be done normally within 5 to 10 working days.
In the meantime, you can read the questions and answers that others have left to this pattern or join the DROPS Workshop on Facebook to get help from fellow knitters/crocheters!

You might also like...

Post a comment to pattern DROPS 191-18

We would love to hear what you have to say about this pattern!

If you want to leave a question, please make sure you select the correct category in the form below, to speed up the answering process. Required fields are marked *.

Comments / Questions (55)

country flag Heleen wrote:

Geachte heer/ mevrouw, Ik wil dit patroon plus garen graag bestellen, maar ik zie geen winkelwagentje, Kunt u mij helpen. Met vr groet,

31.03.2021 - 23:55

DROPS Design answered:

Dag Heleen,

Het patroon kun je op onze site gratis downloaden via de knop 'Afdrukken' onderaan de materialenlijst. Voor het garen kun je terecht bij een van onze verkooppunten

01.04.2021 - 20:06

country flag Lise Emond Pellerin wrote:

À chaue fois que je tricot une bordure elle condolle toujours pourquoi..

04.03.2021 - 23:12

DROPS Design answered:

Bonjour Mme Pellerin, je ne suis pas sûre de voir de quelle bordure vous parlez, toutefois, bien souvent un simple "blocage" peut permettre de retirer toute irrégularité, humidifiez votre ouvrage terminé (ou bien lavez-le en suivant les indications de l'étiquette) et faites le sécher bien à plat, en épinglant les parties "rebelles" si besoin. Bon tricot!

05.03.2021 - 07:44

country flag Mette Tode wrote:

Jeg er i tvivl om, hvad der er ærmets længde og hvad der hører til ærmegabet - altså hvor langt skal ærmet syes sammen inden det monteres i ærmegabet?

03.02.2021 - 19:30

DROPS Design answered:

Hej Mette, ærmet måler 45 cm når du tager ind til ærmekuppel :)

17.05.2021 - 16:01

country flag Małgorzata wrote:

Szkoda, że zapytania i komentarze nie są tłumaczone na język polski, na pewno zawarte są w nich cenne uwagi :) taka moja sugestia i prośba , pozdrawiam ciepło Małgorzata

26.01.2021 - 14:29

DROPS Design answered:

Witaj Małgorzato, obawiam się, że to byłoby bardzo trudne do wykonania. Zachęcam do zadawania pytań jak tylko pojawi się wątpliwość dotycząca wzoru, zawsze odpowiadamy:) Pozdrawiamy!

26.01.2021 - 16:05

country flag Malene Wulff wrote:

Hej. Jeg skal lukke af til skuldre, først ve side fra vrang siden, jeg forstår ikke hvad der menes, 6 masker 3 gange derefter lukkes de sidste 6 masker af? Hvordan skal det forstås? Mange hilsner Malene

04.01.2021 - 22:01

DROPS Design answered:

Hei Malene. Du har 24 masker igjen på hver skulder.Fell 6 masker på første pinne fra vrangen, strikk pinnen ut, neste pinne fra vrangen felles det også 6 masker og 3. pinne fra vrangen felles det også 6 masker. Du har nå felt 18 masker og har 6 masker igjen på pinnen, fell nå de resterende 6 maskene av. Gjenta i den andre siden. God Fornøyelse!

13.01.2021 - 15:51

country flag Melanie wrote:

Hallo! Habe die Jacke gerade fertig gestellt. Sie sieht toll aus in Jeansblau! Danke für die super Anleitung!

01.01.2021 - 13:56

country flag Peggy wrote:

Hallo, beim Ärmel wird erst das Bündchen gestrickt, in der letzten Reihe nehme ich 11 Maschen zu, dann stricke ich Vollpatent bis ich 37 cm erreicht habe. Aber wann nehme ich die 8 Maschen ab? In der Beschreibung steht gleichzeitig mit Beginn des Wechsels auf Nadel 7.... Über eine kurze Rückmeldung würde ich mich freuen. Viele Grüße Peggy

05.10.2020 - 21:31

DROPS Design answered:

Liebe Peggy, wenn die Ärmel 37 cm mist, dann stricken Sie 1 Reihe glatt rechts und gleichzeitig nehmen Sie 8 Maschen ab. Jetzt stricken Sie glatt rechts über die 47 Maschen bis die Arbeit 45 cm mist (immer noch mit der Nadel Nr 7). Viel Spaß beim stricken!

06.10.2020 - 10:52

country flag Aj wrote:

Drops pattern 191-18 Hi il doing this pattern but a bit confused on the shoulders on the back piece I cast off from the arms (not the neck) On the front sides do I cast off the same way or the other side eg after the band side?

11.07.2020 - 19:21

DROPS Design answered:

Dear Aj, you cast off for shoulder at the beg of the row from the armhole (from RS on right shoulder, from WS on left shoulder). On right front piece, you cast off for shoulder at the beg of rows from WS and for left front piece at the beg of rows from RS. Happy knitting!

13.07.2020 - 09:35

country flag Nora wrote:

Bij dit patroon bij de uitleg van de Engelse Patentsteek staat bij naald 2: tot er 2 steken over zijn, eindig met 1 omslag, 1 steek averecht, 1 steek ribbelsteek. Dit moet volgens mij zijn: 1 omslag, 1 steek averecht afhalen, 1 steek ribbelsteek.

08.07.2020 - 10:53

country flag Mette wrote:

Jeg har et spørgsmål til højre forstykke - er det virkelig rigtigt, at jeg allerede skal begynde at tage ind , når arbejdet målet 15 cm? Og også allerede tage ind til knaphul der?

09.05.2020 - 19:11

DROPS Design answered:

Hej Mette, Ja vi tager ind i hver side, så jakken former sig mere til kroppen. Og ja vi har lavet 6 knapper inden vi starter på indtagningerne til v-hals. Vil du kun have 5 knapper, så starter du bare højere oppe :)

12.05.2020 - 15:09