DROPS Air
DROPS Air
65% Alpaca, 28% Polyamide, 7% Wool
from 4.80 £ /50g
DROPS Brushed Alpaca Silk
77% Alpaca, 23% Silk
from 2.90 £ /25g
Get the yarn to make this pattern from 58.70£.

The yarn cost is calculated from the pattern’s smallest size and the yarn’s cheapest product type. Looking for an even better price? You might find it on the DROPS Deals!

DROPS SS24

La Mare

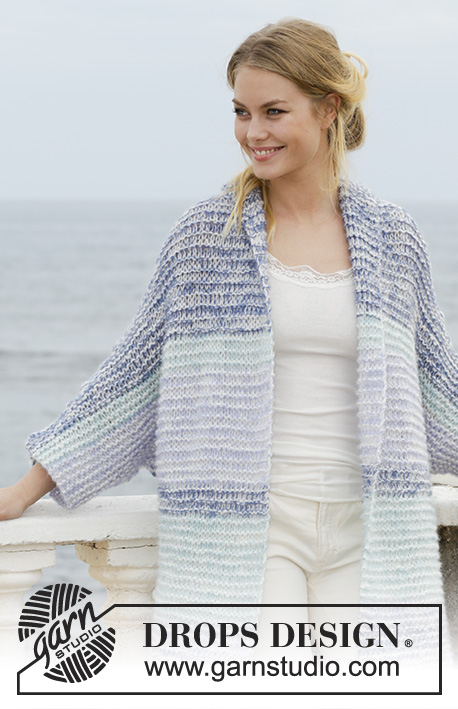
Knitted jacket with garter stitch, stripes, shawl collar, kimono sleeves and split in sides. Sizes S - XXXL. The piece is worked in DROPS Air and DROPS Brushed Alpaca Silk.

DROPS 191-28
DROPS Design: Pattern no as-083
Yarn group C + C or E
-----------------------------------------------------------
Sizes: S - M - L - XL - XXL - XXXL
Materials:
DROPS AIR from Garnstudio (belongs to yarn group C)
250–250–300–300–350–350 g colour 01, off white
and use:
DROPS BRUSHED ALPACA SILK from Garnstudio (belongs to yarn group C)
75-75-100-100-100-100 g colour 13, denim blue
50-50-50-50-50-50 g colour 15, light sea green
50-50-50-50-50-50 g colour 17, light lavender

The piece can also be knitted with yarn from:
"Alternative yarn (Yarn group C)" – see link below.

DROPS CIRCULAR NEEDLE (80 cm) SIZE 10 MM – or the size needed to get 9 stitches and 18 rows garter stitch on 10 cm in width and 10 cm in height.
----------------------------------------------------------

-------------------------------------------------------

Alternative Yarn – See how to change yarns here
Yarn Groups A to F – Use the same pattern and change the yarn here
Yarn usage using an alternative yarn – Use our yarn converter here

-------------------------------------------------------

DROPS Air
DROPS Air
65% Alpaca, 28% Polyamide, 7% Wool
from 4.80 £ /50g
DROPS Brushed Alpaca Silk
77% Alpaca, 23% Silk
from 2.90 £ /25g
Get the yarn to make this pattern from 58.70£.

The yarn cost is calculated from the pattern’s smallest size and the yarn’s cheapest product type. Looking for an even better price? You might find it on the DROPS Deals!

Pattern instructions

NOTE: This pattern is written in British English. All measurements in charts are in cm. For conversion from cm to inches - click here. There are different terms for crocheting in British and American English. If this pattern includes crochet, click for "crochet terms" here. For this pattern in American English, please click here.
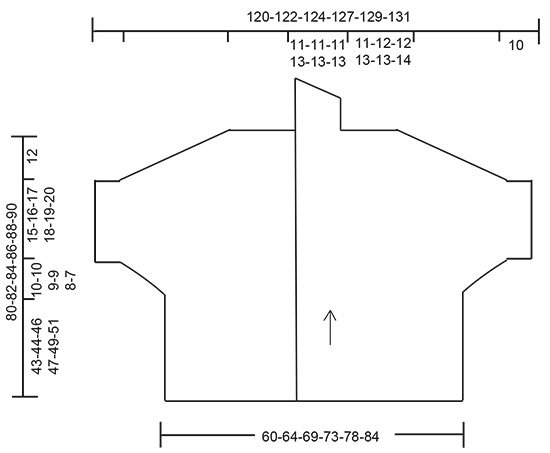
INFORMATION FOR THE PATTERN:

RIDGE/GARTER STITCH (worked back and forth):
1 ridge = Knit 2 rows.

STRIPES:
The piece is worked in stripes. The first row in each stripe is always worked from the right side.
STRIPE 1: Work 23-24-25-25-27-28 cm with off white and denim blue.
STRIPE 2: Work 4 cm with off white and lavender.
STRIPE 3: Work 15-15-16-17-17-17 cm with off white and light sea green.
STRIPE 4: Work 4 cm with off white and denim blue.
STRIPE 5: Work 15-15-16-17-17-17 cm with off white and lavender.
STRIPE 6: Work 4 cm with off white and light sea green.
STRIPE 7: Work the rest of the piece with off white and denim blue (= approx. 15-16-15-15-15-16 cm).
----------------------------------------------------------

JACKET:
The piece is worked back and forth in garter stitch. Front and back pieces are worked separately and sewn together to finish. Stitches are cast on for the sleeves.

BACK PIECE:
Cast on 54-58-62-66-70-76 stitches with circular needle size 10 mm and 1 strand off white and 1 strand denim blue (= 2 strands). Work GARTER STITCH and STRIPES - see description above. REMEMBER THE KNITTING TENSION! When the piece measures 43-44-46-47-49-51 cm, cast on 2 new stitches for the sleeve on each side at the end of each row a total of 9-8-8-7-7-6 times, then 1 stitch a total of 0-1-0-1-0-0 times= 18-17-16-15-14-12 new stitches on each side of the piece = 90-92-94-96-98-100 stitches. Then cast on 9 new stitches at the end of the next 2 rows = 108-110-112-114-116-118 stitches. When the piece measures 68-70-72-74-76-78 cm cast off stitches for the diagonal shoulder on each side of the piece at the beginning of each row as follows: Cast off 9-9-10-9-10-10 stitches 1 time, 3 stitches a total of 10 times. AT THE SAME TIME when the piece measures 76-78-80-82-84-86 cm cast off the middle 10-10-10-12-12-12 stitches for neck and each shoulder is finished separately. When the decreases for diagonal shoulders are finished, cast off the remaining 10-11-11-12-12-13 stitches. Work the other shoulder in the same way.

RIGHT FRONT PIECE:
Cast on 32-34-36-38-40-43 stitches with circular needle size 10 mm and 1 strand off white and 1 strand denim blue (= 2 strands). Work garter stitch and stripes. When the piece measures 43-44-46-47-49-51 cm cast on 2 new stitches for the sleeve at the end of each row from the right side a total of 9-8-8-7-7-6 times, then 1 stitch a total of 0-1-0-1-0-0 times = 18-17-16-15-14-12 new stitches = 50-51-52-53-54-55 stitches. Then cast on 9 new stitches at the end of the next row from the right side = 59-60-61-62-63-64 stitches. When the piece measures 68-70-72-74-76-78 cm, cast off stitches for the diagonal shoulder at the beginning of each row from the wrong side as follows: Cast off 9-9-10-9-10-10 stitches 1 time, 3 stitches a total of 10 times and 10-11-11-12-12-13 stitches 1 time = 10-10-10-11-11-11 stitches for shawl collar. Now work short rows over the collar as follows:

SHAWL COLLAR:
Work from mid front: * Work 2 rows over the first 6 stitches, 2 rows over all stitches *, work from *-* until the piece measures approx. 10-10-10-12-12-12 cm at the narrowest point (measured closest to the shoulder). Cast off.

LEFT FRONT PIECE:
Work as for the right front piece, but reversed; i.e. cast on new stitches at the end of each row from the wrong side and cast off stitches at the beginning of each row from the right side.

ASSEMBLY:
Sew shoulder seams in the outermost loop of the outermost stitch. Sew the shawl collar together mid back and sew onto the neckline on the back piece; make sure the seam is towards the wrong side when the collar is folded down.
Sew the underarm seams and side seams until you have approx. 23-24-25-25-27-28 cm left down to the bottom (= split).

This pattern has been corrected.

Updated online: 03.05.2018
The amount of yarn required has been adjusted

Diagram

symbols = knitting direction
diagram
Do you have a question? See a list of frequently asked questions (FAQ)

Knitting tension is what determines the final measurements of your work, and is usually measured per 10 x 10 cm. It is provided like so: number of stitches in width x number of rows in height - eg: 19 stitches x 26 rows = 10 x 10 cm.

The knitting tension is very individual; some people knit/crochet loosely while others work tightly. You adjust the knitting tension with the needle size, which is why the suggested needle size is only meant as a guide! You need to adjust this (up or down) to ensure that YOUR knitting tension matches the knitting tension provided in the pattern. If you work with a different knitting tension than provided you will have a different yarn consumption, and your work will have different measurements than what the pattern suggests.

The knitting tension also determines which yarns can replace each other. As long as you achieve the same knitting tension you can replace one yarn with another.

See DROPS lesson: How to measure your tension/gauge

See DROPS video: How to make a gauge tension swatch

The required amount of yarn is provided in grams, eg: 450 g. To calculate how many balls you’ll need you first need to know how many grams are in 1 ball (25g, 50g or 100g). This information is available if you click on the individual yarn quality on our pages. Divide the amount required with the amount of each ball. For example, if each ball is 50g (the most common amount), the calculation will be as follows: 450 / 50 = 9 balls.

The important thing when changing from one yarn to another is that the knitting/crochet tension remains the same. This is so that the measurements of the finished piece will be the same as on the sketch provided. It is easier to achieve the same knitting tension using yarns from the same yarn group. It is also possible to work with multiple strands of a thinner yarn to achieve the knitting tension of a thicker one. Please try our yarn converter. We recommend you to always work a test swatch.

Please NOTE: when changing yarn the garment might have a different look and feel to the garment in the photo, due to individual properties and qualities of each yarn.

See DROPS lesson: Can I use a different yarn than the one mentioned in the pattern?

All our yarns are categorised into yarn groups (from A to F) according to thickness and knitting tension – group A contains the thinnest yarns and group F the thickest. This makes it easier for you to find alternative yarns to our patterns, should you wish to switch yarn. All yarns within the same group have a similar knitting tension and can easily replace each other. However, different yarn qualities have different structures and properties which will give the finished work a unique look and feel.

Click here for an overview of the yarns in each yarn group

At the top of all our patterns you’ll find a link to our yarn calculator, which is a helpful tool should you wish to use a different yarn than suggested. By filling in the yarn quality you wish to replace, the amount (in your size) and number of strands, the calculator will present good alternative yarns with the same knitting tension. Additionally it will tell you how much you’ll require in the new qualities and whether you’ll need to work with multiple strands. Most skeins are 50g (some are 25g or 100g).

If the pattern is worked with multiple colours, every colour will have to be calculated separately. Similarly, if the pattern is worked with several strands of different yarns (for example 1 strand Alpaca and 1 strand Kid-Silk) you will have to find alternatives for each, individually.

Click here to see our yarn calculator

Since different yarns have different qualities and textures we have chosen to keep the original yarn in our patterns. However, you can easily find options among our available qualities by using our yarn calculator, or simply pick a yarn from the same yarn group.

It is possible that some retailers still have discontinued yarns in stock, or that someone has a few skeins at home that they would like to find patterns for.

The yarn calculator will provide both alternative yarn as well as required amount in the new quality.

If you think it's hard to decide what size to make, it can be a good idea to measure a garment you own already and like the size of. Then you can pick the size by comparing those measures with the ones available in the pattern's size chart.

You'll find the size chart at the bottom of the pattern.

See DROPS lesson: How to read size chart

The needle size provided in the pattern serves only as a guide, the important thing is to follow the knitting tension. And since knitting tension is very individual, you will have to adjust the needle size to ensure that YOUR tension is the same as in the pattern – maybe you’ll have to adjust 1, or even 2 needle sizes, up or down to achieve the correct tension. For this, we recommend that you work test swatches.

Should you work with a different knitting tension than the one provided, the measurements of the finished garment might deviate from the measurement sketch.

See DROPS lesson: How to measure your tension/gauge

See DROPS video: How to make a tension/gauge swatch

Working a garment top-down provides more flexibility and room for personal adjustment. For example it is easier to try the garment on while working, as well as making adjustments to length of yoke and shoulder caps.

The instructions are carefully explaining every step, in the correct order. Diagrams are adjusted to the knitting direction and are worked as usual.

The diagram depicts all rows/rounds, and every stitch seen from the right side. It is read from bottom to top, from right to left. 1 square = 1 stitch.

When working back and forth, every other row is worked from the right side and every other row is worked from the wrong side. When working from the wrong side, the diagram will have to be worked reversed: from left to right, knit stitches are purled, purl stitches are knit etc.

When working in the round every round is worked from the right side and the diagram are worked from right to left on all rounds.

See DROPS lesson: How to read knitting diagrams

The diagram depicts all rows/rounds, and every stitch seen from the right side. It is worked from bottom to top, from right to left.

When working back and forth every other row is worked from the right side: from right to left and every other row is worked from the wrong side: from left to right.

When working in the round, every row in the diagram are worked from the right side, from right to left.

When working a circular diagram you start in the middle and work your way outwards, counter clockwise, row by row.

The rows usually start with a given number of chain stitches (equivalent to the height of the following stitch), this will either be depicted in the diagram or explained in the pattern.

See DROPS lesson: How to read crochet diagrams

Instructions for working several diagrams after each other on the same row/round, will often be written like so: “work A.1, A.2, A.3 a total of 0-0-2-3-4 times". This means you work A.1 once, then A.2 is worked once, and A.3 is repeated (in width) the number of times provided for your size – in this case like so: S = 0 times, M = 0 times, L=2 times, XL= 3 times and XXL = 4 times.

The diagrams are worked as usual: begin with the first row in A.1, then work the first row in A.2 etc.

See DROPS lesson: How to read knitting diagrams

See DROPS lesson: How to read crochet diagrams

The total width of the garment (from wrist-to-wrist) will be larger in the larger sizes, despite the actual sleeves being shorter. The larger sizes have longer sleeve caps and wider shoulders, so there will be a good fit in all sizes.

The measurement sketch/schematic drawing provides information regarding the full length of the garment. If it’s a jumper or a jacket the length is measured from the highest point on the shoulder closest to the neckline, and straight down to the bottom of the garment. It is NOT measured from the tip of shoulder. Similarly, the length of yoke is measured from the highest point on the shoulder and down to where yoke is split into body and sleeves.

On a jacket measures are never taken along bands, unless specifically stated. Always measure inside band stitches when measuring the length.

See DROPS lesson: How to read a schematic drawing

Diagrams are often repeated on the round or in height. 1 repeat is the diagram the way it appears in the pattern. If it says to work 5 repeats of A.1 in the round, then you work A.1 a total of 5 times after/next to each other in the round. If it says to work 2 repeats of A.1 vertically/in height you work the entire diagram once, then begin again at the start and work the entire diagram one more time.

Chain stitches are slightly narrower than other stitches and to avoid working the cast-on edge too tight, we simply chain more stitches to begin with. The stitch count will be adjusted on the following row to fit the pattern and measurement sketch.

The rib edge is more elastic and will contract slightly compared to, for example, stocking stitch. By increasing before the rib edge, you avoid a visible difference in width between the rib edge and the rest of the body.

It’s very easy to cast off too tightly, and by making yarn overs while casting off (and simultaneously casting these off) you avoid a too tight cast off edge.

See DROPS video: How to bind off with yarn overs (yo)

To achieve an even increase (or decrease) you can increase on, for example: every 3rd and 4th row alternately, like so: work 2 rows and increase on the 3rd row, work 3 rows and increase on the 4th. Repeat this until the increase is complete.

See DROPS lesson: Increase or decrease 1 st on every 3rd and 4th row alternately

Should you prefer to work in the round instead of back and forth, you may of course adjust the pattern. You’ll need to add steeks mid-front (usually 5 stitches), and follow the instructions. When you would normally turn and work from the wrong side, simply work across the steek and continue in the round. At the end you’ll cut the piece open, pick up stitches to work bands, and cover the cut edges.

See DROPS video: How to knit steeks and cut open

Should you prefer to work back and forth instead of in the round, you may of course adjust the pattern so you work the pieces separately and then assemble them at the end. Divide the stitches for the body in 2, add 1 edge stitch in each side (for sewing) and work the front and back pieces separately.

See DROPS lesson: Can I adapt a pattern for circular needles into straight needles?

Pattern repeats can vary slightly in the different sizes, in order to get the correct proportions. If you’re not working the exact same size as the garment in the photo, yours might deviate slightly. This has been carefully developed and adjusted so that the complete impression of the garment is the same in all sizes.

Make sure to follow instructions and diagrams for your size!

If you have found a pattern you like which is available in women’s size it’s not very difficult to convert it to men’s size. The biggest difference will be the length of sleeves and body. Start working on the women size that you think would fit across the chest. The additional length will be worked right before you cast off for the armhole/sleeve cap. If the pattern is worked top-down you can add the length right after the armhole or before the first decrease on sleeve.

Regarding additional yarn amount, this will depend on how much length you add, but it is better with a skein too many than too few.

All yarns will have excess fibres (from production) that might come off as lint or shedding. Brushed yarns (ie hairier yarns) have more of these loose, excess fibres, causing more shedding.

Shedding also depends on what is worn under or over the garment, and whether this pulls at the yarn fibres. It’s therefore not possible to guarantee that there will be no shedding

Below are some tips on how to get the best result when working with hairier yarns:

1. When the garment is finished (before you wash it) shake it vigorously so the looser hairs come off. NOTE: do NOT use a lint roller, brush or any method that pulls at the yarn.

2. Place the garment in a plastic bag and put it in your freezer - the temperature will cause the fibres to become less attached to each other, and excess fibres will come off easier.

3. Leave in the freezer for a few hours before taking it out and shaking it again.

4. Wash the garment according to the instructions on the yarn label.

Pilling is a natural process that happens to even the most exclusive of fibers. It's a natural sign of wear and tear that is hard to avoid, and that is most visible in high friction areas of your garment like a sweater's arms and cuffs.

You can make your garment look as new by removing the pilling, using a fabric comb or a pill/lint remover.

Still can't find the answer you need? Then scroll down and leave your question so one of our experts can try to help you. This will be done normally within 5 to 10 working days.
In the meantime, you can read the questions and answers that others have left to this pattern or join the DROPS Workshop on Facebook to get help from fellow knitters/crocheters!

You might also like...

Post a comment to pattern DROPS 191-28

We would love to hear what you have to say about this pattern!

If you want to leave a question, please make sure you select the correct category in the form below, to speed up the answering process. Required fields are marked *.

Comments / Questions (33)

country flag Samants wrote:

Buongiorno, I vostri modelli sono sempre perfetti. Una curiosità :cosa significa l immagine rosa con il diamante sulla pagina iniziale dove sono le foto con i modelli?

16.08.2020 - 13:29

DROPS Design answered:

Buonasera Samants, il diamante rosa rappresenta i modelli in evidenza. Buon lavoro!

27.08.2020 - 19:46

country flag Angelika Kuhnert wrote:

Die Maße können irgendwie nicht stimmen wenn nach 53 cm für größe S der Ärmel beginnt

11.06.2020 - 10:57

DROPS Design answered:

Liebe Frau Kuhnert, die ersten Maschen für die Ärmel schlagen Sie/nehmen Sie nach 43 cm, und dann bei 53 cm sind sie alle angeschlagen - dann nehmen Sie ab/ketten Sie ab - siehe auch Maßskizze. Viel Spaß beim stricken!

11.06.2020 - 13:31

country flag Angelika Kuhnert wrote:

Ich stricke gerade die Jacke la Mare aber auf dem Bild ist es eher ein Mantel und nach der Anleitung wird es bei mir eine Jacke, obwohl ich das orginalgarn verwende. Lg

11.06.2020 - 08:40

DROPS Design answered:

Liebe Angelika, die Jacke ist tatsächlich von der Länge her ein Mantel. Schauen Sie sich am besten die Maße in der Skizze an, dort sehen Sie, wie lang die Jacke für Ihre Größe wird. Wenn Sie die cm-Angaben in der Anleitung befolgen, sollte die Jacke lang genug werden. Viel Spaß beim Weiterstricken!

11.06.2020 - 10:07

country flag Birte Høncke wrote:

Jeg ønsker at strikke model as 083 str large I nøjagtig samme farver som vist på model Har I ikke disse farver ?

30.03.2020 - 19:14

DROPS Design answered:

Hej Jakken på bilden är stickad i de färger som står i oppskriften, så de färgerna har vi. Färgerna kan se lite olika ut på skärmen. Mvh DROPS Design

31.03.2020 - 07:20

country flag Françoise Teycheney wrote:

Bonjour ! Je souhaite tricoter ce modèle mais j'ai vu que le modèle avait été corrigé quant à la quantité de laine employée. Le nombre de pelotes figurant en tête du modèle est-il le bon ? Merci pour votre réponse.

06.03.2020 - 12:37

DROPS Design answered:

Bonjour Mme Teycheney, les quantités indiquées actuellement sont les bonnes, si vous aviez imprimé le modèle avant la date de la correction, ce sont celles qui figurent actuellement que vous devez prendre. Bon tricot!

06.03.2020 - 13:40

country flag Blandine wrote:

Bonjour, je suis perdue. Pour le dos après 51 cm de haut en taille xxxl on nous dit d'augmenter de 6 fois 2 mailles à chaque fin de rang et on nous dit qu'on doit avoir 100 mailles hors si je compte bien au départ 76 mailles plus 12 mailles rajoutées je me retrouve avec 8ibmailles sur mes aiguilles. Pourriez me dire ce que j'ai raté. Merci

15.02.2020 - 20:47

DROPS Design answered:

Bonjour Blandine, on doit augmenter 6 x 2 mailles de chaque côté (= à la fin de chaque rang sur l'endroit et sur l'envers), vous aurez donc 12 mailles montées de chaque côté, soit 76+12+12= 100 m. Bon tricot!

17.02.2020 - 08:59

country flag Maria wrote:

Hay que planchar la chaqueta una vez montada¿?

10.10.2019 - 22:06

DROPS Design answered:

Hola Maria. No, no se recomienda planchar este tipo de chaquetas.

10.10.2019 - 23:33

country flag Valerie wrote:

Bonjour je désire le tricoter avec des aiguilles nm 5. vous me conseillez de rajouter combien de rangs sur chaque cotés et manches et chale svp ? merci

12.07.2019 - 11:47

DROPS Design answered:

Bonjour Valérie, nous ne sommes pas en mesure de pouvoir adapter chacun de nos modèles à chaque demande individuelle. Vous pouvez recalculer sur la base de votre échantillon et du schéma des mesures. Pour toute assistance complémentaire, merci de bien vouloir contacter, même par mail ou téléphone, le magasin où vous avez acheté votre laine. Bon tricot!

12.07.2019 - 13:11

country flag Lilou wrote:

Bonjour Madame, vous dites que l'on peut remplacer la laine indiquée par une laine de même catégorie. Je voulais remplacer air par Népal qui est aussi du groupe C, hors 1 fil Népal + 1 fil Brushed Alpaca Silk aiguille n° 10 me donne un échantillon de 8 cm de large au lieu de 10 ?... Que me suggérez vous Merci

10.06.2019 - 09:33

DROPS Design answered:

Bonjour Lilou, nous tricotons toutes d'une façon différente, et parfois, avec de grosses aiguilles, on a tendance à serrer, faites bien passer votre aiguille dans toute la maille pour qu'elle ait la bonne largeur, si vous n'avez pas assez de mailles pour 10 cm, essayez avec une aiguille d'une taille au-dessus (par ex. en 12). Vous trouverez plus d'infos sur les échantillons ici. Bon tricot!

11.06.2019 - 11:47

country flag Tiina wrote:

Langan menekki ei pidä paikkaansa. Farkunsininen Alpaca Silk ei riitä kokoon M ja jouduin ostamaan myös Airia lisää. Nähtäväksi jää riittääkö sitä yksi lisäkerä.

12.05.2019 - 20:37