DROPS Alpaca
DROPS Alpaca
100% Alpaca
from 3.40 £ /50g
DROPS Kid-Silk
DROPS Kid-Silk
75% Mohair, 25% Silk
from 4.60 £ /25g
Get the yarn to make this pattern from 33.20£.

The yarn cost is calculated from the pattern’s smallest size and the yarn’s cheapest product type. Looking for an even better price? You might find it on the DROPS Deals!

DROPS SS24

Le Conquet

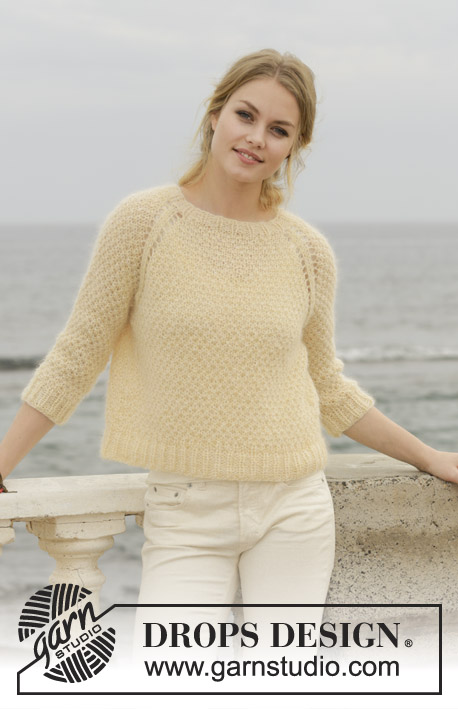
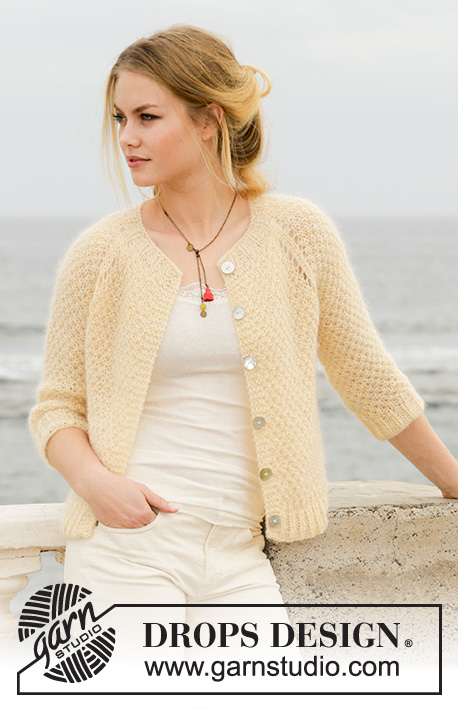
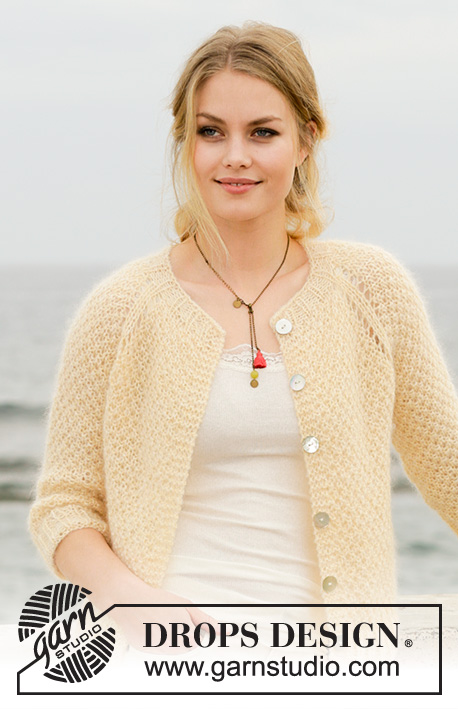
Jacket with raglan, moss stitch and ¾ sleeves, knitted top down. Size: S - XXXL Piece is knitted in 1 strand DROPS Alpaca and 2 strands DROPS Kid-Silk.

DROPS 191-8
DROPS design: Pattern z-817
Yarn group A + A + A or D
----------------------------------------------------------
Size: XS/S - M - L - XL - XXL - XXXL
Materials:
DROPS ALPACA from Garnstudio (belongs to yarn group A)
150-150-200-200-200-250 g colour no 2110, wheat
and use:
DROPS KID-SILK from Garnstudio (belongs to yarn group A)
125-125-125-150-150-175 g colour 01, off white

Piece can also be knitted with yarn from:
“Alternative yarn (yarn group A)” - see link below.

DROPS DOUBLE POINTED NEEDLES AND CIRCULAR NEEDLE (60 and 80 cm) SIZE 7 mm – or size needed to get 13 stitches and 15 rows in moss stitch with 3 strands = width 10 cm and 10 cm vertically.

DROPS DOUBLE POINTED NEEDLES and CIRCULAR NEEDLE (60 or 80 cm) SIZE 6 mm - for rib

DROPS MOTHER-OF-PEARL BUTTON ARCHED (white), NO 522: 6-6-6-7-7-7 pieces
----------------------------------------------------------

-------------------------------------------------------

Alternative Yarn – See how to change yarns here
Yarn Groups A to F – Use the same pattern and change the yarn here
Yarn usage using an alternative yarn – Use our yarn converter here

-------------------------------------------------------

DROPS Alpaca
DROPS Alpaca
100% Alpaca
from 3.40 £ /50g
DROPS Kid-Silk
DROPS Kid-Silk
75% Mohair, 25% Silk
from 4.60 £ /25g
Get the yarn to make this pattern from 33.20£.

The yarn cost is calculated from the pattern’s smallest size and the yarn’s cheapest product type. Looking for an even better price? You might find it on the DROPS Deals!

Pattern instructions

NOTE: This pattern is written in British English. All measurements in charts are in cm. For conversion from cm to inches - click here. There are different terms for crocheting in British and American English. If this pattern includes crochet, click for "crochet terms" here. For this pattern in American English, please click here.
----------------------------------------------------------

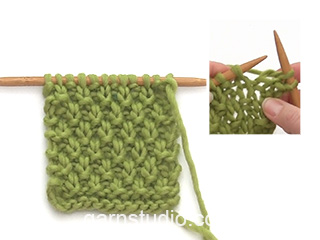
INFORMATION FOR PATTERN:

GARTER STITCH (back and forth):
1 ridge = knit 2 rows.

INCREASE TIP:
To calculate how to increase evenly, use the total number of stitches on row (e.g. 63 stitches), minus bands (e.g. 8 stitches) and divide the remaining stitches by number of increases to be done (e.g. 12) = 4.6.
In this example increase after alternately approx. every 4th and 5th stitch.
Increase 1 stitch by making 1 yarn over, on next row work yarn over twisted to avoid holes.

PATTERN:
See diagram A.1 (moss stitch). Diagrams show all rows in pattern seen from the right side.

RAGLAN:
All increases are done from the right side.
Increase on every other row (i.e. every row from right side) as follows: Begin 1 stitch before marker thread, make 1 yarn over, work 2 stitches in stocking stitch (marker thread is in the middle of these two stitches), make 1 yarn over (= 2 stitches increased). Increase on each side of the 4 marker threads.
On next row (wrong side) purl yarn overs to make holes, then work the increased stitch in pattern. The 2 stitches along each raglan line are worked in stocking stitch until yoke is done.

DECREASE TIP (applies to sides on body and mid under sleeves):
Work until 1 stitch remains before stitch with marker thread, slip 2 stitches as if to knit together, work next stitch as shown in A.1 and pass the 2 slipped stitches over. This way A.1 will continue nicely over decrease on next row/round.

BUTTONHOLES:
Decrease for buttonholes on right band (when garment is worn). Decrease from right side when 3 stitches remain on row as follows: Make 1 yarn over, knit the next 2 stitches together, knit last stitch. On next row knit yarn over to make holes.
Decrease first buttonhole when neck edge measures approx. 1½-2 cm. Then decrease the next 5-5-5-6-6-6 buttonholes approx. 7½-8-8-7-7½-8 cm apart.
----------------------------------------------------------

JACKET:
Work back and forth on circular needle from mid front, work top down. Sleeves are worked in the round on a short circular needle top down, switch to double pointed needles when needed.

NECK EDGE:
Cast on 63-63-69-75-78-81 stitches (including 4 band stitches in each side towards mid front) on circular needle size 6 mm with 1 strand Alpaca + 2 strands Kid-Silk (= 3 strands). Purl 1 row (= wrong side). Work next row as follows from right side: 4 band stitches in GARTER STITCH - see explanation above - * knit 1, purl 2 *, repeat from *-* until 5 stitches remain, knit 1 and finish with 4 band stitches in garter stitch. Continue rib like this for 3 cm – remember BUTTONHOLES on right band – see explanation above.
After rib purl 1 row from wrong side while increasing 12-12-14-14-11-10 stitches evenly - read INCREASE TIP = 75-75-83-89-89-91 stitches.
Now insert 4 marker threads in the piece as follows (without working the stitches): Insert first marker thread after the first 16-16-18-20-20-20 stitches (= front piece), insert 2nd marker thread after the next 9 stitches (= sleeve), insert 3rd marker thread after the next 25-25-29-31-31-33 stitches (= back piece), and insert 4th marker thread after the next 9 stitches (= sleeve). There are 16-16-18-20-20-20 stitches after last marker thread on front piece. Then work yoke as explained below.

YOKE:
Switch to circular needle size 7 mm and work first row from right side as follows: 4 band stitches in garter stitch, work A.1 over the next 11-11-13-15-15-15 stitches (begin and end with knit 1), make 1 yarn over, work 2 stitches in stocking stitch (marker thread is in the middle of these two stitches), make 1 yarn over, work A.1 over the next 7 stitches (begin and end with knit 1), make 1 yarn over, work 2 stitches in stocking stitch, make 1 yarn over, work A.1 over the next 23-23-27-29-29-31 stitches (begin and end with knit 1), make 1 yarn over, work 2 stitches in stocking stitch, make 1 yarn over, work A.1 over the next 7 stitches (begin and end with knit 1), make 1 yarn over, work 2 stitches in stocking stitch, make 1 yarn over, work A.1 over the next 11-11-13-15-15-15 stitches (begin and end with knit 1) and finish with 4 band stitches in garter stitch (= 8 stitches increased). Continue A.1 back and forth with 4 band stitches in garter stitch in each side towards mid front and 2 stitches in stocking stitch along each raglan line. AT THE SAME TIME continue increase in RAGLAN on each side of the 4 marker threads – see explanation above, until 11-15-16-16-19-20 increases have been done in total along each raglan line (including increase on first row after neck edge). REMEMBER THE KNITTING TENSION! After last increase there are 163-195-211-217-241-251 stitches on needle. Continue pattern with 2 stitches in stocking stitch along each raglan line until piece measures 18-24-25-25-29-30 cm from cast-on edge mid front.
Work next row as follows from wrong side: Work the first 26-30-32-34-38-40
stitches as before, slip the next 33-41-45-45-49-49 stitches on 1 stitch holder for sleeve, cast on 5-5-5-7-7-11 new stitches on needle (= in the side under sleeve), work the next 45-53-57-59-67-73 stitches as before, slip the next 33-41-45-45-49-49 stitches on a stitch holder for sleeve, cast on 5-5-5-7-7-11 new stitches on needle and work the last 26-30-32-34-38-40 stitches as before. Then finish body and sleeves separately. NOW MEASURE THE PIECE FROM HERE!

BODY:
= 107-123-131-141-157-175 stitches. Insert 1 marker thread in the middle of the 5-5-5-7-7-11 stitches cast on under sleeve in each side and move the marker threads upwards when working.
Continue A.1 back and forth with 4 band stitches in garter stitch in each side. When piece measures 4 cm from division, decrease 2 stitches in each side - read DECREASE TIP (= 4 stitches decreased). Decrease like this every 6-4-4-8-8-8 cm a total of 3-3-3-2-2-2 times in each side = 95-111-119-133-149-167 stitches.
When piece measures 19-15-16-18-16-17 cm from division, knit 1 row from right side while increasing 13-12-13-17-19-19 stitches evenly = 108-123-132-150-168-186 stitches. Switch to circular needle size 6 mm. Work next row as follows from wrong side: 4 band stitches in garter stitch, * purl 1, knit 2 *, repeat from *-* until 5 stitches remain, purl 1 and 4 band stitches in garter stitch. Continue rib like this for 4 cm. Switch back to circular needle size 7 mm and cast off with knit over knit and purl over purl - make sure to avoid a tight cast-off edge. Jacket measures approx. 44-46-48-50-52-54 cm from shoulder and down.

SLEEVE:
Slip the 33-41-45-45-49-49 stitches from stitch holder in one side of piece on a short circular needle size 7 mm and pick in addition up 1 stitch in each of the 5-5-5-7-7-11 stitches cast on under sleeve = 38-46-50-52-56-60 stitches. Insert 1 marker thread in the middle stitch of the 5-5-5-7-7-11 stitches under sleeve. Continue A.1 in the round. When piece measures 3 cm from division, decrease 2 stitches mid under sleeve - read DECREASE TIP. Decrease like this every 13-3½-3-3-2-1½cm 3-7-8-8-10-11 times in total = 32-32-34-36-36-38 stitches. Continue until sleeve measures 32-27-26-26-23-22 cm from division (shorter measurements in the larger sizes because of wider neck and longer yoke). Knit 1 round while increasing 4-4-5-3-3-4 stitches evenly = 36-36-39-39-39-42 stitches. Switch to double pointed needles size 6 mm. Work rib in the round = knit 1/purl 2 for 4 cm. Cast off with knit over knit and purl over purl but to avid at tight cast-off edge make 1 yarn over after every 6th stitch at the same time cast off (cast off yarn overs as stitches). Sleeve measures approx. 36-31-30-30-27-26 cm from division. Work the other sleeve the same way.

ASSEMBLY:
Sew the buttons on to the left band.

This pattern has been corrected.

Updated online: 11.02.2019
Correction- BODY: Work next row as follows from wrong side: 4 band stitches in garter stitch, * purl 1, knit 2 *, repeat from *-*

Diagram

symbols = knit from the right side, purl from the wrong side
symbols = purl from the right side, knit from the wrong side
diagram

Each of our patterns has specific tutorial videos to help you.

Do you have a question? See a list of frequently asked questions (FAQ)

Knitting tension is what determines the final measurements of your work, and is usually measured per 10 x 10 cm. It is provided like so: number of stitches in width x number of rows in height - eg: 19 stitches x 26 rows = 10 x 10 cm.

The knitting tension is very individual; some people knit/crochet loosely while others work tightly. You adjust the knitting tension with the needle size, which is why the suggested needle size is only meant as a guide! You need to adjust this (up or down) to ensure that YOUR knitting tension matches the knitting tension provided in the pattern. If you work with a different knitting tension than provided you will have a different yarn consumption, and your work will have different measurements than what the pattern suggests.

The knitting tension also determines which yarns can replace each other. As long as you achieve the same knitting tension you can replace one yarn with another.

See DROPS lesson: How to measure your tension/gauge

See DROPS video: How to make a gauge tension swatch

The required amount of yarn is provided in grams, eg: 450 g. To calculate how many balls you’ll need you first need to know how many grams are in 1 ball (25g, 50g or 100g). This information is available if you click on the individual yarn quality on our pages. Divide the amount required with the amount of each ball. For example, if each ball is 50g (the most common amount), the calculation will be as follows: 450 / 50 = 9 balls.

The important thing when changing from one yarn to another is that the knitting/crochet tension remains the same. This is so that the measurements of the finished piece will be the same as on the sketch provided. It is easier to achieve the same knitting tension using yarns from the same yarn group. It is also possible to work with multiple strands of a thinner yarn to achieve the knitting tension of a thicker one. Please try our yarn converter. We recommend you to always work a test swatch.

Please NOTE: when changing yarn the garment might have a different look and feel to the garment in the photo, due to individual properties and qualities of each yarn.

See DROPS lesson: Can I use a different yarn than the one mentioned in the pattern?

All our yarns are categorised into yarn groups (from A to F) according to thickness and knitting tension – group A contains the thinnest yarns and group F the thickest. This makes it easier for you to find alternative yarns to our patterns, should you wish to switch yarn. All yarns within the same group have a similar knitting tension and can easily replace each other. However, different yarn qualities have different structures and properties which will give the finished work a unique look and feel.

Click here for an overview of the yarns in each yarn group

At the top of all our patterns you’ll find a link to our yarn calculator, which is a helpful tool should you wish to use a different yarn than suggested. By filling in the yarn quality you wish to replace, the amount (in your size) and number of strands, the calculator will present good alternative yarns with the same knitting tension. Additionally it will tell you how much you’ll require in the new qualities and whether you’ll need to work with multiple strands. Most skeins are 50g (some are 25g or 100g).

If the pattern is worked with multiple colours, every colour will have to be calculated separately. Similarly, if the pattern is worked with several strands of different yarns (for example 1 strand Alpaca and 1 strand Kid-Silk) you will have to find alternatives for each, individually.

Click here to see our yarn calculator

Since different yarns have different qualities and textures we have chosen to keep the original yarn in our patterns. However, you can easily find options among our available qualities by using our yarn calculator, or simply pick a yarn from the same yarn group.

It is possible that some retailers still have discontinued yarns in stock, or that someone has a few skeins at home that they would like to find patterns for.

The yarn calculator will provide both alternative yarn as well as required amount in the new quality.

If you think it's hard to decide what size to make, it can be a good idea to measure a garment you own already and like the size of. Then you can pick the size by comparing those measures with the ones available in the pattern's size chart.

You'll find the size chart at the bottom of the pattern.

See DROPS lesson: How to read size chart

The needle size provided in the pattern serves only as a guide, the important thing is to follow the knitting tension. And since knitting tension is very individual, you will have to adjust the needle size to ensure that YOUR tension is the same as in the pattern – maybe you’ll have to adjust 1, or even 2 needle sizes, up or down to achieve the correct tension. For this, we recommend that you work test swatches.

Should you work with a different knitting tension than the one provided, the measurements of the finished garment might deviate from the measurement sketch.

See DROPS lesson: How to measure your tension/gauge

See DROPS video: How to make a tension/gauge swatch

Working a garment top-down provides more flexibility and room for personal adjustment. For example it is easier to try the garment on while working, as well as making adjustments to length of yoke and shoulder caps.

The instructions are carefully explaining every step, in the correct order. Diagrams are adjusted to the knitting direction and are worked as usual.

The diagram depicts all rows/rounds, and every stitch seen from the right side. It is read from bottom to top, from right to left. 1 square = 1 stitch.

When working back and forth, every other row is worked from the right side and every other row is worked from the wrong side. When working from the wrong side, the diagram will have to be worked reversed: from left to right, knit stitches are purled, purl stitches are knit etc.

When working in the round every round is worked from the right side and the diagram are worked from right to left on all rounds.

See DROPS lesson: How to read knitting diagrams

The diagram depicts all rows/rounds, and every stitch seen from the right side. It is worked from bottom to top, from right to left.

When working back and forth every other row is worked from the right side: from right to left and every other row is worked from the wrong side: from left to right.

When working in the round, every row in the diagram are worked from the right side, from right to left.

When working a circular diagram you start in the middle and work your way outwards, counter clockwise, row by row.

The rows usually start with a given number of chain stitches (equivalent to the height of the following stitch), this will either be depicted in the diagram or explained in the pattern.

See DROPS lesson: How to read crochet diagrams

Instructions for working several diagrams after each other on the same row/round, will often be written like so: “work A.1, A.2, A.3 a total of 0-0-2-3-4 times". This means you work A.1 once, then A.2 is worked once, and A.3 is repeated (in width) the number of times provided for your size – in this case like so: S = 0 times, M = 0 times, L=2 times, XL= 3 times and XXL = 4 times.

The diagrams are worked as usual: begin with the first row in A.1, then work the first row in A.2 etc.

See DROPS lesson: How to read knitting diagrams

See DROPS lesson: How to read crochet diagrams

The total width of the garment (from wrist-to-wrist) will be larger in the larger sizes, despite the actual sleeves being shorter. The larger sizes have longer sleeve caps and wider shoulders, so there will be a good fit in all sizes.

The measurement sketch/schematic drawing provides information regarding the full length of the garment. If it’s a jumper or a jacket the length is measured from the highest point on the shoulder closest to the neckline, and straight down to the bottom of the garment. It is NOT measured from the tip of shoulder. Similarly, the length of yoke is measured from the highest point on the shoulder and down to where yoke is split into body and sleeves.

On a jacket measures are never taken along bands, unless specifically stated. Always measure inside band stitches when measuring the length.

See DROPS lesson: How to read a schematic drawing

Diagrams are often repeated on the round or in height. 1 repeat is the diagram the way it appears in the pattern. If it says to work 5 repeats of A.1 in the round, then you work A.1 a total of 5 times after/next to each other in the round. If it says to work 2 repeats of A.1 vertically/in height you work the entire diagram once, then begin again at the start and work the entire diagram one more time.

Chain stitches are slightly narrower than other stitches and to avoid working the cast-on edge too tight, we simply chain more stitches to begin with. The stitch count will be adjusted on the following row to fit the pattern and measurement sketch.

The rib edge is more elastic and will contract slightly compared to, for example, stocking stitch. By increasing before the rib edge, you avoid a visible difference in width between the rib edge and the rest of the body.

It’s very easy to cast off too tightly, and by making yarn overs while casting off (and simultaneously casting these off) you avoid a too tight cast off edge.

See DROPS video: How to bind off with yarn overs (yo)

To achieve an even increase (or decrease) you can increase on, for example: every 3rd and 4th row alternately, like so: work 2 rows and increase on the 3rd row, work 3 rows and increase on the 4th. Repeat this until the increase is complete.

See DROPS lesson: Increase or decrease 1 st on every 3rd and 4th row alternately

Should you prefer to work in the round instead of back and forth, you may of course adjust the pattern. You’ll need to add steeks mid-front (usually 5 stitches), and follow the instructions. When you would normally turn and work from the wrong side, simply work across the steek and continue in the round. At the end you’ll cut the piece open, pick up stitches to work bands, and cover the cut edges.

See DROPS video: How to knit steeks and cut open

Should you prefer to work back and forth instead of in the round, you may of course adjust the pattern so you work the pieces separately and then assemble them at the end. Divide the stitches for the body in 2, add 1 edge stitch in each side (for sewing) and work the front and back pieces separately.

See DROPS lesson: Can I adapt a pattern for circular needles into straight needles?

Pattern repeats can vary slightly in the different sizes, in order to get the correct proportions. If you’re not working the exact same size as the garment in the photo, yours might deviate slightly. This has been carefully developed and adjusted so that the complete impression of the garment is the same in all sizes.

Make sure to follow instructions and diagrams for your size!

If you have found a pattern you like which is available in women’s size it’s not very difficult to convert it to men’s size. The biggest difference will be the length of sleeves and body. Start working on the women size that you think would fit across the chest. The additional length will be worked right before you cast off for the armhole/sleeve cap. If the pattern is worked top-down you can add the length right after the armhole or before the first decrease on sleeve.

Regarding additional yarn amount, this will depend on how much length you add, but it is better with a skein too many than too few.

All yarns will have excess fibres (from production) that might come off as lint or shedding. Brushed yarns (ie hairier yarns) have more of these loose, excess fibres, causing more shedding.

Shedding also depends on what is worn under or over the garment, and whether this pulls at the yarn fibres. It’s therefore not possible to guarantee that there will be no shedding

Below are some tips on how to get the best result when working with hairier yarns:

1. When the garment is finished (before you wash it) shake it vigorously so the looser hairs come off. NOTE: do NOT use a lint roller, brush or any method that pulls at the yarn.

2. Place the garment in a plastic bag and put it in your freezer - the temperature will cause the fibres to become less attached to each other, and excess fibres will come off easier.

3. Leave in the freezer for a few hours before taking it out and shaking it again.

4. Wash the garment according to the instructions on the yarn label.

Pilling is a natural process that happens to even the most exclusive of fibers. It's a natural sign of wear and tear that is hard to avoid, and that is most visible in high friction areas of your garment like a sweater's arms and cuffs.

You can make your garment look as new by removing the pilling, using a fabric comb or a pill/lint remover.

Still can't find the answer you need? Then scroll down and leave your question so one of our experts can try to help you. This will be done normally within 5 to 10 working days.
In the meantime, you can read the questions and answers that others have left to this pattern or join the DROPS Workshop on Facebook to get help from fellow knitters/crocheters!

You might also like...

Le Conquet

Kristine, Denmark

Gul sommarkofta

Susanne, Sweden

Post a comment to pattern DROPS 191-8

We would love to hear what you have to say about this pattern!

If you want to leave a question, please make sure you select the correct category in the form below, to speed up the answering process. Required fields are marked *.

Comments / Questions (73)

country flag Veronique FERRON wrote:

Il y a un sérieux pbm au niveau des quantités de laine préconisées. Pour une taille L, il est demandé 200+125 en laine de groupe A, soit un total de 325g. J en suis à mon 2d reassort. Au total il manquait 200 g....Dommage...

23.08.2021 - 19:05

DROPS Design answered:

Bonjour Mme Ferron, avez-vous bien tricoté en Alpaca (= 4 pelotes) et en Kid-Silk (= 5 pelotes)? Et aviez-vous bien le bon échantillon en largeur autant qu'en hauteur? Nous n'avions pas encore eu de retour similaire.

24.08.2021 - 08:20

country flag Maria wrote:

Jag tyckte det inte framgick tydligt att det rörde sig om dubbel mosstickning. I beskrivningen står det bara mosstickning överallt och jag kan tycka att man kan nämna tydligare att det rör sig om dubbel mosstickning. Diagrammet förklarar ju det men även texten bör nämna det.

28.07.2021 - 13:26

country flag Helen Fontenot wrote:

Thanks for the quick response to sizes in inches for Drops design 191/8. I guess I was thinking cm measurements. Now I fill better and a million thanks. I prefer to do Top down raglan cardigans for the ease of trying on for that perfect fit.

04.07.2021 - 00:49

country flag Helen Fontenot wrote:

What sizes in inches are the measurements for the DROPs 191.8 cardigan

03.07.2021 - 03:14

DROPS Design answered:

Dear Helen, you can find the measurements of the finihsed piece on the schematic drawing at the bottom of the instructions. We always suggest that you compare those to a sweater that fits you nicely. Happy Stitching!

03.07.2021 - 06:57

country flag Monia wrote:

Buongiorno vorrei provare a fare questo cardigan con il cotone quale posso scegliere? e quanto ne devo prendere?

10.04.2021 - 16:15

DROPS Design answered:

Buongiorno Monia, può provare a lavorarlo con 3 capi del filato Safran: per calcolare la quantità necessaria per la sua taglia, provi a seguire questo tutorial. Buon lavoro!

11.04.2021 - 11:57

country flag Fausta wrote:

Come si fa a prendere 2 capi di un filato e 1 capo dell altro filato?

09.03.2021 - 22:52

DROPS Design answered:

Buonasera Fausta, deve lavorare on 2 fili di Kid-Silk e 1 filo di Alpaca. Buon lavoro!

09.03.2021 - 23:21

country flag Kirsten Markvardsen wrote:

Hej. Er det Baby Alpaca, der skal bruges til denne cardigan ? Kan det passe at man kun skal bruge 3 nøgler alpaca og 5 nøgler Kid Silk til hele trøjen i str. medium ?? Tak. MVH Kirsten

22.12.2020 - 09:18

DROPS Design answered:

Hej Kirsten, Det er 1 tråd DROPS alpaca og 2 tråde DROPS Kid-Silk, og du skal overholde strikkefastheden :)

22.12.2020 - 09:37

country flag Biojout Deborah wrote:

Bonjour, j'ai une petite question à vous poser. J'en suis ici :"Après la dernière augmentation, on a 163-195-211-217-241-251 mailles. Continuer au point de blé avec 2 mailles jersey le long de chaque raglan jusqu'à ce que l'ouvrage mesure 18-24-25-25-29-30 cm depuis le rang de montage au milieu devant." À partir de là, je continuer à faire le raglan mais sans augmentations c'est bien ça ?

05.10.2020 - 13:03

DROPS Design answered:

Bonjour Mme Biojout, à partir de là, vous continuez comme avant (= point de blé et 2 mailles jersey à chaque raglan) mais vous n'augmentez plus de chaque côté des 2 mailles jersey. Bon tricot!

05.10.2020 - 15:35

country flag Bernadette wrote:

Bonjour, J'aimerais tricoter le gilet "Le Conquet" non pas avec des manches 3/4 mais avec des manches longues. Pourriez-vous me dire SVP quelle quantité de laine dois-je rajouter pour le réaliser en taille XL ? Merci pour votre aimable réponse. Cordialement

10.08.2020 - 12:09

DROPS Design answered:

Bonjour Bernadette, nous ne sommes malheureusement pas en mesure de pouvoir adapter chacun de nos modèles à chaque demande - vous pouvez consulter les modèles similaires de même tension pour vous en inspirer et demander de l'aide à votre magasin - même par mail ou téléphone. Bon tricot!

10.08.2020 - 12:43

country flag Maya Nesbit wrote:

Hej Jeg skal igang med at strikke ærme. Der står, at jeg skal strikke A1-mønsteret - men hvordan får jeg det til at passe, over raglanlinjen, hvor der jo er 2 masker glatstrik - da det kun er 2 masker og der er samme type maske før og efter de 2 masker glatstrik kan jeg ikke få det til at passe. Hvordan gør jeg, så det bliver pænt? Mvh Maya

02.08.2020 - 22:54

DROPS Design answered:

Hei Maya. Nå er du ferdig med raglanøkningene og de 2 glattstrikkete maskene i raglanslinjen, så nå skal det strikkes etter mønster og perlestrikken vil da stemme. God Fornøyelse!

10.08.2020 - 13:54