DROPS Paris
DROPS Paris
100% Cotton
from 1.10 £ /50g
Get the yarn to make this pattern from 19.80£.

The yarn cost is calculated from the pattern’s smallest size and the yarn’s cheapest product type. Looking for an even better price? You might find it on the DROPS Deals!

DROPS SS24

Cressida

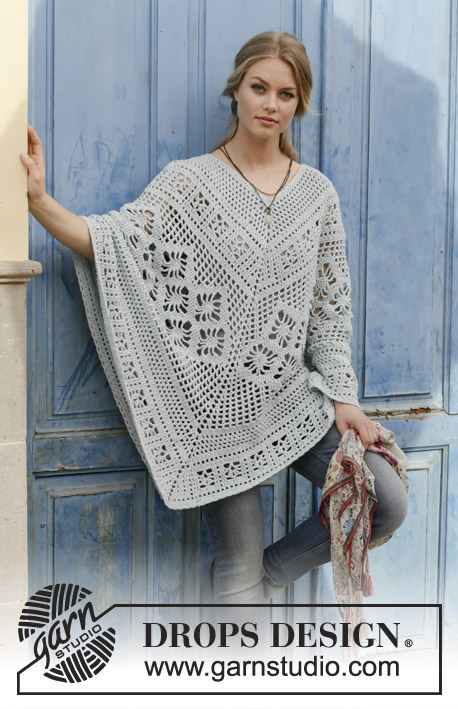
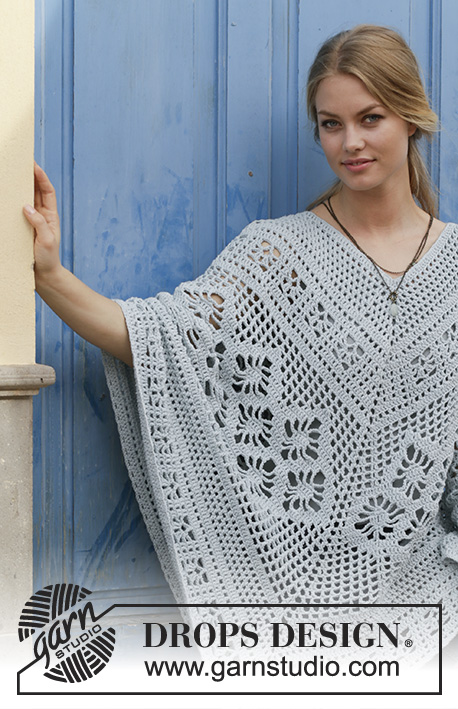
Crocheted poncho with lace pattern, worked top down. Size: S - XXXL Piece is crocheted in DROPS Paris.

DROPS 188-27
DROPS design: Pattern w-697
Yarn group C or A + A
----------------------------------------------------------
Size: S/M – L/XL – XXL/XXXL
Materials:
DROPS PARIS from Garnstudio (belongs to yarn group C)
900-1100-1300 g colour 29, light ice blue

Piece can also be crocheted with yarn from:
“Alternative yarn (yarn group C)” - see link below.

DROPS CROCHET HOOK SIZE 4.5 mm - or size needed to get 16 treble crochets x 9 rows = 10 cm in width and 10 cm vertically.
----------------------------------------------------------

-------------------------------------------------------

Alternative Yarn – See how to change yarns here
Yarn Groups A to F – Use the same pattern and change the yarn here
Yarn usage using an alternative yarn – Use our yarn converter here

-------------------------------------------------------

More like this:
Women Ponchoslace top down v-neck
DROPS Paris
DROPS Paris
100% Cotton
from 1.10 £ /50g
Get the yarn to make this pattern from 19.80£.

The yarn cost is calculated from the pattern’s smallest size and the yarn’s cheapest product type. Looking for an even better price? You might find it on the DROPS Deals!

Pattern instructions

NOTE: This pattern is written in British English. All measurements in charts are in cm. For conversion from cm to inches - click here. There are different terms for crocheting in British and American English. If this pattern includes crochet, click for "crochet terms" here. For this pattern in American English, please click here.
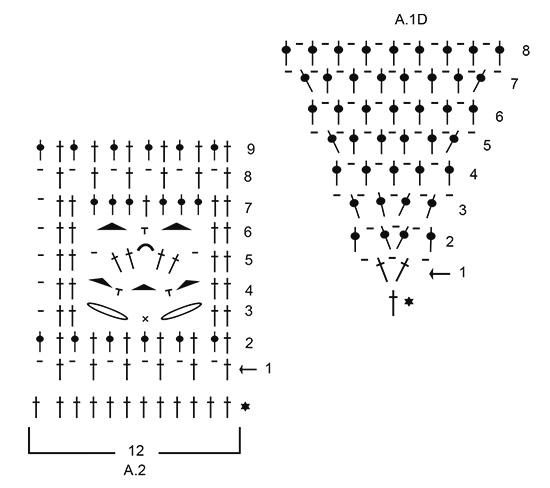
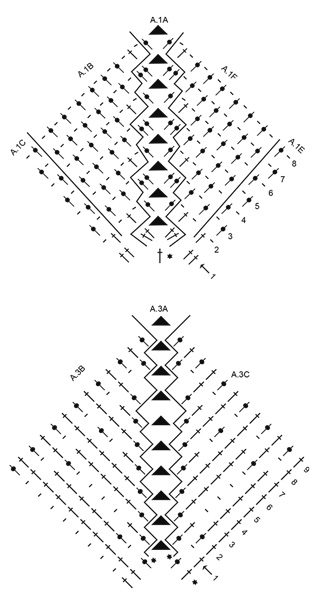
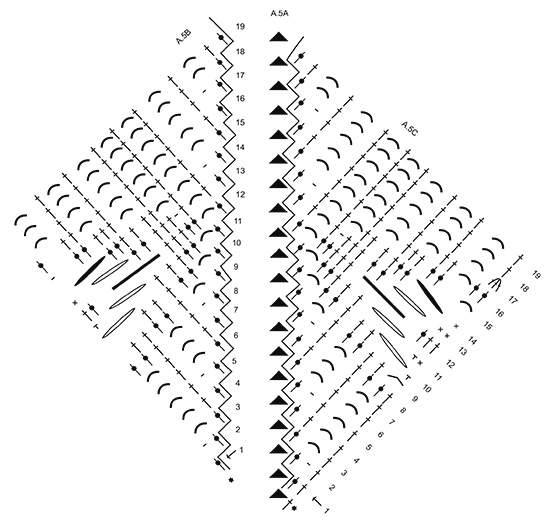
INFORMATION FOR PATTERN:

PATTERN: 
See diagrams A.1 to A.5.

CROCHET INFO:
The first treble crochet at the beginning of round are replaced with 3 chain stitches. Finish round with 1 slip stitch in 3rd chain stitch at beginning of round, then work slip stitches until middle space.

DECREASE TIP - WORK 2 DOUBLE TREBLE CROCHETS TOGETHER:
Work 1 double treble crochet around chain space below but wait with last pull through (= 2 stitches on hook), skip 1 double crochet and work 1 double treble crochet around next chain space but on last pull through pull yarn through all loops on hook.

INCREASE TIP:
Increase 1 treble crochet by working 2 treble crochets in same stitch.
----------------------------------------------------------

PONCHO:
Poncho is worked in the round, top down. First increase mid front, mid back and on each side of each shoulder, then increase only mid front and mid back.

Work 156-166-166 chain stitches on hook size 4.5 mm with Paris and form a ring with 1 slip stitch in first chain stitch.
Work 3 chain stitches - read CROCHET INFO! Then work 1 treble crochet in each of the next 5-3-3 chain stitches, * skip 1 chain stitch, work 1 treble crochet in each of the next 5 chain stitches *, work from *-* 25-27-27 times in total = 130-138-138 treble crochets + 3 chain stitches at beginning of round. REMEMBER THE CROCHET TENSION!

Now insert 6 markers from beginning of round as follows (without working): Insert 1 marker in 1st treble crochet on round (i.e. in treble crochet after the 3 chain stitches = mid back), skip 24-26-26 treble crochets, insert 1 marker in next treble crochet (= shoulder), skip 14 treble crochets, insert 1 marker in next treble crochet (= shoulder), skip 24-26-26 treble crochets, insert 1 marker in next treble crochet (= mid front), skip 24-26-26 treble crochets, insert 1 marker in next treble crochet (= shoulder), skip 14 treble crochets, insert 1 marker in next treble crochet (= shoulder), there are now 24-26-26 treble crochets between last marker and beginning of round.

WORK A.1 AS FOLLOWS:
Work 1st round as follows: Work * A.1A in first/next treble crochet with marker (= mid front/mid back), repeat A.1C 12-13-13 times in total, A.1D in next treble crochet with marker (= shoulder increase), repeat A.1E 7 times in total, A.1D in next treble crochet with marker (= shoulder increase), A.1E 12-13-13 times in total *, work from *-* 2 times in total.
Work 2nd round as follows: Work * A.1A (= mid front/mid back), A.1B, repeat A.1C 12-13-13 times in total, A.1D (= shoulder increase), repeat A.1E 7 times in total, A.1D (= shoulder increase), A.1E 12-13-13 times in total, A.1F *, work from *-* 2 times in total. Continue to and with 6th-7th-8th round in diagram A.1.
There are now 108-128-132 stitches between chain space mid front and mid back (= 216-256-264 stitches + 2 middle spaces on round).
Piece measures approx. 8-9-10 cm in crochet direction (measure down from the shoulder from the cast-on edge).

ROUND WITH TREBLE CROCHETS:
Work 1 round with treble crochets, work (2 treble crochets, 3 chain stitches, 2 treble crochets) around middle space, and adjust AT THE SAME TIME number of treble crochets to decrease/increase as follows:
S/M – XXL/XXXL: Increase 1-1 treble crochet along each of the sides between mid front/mid back (= 2-2 treble crochets in total) – read INCREASE TIP
L/XL: Decrease 7 treble crochets along each of the sides between mid front/mid back (= 14 treble crochets in total) – read DECREASE TIP
There are now 113-125-137 stitches between chain space mid front and mid back (= 226-250-274 stitches + 2 middle spaces on round).
NOTE! Do not increase on each side of each shoulder onwards, but only mid front and mid back on poncho! 

WORK A.2/A.3 AS FOLLOWS:
Work * A.3A (= middle space), A.3B over 3 treble crochets, A.2 (= 12 stitches) 9-10-11 times in total in width, A.3C over the next 2 treble crochets *, work from *-* 2 times in total. On 9th round increase 12-24-36 treble crochets evenly on each side of A.3A (i.e. increase 24-48-72 treble crochets in total on round) = 145-169-193 treble crochets between chain space mid front and mid back (= 290-338-386 treble crochets in total + 2 middle spaces on round) – read INCREASE TIP.
Piece measures approx. 19-20-21 cm in crochet direction from cast-on edge.

WORK A.4/A.5 AS FOLLOWS:
Work * A.5A (= middle space), A.5B, A.4 (= 24 stitches) 6-7-8 times in total in width, A.5C over next treble crochet *, work from *-* 2 times in total.
When A.5 has been done vertically, 19 rounds have been worked, continue on 20th round as follows: Work * A.5D, A.5E over 1 treble crochet, A.5F 7 times in total in width, A.4 (= 24 stitches) 6-7-8 times in total in width, A.5F 7 times in total in width, A.5G *, work from *-* 2 times in total. When A.4/A.5 have been worked, there are 211-235-259 treble crochets between chain space mid front and mid back (= 422-470-518 treble crochets in total + 2 middle spaces on round).
Piece measures approx. 46-47-48 cm in crochet direction from cast-on edge.

WORK 2ND AND 3RD ROUND IN A.1 AS FOLLOWS:
Begin around one middle space and begin from 3rd round in diagram.
Work * A.1A (= middle space), repeat A.1C until next middle space (work last stitch only over 1 stitch on first round *, work from *-* 2 times in total. Repeat 2nd and 3rd round until 4-8-10 rounds have been worked in total.
Piece measures approx. 51-56-59 cm in crochet direction from cast-on edge.

ROUND WITH TREBLE CROCHETS:
Work 1 round with treble crochets and decrease AT THE SAME TIME 7-5-5 treble crochets evenly along each of the sides between mid front/mid back (= 14-10-10 treble crochets in total) as follows: Work * (2 treble crochets, 3 chain stitches, 2 treble crochets) around middle space, then work 1 treble crochet in every treble crochet and 1 treble crochet around every chain stitch until next middle space *, work from *-* 2 times in total = 209-245-269 treble crochets between chain space mid front and mid back (= 418-490-538 treble crochets + 2 middle space on round). Cut the yarn.

WORK A.2/A.3 AS FOLLOWS:
Work * A.3A (= middle space), A.3B over 3 treble crochets, A.2 (= 12 stitches) 17-20-22 times in total in width, A.3C over the next 2 treble crochets *, work from *-* 2 times in total.
When A.2/A.3 have been worked, there are 229-265-289 treble crochets between chain space mid front and mid back (= 458-530-578 treble crochets + 2 middle spaces on round). Piece measures approx. 62-67-70 cm in crochet direction from cast-on edge.

EDGE:
Work a finishing edge around the entire poncho as follows: 1 slip stitch in first stitch, * work 3 chain stitches, skip 2 stitches, 1 double crochet in next stitch *, work from *-* the entire round and finish with 1 slip stitch in slip stitch at beginning of round. Fasten off.

This pattern has been corrected.

Updated online: 09.04.2018
Correction under PONCHO:...Now insert 6 markers from beginning of round as follows (without working): Insert 1 marker in 1st treble crochet on round (i.e. in treble crochet after the 3 chain stitches = mid back), skip 24-26-26 treble crochets, insert 1 marker in next treble crochet (= shoulder), skip 14 treble crochets, insert 1 marker in next treble crochet (= shoulder), skip 24-26-26 treble crochets, insert 1 marker in next treble crochet (= mid front), skip 24-26-26 treble crochets, insert 1 marker in next treble crochet (= shoulder), skip 14 treble crochets, insert 1 marker in next treble crochet (= shoulder), there are now 24-26-26 treble crochets between last marker and beginning of round.

WORK A.1 AS FOLLOWS:
Work 1st round as follows: Work * A.1A in first/next treble crochet with marker (= mid front/mid back), repeat A.1C 12-13-13 times in total, A.1D in next treble crochet with marker (= shoulder increase), repeat A.1E 7 times in total, A.1D in next treble crochet with marker (= shoulder increase), A.1E 12-13-13 times in total *, work from *-* 2 times in total.
Work 2nd round as follows: Work * A.1A (= mid front/mid back), A.1B, repeat A.1C 12-13-13 times in total, A.1D (= shoulder increase), repeat A.1E 7 times in total, A.1D (= shoulder increase), A.1E 12-13-13 times in total, A.1F *, work from *-* 2 times in total. Continue to and with 6th-7th-8th round in diagram A.1...

Diagram

symbols = 1 chain stitch
symbols = 2 chain stitches
symbols = 3 chain stitches
symbols = 4 chain stitches
symbols = 5 chain stitches
symbols = 6 chain stitches
symbols = 7 chain stitches
symbols = 8 chain stitches
symbols = 1 double crochet in stitch
symbols = 1 double crochet around chain space
symbols = 1 treble crochet in stitch
symbols = 1 treble crochet around chain stitch/chain space
symbols = work 3 treble crochets together as follows: Work 1 treble crochet in next treble crochet but wait with last pull through (= 2 loops on hook), work 1 treble crochet in each of the next 2 treble crochets the same way, then pull yarn through all 4 loops on hook
symbols = begin here = 1st round
symbols = this round has already been worked
diagram
diagram
diagram
diagram
diagram
Do you have a question? See a list of frequently asked questions (FAQ)

Knitting tension is what determines the final measurements of your work, and is usually measured per 10 x 10 cm. It is provided like so: number of stitches in width x number of rows in height - eg: 19 stitches x 26 rows = 10 x 10 cm.

The knitting tension is very individual; some people knit/crochet loosely while others work tightly. You adjust the knitting tension with the needle size, which is why the suggested needle size is only meant as a guide! You need to adjust this (up or down) to ensure that YOUR knitting tension matches the knitting tension provided in the pattern. If you work with a different knitting tension than provided you will have a different yarn consumption, and your work will have different measurements than what the pattern suggests.

The knitting tension also determines which yarns can replace each other. As long as you achieve the same knitting tension you can replace one yarn with another.

See DROPS lesson: How to measure your tension/gauge

See DROPS video: How to make a gauge tension swatch

The required amount of yarn is provided in grams, eg: 450 g. To calculate how many balls you’ll need you first need to know how many grams are in 1 ball (25g, 50g or 100g). This information is available if you click on the individual yarn quality on our pages. Divide the amount required with the amount of each ball. For example, if each ball is 50g (the most common amount), the calculation will be as follows: 450 / 50 = 9 balls.

The important thing when changing from one yarn to another is that the knitting/crochet tension remains the same. This is so that the measurements of the finished piece will be the same as on the sketch provided. It is easier to achieve the same knitting tension using yarns from the same yarn group. It is also possible to work with multiple strands of a thinner yarn to achieve the knitting tension of a thicker one. Please try our yarn converter. We recommend you to always work a test swatch.

Please NOTE: when changing yarn the garment might have a different look and feel to the garment in the photo, due to individual properties and qualities of each yarn.

See DROPS lesson: Can I use a different yarn than the one mentioned in the pattern?

All our yarns are categorised into yarn groups (from A to F) according to thickness and knitting tension – group A contains the thinnest yarns and group F the thickest. This makes it easier for you to find alternative yarns to our patterns, should you wish to switch yarn. All yarns within the same group have a similar knitting tension and can easily replace each other. However, different yarn qualities have different structures and properties which will give the finished work a unique look and feel.

Click here for an overview of the yarns in each yarn group

At the top of all our patterns you’ll find a link to our yarn calculator, which is a helpful tool should you wish to use a different yarn than suggested. By filling in the yarn quality you wish to replace, the amount (in your size) and number of strands, the calculator will present good alternative yarns with the same knitting tension. Additionally it will tell you how much you’ll require in the new qualities and whether you’ll need to work with multiple strands. Most skeins are 50g (some are 25g or 100g).

If the pattern is worked with multiple colours, every colour will have to be calculated separately. Similarly, if the pattern is worked with several strands of different yarns (for example 1 strand Alpaca and 1 strand Kid-Silk) you will have to find alternatives for each, individually.

Click here to see our yarn calculator

Since different yarns have different qualities and textures we have chosen to keep the original yarn in our patterns. However, you can easily find options among our available qualities by using our yarn calculator, or simply pick a yarn from the same yarn group.

It is possible that some retailers still have discontinued yarns in stock, or that someone has a few skeins at home that they would like to find patterns for.

The yarn calculator will provide both alternative yarn as well as required amount in the new quality.

If you think it's hard to decide what size to make, it can be a good idea to measure a garment you own already and like the size of. Then you can pick the size by comparing those measures with the ones available in the pattern's size chart.

You'll find the size chart at the bottom of the pattern.

See DROPS lesson: How to read size chart

The needle size provided in the pattern serves only as a guide, the important thing is to follow the knitting tension. And since knitting tension is very individual, you will have to adjust the needle size to ensure that YOUR tension is the same as in the pattern – maybe you’ll have to adjust 1, or even 2 needle sizes, up or down to achieve the correct tension. For this, we recommend that you work test swatches.

Should you work with a different knitting tension than the one provided, the measurements of the finished garment might deviate from the measurement sketch.

See DROPS lesson: How to measure your tension/gauge

See DROPS video: How to make a tension/gauge swatch

Working a garment top-down provides more flexibility and room for personal adjustment. For example it is easier to try the garment on while working, as well as making adjustments to length of yoke and shoulder caps.

The instructions are carefully explaining every step, in the correct order. Diagrams are adjusted to the knitting direction and are worked as usual.

The diagram depicts all rows/rounds, and every stitch seen from the right side. It is read from bottom to top, from right to left. 1 square = 1 stitch.

When working back and forth, every other row is worked from the right side and every other row is worked from the wrong side. When working from the wrong side, the diagram will have to be worked reversed: from left to right, knit stitches are purled, purl stitches are knit etc.

When working in the round every round is worked from the right side and the diagram are worked from right to left on all rounds.

See DROPS lesson: How to read knitting diagrams

The diagram depicts all rows/rounds, and every stitch seen from the right side. It is worked from bottom to top, from right to left.

When working back and forth every other row is worked from the right side: from right to left and every other row is worked from the wrong side: from left to right.

When working in the round, every row in the diagram are worked from the right side, from right to left.

When working a circular diagram you start in the middle and work your way outwards, counter clockwise, row by row.

The rows usually start with a given number of chain stitches (equivalent to the height of the following stitch), this will either be depicted in the diagram or explained in the pattern.

See DROPS lesson: How to read crochet diagrams

Instructions for working several diagrams after each other on the same row/round, will often be written like so: “work A.1, A.2, A.3 a total of 0-0-2-3-4 times". This means you work A.1 once, then A.2 is worked once, and A.3 is repeated (in width) the number of times provided for your size – in this case like so: S = 0 times, M = 0 times, L=2 times, XL= 3 times and XXL = 4 times.

The diagrams are worked as usual: begin with the first row in A.1, then work the first row in A.2 etc.

See DROPS lesson: How to read knitting diagrams

See DROPS lesson: How to read crochet diagrams

The total width of the garment (from wrist-to-wrist) will be larger in the larger sizes, despite the actual sleeves being shorter. The larger sizes have longer sleeve caps and wider shoulders, so there will be a good fit in all sizes.

The measurement sketch/schematic drawing provides information regarding the full length of the garment. If it’s a jumper or a jacket the length is measured from the highest point on the shoulder closest to the neckline, and straight down to the bottom of the garment. It is NOT measured from the tip of shoulder. Similarly, the length of yoke is measured from the highest point on the shoulder and down to where yoke is split into body and sleeves.

On a jacket measures are never taken along bands, unless specifically stated. Always measure inside band stitches when measuring the length.

See DROPS lesson: How to read a schematic drawing

Diagrams are often repeated on the round or in height. 1 repeat is the diagram the way it appears in the pattern. If it says to work 5 repeats of A.1 in the round, then you work A.1 a total of 5 times after/next to each other in the round. If it says to work 2 repeats of A.1 vertically/in height you work the entire diagram once, then begin again at the start and work the entire diagram one more time.

Chain stitches are slightly narrower than other stitches and to avoid working the cast-on edge too tight, we simply chain more stitches to begin with. The stitch count will be adjusted on the following row to fit the pattern and measurement sketch.

The rib edge is more elastic and will contract slightly compared to, for example, stocking stitch. By increasing before the rib edge, you avoid a visible difference in width between the rib edge and the rest of the body.

It’s very easy to cast off too tightly, and by making yarn overs while casting off (and simultaneously casting these off) you avoid a too tight cast off edge.

See DROPS video: How to bind off with yarn overs (yo)

To achieve an even increase (or decrease) you can increase on, for example: every 3rd and 4th row alternately, like so: work 2 rows and increase on the 3rd row, work 3 rows and increase on the 4th. Repeat this until the increase is complete.

See DROPS lesson: Increase or decrease 1 st on every 3rd and 4th row alternately

Should you prefer to work in the round instead of back and forth, you may of course adjust the pattern. You’ll need to add steeks mid-front (usually 5 stitches), and follow the instructions. When you would normally turn and work from the wrong side, simply work across the steek and continue in the round. At the end you’ll cut the piece open, pick up stitches to work bands, and cover the cut edges.

See DROPS video: How to knit steeks and cut open

Should you prefer to work back and forth instead of in the round, you may of course adjust the pattern so you work the pieces separately and then assemble them at the end. Divide the stitches for the body in 2, add 1 edge stitch in each side (for sewing) and work the front and back pieces separately.

See DROPS lesson: Can I adapt a pattern for circular needles into straight needles?

Pattern repeats can vary slightly in the different sizes, in order to get the correct proportions. If you’re not working the exact same size as the garment in the photo, yours might deviate slightly. This has been carefully developed and adjusted so that the complete impression of the garment is the same in all sizes.

Make sure to follow instructions and diagrams for your size!

If you have found a pattern you like which is available in women’s size it’s not very difficult to convert it to men’s size. The biggest difference will be the length of sleeves and body. Start working on the women size that you think would fit across the chest. The additional length will be worked right before you cast off for the armhole/sleeve cap. If the pattern is worked top-down you can add the length right after the armhole or before the first decrease on sleeve.

Regarding additional yarn amount, this will depend on how much length you add, but it is better with a skein too many than too few.

All yarns will have excess fibres (from production) that might come off as lint or shedding. Brushed yarns (ie hairier yarns) have more of these loose, excess fibres, causing more shedding.

Shedding also depends on what is worn under or over the garment, and whether this pulls at the yarn fibres. It’s therefore not possible to guarantee that there will be no shedding

Below are some tips on how to get the best result when working with hairier yarns:

1. When the garment is finished (before you wash it) shake it vigorously so the looser hairs come off. NOTE: do NOT use a lint roller, brush or any method that pulls at the yarn.

2. Place the garment in a plastic bag and put it in your freezer - the temperature will cause the fibres to become less attached to each other, and excess fibres will come off easier.

3. Leave in the freezer for a few hours before taking it out and shaking it again.

4. Wash the garment according to the instructions on the yarn label.

Pilling is a natural process that happens to even the most exclusive of fibers. It's a natural sign of wear and tear that is hard to avoid, and that is most visible in high friction areas of your garment like a sweater's arms and cuffs.

You can make your garment look as new by removing the pilling, using a fabric comb or a pill/lint remover.

Still can't find the answer you need? Then scroll down and leave your question so one of our experts can try to help you. This will be done normally within 5 to 10 working days.
In the meantime, you can read the questions and answers that others have left to this pattern or join the DROPS Workshop on Facebook to get help from fellow knitters/crocheters!

You might also like...

Cressida

Lisa, Norway

Cressida

Sheila, Germany

Post a comment to pattern DROPS 188-27

We would love to hear what you have to say about this pattern!

If you want to leave a question, please make sure you select the correct category in the form below, to speed up the answering process. Required fields are marked *.

Comments / Questions (66)

country flag Gaetane wrote:

Bonjour au 3eme rang il faut répéter A1B, donc 1 ml, 1 b, 1ml ( ce qui fait un enchaînement de 2ml) ou dois je faire 1ml, 1 b, 1ml, 1 b.... en répétition. Car cela fais plusieurs fois que je recommence et je ne tombe jamais juste sur le compte de maille à la fin soit 108m. Cordialement.

24.12.2019 - 12:22

DROPS Design answered:

Bonjour Gaetane, au 3ème rang de A.1B vous crochetez: 1 ml, 1 bride dans la bride suivante, 1 ml, 1 bride autour de l'arceau suivant, 1 ml, 1 bride autour de l'arceau suivant, 1 ml, 1 bride autour de l'arceau suivant, puis vous crochetez A.1c = 1 ml, 1 bride autour de l'arceau suivant. Bon crochet!

02.01.2020 - 10:47

country flag Gaetane wrote:

Suite du message précédent... Il y a t-il bien, dans le tour de brides, un arceau devant et dos comme suit : 2 brides, 3 mailles en l'air, 2 brides ? Cordialement

15.12.2019 - 22:40

DROPS Design answered:

Bonjour Gaetane, A.3 = 3 mailles en l'air (=3ème symbole). commencez le tour par 3 ml (= pour remplacer la 1ère bride) et terminez le tour par 1 mc dans la 3ème ml du début du tour (= vous pouvez soit considérer que ces 3 m sont la dernière bride de A.3C ou bien faire ces 3 ml en plus de la dernière bride de A.3C). Bon crochet!

16.12.2019 - 09:04

country flag Gaetane wrote:

Bonjour, pourriez vous me donner de plus amples explications sur le 1er rang de A3 après le tour de brides. Dois je faire brides, maille en l'air, bride dans l'arceau ou n'y a t-il que 3 mailles en l'air au dessus de l'arceau du rang précédent. Je ne comprend pas car le diagramme A3a ne représente que 3 mailles en l'air et je ne voit pas où il faut commencer les brides. Merci de votre attention à mon message. Cordialement

15.12.2019 - 22:24

DROPS Design answered:

Bonjour Gaétane, les diagrammes A.3 se crochètent comme le montre les diagrammes, par ex. au 1er rang: A.3C = 1 b dans la b, 1 ml, sautez 1 b, 1 b dans l'arceau - A.3A = 3 ml - A.3C = 1 b dans l'arceau, 1 ml, sautez 1 b, 1 b dans la b suivante, 1 ml, sautez 1 b. Suivez bien le diagramme, vous allez ensuite crocheter des brides soient dans la bride du tour précédent, soit autour de l'arceau. Bon crochet!

16.12.2019 - 09:02

country flag Kristin L Blevins wrote:

In the beginning of the pattern when placing stitch markers, in the American english version...is there an error in regards to the instructions. The stitch count does not add or line up, so I am confused. I have read the instructions several times and tried doing the stitch markers and I am still sending with a huge number of stitches before the first marker. Is there a section missing?

21.11.2019 - 23:35

DROPS Design answered:

Dear Mrs Blevins, at the end of first round you should have 130-138-138 dc + 3 ch, you then insert markers as follows: marker in first dc, 24-26-26 dc, marker in next st, 14 dc, marker in next st, 24-26-26 dc, marker in next st, 24-26-26 dc, marker in next st, 14 dc, marker in next st, 24-26-26 dc = 1 + (24-26-26) + 1 + 14 + 1 + (24-26-26 ) +1+ (24-26-26) +1+14+1+ (24-26-26)=130-138-138 sts. Happy crocheting!

22.11.2019 - 08:20

country flag Camilla Kjær wrote:

Hej Nu er jeg gået i gang med denne poncho men jeg kan altså ikke forstå det der står med A.1 og alt det kan jeg både om en dybere forklaring :) Mvh Camilla

29.07.2019 - 15:25

country flag Sarah wrote:

Also there is no A2 diagram.

15.07.2019 - 23:35

DROPS Design answered:

Hi Sarah, All the diagrams are at the bottom of the page, Happy crocheting!

16.07.2019 - 06:59

country flag Sarah wrote:

On instructions for round 2, towards the end it states continue to and with 6th-7th-8th round in diagram A.1. but there isn't just an A.1. which diagram am I looking at exactly please

15.07.2019 - 23:21

DROPS Design answered:

Dear Sarah, all diagrams A.1 have the same number of rows, just work to the 6th-7th-8th round included in A.1. Happy crocheting!

16.07.2019 - 09:34

country flag Parmentier wrote:

Bonjour, Je suis arrivée au tour 9. Dois je faire un tour de brides uniquement en ajoutant 72 augmentations ou dois je suivre le diagramme A3? Merci de votre réponse. Bien cordialement.

06.12.2018 - 11:33

DROPS Design answered:

Bonjour Mme Parmentier, vous crochetez le 9ème tour en suivant les diagrammes comme avant = le tour 9 dans A.3 et A.2 est un tour en brides, en même temps, vous augmentez 36 brides de chaque côté de A.3A (= soit 72 brides au total). Bon crochet!

06.12.2018 - 12:45

Kez wrote:

Hi there, I love this pattern but am really stuck after placing the stitch markers. I’m having issues following the diagram, I’m not sure how you start, completely confused. I understand the stitches and can follow the video tutorials no problem but just don’t get the diagram. Please help me cos I really want to make it, it’s so beautiful

01.12.2018 - 04:13

DROPS Design answered:

Dear Kez, work the diagram starting from the row with the arrow and read every round from the right towards the left. Each symbol represents one stitch/group of stitches as explained under diagram key. Happy crocheting!

03.12.2018 - 08:31

country flag Nina wrote:

Ich versteh leider die Häkelinfo nicht. KM in die 3. LM ist klar, aber was heißt KM bis zur Mitte des Luftmaschenbogens?

01.11.2018 - 22:32

DROPS Design answered:

Liebe Nina, damit die Runde an der richtigen Stelle beginnt, häkelt man 1 KM in jede Lm bis zur Mitte des Luftmaschenbogens, dann beginnt die nächste Rund mit 3 Lm (= 1. Stb). Viel Spaß beim häkeln!

02.11.2018 - 07:56