DROPS Paris
DROPS Paris
100% Cotton
from 1.60 $ /50g
Get the yarn to make this pattern from 28.80$.

The yarn cost is calculated from the pattern’s smallest size and the yarn’s cheapest product type. Looking for an even better price? You might find it on the DROPS Deals!

DROPS SS24

Cressida

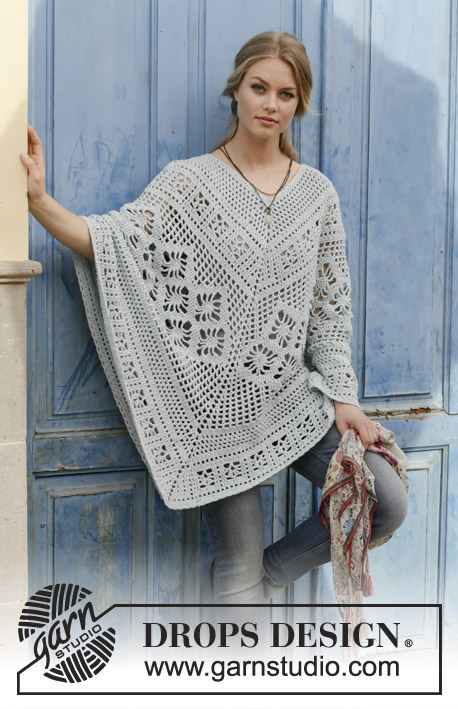
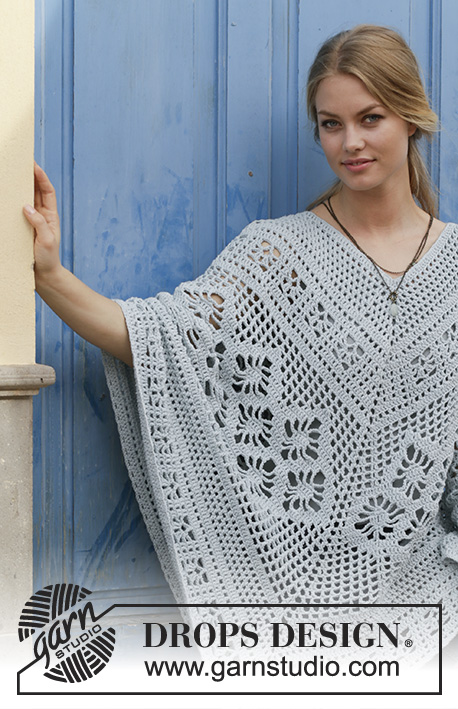
Crocheted poncho with lace pattern, worked top down. Size: S - XXXL Piece is crocheted in DROPS Paris.

DROPS 188-27
DROPS design: Pattern w-697
Yarn group C or A + A
----------------------------------------------------------
Size: S/M – L/XL – XXL/XXXL
Materials:
DROPS PARIS from Garnstudio (belongs to yarn group C)
900-1100-1300 g color 29, light ice blue

Piece can also be crocheted with yarn from:
"Alternative yarn (yarn group C)" - see link below.

DROPS CROCHET Hook size 4.5 mm/US 7 - or size needed to get 16 double crochets x 9 rows = 10 cm / 4" in width and 10 cm / 4" vertically.

-------------------------------------------------------

Alternative Yarn – See how to change yarns here
Yarn Groups A to F – Use the same pattern and change the yarn here
Yarn usage using an alternative yarn – Use our yarn converter here

-------------------------------------------------------

More like this:
Women Ponchoslace top down v-neck
DROPS Paris
DROPS Paris
100% Cotton
from 1.60 $ /50g
Get the yarn to make this pattern from 28.80$.

The yarn cost is calculated from the pattern’s smallest size and the yarn’s cheapest product type. Looking for an even better price? You might find it on the DROPS Deals!

Pattern instructions

NOTE: This pattern is written in American English. All measurements in charts are in cm. For conversion from inches to cm - click here. There are different terms for crocheting in American and British English. If this pattern includes crochet, click for "crochet terms" here. For this pattern in British English, please click here.
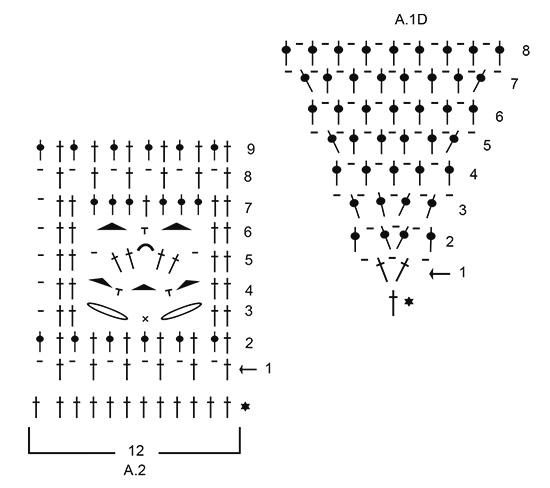
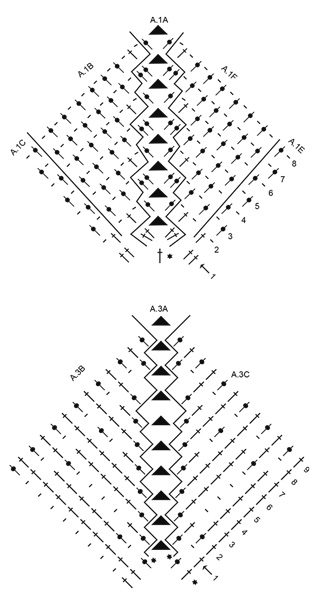
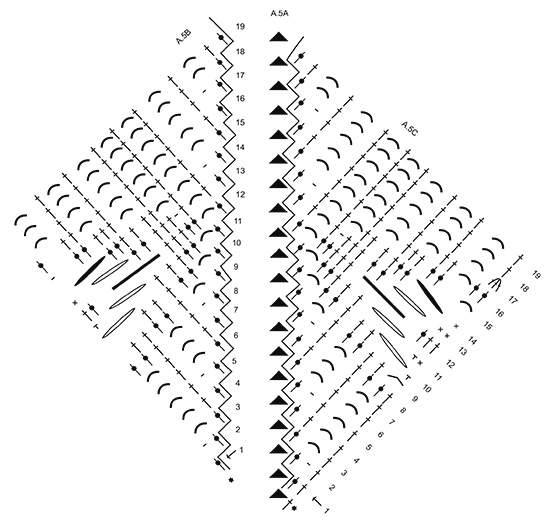
INFORMATION FOR PATTERN:

PATTERN:
See diagrams A.1 to A.5.

CROCHET INFO:
The first double crochet at the beginning of round are replaced with 3 chain stitches. Finish round with 1 slip stitch in 3rd chain stitch at beginning of round, then work slip stitches until middle space.

DECREASE TIP - WORK 2 TREBLE CROCHETS TOGETHER:
Work 1 treble crochet around chain space below but wait with last pull through (= 2 stitches on hook), skip 1 single crochet and work 1 treble crochet around next chain space but on last pull through pull yarn through all loops on hook.

INCREASE TIP:
Increase 1 double crochet by working 2 double crochets in same stitch.
----------------------------------------------------------

PONCHO:
Poncho is worked in the round, top down. First increase mid front, mid back and on each side of each shoulder, then increase only mid front and mid back.

Work 156-166-166 chain stitches on hook size 4.5 mm/US 7 with Paris and form a ring with 1 slip stitch in first chain stitch.
Work 3 chain stitches - read CROCHET INFO! Then work 1 double crochet in each of the next 5-3-3 chain stitches, * skip 1 chain stitch, work 1 double crochet in each of the next 5 chain stitches *, work from *-* 25-27-27 times in total = 130-138-138 double crochets + 3 chain stitches at beginning of round. REMEMBER THE CROCHET GAUGE!

Now insert 6 markers from beginning of round as follows (without working): Insert 1 marker in 1st double crochet on round (i.e. in double crochet after the 3 chain stitches = mid back), skip 24-26-26 double crochets, insert 1 marker in next double crochet (= shoulder), skip 14 double crochets, insert 1 marker in next double crochet (= shoulder), skip 24-26-26 double crochets, insert 1 marker in next double crochet (= mid front), skip 14 double crochets, insert 1 marker in next double crochet (= shoulder), skip 26-26-26 double crochets, insert 1 marker in next double crochet (= shoulder), there are now 6 double crochets between last marker and beginning of round.

WORK A.1 AS FOLLOWS:
Work 1st round as follows: Work * A.1A in first/next double crochet with marker (= mid front/mid back), repeat A.1C 12-13-13 times in total, A.1D in next double crochet with marker (= shoulder increase), repeat A.1E 7 times in total, A.1D in next double crochet with marker (= shoulder increase), A.1E 12-13-13 times in total *, work from *-* 2 times in total.
Work 2nd round as follows: Work * A.1A (= mid front/mid back), A.1B, repeat A.1C 12-13-13 times in total, A.1D (= shoulder increase), repeat A.1E 7 times in total, A.1D (= shoulder increase), A.1E 12-13-13 times in total, A.1F *, work from *-* 2 times in total. Continue to and with 6th-7th-8th round in diagram A.1.
There are now 108-128-132 stitches between chain space mid front and mid back (= 216-256-264 stitches + 2 middle spaces on round).
Piece measures approx. 8-9-10 cm / 4" in crochet direction (measure down from the shoulder from the cast-on edge).

ROUND WITH DOUBLE CROCHETS:
Work 1 round with double crochets, work (2 double crochets, 3 chain stitches, 2 double crochets) around middle space, and adjust AT THE SAME TIME number of double crochets to decrease/increase as follows:
S/M – XXL/XXXL: Increase 1-1 double crochet along each of the sides between mid front/mid back (= 2-2 double crochets in total) – read INCREASE TIP
L/XL: Decrease 7 double crochets along each of the sides between mid front/mid back (= 14 double crochets in total) – read DECREASE TIP
There are now 113-125-137 stitches between chain space mid front and mid back (= 226-250-274 stitches + 2 middle spaces on round).
NOTE! Do not increase on each side of each shoulder onwards, but only mid front and mid back on poncho!

WORK A.2/A.3 AS FOLLOWS:
Work * A.3A (= middle space), A.3B over 3 double crochets, A.2 (= 12 stitches) 9-10-11 times in total in width, A.3C over the next 2 double crochets *, work from *-* 2 times in total. On 9th round increase 12-24-36 double crochets evenly on each side of A.3A (i.e. increase 24-48-72 double crochets in total on round) = 145-169-193 double crochets between chain space mid front and mid back (= 290-338-386 double crochets in total + 2 middle spaces on round) – read INCREASE TIP.
Piece measures approx. 19-20-21 cm / 7½"-8"-8¼" in crochet direction from cast-on edge.

WORK A.4/A.5 AS FOLLOWS:
Work * A.5A (= middle space), A.5B, A.4 (= 24 stitches) 6-7-8 times in total in width, A.5C over next double crochet *, work from *-* 2 times in total.
When A.5 has been done vertically, 19 rounds have been worked, continue on 20th round as follows: Work * A.5D, A.5E over 1 double crochet, A.5F 7 times in total in width, A.4 (= 24 stitches) 6-7-8 times in total in width, A.5F 7 times in total in width, A.5G *, work from *-* 2 times in total. When A.4/A.5 have been worked, there are 211-235-259 double crochets between chain space mid front and mid back (= 422-470-518 double crochets in total + 2 middle spaces on round).
Piece measures approx. 46-47-48 cm / 18"-18½"-19" in crochet direction from cast-on edge.

WORK 2ND AND 3RD ROUND IN A.1 AS FOLLOWS:
Begin around one middle space and begin from 3rd round in diagram.
Work * A.1A (= middle space), repeat A.1C until next middle space (work last stitch only over 1 stitch on first round *, work from *-* 2 times in total. Repeat 2nd and 3rd round until 4-8-10 rounds have been worked in total.
Piece measures approx. 51-56-59 cm / 20"-22"-23¼" in crochet direction from cast-on edge.

ROUND WITH DOUBLE CROCHETS:
Work 1 round with double crochets and decrease AT THE SAME TIME 7-5-5 double crochets evenly along each of the sides between mid front/mid back (= 14-10-10 double crochets in total) as follows: Work * (2 double crochets, 3 chain stitches, 2 double crochets) around middle space, then work 1 double crochet in every double crochet and 1 double crochet around every chain stitch until next middle space *, work from *-* 2 times in total = 209-245-269 double crochets between chain space mid front and mid back (= 418-490-538 double crochets + 2 middle space on round). Cut the yarn.

WORK A.2/A.3 AS FOLLOWS:
Work * A.3A (= middle space), A.3B over 3 double crochets, A.2 (= 12 stitches) 17-20-22 times in total in width, A.3C over the next 2 double crochets *, work from *-* 2 times in total.
When A.2/A.3 have been worked, there are 229-265-289 double crochets between chain space mid front and mid back (= 458-530-578 double crochets + 2 middle spaces on round). Piece measures approx. 62-67-70 cm / 24½"-26½"-27½" in crochet direction from cast-on edge.

EDGE:
Work a finishing edge around the entire poncho as follows: 1 slip stitch in first stitch, * work 3 chain stitches, skip 2 stitches, 1 single crochet in next stitch *, work from *-* the entire round and finish with 1 slip stitch in slip stitch at beginning of round. Fasten off.

This pattern has been corrected.

Updated online: 09.04.2018
Correction under PONCHO:...Now insert 6 markers from beginning of round as follows (without working): Insert 1 marker in 1st double crochet on round (i.e. in double crochet after the 3 chain stitches = mid back), skip 24-26-26 double crochets, insert 1 marker in next double crochet (= shoulder), skip 14 double crochets, insert 1 marker in next double crochet (= shoulder), skip 24-26-26 double crochets, insert 1 marker in next double crochet (= mid front), skip 24-26-26 double crochets, insert 1 marker in next double crochet (= shoulder), skip 14 double crochets, insert 1 marker in next double crochet (= shoulder), there are now 24-26-26 double crochets between last marker and beginning of round.

WORK A.1 AS FOLLOWS:
Work 1st round as follows: Work * A.1A in first/next double crochet with marker (= mid front/mid back), repeat A.1C 12-13-13 times in total, A.1D in next double crochet with marker (= shoulder increase), repeat A.1E 7 times in total, A.1D in next double crochet with marker (= shoulder increase), A.1E 12-13-13 times in total *, work from *-* 2 times in total.
Work 2nd round as follows: Work * A.1A (= mid front/mid back), A.1B, repeat A.1C 12-13-13 times in total, A.1D (= shoulder increase), repeat A.1E 7 times in total, A.1D (= shoulder increase), A.1E 12-13-13 times in total, A.1F *, work from *-* 2 times in total. Continue to and with 6th-7th-8th round in diagram A.1...

Diagram

All measurements in charts are in cm.

symbols = 1 chain stitch
symbols = 2 chain stitches
symbols = 3 chain stitches
symbols = 4 chain stitches
symbols = 5 chain stitches
symbols = 6 chain stitches
symbols = 7 chain stitches
symbols = 8 chain stitches
symbols = 1 single crochet in stitch
symbols = 1 single crochet around chain space
symbols = 1 double crochet in stitch
symbols = 1 double crochet around chain stitch/chain space
symbols = work 3 double crochets together as follows: Work 1 double crochet in next double crochet but wait with last pull through (= 2 loops on hook), work 1 double crochet in each of the next 2 double crochets the same way, then pull yarn through all 4 loops on hook
symbols = begin here = 1st round
symbols = this round has already been worked
diagram
diagram
diagram
diagram
diagram
Do you have a question? See a list of frequently asked questions (FAQ)

Knitting tension is what determines the final measurements of your work, and is usually measured per 10 x 10 cm. It is provided like so: number of stitches in width x number of rows in height - eg: 19 stitches x 26 rows = 10 x 10 cm.

The knitting tension is very individual; some people knit/crochet loosely while others work tightly. You adjust the knitting tension with the needle size, which is why the suggested needle size only serve as a guide! You need to adjust this (up or down) to ensure that YOUR knitting tension matches the knitting tension provided in the pattern. If you work with a different knitting tension than provided you will have a different yarn consumption, and your work will have different measurements than what the pattern suggests.

The knitting tension also determines which yarns can replace each other. As long as you achieve the same knitting tension you can replace one yarn with another.

See DROPS lesson: How to measure your tension/gauge

See DROPS video: How to make a gauge tension swatch

The required amount of yarn is provided in grams, eg: 450 g. To calculate how many balls you’ll need you first need to know how many grams are in 1 ball (25g, 50g or 100g). This information is available if you click on the individual yarn quality on our pages. Divide the amount required with the amount of each ball. For example, if each ball is 50g (the most common amount), the calculation will be as follows: 450 / 50 = 9 balls.

The important thing when changing from one yarn to another is that the knitting/crochet tension remains the same. This is so that the measurements of the finished piece will be the same as on the sketch provided. It is easier to achieve the same knitting tension using yarns from the same yarn group. It is also possible to work with multiple strands of a thinner yarn to achieve the knitting tension of a thicker one. Please try our yarn converter. We recommend you to always work a test swatch.

Please NOTE: when changing yarn the garment might have a different look and feel to the garment in the photo, due to individual properties and qualities of each yarn.

See DROPS lesson: Can I use a different yarn than the one mentioned in the pattern?

All our yarns are categorised into yarn groups (from A to F) according to thickness and knitting tension – group A contains the thinnest yarns and group F the thickest. This makes it easier for you to find alternative yarns to our patterns, should you wish to switch yarn. All yarns within the same group have a similar knitting tension and can easily replace each other. However, different yarn qualities have different structures and properties which will give the finished work a unique look and feel.

Click here for an overview of the yarns in each yarn group

At the top of all our patterns you’ll find a link to our yarn converter, which is a helpful tool should you wish to use a different yarn than suggested. By filling in the yarn quality you wish to replace, the amount (in your size) and number of strands, the converter will present good alternative yarns with the same knitting tension. Additionally it will tell you how much you’ll require in the new qualities and whether you’ll need to work with multiple strands. Most skeins are 50g (some are 25g or 100g).

If the pattern is worked with multiple colours, every colour will have to be converted separately. Similarly, if the pattern is worked with several strands of different yarns (for example 1 strand Alpaca and 1 strand Kid-Silk) you will have to find alternatives for each, individually.

Click here to see our yarn converter

Since different yarns have different qualities and textures we have chosen to keep the original yarn in our patterns. However, you can easily find options among our available qualities by using our yarn converter, or simply pick a yarn from the same yarn group.

It is possible that some retailers still have discontinued yarns in stock, or that someone has a few skeins at home that they would like to find patterns for.

The yarn converter will provide both alternative yarn as well as required amount in the new quality.

If you think it's hard to decide what size to make, it can be a good idea to measure a garment you own already and like the size of. Then you can pick the size by comparing those measures with the ones available in the pattern's size chart.

You'll find the size chart at the bottom of the pattern.

See DROPS lesson: How to read size chart

The needle size provided in the pattern serves only as a guide, the important thing is to follow the knitting tension. And since knitting tension is very individual, you will have to adjust the needle size to ensure that YOUR tension is the same as in the pattern – maybe you’ll have to adjust 1, or even 2 needle sizes, up or down to achieve the correct tension. For this, we recommend that you work test swatches.

Should you work with a different knitting tension than the one provided, the measurements of the finished garment might deviate from the measurement sketch.

See DROPS lesson: How to measure your tension/gauge

See DROPS video: How to make a gauge tension swatch

Working a garment top-down provides more flexibility and room for personal adjustment. For example it is easier to try the garment on while working, as well as making adjustments to length of yoke and shoulder caps.

The instructions are carefully explaining every step, in the correct order. Diagrams are adjusted to the knitting direction and are worked as usual.

The diagram depicts all rows/rounds, and every stitch seen from the right side. It is read from bottom to top, from right to left. 1 square = 1 stitch.

When working back and forth, every other row is worked from the right side and every other row is worked from the wrong side. When working from the wrong side, the diagram will have to be worked reversed: from left to right, knit stitches are purled, purl stitches are knit etc.

When working in the round every round is worked from the right side and the diagram are worked from right to left on all rounds.

See DROPS lesson: How to read knitting diagrams

The diagram depicts all rows/rounds, and every stitch seen from the right side. It is worked from bottom to top, from right to left.

When working back and forth every other row is worked from the right side: from right to left and every other row is worked from the wrong side: from left to right.

When working in the round, every row in the diagram are worked from the right side, from right to left.

When working a circular diagram you start in the middle and work your way outwards, counter clockwise, row by row.

The rows usually start with a given number of chain stitches (equivalent to the height of the following stitch), this will either be depicted in the diagram or explained in the pattern.

See DROPS lesson: How to read crochet diagrams

Instructions for working several diagrams after each other on the same row/round, will often be written like so: “work A.1, A.2, A.3 a total of 0-0-2-3-4 times". This means you work A.1 once, then A.2 is worked once, and A.3 is repeated (in width) the number of times provided for your size – in this case like so: S = 0 times, M = 0 times, L=2 times, XL= 3 times and XXL = 4 times.

The diagrams are worked as usual: begin with the first row in A.1, then work the first row in A.2 etc.

See DROPS lesson: How to read knitting diagrams

See DROPS lesson: How to read crochet diagrams

The total width of the garment (from wrist-to-wrist) will be larger in the larger sizes, despite the actual sleeves being shorter. The larger sizes have longer sleeve caps and wider shoulders, so there will be a good fit in all sizes.

The measurement sketch/schematic drawing provides information regarding the full length of the garment. If it’s a jumper or a jacket the length is measured from the highest point on the shoulder (usually closest to the neckline), and straight down to the bottom of the garment. It is NOT measured from the tip of shoulder. Similarly, the length of yoke is measured from the highest point on the shoulder and down to where yoke is split into body and sleeves.

See DROPS lesson: How to read a schematic drawing

Diagrams are often repeated on the round or in height. 1 repeat is the diagram the way it appears in the pattern. If it says to work 5 repeats of A.1 in the round, then you work A.1 a total of 5 times after/next to each other in the round. If it says to work 2 repeats of A.1 vertically/in height you work the entire diagram once, then begin again at the start and work the entire diagram one more time.

Chain stitches are slightly narrower than other stitches and to avoid working the cast-on edge too tight, we simply chain more stitches to begin with. The stitch count will be adjusted on the following row to fit the pattern and measurement sketch.

The rib edge is more elastic and will contract slightly compared to, for example, stocking stitch. By increasing before the rib edge, you avoid a visible difference in width between the rib edge and the rest of the body.

It’s very easy to cast off too tightly, and by making yarn overs while casting off (and simultaneously casting these off) you avoid a too tight cast off edge.

See DROPS video: How to bind off with yarn overs (yo)

To achieve an even increase (or decrease) you can increase on, for example: every 3rd and 4th row alternately, like so: work 2 rows and increase on the 3rd row, work 3 rows and increase on the 4th. Repeat this until the increase is complete.

See DROPS lesson: Increase or decrease 1 st on every 3rd and 4th row alternately

Should you prefer to work in the round instead of back and forth, you may of course adjust the pattern. You’ll need to add steeks mid-front (usually 5 stitches), and follow the instructions. When you would normally turn and work from the wrong side, simply work across the steek and continue in the round. At the end you’ll cut the piece open, pick up stitches to work bands, and cover the cut edges.

See DROPS video: How to knit steeks and cut open

Should you prefer to work back and forth instead of in the round, you may of course adjust the pattern so you work the pieces separately and then assemble them at the end. Divide the stitches for the body in 2, add 1 edge stitch in each side (for sewing) and work the front and back pieces separately.

See DROPS lesson: Can I adapt a pattern for circular needles into straight needles?

Pattern repeats can vary slightly in the different sizes, in order to get the correct proportions. If you’re not working the exact same size as the garment in the photo, yours might deviate slightly. This has been carefully developed and adjusted so that the complete impression of the garment is the same in all sizes.

Make sure to follow instructions and diagrams for your size!

If you have found a pattern you like which is available in women’s size it’s not very difficult to convert it to men’s size. The biggest difference will be the length of sleeves and body. Start working on the women size that you think would fit across the chest. The additional length will be worked right before you cast off for the armhole/sleeve cap. If the pattern is worked top-down you can add the length right after the armhole or before the first decrease on sleeve.

Regarding additional yarn amount, this will depend on how much length you add, but it is better with a skein too many than too few.

All yarns will have excess fibres (from production) that might come off as lint or shedding. Brushed yarns (ie hairier yarns) have more of these loose, excess fibres, causing more shedding.

Shedding also depends on what is worn under or over the garment, and whether this pulls at the yarn fibres. It’s therefore not possible to guarantee that there will be no shedding

Below are some tips on how to get the best result when working with hairier yarns:

1. When the garment is finished (before you wash it) shake it vigorously so the looser hairs come off. NOTE: do NOT use a lint roller, brush or any method that pulls at the yarn.

2. Place the garment in a plastic bag and put it in your freezer - the temperature will cause the fibres to become less attached to each other, and excess fibres will come off easier.

3. Leave in the freezer for a few hours before taking it out and shaking it again.

4. Wash the garment according to the instructions on the yarn label.

Pilling is a natural process that happens to even the most exclusive of fibers. It's a natural sign of wear and tear that is hard to avoid, and that is most visible in high friction areas of your garment like a sweater's arms and cuffs.

You can make your garment look as new by removing the pilling, using a fabric comb or a pill/lint remover.

Still can't find the answer you need? Then scroll down and leave your question so one of our experts can try to help you. This will be done normally within 5 to 10 working days.
In the meantime, you can read the questions and answers that others have left to this pattern or join the DROPS Workshop on Facebook to get help from fellow knitters/crocheters!

You might also like...

Cressida

Lisa, Norway

Cressida

Sheila, Germany

Post a comment to pattern DROPS 188-27

We would love to hear what you have to say about this pattern!

If you want to leave a question, please make sure you select the correct category in the form below, to speed up the answering process. Required fields are marked *.

Comments / Questions (66)

country flag Gwennie B Campbell wrote:

Ok, I see my mistake. So every beginning of a round I do 3 chain stitches. So for example first round of A1 the very first double crochet would be 3 chains? So in A1A that first stich with a marker I would have 3 chains, a double, 3 chains and then 2 doubles? Or do I do the 3 chains where the slip stich from the last round is, then do the first row from A1A?

25.10.2021 - 05:28

DROPS Design answered:

Dear Gwennie, once again, I will have to refer to the same part of th epattern (Pattern info), where it tells you, that the first stitch is replased with 3 chain stitch. Replaced and not crocheted in addition. The 3 chain stitch shouéd be made, where the first stitch of the pattern should be. Happy stitching!

25.10.2021 - 06:15

country flag Gwennie B Campbell wrote:

Hi, I am wondering if after finishing a row there needs to be a slipstich to connect to the first stitches? Or do I just keep crocheting in a circle?

25.10.2021 - 02:59

DROPS Design answered:

Dear Gwennie, please check the "Information for the pattern" section. It says " Finish round with 1 slip stitch in 3rd chain stitch at beginning of round, then work slip stitches until middle space.", so you will have to connect/close the round with a slip stitch. Happy Stitching!

25.10.2021 - 04:38

country flag Irene wrote:

Buonasera, non riesco a capire l'avvio di questo modello: la prima riga di A1C è costituita da due maglie alte o una maglia alta e una catenella ? Grazie per l'aiuto

17.10.2021 - 20:13

DROPS Design answered:

Buonasera Irene, i diagrammi si leggono dal basso verso l'alto, per cui la prima riga di A1C sarà 2 maglie alte. Buon lavoro!

24.10.2021 - 20:28

country flag Bekki wrote:

I have a question about sizing: if my bust size is about 34 in/86cm, what size should I crochet? The schematic for this pattern isn't very helpful in that regard. Thank you!

25.09.2021 - 17:44

DROPS Design answered:

Dear Bekki, we suggest that you take a similar piece and check the measurements and compare to the schematic drawing. Happy Stitching!

27.09.2021 - 03:16

country flag Marijke wrote:

Ik heb een probleem met het kiezen van de juiste haaknaald. Met 4.5 krijg ik 10 cm breed en 12 cm hoog. Met 5 wordt het 11 cm breed en hoger. Met 4 wordt het 9 cm breed. Is 4.5 dan toch de juiste keuze?

09.07.2021 - 11:57

country flag Magda wrote:

Jestem na samym poczatku :) Schemat A1. Przerobilam 1 okrazenie i drugie. i wszystko bylo ok. W drugim okrazeniu zrobilam liczbe slupkow/powtorzen jak w opisie i wszystko bylo ok. Trzecie okrazenie A1A, A1B, A1C i A1D OK ale w A1E nie wyszlo mi juz 7 powtorzen jak w drugim okrazeniu tylko wiecej. Czy w kazdym okrazeniu schemat A1E trzeba powtarzac 7 razy? Tylko pomiedzy dwoma A1D wychodzi mi tak. Pozostale czesci wzoru byly ok.

01.04.2021 - 13:57

DROPS Design answered:

Witaj Magdo, schemat A.1D rozszerza się i w każdym kolejnym okrążeniu będzie w nim więcej oczek (te oczka są wliczane do tego schematu). Co do schematu A.1E - on się nie poszerza, tzn. w każdym kolejnym okrążeniu będzie tam 14 oczek. Schemat ten będzie powtarzany zawsze 7 razy. Poza schematem A.1D, poszerzać się też będą schematy A.1B i A1.F. Pozdrawiamy!

06.04.2021 - 15:47

country flag Magda wrote:

Witam. Robie rozmimar S/M

01.04.2021 - 00:01

DROPS Design answered:

Dobrze, napisz jeszcze proszę, w którym momencie w opisie jesteś? Które dokładnie schematy przerabiasz?

01.04.2021 - 13:41

country flag Magda wrote:

Zupelnie nie zgadza mi sie liczba slupkow w czesci AE pomiedzy AD. Pierwszy i drugi rzad mam ok wg opisu 7 powtorzen AE ale w rzedzie 3 bede miala wiecej niz 7. Tak powinno byc czy cos robie zle?

31.03.2021 - 11:35

DROPS Design answered:

Witaj Magdo, jaki rozmiar wykonujesz?

31.03.2021 - 22:48

country flag Ewa wrote:

Kompletnie nie mam pojecia jak czytac schemat A1.A (a nie jestem poczatkujaca w szydelkowaniu). cCo to sa te zygzaki w pionie?

23.03.2021 - 12:23

DROPS Design answered:

Witaj Ewo, zygzaki, o których piszesz wyodrębniają po prostu pewną część schematu, tak aby był bardziej czytelny. Pozdrawiamy!

23.03.2021 - 14:03

country flag Susanne wrote:

Efter diagram A.1A + A.1D hvor antal har passet, har jeg nu en del flere masker end de 113 m imellem luftmaskebuerne. Hvor kan det gå galt? Jeg har hæklet stangmasker i luftmaskebuerne og i stangmaskerne i omgangen før

17.02.2021 - 16:59

DROPS Design answered:

Hej Susanne, det er svært at gætte sig til hvor det er gået galt. Vil du skrive hvilke størrelse du hækler og hvilket stykke du er kommet til i opskriften, så kan vi muligvis prøve at sætte os ind i arbejdet :)

19.02.2021 - 14:48