DROPS Merino Extra Fine
100% Wool
from 3.75 € /50g
Get the yarn to make this pattern from 30.00€.

The yarn cost is calculated from the pattern’s smallest size and the yarn’s cheapest product type. Looking for an even better price? You might find it on the DROPS Deals!

DROPS SS24

Golden Girl

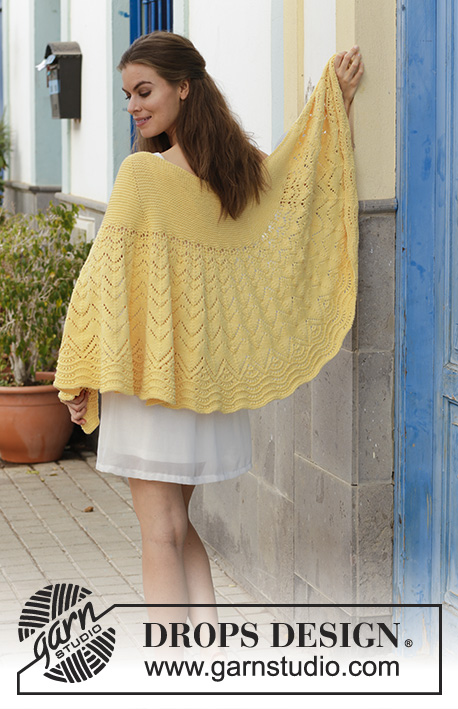
Jumper with cables, lace pattern, raglan and A-shape, knitted top down. Size: S - XXXL Piece is knitted in DROPS Merino Extra Fine.

DROPS 187-25
DROPS design: Pattern me-130
Yarn group B
----------------------------------------------------------
Size: S - M - L - XL - XXL - XXXL
Materials:
DROPS MERINO EXTRA FINE from Garnstudio (belongs to yarn group B)
400-450-500-550-600-650 g colour 30, mustard

Piece can also be knitted with yarn from:
“Alternative yarn (yarn group B)” - see link below.

DROPS DOUBLE POINTED NEEDLES AND CIRCULAR NEEDLE (40 and 60 or 80 cm) SIZE 4.5 mm – or size needed to get 20 stitches and 26 rows in stocking stitch = width 10 cm and 10 cm vertically.

DROPS DOUBLE POINTED NEEDLES AND CIRCULAR NEEDLE (40 and 60 or 80 cm) SIZE 4 mm for ridges in garter stitch – or size needed to get 21 stitches and 42 rows in garter stitch = width 10 cm and 10 cm vertically.

DROPS CABLE NEEDLE - for cables.
----------------------------------------------------------

-------------------------------------------------------

Alternative Yarn – See how to change yarns here
Yarn Groups A to F – Use the same pattern and change the yarn here
Yarn usage using an alternative yarn – Use our yarn converter here

-------------------------------------------------------

DROPS Merino Extra Fine
100% Wool
from 3.75 € /50g
Get the yarn to make this pattern from 30.00€.

The yarn cost is calculated from the pattern’s smallest size and the yarn’s cheapest product type. Looking for an even better price? You might find it on the DROPS Deals!

Pattern instructions

NOTE: This pattern is written in British English. All measurements in charts are in cm. For conversion from cm to inches - click here. There are different terms for crocheting in British and American English. If this pattern includes crochet, click for "crochet terms" here. For this pattern in American English, please click here.
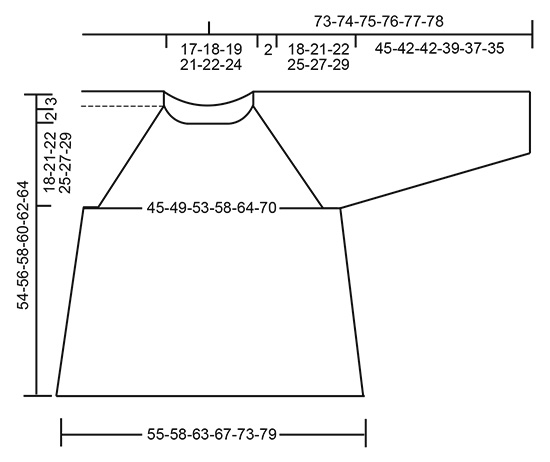
INFORMATION FOR PATTERN:

GARTER STITCH (worked in the round):
1 ridge = 2 rounds. Knit 1 round and purl 1 round.

PATTERN:
See diagrams A.1 to A.3.

INCREASE TIP:
Increase 1 stitch by making 1 yarn over between 2 stitches. On next round work yarn over twisted to avoid holes.

DECREASE TIP (applies to sleeves): 
Decrease 1 stitch on each side of marker thread as follows: Work until 3 stitches remain before marker thread, slip 1 stitch knitwise, knit 1, pass slipped stitch over stitch worked, knit 2 (marker thread is in the middle of these stitches), knit the next 2 stitches together. 
----------------------------------------------------------

JUMPER:
Yoke and body are worked in the round on circular needle, top down. Sleeves are worked in the round on double pointed needles.

YOKE:
Cast on 92-96-100-108-112-120 stitches on a short circular needle size 4 mm with Merino Extra Fine. Work 3 ridges in GARTER STITCH - see explanation above. Switch to circular needle size 4.5 mm. Work next round (round begins mid back) as follows:
Knit 17-18-19-21-22-24 and increase 1 stitch – read INCREASE TIP (= half back piece), * 1 yarn over, knit 1 *, work from *-* 12 times in total (= 12 stitches increased = sleeve), knit 34-36-38-42-44-48 and increase 3-1-3-1-3-3 stitches evenly (= front piece), work from *-* 12 times in total (= 12 stitches increased = sleeve) and finish by knitting 17-18-19-21-22-24 and increasing 2-0-2-0-2-2 stitches evenly (= half back piece) = 122-122-130-134-142-150 stitches.
Knit 1 round, work all yarn overs twisted, they should not make holes.
Then work next round as follows:
Knit 15-15-19-19-19-23, A.1a (= 6 stitches), knit 18-18-14-16-20-16, A.2a (= 6 stitches), knit 31-31-39-39-39-47, A.1a over the next 6 stitches, knit 18-18-14-16-20-16, A.2a over the next 6 stitches and finish by knitting 16-16-20-20-20-24 stitches (= 2 stitches increased in every A.1a and A.2a = 8 stitches increased in total) = 130-130-138-142-150-158 stitches.
REMEMBER THE KNITTING TENSION!
Now increase for raglan AT THE SAME TIME work pattern, read both sections before continuing:

RAGLAN:
On next round increase 1 stitch by making a yarn over on each side of every A.1 and A.2 (= 8 stitches increased in total). Knit the increased yarn overs on next round round to make holes. Increase like this every other round 21-25-27-30-33-36 times in total.

PATTERN:
When A.1a and A.2a have been worked 1 time vertically, work A.1b over A.1a and A.2b over A.2a. Repeat diagram A.1b and A.2b vertically.
When all increases for raglan are done, there are 298-330-354-382-414-446 stitches on round. Then work A.1c over A.1b and A.2c over A.2b (adjust which round to start on according to pattern, i.e. continue cable as before and work eyelet row on each side of every cable).

Continue to work until piece measures 20-23-24-27-29-31 cm. Work 1 round while decreasing 2 stitches evenly over every A.1c and A.2c (= 8 stitches decreased in total) = 290-322-346-374-406-438 stitches.
Continue working in stocking stitch over all stitches.
Now divide yoke for body and sleeves as follows: Knit 40-44-48-53-59-65 (= half back piece), slip the next 64-72-76-80-84-88 stitches on a stitch holder for sleeve, cast on 8 stitches under sleeve, insert 1 marker in the middle of the new stitches, knit 81-89-97-107-119-131 (= front piece), slip the next 64-72-76-80-84-88 stitches on a stitch holder for sleeve, cast on 8 stitches under sleeve, insert 1 marker in the middle of the new stitches and finish by knitting 41-45-49-54-60-66 stitches (= half back piece) = 178-194-210-230-254-278 stitches.
Finish body and sleeves separately.

BODY:
= 178-194-210-230-254-278 stitches. Work A.3 (= 6 stitches) over the middle stitches in the side under each sleeve (= 3 stitches on each side of each marker), work the remaining stitches in stocking stitch. When piece measures 31-30-31-30-30-30 cm (there are approx. 218-230-250-266-290-314 stitches on needle) from where body was divided from sleeves, switch to circular needle size 4 mm and work 3 ridges. Cast off. Make sure to avoid a tight cast-off edge, cast off with 1 larger needle size if needed.

SLEEVE:
Worked in the round on double pointed needles. Slip the 64-72-76-80-84-88 stitches from stitch holder in one side of piece on double pointed needles size 4.5 mm and pick in addition up 1 new stitch in each of the 8 stitches cast on under sleeve = 72-80-84-88-92-96 stitches on needle. Insert a marker thread in the middle of the new stitches under the sleeve. Work in stocking stitch in the round. When piece measures 2 cm, decrease 2 stitches mid under sleeve - read DECREASE TIP. Decrease like this every 2½-2-1½-1½-1½-1 cm 15-18-19-20-21-22 times in total = 42-44-46-48-50-52 stitches.
When piece measures 44-41-41-38-36-34 cm, switch to double pointed needles size 4 mm and work 3 ridges in garter stitch. Cast off by knitting. Make sure to avoid a tight cast-off edge, cast off with 1 larger needle size if needed.
Sleeve measures 45-42-42-39-37-35 cm in total from where sleeve was divided from body. Work the other sleeve the same way.

Diagram

symbols = purl
symbols = knit
symbols = slip 1 stitch knitwise, knit 1, pass slipped stitch over stitch worked
symbols = knit 2 together
symbols = 1 yarn over between 2 stitches, on next round knit yarn over to make holes
symbols = 1 yarn over between 2 stitches, on next round knit yarn over twisted to AVOID holes
symbols = slip 3 stitches on cable needle behind piece, knit 3, knit 3 from cable needle
symbols = slip 3 stitches on cable needle in front of piece, knit 3, knit 3 from cable needle
diagram
diagram

Each of our patterns has specific tutorial videos to help you.

Do you have a question? See a list of frequently asked questions (FAQ)

Knitting tension is what determines the final measurements of your work, and is usually measured per 10 x 10 cm. It is provided like so: number of stitches in width x number of rows in height - eg: 19 stitches x 26 rows = 10 x 10 cm.

The knitting tension is very individual; some people knit/crochet loosely while others work tightly. You adjust the knitting tension with the needle size, which is why the suggested needle size is only meant as a guide! You need to adjust this (up or down) to ensure that YOUR knitting tension matches the knitting tension provided in the pattern. If you work with a different knitting tension than provided you will have a different yarn consumption, and your work will have different measurements than what the pattern suggests.

The knitting tension also determines which yarns can replace each other. As long as you achieve the same knitting tension you can replace one yarn with another.

See DROPS lesson: How to measure your tension/gauge

See DROPS video: How to make a gauge tension swatch

The required amount of yarn is provided in grams, eg: 450 g. To calculate how many balls you’ll need you first need to know how many grams are in 1 ball (25g, 50g or 100g). This information is available if you click on the individual yarn quality on our pages. Divide the amount required with the amount of each ball. For example, if each ball is 50g (the most common amount), the calculation will be as follows: 450 / 50 = 9 balls.

The important thing when changing from one yarn to another is that the knitting/crochet tension remains the same. This is so that the measurements of the finished piece will be the same as on the sketch provided. It is easier to achieve the same knitting tension using yarns from the same yarn group. It is also possible to work with multiple strands of a thinner yarn to achieve the knitting tension of a thicker one. Please try our yarn converter. We recommend you to always work a test swatch.

Please NOTE: when changing yarn the garment might have a different look and feel to the garment in the photo, due to individual properties and qualities of each yarn.

See DROPS lesson: Can I use a different yarn than the one mentioned in the pattern?

All our yarns are categorised into yarn groups (from A to F) according to thickness and knitting tension – group A contains the thinnest yarns and group F the thickest. This makes it easier for you to find alternative yarns to our patterns, should you wish to switch yarn. All yarns within the same group have a similar knitting tension and can easily replace each other. However, different yarn qualities have different structures and properties which will give the finished work a unique look and feel.

Click here for an overview of the yarns in each yarn group

At the top of all our patterns you’ll find a link to our yarn calculator, which is a helpful tool should you wish to use a different yarn than suggested. By filling in the yarn quality you wish to replace, the amount (in your size) and number of strands, the calculator will present good alternative yarns with the same knitting tension. Additionally it will tell you how much you’ll require in the new qualities and whether you’ll need to work with multiple strands. Most skeins are 50g (some are 25g or 100g).

If the pattern is worked with multiple colours, every colour will have to be calculated separately. Similarly, if the pattern is worked with several strands of different yarns (for example 1 strand Alpaca and 1 strand Kid-Silk) you will have to find alternatives for each, individually.

Click here to see our yarn calculator

Since different yarns have different qualities and textures we have chosen to keep the original yarn in our patterns. However, you can easily find options among our available qualities by using our yarn calculator, or simply pick a yarn from the same yarn group.

It is possible that some retailers still have discontinued yarns in stock, or that someone has a few skeins at home that they would like to find patterns for.

The yarn calculator will provide both alternative yarn as well as required amount in the new quality.

If you think it's hard to decide what size to make, it can be a good idea to measure a garment you own already and like the size of. Then you can pick the size by comparing those measures with the ones available in the pattern's size chart.

You'll find the size chart at the bottom of the pattern.

See DROPS lesson: How to read size chart

The needle size provided in the pattern serves only as a guide, the important thing is to follow the knitting tension. And since knitting tension is very individual, you will have to adjust the needle size to ensure that YOUR tension is the same as in the pattern – maybe you’ll have to adjust 1, or even 2 needle sizes, up or down to achieve the correct tension. For this, we recommend that you work test swatches.

Should you work with a different knitting tension than the one provided, the measurements of the finished garment might deviate from the measurement sketch.

See DROPS lesson: How to measure your tension/gauge

See DROPS video: How to make a tension/gauge swatch

Working a garment top-down provides more flexibility and room for personal adjustment. For example it is easier to try the garment on while working, as well as making adjustments to length of yoke and shoulder caps.

The instructions are carefully explaining every step, in the correct order. Diagrams are adjusted to the knitting direction and are worked as usual.

The diagram depicts all rows/rounds, and every stitch seen from the right side. It is read from bottom to top, from right to left. 1 square = 1 stitch.

When working back and forth, every other row is worked from the right side and every other row is worked from the wrong side. When working from the wrong side, the diagram will have to be worked reversed: from left to right, knit stitches are purled, purl stitches are knit etc.

When working in the round every round is worked from the right side and the diagram are worked from right to left on all rounds.

See DROPS lesson: How to read knitting diagrams

The diagram depicts all rows/rounds, and every stitch seen from the right side. It is worked from bottom to top, from right to left.

When working back and forth every other row is worked from the right side: from right to left and every other row is worked from the wrong side: from left to right.

When working in the round, every row in the diagram are worked from the right side, from right to left.

When working a circular diagram you start in the middle and work your way outwards, counter clockwise, row by row.

The rows usually start with a given number of chain stitches (equivalent to the height of the following stitch), this will either be depicted in the diagram or explained in the pattern.

See DROPS lesson: How to read crochet diagrams

Instructions for working several diagrams after each other on the same row/round, will often be written like so: “work A.1, A.2, A.3 a total of 0-0-2-3-4 times". This means you work A.1 once, then A.2 is worked once, and A.3 is repeated (in width) the number of times provided for your size – in this case like so: S = 0 times, M = 0 times, L=2 times, XL= 3 times and XXL = 4 times.

The diagrams are worked as usual: begin with the first row in A.1, then work the first row in A.2 etc.

See DROPS lesson: How to read knitting diagrams

See DROPS lesson: How to read crochet diagrams

The total width of the garment (from wrist-to-wrist) will be larger in the larger sizes, despite the actual sleeves being shorter. The larger sizes have longer sleeve caps and wider shoulders, so there will be a good fit in all sizes.

The measurement sketch/schematic drawing provides information regarding the full length of the garment. If it’s a jumper or a jacket the length is measured from the highest point on the shoulder closest to the neckline, and straight down to the bottom of the garment. It is NOT measured from the tip of shoulder. Similarly, the length of yoke is measured from the highest point on the shoulder and down to where yoke is split into body and sleeves.

On a jacket measures are never taken along bands, unless specifically stated. Always measure inside band stitches when measuring the length.

See DROPS lesson: How to read a schematic drawing

Diagrams are often repeated on the round or in height. 1 repeat is the diagram the way it appears in the pattern. If it says to work 5 repeats of A.1 in the round, then you work A.1 a total of 5 times after/next to each other in the round. If it says to work 2 repeats of A.1 vertically/in height you work the entire diagram once, then begin again at the start and work the entire diagram one more time.

Chain stitches are slightly narrower than other stitches and to avoid working the cast-on edge too tight, we simply chain more stitches to begin with. The stitch count will be adjusted on the following row to fit the pattern and measurement sketch.

The rib edge is more elastic and will contract slightly compared to, for example, stocking stitch. By increasing before the rib edge, you avoid a visible difference in width between the rib edge and the rest of the body.

It’s very easy to cast off too tightly, and by making yarn overs while casting off (and simultaneously casting these off) you avoid a too tight cast off edge.

See DROPS video: How to bind off with yarn overs (yo)

To achieve an even increase (or decrease) you can increase on, for example: every 3rd and 4th row alternately, like so: work 2 rows and increase on the 3rd row, work 3 rows and increase on the 4th. Repeat this until the increase is complete.

See DROPS lesson: Increase or decrease 1 st on every 3rd and 4th row alternately

Should you prefer to work in the round instead of back and forth, you may of course adjust the pattern. You’ll need to add steeks mid-front (usually 5 stitches), and follow the instructions. When you would normally turn and work from the wrong side, simply work across the steek and continue in the round. At the end you’ll cut the piece open, pick up stitches to work bands, and cover the cut edges.

See DROPS video: How to knit steeks and cut open

Should you prefer to work back and forth instead of in the round, you may of course adjust the pattern so you work the pieces separately and then assemble them at the end. Divide the stitches for the body in 2, add 1 edge stitch in each side (for sewing) and work the front and back pieces separately.

See DROPS lesson: Can I adapt a pattern for circular needles into straight needles?

Pattern repeats can vary slightly in the different sizes, in order to get the correct proportions. If you’re not working the exact same size as the garment in the photo, yours might deviate slightly. This has been carefully developed and adjusted so that the complete impression of the garment is the same in all sizes.

Make sure to follow instructions and diagrams for your size!

If you have found a pattern you like which is available in women’s size it’s not very difficult to convert it to men’s size. The biggest difference will be the length of sleeves and body. Start working on the women size that you think would fit across the chest. The additional length will be worked right before you cast off for the armhole/sleeve cap. If the pattern is worked top-down you can add the length right after the armhole or before the first decrease on sleeve.

Regarding additional yarn amount, this will depend on how much length you add, but it is better with a skein too many than too few.

All yarns will have excess fibres (from production) that might come off as lint or shedding. Brushed yarns (ie hairier yarns) have more of these loose, excess fibres, causing more shedding.

Shedding also depends on what is worn under or over the garment, and whether this pulls at the yarn fibres. It’s therefore not possible to guarantee that there will be no shedding

Below are some tips on how to get the best result when working with hairier yarns:

1. When the garment is finished (before you wash it) shake it vigorously so the looser hairs come off. NOTE: do NOT use a lint roller, brush or any method that pulls at the yarn.

2. Place the garment in a plastic bag and put it in your freezer - the temperature will cause the fibres to become less attached to each other, and excess fibres will come off easier.

3. Leave in the freezer for a few hours before taking it out and shaking it again.

4. Wash the garment according to the instructions on the yarn label.

Pilling is a natural process that happens to even the most exclusive of fibers. It's a natural sign of wear and tear that is hard to avoid, and that is most visible in high friction areas of your garment like a sweater's arms and cuffs.

You can make your garment look as new by removing the pilling, using a fabric comb or a pill/lint remover.

Still can't find the answer you need? Then scroll down and leave your question so one of our experts can try to help you. This will be done normally within 5 to 10 working days.
In the meantime, you can read the questions and answers that others have left to this pattern or join the DROPS Workshop on Facebook to get help from fellow knitters/crocheters!

You might also like...

Post a comment to pattern DROPS 187-25

We would love to hear what you have to say about this pattern!

If you want to leave a question, please make sure you select the correct category in the form below, to speed up the answering process. Required fields are marked *.

Comments / Questions (14)

country flag Christina wrote:

Hello! Can you explain why the stitches for the body from 178 become 218? As far as I understand the increases from A3 are 4+4=8. Do I knit A3 one time vertically? Thank you

16.08.2022 - 16:31

DROPS Design answered:

Dear Christina, when working A.3 on both sides of the jumper you will increase stitches (4 sts in each A.3 in height = 8 sts are increased after A.3 has been worked one time in height). You then repeat A.3 in height as before until body measures 31 cm from the division. You should have repeat A.3 approx. a total of 5 times in height (= 5 times x 4 sts x 2 sides = 40 sts increased + 178 sts at the beg of body = 218 sts). Happy knitting!

16.08.2022 - 17:10

country flag RJ wrote:

Pls guide how much Drops extra fine merino wool to buy for this Small sized sweater? Thank you.

27.09.2021 - 05:11

DROPS Design answered:

Dear RJ, you will always find the total amount of yarn required in grams at the beg of the pattern, under the header, ie in S: 400 g DROPS Merino Extra Fine /50 g a ball = 8 balls in size S. Happy knitting!

27.09.2021 - 08:43

country flag Roberta Ghezzi wrote:

Vorrei mettere la foto è possibile

02.04.2021 - 18:10

DROPS Design answered:

Buonasera Roberta, a questo link può inserire il suo progetto, oppure pubblicare un posto sui suoi social media e taggarci con #dropsdesign in modo che possiamo vedere il progetto. Buon lavoro!

03.04.2021 - 20:14

country flag Roberta Ghezzi wrote:

Ho fatto questo bel maglione ed ho seguito le vostre istruzioni per la taglia S. non ho fatto le maniche lunghe perchè ho usato un bellissimo cotone color corallo. Lo regalerò ad una giovanissima amica di mio figlio.

02.04.2021 - 17:38

country flag Françoise wrote:

Ma bordure en point mousse du bas du pull rebique et roule vers l’avant . Y a-t-il une raison à cela ? Dois je la refaire en prenant encore des aiguilles plus fines ? Merci de vos conseils !

03.12.2020 - 12:07

DROPS Design answered:

Bonjour Françoise, lavez (en suivant bien les indications de l'étiquette, du nuancier + ces quelques généralités) et faites sécher le pull bien à plat, ajoutez des épingles si besoin pour maintenir le bas. Bonnes finitions!

03.12.2020 - 16:15

country flag Pascaline wrote:

Vous dites "Juste après le jeté, tricotez 1 tour comme avant puis, tricotez A.1C et A.2C " Si je résume; rang 53 : dernière torsade de A1b, rg 54: jeté, rg 55 : normal- rg 56 : jeté (dernier de A1b) puis rg 57 : comme avant en tricotant les jeté à l'endroit comme vous le dites- rg 58 : premier rang de A1c avec jeté et rg 59: rg normal à en croire le diagramme A1c alors que je devrais avoir la torsade (5ème rang), Je suis désolée de ne pas comprendre

05.02.2019 - 11:44

DROPS Design answered:

Bonjour Pascaline, tout à fait, vous allez devoir commencer les jours de A.1c/A2c au 58ème rang et faire la torsade de ces 2 diagrammes au 59ème rang, et continuer ainsi, avec les jours tous les 2 tours de chaque côté de A.1c/A.2c et la torsade en décalage mais toujours tous les 5 tours pour ne pas la décaler entre les diagrammes b et c. Bon tricot!

05.02.2019 - 13:40

country flag Pascaline wrote:

Rebonjour, désolée, je ne comprends pas. L'augmentation par jeté se fait (si je ne me suis pas trompée ) sur les rangs pairs de A1a et A1b, c'est à dire sur les rangs précédents et suivants la torsade. Or, sur A1c, elle se fait sur le rang de la torsade, et sur rang impair, donc ça ne correspond pas..Puis je adapter et faire les jetés sur rangs pair de A1C?

05.02.2019 - 10:47

DROPS Design answered:

Bonjour Pascaline, après les augmentations du raglan, vous tricotez A.1C et A.2C au-dessus de A.1b et A.2b, simplement comme avant (= pas de transition entre les deux diagrammes, vous devez avoir le même nombre de rangs entre les torsades). Juste après le jeté, tricotez 1 tour comme avant puis, tricotez A.1C et A.2C (les jours de chaque côté des torsades vont remplacer les jetés des augmentations du raglan). Vous pouvez ajuster les jours pour qu'ils soient tous les rangs pairs, mais les torsades doivent toujours être faites comme avant, avec 5 rangs entre chaque. Bon tricot!

05.02.2019 - 11:15

country flag Pascaline wrote:

Bonjour Je suis bloquée entre A1b /A2b et A1C/A2C. j'ai fini A1b /A2b par la 21ème augmentation par jeté. Avant de commencer A1c et A2C, dois je faire un retour classique pour tricoter les jetés à l'endroit avant de commencer la première ligne A1C/A2c (dans ce cas là, il y a une ligne en plus entre la torsade =6 rangs au lieu de 5). ou dois-je directement commencer A1C/A2C mais alors, il y a deux jetés de suite, le 21ème rang et la première ligne de A1C/A2C ? merci

05.02.2019 - 07:54

DROPS Design answered:

Bonjour Pascaline, comme le pull se tricote en rond, on n'a pas de rang "retour", mais au tour suivant, tricotez les mailles comme elles doivent l'être: continuez A.1b et A.2b comme avant (si c'est un rang impair du diagramme, commencez A.1c et A.2c, sinon, tricotez encore une fois A.1b et A.2b et au tour suivant (rang impair de A.1b/A.2b, continuez en suivant A.1c/A.2c, en tricotant les jours avant/après les diagrammes si vous êtes sur un rang impair, et la torsade si vous avez bien 5 rangs depuis la dernière torsade. Bon tricot!

05.02.2019 - 09:24

country flag Paco wrote:

BOnjour, Je ne comprends pas dans l'étape raglan: il est indiqué de faire un jeté de chaque côté A1 et A2. On est bien d accord que sur un tour, il y a 2 A1 et deux A2? Donc, ca augmente de 8 mailles comme vous le précisez (2jetes autour de 4 A1/A2). Je ne vois pas comment vous arrivez au chiffre de "augmenter ainsi 21 fois au total tous les 2 tours(je dirais 2 tours= 16 augmentations) je vous remercie

29.01.2019 - 13:22

DROPS Design answered:

Bonjour Mme Paco, c'est exact, on augmente bien de chaque côté de A.1 et de A.2 soit 8 mailles augmentées par tour d'augmentations. On augmente tous les 2 tours, donc après 2 tours d'augmentations, on aura augmenté un total de 16 mailles, après 3 tours d'augmentations un total de 24 mailles, mais toujours 8 mailles à chaque tour d'augmentations et donc 21 fois tous les 2 tours = 21 x 8 = 168 augmentations sur 21x2 tours = 42 tours. Bon tricot!

29.01.2019 - 16:29

country flag Martine PITSCHON wrote:

Bonjour : je tricote la taille S. Manches : 64m + 8m sous la manche. + 1m ds les 8m montées ? Le total ne peut être 72m ? Faut-il vraiment ajouter ces 8m supplémentaires ? Merci de votre réponse. Martine

10.09.2018 - 12:19

DROPS Design answered:

Bonjour Mme Pitschon, vous aviez mis 64 m en attente pour la manche et vous relevez ensuite 1 maille dans chacune des 8 mailles montées sous la manche lorsque vous les avez mises en attente (ces mailles ont ensuite été tricotées pour les côtés du pull avec le dos/le devant) = on a bien 72 mailles pour la manche. Bon tricot!

11.09.2018 - 09:44