DROPS Safran
DROPS Safran
100% Cotton
from 1.30 £ /50g
Get the yarn to make this pattern from 18.20£.

The yarn cost is calculated from the pattern’s smallest size and the yarn’s cheapest product type. Looking for an even better price? You might find it on the DROPS Deals!

DROPS SS24

Queensland

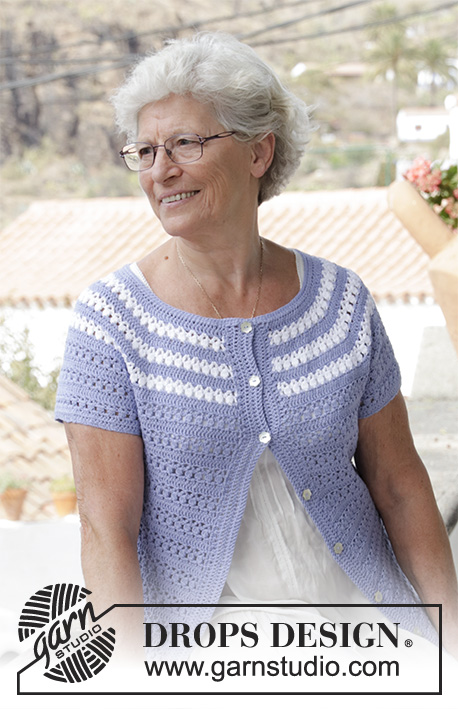
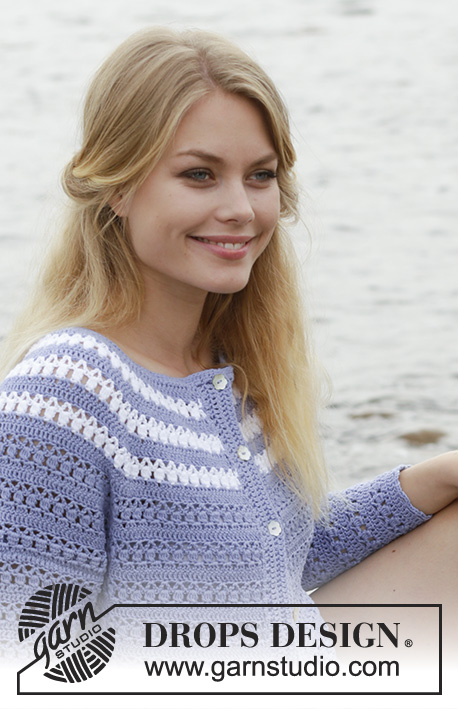
Crocheted dress with raglan, lace pattern and short sleeves, worked top down. Sizes S - XXXL. The piece is worked in DROPS Safran.

DROPS 186-12
DROPS Design: Pattern no e-270
Yarn group A
-----------------------------------------------------------
Sizes: S - M - L - XL - XXL - XXXL
Materials:
DROPS SAFRAN from Garnstudio (belongs to yarn group A)
700-750-800-900-1000-1050 g colour 05, light blue purple

The piece can also be crocheted with yarn from:
"Alternative yarn (Yarn group A)" – see link below.

DROPS CROCHET HOOK SIZE 3.5 MM – or the size needed to get 22 treble crochets and 12 rows on 10 cm in width and 10 cm in height.

DROPS CROCHET HOOK SIZE 3 MM – for short sleeves.
----------------------------------------------------------

-------------------------------------------------------

Alternative Yarn – See how to change yarns here
Yarn Groups A to F – Use the same pattern and change the yarn here
Yarn usage using an alternative yarn – Use our yarn converter here

-------------------------------------------------------

DROPS Safran
DROPS Safran
100% Cotton
from 1.30 £ /50g
Get the yarn to make this pattern from 18.20£.

The yarn cost is calculated from the pattern’s smallest size and the yarn’s cheapest product type. Looking for an even better price? You might find it on the DROPS Deals!

Pattern instructions

NOTE: This pattern is written in British English. All measurements in charts are in cm. For conversion from cm to inches - click here. There are different terms for crocheting in British and American English. If this pattern includes crochet, click for "crochet terms" here. For this pattern in American English, please click here.
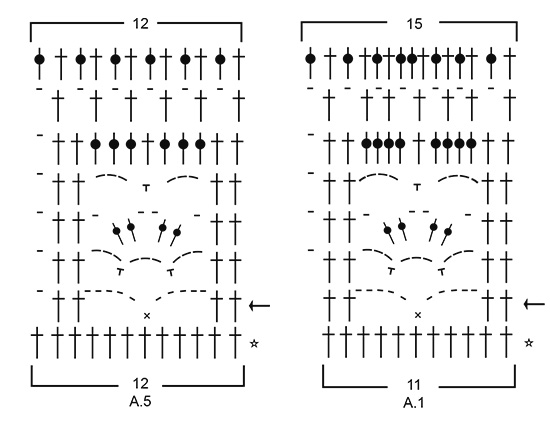
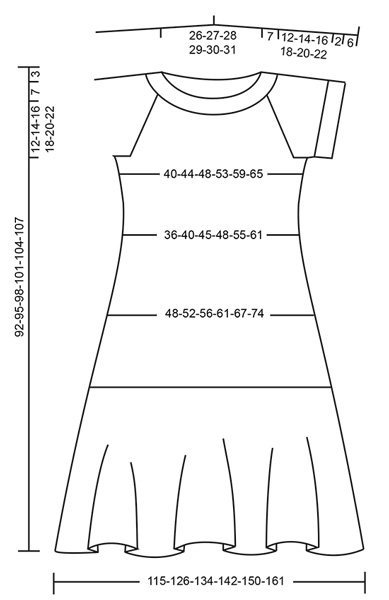
INFORMATION FOR THE PATTERN:

CROCHET INFO:
On beginning of each round with treble crochets replace first treble crochet with 3 chain stitches. The round finishes with 1 slip stitch in the 3rd chain stitch at the beginning of the round.

INCREASE/DECREASE TIP (evenly spaced):
To work out how to increase/decrease evenly, count the total number of stitches on the round (e.g. 114 stitches) and divide by the number of increases/decreases to be made (e.g. 29) = 3.9.
In this example, increase in approx. every 4th stitch – read INCREASE TIP.
When decreasing, crochet every 3rd and 4th stitch together – read DECREASE TIP.

INCREASE TIP:
Increase 1 treble crochet by working 2 treble crochets in the same stitch.

DECREASE TIP:
Decrease 1 treble crochet by working the next 2 treble crochets together as follows: Work 1 treble crochet, but wait with the last yarn over and pull through (= 2 loops on hook), work the next treble crochet, but when working the last pull through, pull the strand through all 3 loops on the hook.

PATTERN:
See diagrams A.1 to A.5.
----------------------------------------------------------

DRESS:
The piece is worked in the round, top down.

NECK:
Work 114-118-124-128-132-136 slightly loose chain stitches with hook size 3.5 mm and Safran and form them into a ring with 1 slip stitch in the first chain stitch.
ROUND 1: Work 2 chain stitches (equivalent to 1 half treble crochet), then work 1 half treble crochet in each chain stitch to end of round, finish the round with 1 slip stitch in the 2nd chain stitch at the beginning of the round = 114-118-124-128-132-136 half treble crochets.
ROUND 2: Work 3 chain stitches (equivalent to 1 half treble crochet + 1 chain stitch), skip 1 half treble crochet, * work 1 half treble crochet in the next half treble crochet, 1 chain stitch, skip 1 half treble crochet *, work from *-* to end of round and finish with 1 slip stitch in the 2nd chain at the beginning of the round = 114-118-124-128-132-136 stitches on round.
ROUND 3: Work 3 chain stitches (equivalent to 1 treble crochet), then work 1 treble crochet in each half treble crochet and 1 treble crochet around each chain stitch – AT THE SAME TIME increase 29-25-30-26-33-29 treble crochets evenly on round – read INCREASE/DECREASE TIP and INCREASE TIP = 143-143-154-154-165-165 treble crochets. Finish the round with 1 slip stitch in the 3rd chain stitch at the beginning of the round.
Read CROCHET INFO and work A.1 in the round (= 13-13-14-14-15-15 repeats of 11 stitches). On the last round in A.1 you will, for the most part, work 15 treble crochets in each repeat, but in 5-5-6-10-7-11 repeats evenly spaced on the round, increase this to 16 treble crochets so that the total is 200-200-216-220-232-236 treble crochets on the round. The piece now measures approx. 7 cm from the cast-on edge. Now work yoke as described below. REMEMBER THE CROCHET TENSION!

YOKE:
Work 1 round of treble crochets with 1 treble crochet in each treble crochet. Then insert 4 marker threads in the piece as follows (without working the stitches): Count 34-34-38-39-42-43 treble crochets (= ½ back piece), insert 1 marker thread in the next treble crochet, count 30 treble crochets (= sleeve), insert 1 marker thread in the next treble crochet, count 68-68-76-78-84-86 treble crochets (= front piece), insert 1 marker thread in the next treble crochet, count 30 treble crochets (= sleeve), insert 1 marker thread in the next treble crochet. There are 34-34-38-39-42-43 treble crochets left on the round after the last treble crochet with marker thread.
Continue working treble crochets in the round with 1 treble crochet in each treble crochet - AT THE SAME TIME increase to raglan at each marker thread as follows:
ROUND 1: Work 1 treble crochet + 2 chain stitches + 1 treble crochet in each treble crochet with a marker thread (= 4 treble crochets increased on the round) = 204-204-220-224-236-240 treble crochets on the round.
ROUND 2: Around each chain-space with 2 chain stitches work 1 treble crochet + 2 chain stitches + 1 treble crochet (= 8 treble crochets increased on round) = 212-212-228-232-244-248 treble crochets on round.
Repeat round 2 until you have worked a total of 9-13-15-18-20-23 rounds with increases (including the increases in round 1) = 268-300-332-360-388-416 treble crochets on the round.
On the next round work 1 treble crochet in each treble crochet, but around each chain-space with 2 chain stitches work 2 treble crochets (= 8 treble crochets increased on the round) = 276-308-340-368-396-424 treble crochets on the round.
Continue to work treble crochets without increases until the piece measures 19-21-23-25-27-29 cm from the cast-on edge mid front.
The next round is worked as follows: Work 40-44-48-53-59-65 treble crochets (including the 3 chain stitches at beginning of round = ½ back piece), work 8-8-10-10-12-14 slightly loose chain stitches, skip 58-66-74-78-80-82 treble crochets (= sleeve), work 80-88-96-106-118-130 treble crochets (= front piece), work 8-8-10-10-12-14 slightly loose chain stitches, skip 58-66-74-78-80-82 treble crochets (= sleeve) and work the last 40-44-48-53-59-65 treble crochets on the round (= ½ back piece). Cut the strand.
Body and sleeves are finished separately. THE PIECE IS NOW MEASURED FROM HERE!

BODY:
Insert 1 marker in the middle of the 8-8-10-10-12-14 chain stitches under the sleeve on the one side of the piece and start the round here.
Work 1 double crochet in the first chain stitch, 3 chain stitches (equivalent to 1 treble crochet), then work 1 treble crochet in each chain stitch and 1 treble crochet in each treble crochet to end of round = 176-192-212-232-260-288 treble crochets. Continue in the round with treble crochets. When the piece measures 2 cm from the separation, decrease 8-8-8-10-10-10 treble crochets evenly on round = 168-184-204-222-250-278 treble crochets – read INCREASE/DECREASE TIP. Repeat the decrease when the piece measures 6 cm from the separation = 160-176-196-212-240-268 treble crochets.
When the piece measures 12 cm from the separation, increase 12-12-12-14-14-14 treble crochets evenly on round = 172-188-208-226-254-282 treble crochets.
When the piece measures 18 cm from the separation, increase 12-12-12-14-14-14 treble crochets evenly on round = 184-200-220-240-268-296 treble crochets.
When the piece measures 26 cm from the separation, increase 14 treble crochets evenly on round in all sizes = 198-214-234-254-282-310 treble crochets.
When the piece measures 34 cm from the separation, increase 14 treble crochets evenly on round in all sizes = 212-228-248-268-296-324 treble crochets.
When the piece measures 40-41-42-43-44-45 cm from the separation, (the piece now measures approx. 62-65-68-71-74-77 cm from the shoulder) increase 40-48-40-44-40-48 treble crochets evenly on round = 252-276-288-312-336-372 treble crochets.
Work A.2 in the round (= 21-23-24-26-28-31 repeats of 12 stitches). AT THE SAME TIME on the last round in A.2 increase 52-60-64-72-64-60 treble crochets evenly on round = 304-336-352-384-400-432 treble crochets.
Work A.3 in the round (= 19-21-22-24-25-27 repeats of 16 stitches).
When A.3 has been completed, there are 475-525-550-600-625-675 treble crochets on the round. Now work A.X as shown in A.2 (= 2 rounds). AT THE SAME TIME on the last round increase 30-28-39-25-36-34 treble crochets evenly on round = 505-553-589-625-661-709 treble crochets.
The next round is worked as follows: A.4A (= 6 stitches), work A.4B over the next 492-540-576-612-648-696 treble crochets (= 41-45-48-51-54-58 repeats of 12 stitches), finish with A.4C (= 7 stitches). When A.4 has been completed, cut and fasten the strand. The dress measures approx. 92-95-98-101-104-107 cm from the shoulder down.

SLEEVE:
Insert 1 marker in the middle of the 8-8-10-10-12-14 chain stitches under the sleeve on the one side of the piece and start the round here.
Work 1 double crochet in the first chain stitch, 3 chain stitches (equivalent to 1 treble crochet), then work 1 treble crochet in each chain stitch and 1 treble crochet in each treble crochet to end of round = 66-74-84-88-92-96 treble crochets. Work 1 round of treble crochets where you decrease 6-2-12-4-8-0 treble crochets evenly on round = 60-72-72-84-84-96 treble crochets. Work A.5 in the round (= 5-6-6-7-7-8 repeats of 12 stitches). When there are 3 rounds left in A.5 change to hook size 3 mm. Finish working A.5, cut and fasten the strand. The sleeve measures approx. 8 cm from the separation.
Work the other sleeve in the same way.

This pattern has been corrected.

Updated online: 27.04.2018
Correction: NECK:... Read CROCHET INFO and work A.1 in the round (= 13-13-14-14-15-15 repeats of 11 stitches). On the last round in A.1 you will, for the most part, work 15 treble crochets in each repeat, but in 5-5-6-10-7-11 repeats evenly spaced on the round, increase this to 16 treble crochets so that the total is 200-200-216-220-232-236 treble crochets on the round. The piece now measures approx. 7 cm from the cast-on edge. Now work yoke as described below. REMEMBER THE CROCHET TENSION!

YOKE:
Work 1 round of treble crochets with 1 treble crochet in each treble crochet. Then insert 4 marker threads in the piece as follows (without working the stitches): Count 34-34-38-39-42-43 treble crochets (= ½ back piece), insert 1 marker thread in the next treble crochet, count 30 treble crochets (= sleeve), insert 1 marker thread in the next treble crochet, count 68-68-76-78-84-86 treble crochets (= front piece), insert 1 marker thread in the next treble crochet, count 30 treble crochets (= sleeve), insert 1 marker thread in the next treble crochet. There are 34-34-38-39-42-43 treble crochets left on the round after the last treble crochet with marker thread.
Continue working treble crochets in the round with 1 treble crochet in each treble crochet - AT THE SAME TIME increase to raglan at each marker thread as follows:
ROUND 1: Work 1 treble crochet + 2 chain stitches + 1 treble crochet in each treble crochet with a marker thread (= 4 treble crochets increased on the round) = 204-204-220-224-236-240 treble crochets on the round...

Diagram

symbols = treble crochet in stitch
symbols = treble crochet around chain stitch/chain-space
symbols = double crochet in stitch
symbols = double crochet around chain stitch/chain-space
symbols = 1 double treble crochet in stitch
symbols = 1 triple treble crochet in stitch
symbols = 1 chain stitch
symbols = 2 chain stitches
symbols = 3 chain stitches
symbols = 4 chain stitches
symbols = 6 chain stitches
symbols = 7 chain stitches
symbols = work 4 treble crochets around chain-space (do not work the treble crochets together)
symbols = work 2 treble crochets together in the same stitch as follows: Work 1 treble crochet in the stitch, but wait with the last yarn over and pull through (= 2 loops on hook), work 1 treble crochet in the same stitch, but now pull the last yarn over through all 3 loops on the hook
symbols = work 3 treble crochets together as follows: Work 1 treble crochet in each of the next 3 stitches, but wait with the last yarn over and pull through on all of these three treble crochets, make 1 yarn over and pull it through all 4 loops on the hook
symbols = work 4 treble crochets together as follows: work 1 treble crochet in each of the next 4 stitches, but wait with the last yarn over and pull through on all four treble crochets, make 1 yarn over and pull it through all 5 loops on the hook
symbols = 1 picot: work 3 chain stitches, work 1 slip stitch in the first chain stitch worked
symbols = round 1 starts here
symbols = his round has already been worked
diagram
diagram
diagram
diagram
Do you have a question? See a list of frequently asked questions (FAQ)

Knitting tension is what determines the final measurements of your work, and is usually measured per 10 x 10 cm. It is provided like so: number of stitches in width x number of rows in height - eg: 19 stitches x 26 rows = 10 x 10 cm.

The knitting tension is very individual; some people knit/crochet loosely while others work tightly. You adjust the knitting tension with the needle size, which is why the suggested needle size is only meant as a guide! You need to adjust this (up or down) to ensure that YOUR knitting tension matches the knitting tension provided in the pattern. If you work with a different knitting tension than provided you will have a different yarn consumption, and your work will have different measurements than what the pattern suggests.

The knitting tension also determines which yarns can replace each other. As long as you achieve the same knitting tension you can replace one yarn with another.

See DROPS lesson: How to measure your tension/gauge

See DROPS video: How to make a gauge tension swatch

The required amount of yarn is provided in grams, eg: 450 g. To calculate how many balls you’ll need you first need to know how many grams are in 1 ball (25g, 50g or 100g). This information is available if you click on the individual yarn quality on our pages. Divide the amount required with the amount of each ball. For example, if each ball is 50g (the most common amount), the calculation will be as follows: 450 / 50 = 9 balls.

The important thing when changing from one yarn to another is that the knitting/crochet tension remains the same. This is so that the measurements of the finished piece will be the same as on the sketch provided. It is easier to achieve the same knitting tension using yarns from the same yarn group. It is also possible to work with multiple strands of a thinner yarn to achieve the knitting tension of a thicker one. Please try our yarn converter. We recommend you to always work a test swatch.

Please NOTE: when changing yarn the garment might have a different look and feel to the garment in the photo, due to individual properties and qualities of each yarn.

See DROPS lesson: Can I use a different yarn than the one mentioned in the pattern?

All our yarns are categorised into yarn groups (from A to F) according to thickness and knitting tension – group A contains the thinnest yarns and group F the thickest. This makes it easier for you to find alternative yarns to our patterns, should you wish to switch yarn. All yarns within the same group have a similar knitting tension and can easily replace each other. However, different yarn qualities have different structures and properties which will give the finished work a unique look and feel.

Click here for an overview of the yarns in each yarn group

At the top of all our patterns you’ll find a link to our yarn calculator, which is a helpful tool should you wish to use a different yarn than suggested. By filling in the yarn quality you wish to replace, the amount (in your size) and number of strands, the calculator will present good alternative yarns with the same knitting tension. Additionally it will tell you how much you’ll require in the new qualities and whether you’ll need to work with multiple strands. Most skeins are 50g (some are 25g or 100g).

If the pattern is worked with multiple colours, every colour will have to be calculated separately. Similarly, if the pattern is worked with several strands of different yarns (for example 1 strand Alpaca and 1 strand Kid-Silk) you will have to find alternatives for each, individually.

Click here to see our yarn calculator

Since different yarns have different qualities and textures we have chosen to keep the original yarn in our patterns. However, you can easily find options among our available qualities by using our yarn calculator, or simply pick a yarn from the same yarn group.

It is possible that some retailers still have discontinued yarns in stock, or that someone has a few skeins at home that they would like to find patterns for.

The yarn calculator will provide both alternative yarn as well as required amount in the new quality.

If you think it's hard to decide what size to make, it can be a good idea to measure a garment you own already and like the size of. Then you can pick the size by comparing those measures with the ones available in the pattern's size chart.

You'll find the size chart at the bottom of the pattern.

See DROPS lesson: How to read size chart

The needle size provided in the pattern serves only as a guide, the important thing is to follow the knitting tension. And since knitting tension is very individual, you will have to adjust the needle size to ensure that YOUR tension is the same as in the pattern – maybe you’ll have to adjust 1, or even 2 needle sizes, up or down to achieve the correct tension. For this, we recommend that you work test swatches.

Should you work with a different knitting tension than the one provided, the measurements of the finished garment might deviate from the measurement sketch.

See DROPS lesson: How to measure your tension/gauge

See DROPS video: How to make a tension/gauge swatch

Working a garment top-down provides more flexibility and room for personal adjustment. For example it is easier to try the garment on while working, as well as making adjustments to length of yoke and shoulder caps.

The instructions are carefully explaining every step, in the correct order. Diagrams are adjusted to the knitting direction and are worked as usual.

The diagram depicts all rows/rounds, and every stitch seen from the right side. It is read from bottom to top, from right to left. 1 square = 1 stitch.

When working back and forth, every other row is worked from the right side and every other row is worked from the wrong side. When working from the wrong side, the diagram will have to be worked reversed: from left to right, knit stitches are purled, purl stitches are knit etc.

When working in the round every round is worked from the right side and the diagram are worked from right to left on all rounds.

See DROPS lesson: How to read knitting diagrams

The diagram depicts all rows/rounds, and every stitch seen from the right side. It is worked from bottom to top, from right to left.

When working back and forth every other row is worked from the right side: from right to left and every other row is worked from the wrong side: from left to right.

When working in the round, every row in the diagram are worked from the right side, from right to left.

When working a circular diagram you start in the middle and work your way outwards, counter clockwise, row by row.

The rows usually start with a given number of chain stitches (equivalent to the height of the following stitch), this will either be depicted in the diagram or explained in the pattern.

See DROPS lesson: How to read crochet diagrams

Instructions for working several diagrams after each other on the same row/round, will often be written like so: “work A.1, A.2, A.3 a total of 0-0-2-3-4 times". This means you work A.1 once, then A.2 is worked once, and A.3 is repeated (in width) the number of times provided for your size – in this case like so: S = 0 times, M = 0 times, L=2 times, XL= 3 times and XXL = 4 times.

The diagrams are worked as usual: begin with the first row in A.1, then work the first row in A.2 etc.

See DROPS lesson: How to read knitting diagrams

See DROPS lesson: How to read crochet diagrams

The total width of the garment (from wrist-to-wrist) will be larger in the larger sizes, despite the actual sleeves being shorter. The larger sizes have longer sleeve caps and wider shoulders, so there will be a good fit in all sizes.

The measurement sketch/schematic drawing provides information regarding the full length of the garment. If it’s a jumper or a jacket the length is measured from the highest point on the shoulder closest to the neckline, and straight down to the bottom of the garment. It is NOT measured from the tip of shoulder. Similarly, the length of yoke is measured from the highest point on the shoulder and down to where yoke is split into body and sleeves.

On a jacket measures are never taken along bands, unless specifically stated. Always measure inside band stitches when measuring the length.

See DROPS lesson: How to read a schematic drawing

Diagrams are often repeated on the round or in height. 1 repeat is the diagram the way it appears in the pattern. If it says to work 5 repeats of A.1 in the round, then you work A.1 a total of 5 times after/next to each other in the round. If it says to work 2 repeats of A.1 vertically/in height you work the entire diagram once, then begin again at the start and work the entire diagram one more time.

Chain stitches are slightly narrower than other stitches and to avoid working the cast-on edge too tight, we simply chain more stitches to begin with. The stitch count will be adjusted on the following row to fit the pattern and measurement sketch.

The rib edge is more elastic and will contract slightly compared to, for example, stocking stitch. By increasing before the rib edge, you avoid a visible difference in width between the rib edge and the rest of the body.

It’s very easy to cast off too tightly, and by making yarn overs while casting off (and simultaneously casting these off) you avoid a too tight cast off edge.

See DROPS video: How to bind off with yarn overs (yo)

To achieve an even increase (or decrease) you can increase on, for example: every 3rd and 4th row alternately, like so: work 2 rows and increase on the 3rd row, work 3 rows and increase on the 4th. Repeat this until the increase is complete.

See DROPS lesson: Increase or decrease 1 st on every 3rd and 4th row alternately

Should you prefer to work in the round instead of back and forth, you may of course adjust the pattern. You’ll need to add steeks mid-front (usually 5 stitches), and follow the instructions. When you would normally turn and work from the wrong side, simply work across the steek and continue in the round. At the end you’ll cut the piece open, pick up stitches to work bands, and cover the cut edges.

See DROPS video: How to knit steeks and cut open

Should you prefer to work back and forth instead of in the round, you may of course adjust the pattern so you work the pieces separately and then assemble them at the end. Divide the stitches for the body in 2, add 1 edge stitch in each side (for sewing) and work the front and back pieces separately.

See DROPS lesson: Can I adapt a pattern for circular needles into straight needles?

Pattern repeats can vary slightly in the different sizes, in order to get the correct proportions. If you’re not working the exact same size as the garment in the photo, yours might deviate slightly. This has been carefully developed and adjusted so that the complete impression of the garment is the same in all sizes.

Make sure to follow instructions and diagrams for your size!

If you have found a pattern you like which is available in women’s size it’s not very difficult to convert it to men’s size. The biggest difference will be the length of sleeves and body. Start working on the women size that you think would fit across the chest. The additional length will be worked right before you cast off for the armhole/sleeve cap. If the pattern is worked top-down you can add the length right after the armhole or before the first decrease on sleeve.

Regarding additional yarn amount, this will depend on how much length you add, but it is better with a skein too many than too few.

All yarns will have excess fibres (from production) that might come off as lint or shedding. Brushed yarns (ie hairier yarns) have more of these loose, excess fibres, causing more shedding.

Shedding also depends on what is worn under or over the garment, and whether this pulls at the yarn fibres. It’s therefore not possible to guarantee that there will be no shedding

Below are some tips on how to get the best result when working with hairier yarns:

1. When the garment is finished (before you wash it) shake it vigorously so the looser hairs come off. NOTE: do NOT use a lint roller, brush or any method that pulls at the yarn.

2. Place the garment in a plastic bag and put it in your freezer - the temperature will cause the fibres to become less attached to each other, and excess fibres will come off easier.

3. Leave in the freezer for a few hours before taking it out and shaking it again.

4. Wash the garment according to the instructions on the yarn label.

Pilling is a natural process that happens to even the most exclusive of fibers. It's a natural sign of wear and tear that is hard to avoid, and that is most visible in high friction areas of your garment like a sweater's arms and cuffs.

You can make your garment look as new by removing the pilling, using a fabric comb or a pill/lint remover.

Still can't find the answer you need? Then scroll down and leave your question so one of our experts can try to help you. This will be done normally within 5 to 10 working days.
In the meantime, you can read the questions and answers that others have left to this pattern or join the DROPS Workshop on Facebook to get help from fellow knitters/crocheters!

You might also like...

Queensland

Renata, Australia

Queensland

Mart-Mari Breedt, South Africa

Post a comment to pattern DROPS 186-12

We would love to hear what you have to say about this pattern!

If you want to leave a question, please make sure you select the correct category in the form below, to speed up the answering process. Required fields are marked *.

Comments / Questions (60)

country flag Sabine Nelkert wrote:

Hallo, ich habe meinen Fehler gefunden, aber trotzdem danke für die schnelle Antwort.

09.03.2021 - 18:46

country flag Sabine Nelkert wrote:

Hallo, bei der Passe soll man Stäbchen ohne Zunahme häkeln, häkelt man hier die Luftmaschen über den Markierungen. Vielen Dank.

08.03.2021 - 19:52

DROPS Design answered:

Liebe Frau Nelket, wo sind Sie jetzt genau bei der Passe, welche Runde meinen Sie? Können Sie uns etwas mehr sagen, so kann man Ihnen am besten helfen. Danke für Ihr Verständnis.

09.03.2021 - 07:56

country flag Hugue Marie Pierre wrote:

J'ai fait l'échantillon avec crochet n"3 au lieu de 3,5 et je suis arrivée aux mêmes dimensions. Par contre J'ai respecte toutes les données du modèle et sous les emmanchures J'ai 10 cms en trop en largeur.. Je ne comprends pas. Merci de m'aider. Bonne soiree

08.11.2020 - 18:32

DROPS Design answered:

Bonjour Mme Hugue, vérifiez si vous avez bien votre nombre de mailles, si vous avez bien conservé la même tension que pour votre échantillon; avec 22 brides = 10 cm, vous devez avoir 176-192-212-23-260-288 m = 40-44-48-53-59-65 cm (posé à plat, comme dans le schéma). Bon crochet!

09.11.2020 - 11:21

country flag Angiee wrote:

I really need help. this section "Read CROCHET INFO and work A.1 in the round (= 13-13-14-14-15-15 repeats of 11 stitches). On the last round in A.1 you will, for the most part, work 15 double crochets in each repeat, but in 5-5-6-10-7-11 repeats evenly spaced on the round, increase this to 16 double crochets so that the total is 200-200-216-220-232-236 double crochets on the round" does really not make ANY sence. I don't understand what it means, please help

03.10.2020 - 21:51

DROPS Design answered:

Dear Angiee, on the last round in A.1 you have to crochet 15 dc in each A.1 (see diagram) but on this round you have to increase evenly, this means that over some repeats of the round (= 5-5-6-10-7-11 repeats) you will crochet 16 dc instead of 15 dc - you will then incraese a total of 5-5-6-10-7-11 sts; there were 13-13-14-14-15-15 repeats with 11 sts each, you will have now 8-8-8-4-8-4 repeats with 15 sts each + 5-5-6-10-7-11 repeats with 16 sts each = 200-200-216-220-232-236 sts. Happy crocheting!

05.10.2020 - 10:15

country flag Lorraine wrote:

Good day, I am trying to figure out how many 50 g of Drops Safran I need for size L or XL. The pattern does not indicated it and I want to make sure I have enough to finish the dress.

20.04.2020 - 18:53

DROPS Design answered:

Dear Lorraine, for amount of yarn see header nearby main picture: Sizes: S - M - L - XL - XXL - XXXL Materials: DROPS SAFRAN from Garnstudio (belongs to yarn group A) 700-750-800-900-1000-1050 g colour 05, light blue purple Number of amount goes in the same order as letter for sizing, so for size L-XL you need 800-900 g of Safran. If you divide this amount 50 g, you will get number of balls (16-18). Happy crocheting!

20.04.2020 - 19:48

country flag Sarah wrote:

Hallo liebes Team , ich weiß leider nicht wie folgendes gemeint ist : In der letzten Runde von A.1 zunächst 15 Stäbchen in jedem Rapport häkeln, aber in 5-5-6-10-7-11 Rapporten gleichmäßig verteilt in der Runde auf 16 Stäbchen zunehmen, sodass insgesamt 200-200-216-220-232-236 Stäbchen in der Runde sind. Dort komme ich nicht weiter

01.01.2020 - 13:54

DROPS Design answered:

Liebe Sarah, bei der letzten Reihe in A.1 hat man normaleweise 15 Stäbchen in jedem Rapport, aber wenn Sie dann diese Reihe häkeln, sollen Sie regelmäßig zunehmen, dh in 5-5-6-10-7-11 Rapporte häkeln Sie 16 Stäbchen (anstatt 15) und in den übrigen Rapporte häkeln Sie 15 Stäbchen wie im Diagram gezeigt. hier lesen Sie mehr wie man gleichmäßig verteilt zunimmt. Viel Spaß beim häkeln!

02.01.2020 - 15:18

country flag Liza wrote:

Hva er konsekvensene av at man ikke har begynt omgangene i bærestykket med tre luftmasker og avsluttet med kjedemaske i 3.luftmaske? Kan dette eventuelt rettes opp uten å rekke opp alt? Hvordan gjøres det i så fall?

27.10.2019 - 21:10

DROPS Design answered:

Hei Liza. I denne oppskriften starter man med 3 luftmasker som erstatter 1 stav på omgangen, slik kommer du deg opp i "høyden". Om du har startet med en stav, kan du få en liten "bulk" når du skal avslutte omgangen med 1 kjedemasken i denne staven. Du vil også få en stav for liten når du skal telle over maskeantallet, siden de 3 luftmaskene erstatter en stav. mvh DROPS design

28.10.2019 - 14:01

country flag Anjana wrote:

Hello!! Could you please tell me what is meant by "Cast-on edge mid front"??

16.06.2019 - 17:49

DROPS Design answered:

Dear Anjana, this means that you measure your piece from the very first row = cast-on edge and in the middle of front piece, because it is the lower point of neck (back piece has higher neck, so the measurement will be different). Happy crocheting!

16.06.2019 - 18:26

country flag SONIA MORALES wrote:

Could you please explain or write for me Diagram A.4A, A.4B and A.4C Rows: 7 and 8 only. I am having real hard time to understand or follow the diagram. I have put it away for awhile thinking I could try it later but am stuck here. The dress for Mom is almost done. Please help, my doubt are were it says do single crochet in the stitch, which stitch? the double crochet from previous row? or on the 4 double crochet together from previous row? Thank you.

18.05.2019 - 01:02

DROPS Design answered:

Dear Mrs Morales, the "sc in stitch" should be worked at the top of the 4 double crochet worked together on previous row - on row 7. Happy crocheting!

20.05.2019 - 14:20

country flag Kathleen Kuppinger wrote:

How do you down patterns for printing?

01.04.2019 - 19:09

DROPS Design answered:

Dear Mrs Kuppinger, click on the icon with the printer/pattern, a new window will open, in that new window click on "Continue to print the pattern" to launch printing. Happy crocheting!

02.04.2019 - 09:36