DROPS Safran
DROPS Safran
100% Cotton
from 1.30 £ /50g
Get the yarn to make this pattern from 18.20£.

The yarn cost is calculated from the pattern’s smallest size and the yarn’s cheapest product type. Looking for an even better price? You might find it on the DROPS Deals!

DROPS SS24

Queensland

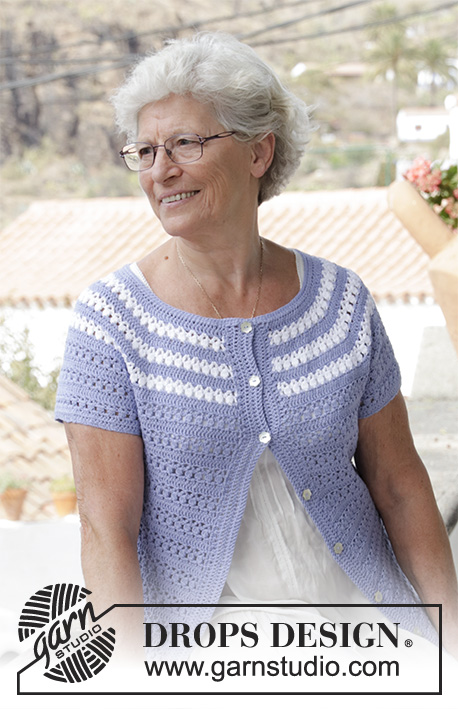
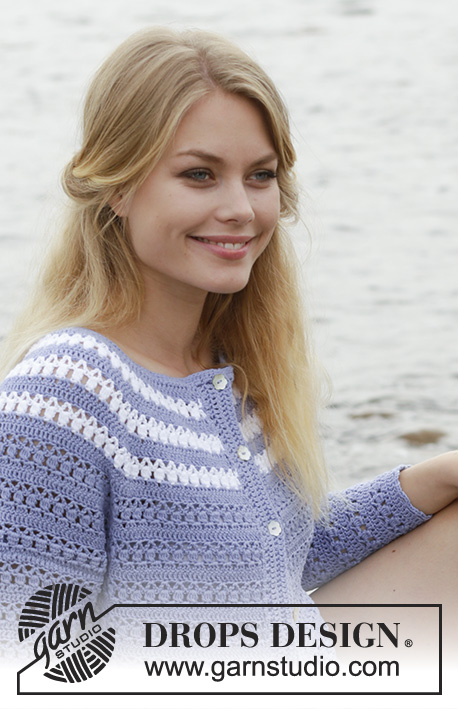
Crocheted dress with raglan, lace pattern and short sleeves, worked top down. Sizes S - XXXL. The piece is worked in DROPS Safran.

DROPS 186-12
DROPS Design: Pattern no e-270
Yarn group A
-----------------------------------------------------------
Sizes: S - M - L - XL - XXL - XXXL
Materials:
DROPS SAFRAN from Garnstudio (belongs to yarn group A)
700-750-800-900-1000-1050 g colour 05, light blue purple

The piece can also be crocheted with yarn from:
"Alternative yarn (Yarn group A)" – see link below.

DROPS CROCHET HOOK SIZE 3.5 MM – or the size needed to get 22 treble crochets and 12 rows on 10 cm in width and 10 cm in height.

DROPS CROCHET HOOK SIZE 3 MM – for short sleeves.
----------------------------------------------------------

-------------------------------------------------------

Alternative Yarn – See how to change yarns here
Yarn Groups A to F – Use the same pattern and change the yarn here
Yarn usage using an alternative yarn – Use our yarn converter here

-------------------------------------------------------

DROPS Safran
DROPS Safran
100% Cotton
from 1.30 £ /50g
Get the yarn to make this pattern from 18.20£.

The yarn cost is calculated from the pattern’s smallest size and the yarn’s cheapest product type. Looking for an even better price? You might find it on the DROPS Deals!

Pattern instructions

NOTE: This pattern is written in British English. All measurements in charts are in cm. For conversion from cm to inches - click here. There are different terms for crocheting in British and American English. If this pattern includes crochet, click for "crochet terms" here. For this pattern in American English, please click here.
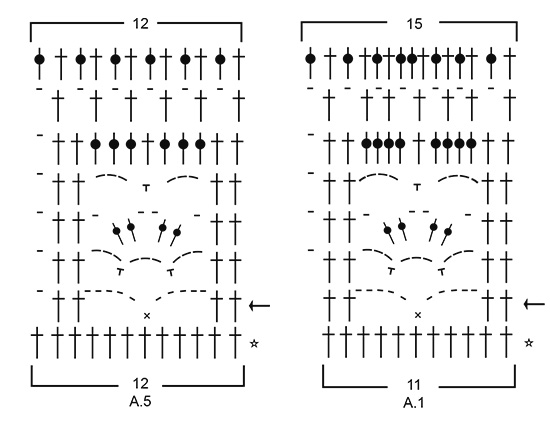
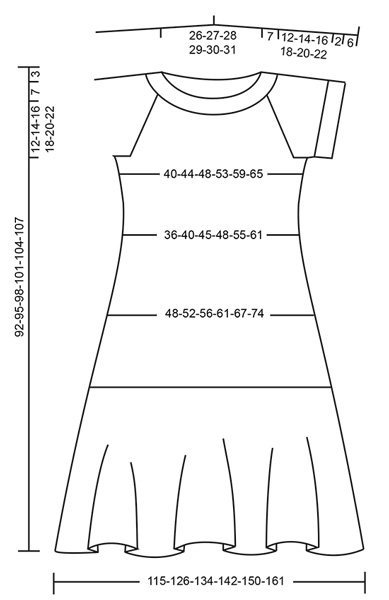
INFORMATION FOR THE PATTERN:

CROCHET INFO:
On beginning of each round with treble crochets replace first treble crochet with 3 chain stitches. The round finishes with 1 slip stitch in the 3rd chain stitch at the beginning of the round.

INCREASE/DECREASE TIP (evenly spaced):
To work out how to increase/decrease evenly, count the total number of stitches on the round (e.g. 114 stitches) and divide by the number of increases/decreases to be made (e.g. 29) = 3.9.
In this example, increase in approx. every 4th stitch – read INCREASE TIP.
When decreasing, crochet every 3rd and 4th stitch together – read DECREASE TIP.

INCREASE TIP:
Increase 1 treble crochet by working 2 treble crochets in the same stitch.

DECREASE TIP:
Decrease 1 treble crochet by working the next 2 treble crochets together as follows: Work 1 treble crochet, but wait with the last yarn over and pull through (= 2 loops on hook), work the next treble crochet, but when working the last pull through, pull the strand through all 3 loops on the hook.

PATTERN:
See diagrams A.1 to A.5.
----------------------------------------------------------

DRESS:
The piece is worked in the round, top down.

NECK:
Work 114-118-124-128-132-136 slightly loose chain stitches with hook size 3.5 mm and Safran and form them into a ring with 1 slip stitch in the first chain stitch.
ROUND 1: Work 2 chain stitches (equivalent to 1 half treble crochet), then work 1 half treble crochet in each chain stitch to end of round, finish the round with 1 slip stitch in the 2nd chain stitch at the beginning of the round = 114-118-124-128-132-136 half treble crochets.
ROUND 2: Work 3 chain stitches (equivalent to 1 half treble crochet + 1 chain stitch), skip 1 half treble crochet, * work 1 half treble crochet in the next half treble crochet, 1 chain stitch, skip 1 half treble crochet *, work from *-* to end of round and finish with 1 slip stitch in the 2nd chain at the beginning of the round = 114-118-124-128-132-136 stitches on round.
ROUND 3: Work 3 chain stitches (equivalent to 1 treble crochet), then work 1 treble crochet in each half treble crochet and 1 treble crochet around each chain stitch – AT THE SAME TIME increase 29-25-30-26-33-29 treble crochets evenly on round – read INCREASE/DECREASE TIP and INCREASE TIP = 143-143-154-154-165-165 treble crochets. Finish the round with 1 slip stitch in the 3rd chain stitch at the beginning of the round.
Read CROCHET INFO and work A.1 in the round (= 13-13-14-14-15-15 repeats of 11 stitches). On the last round in A.1 you will, for the most part, work 15 treble crochets in each repeat, but in 5-5-6-10-7-11 repeats evenly spaced on the round, increase this to 16 treble crochets so that the total is 200-200-216-220-232-236 treble crochets on the round. The piece now measures approx. 7 cm from the cast-on edge. Now work yoke as described below. REMEMBER THE CROCHET TENSION!

YOKE:
Work 1 round of treble crochets with 1 treble crochet in each treble crochet. Then insert 4 marker threads in the piece as follows (without working the stitches): Count 34-34-38-39-42-43 treble crochets (= ½ back piece), insert 1 marker thread in the next treble crochet, count 30 treble crochets (= sleeve), insert 1 marker thread in the next treble crochet, count 68-68-76-78-84-86 treble crochets (= front piece), insert 1 marker thread in the next treble crochet, count 30 treble crochets (= sleeve), insert 1 marker thread in the next treble crochet. There are 34-34-38-39-42-43 treble crochets left on the round after the last treble crochet with marker thread.
Continue working treble crochets in the round with 1 treble crochet in each treble crochet - AT THE SAME TIME increase to raglan at each marker thread as follows:
ROUND 1: Work 1 treble crochet + 2 chain stitches + 1 treble crochet in each treble crochet with a marker thread (= 4 treble crochets increased on the round) = 204-204-220-224-236-240 treble crochets on the round.
ROUND 2: Around each chain-space with 2 chain stitches work 1 treble crochet + 2 chain stitches + 1 treble crochet (= 8 treble crochets increased on round) = 212-212-228-232-244-248 treble crochets on round.
Repeat round 2 until you have worked a total of 9-13-15-18-20-23 rounds with increases (including the increases in round 1) = 268-300-332-360-388-416 treble crochets on the round.
On the next round work 1 treble crochet in each treble crochet, but around each chain-space with 2 chain stitches work 2 treble crochets (= 8 treble crochets increased on the round) = 276-308-340-368-396-424 treble crochets on the round.
Continue to work treble crochets without increases until the piece measures 19-21-23-25-27-29 cm from the cast-on edge mid front.
The next round is worked as follows: Work 40-44-48-53-59-65 treble crochets (including the 3 chain stitches at beginning of round = ½ back piece), work 8-8-10-10-12-14 slightly loose chain stitches, skip 58-66-74-78-80-82 treble crochets (= sleeve), work 80-88-96-106-118-130 treble crochets (= front piece), work 8-8-10-10-12-14 slightly loose chain stitches, skip 58-66-74-78-80-82 treble crochets (= sleeve) and work the last 40-44-48-53-59-65 treble crochets on the round (= ½ back piece). Cut the strand.
Body and sleeves are finished separately. THE PIECE IS NOW MEASURED FROM HERE!

BODY:
Insert 1 marker in the middle of the 8-8-10-10-12-14 chain stitches under the sleeve on the one side of the piece and start the round here.
Work 1 double crochet in the first chain stitch, 3 chain stitches (equivalent to 1 treble crochet), then work 1 treble crochet in each chain stitch and 1 treble crochet in each treble crochet to end of round = 176-192-212-232-260-288 treble crochets. Continue in the round with treble crochets. When the piece measures 2 cm from the separation, decrease 8-8-8-10-10-10 treble crochets evenly on round = 168-184-204-222-250-278 treble crochets – read INCREASE/DECREASE TIP. Repeat the decrease when the piece measures 6 cm from the separation = 160-176-196-212-240-268 treble crochets.
When the piece measures 12 cm from the separation, increase 12-12-12-14-14-14 treble crochets evenly on round = 172-188-208-226-254-282 treble crochets.
When the piece measures 18 cm from the separation, increase 12-12-12-14-14-14 treble crochets evenly on round = 184-200-220-240-268-296 treble crochets.
When the piece measures 26 cm from the separation, increase 14 treble crochets evenly on round in all sizes = 198-214-234-254-282-310 treble crochets.
When the piece measures 34 cm from the separation, increase 14 treble crochets evenly on round in all sizes = 212-228-248-268-296-324 treble crochets.
When the piece measures 40-41-42-43-44-45 cm from the separation, (the piece now measures approx. 62-65-68-71-74-77 cm from the shoulder) increase 40-48-40-44-40-48 treble crochets evenly on round = 252-276-288-312-336-372 treble crochets.
Work A.2 in the round (= 21-23-24-26-28-31 repeats of 12 stitches). AT THE SAME TIME on the last round in A.2 increase 52-60-64-72-64-60 treble crochets evenly on round = 304-336-352-384-400-432 treble crochets.
Work A.3 in the round (= 19-21-22-24-25-27 repeats of 16 stitches).
When A.3 has been completed, there are 475-525-550-600-625-675 treble crochets on the round. Now work A.X as shown in A.2 (= 2 rounds). AT THE SAME TIME on the last round increase 30-28-39-25-36-34 treble crochets evenly on round = 505-553-589-625-661-709 treble crochets.
The next round is worked as follows: A.4A (= 6 stitches), work A.4B over the next 492-540-576-612-648-696 treble crochets (= 41-45-48-51-54-58 repeats of 12 stitches), finish with A.4C (= 7 stitches). When A.4 has been completed, cut and fasten the strand. The dress measures approx. 92-95-98-101-104-107 cm from the shoulder down.

SLEEVE:
Insert 1 marker in the middle of the 8-8-10-10-12-14 chain stitches under the sleeve on the one side of the piece and start the round here.
Work 1 double crochet in the first chain stitch, 3 chain stitches (equivalent to 1 treble crochet), then work 1 treble crochet in each chain stitch and 1 treble crochet in each treble crochet to end of round = 66-74-84-88-92-96 treble crochets. Work 1 round of treble crochets where you decrease 6-2-12-4-8-0 treble crochets evenly on round = 60-72-72-84-84-96 treble crochets. Work A.5 in the round (= 5-6-6-7-7-8 repeats of 12 stitches). When there are 3 rounds left in A.5 change to hook size 3 mm. Finish working A.5, cut and fasten the strand. The sleeve measures approx. 8 cm from the separation.
Work the other sleeve in the same way.

This pattern has been corrected.

Updated online: 27.04.2018
Correction: NECK:... Read CROCHET INFO and work A.1 in the round (= 13-13-14-14-15-15 repeats of 11 stitches). On the last round in A.1 you will, for the most part, work 15 treble crochets in each repeat, but in 5-5-6-10-7-11 repeats evenly spaced on the round, increase this to 16 treble crochets so that the total is 200-200-216-220-232-236 treble crochets on the round. The piece now measures approx. 7 cm from the cast-on edge. Now work yoke as described below. REMEMBER THE CROCHET TENSION!

YOKE:
Work 1 round of treble crochets with 1 treble crochet in each treble crochet. Then insert 4 marker threads in the piece as follows (without working the stitches): Count 34-34-38-39-42-43 treble crochets (= ½ back piece), insert 1 marker thread in the next treble crochet, count 30 treble crochets (= sleeve), insert 1 marker thread in the next treble crochet, count 68-68-76-78-84-86 treble crochets (= front piece), insert 1 marker thread in the next treble crochet, count 30 treble crochets (= sleeve), insert 1 marker thread in the next treble crochet. There are 34-34-38-39-42-43 treble crochets left on the round after the last treble crochet with marker thread.
Continue working treble crochets in the round with 1 treble crochet in each treble crochet - AT THE SAME TIME increase to raglan at each marker thread as follows:
ROUND 1: Work 1 treble crochet + 2 chain stitches + 1 treble crochet in each treble crochet with a marker thread (= 4 treble crochets increased on the round) = 204-204-220-224-236-240 treble crochets on the round...

Diagram

symbols = treble crochet in stitch
symbols = treble crochet around chain stitch/chain-space
symbols = double crochet in stitch
symbols = double crochet around chain stitch/chain-space
symbols = 1 double treble crochet in stitch
symbols = 1 triple treble crochet in stitch
symbols = 1 chain stitch
symbols = 2 chain stitches
symbols = 3 chain stitches
symbols = 4 chain stitches
symbols = 6 chain stitches
symbols = 7 chain stitches
symbols = work 4 treble crochets around chain-space (do not work the treble crochets together)
symbols = work 2 treble crochets together in the same stitch as follows: Work 1 treble crochet in the stitch, but wait with the last yarn over and pull through (= 2 loops on hook), work 1 treble crochet in the same stitch, but now pull the last yarn over through all 3 loops on the hook
symbols = work 3 treble crochets together as follows: Work 1 treble crochet in each of the next 3 stitches, but wait with the last yarn over and pull through on all of these three treble crochets, make 1 yarn over and pull it through all 4 loops on the hook
symbols = work 4 treble crochets together as follows: work 1 treble crochet in each of the next 4 stitches, but wait with the last yarn over and pull through on all four treble crochets, make 1 yarn over and pull it through all 5 loops on the hook
symbols = 1 picot: work 3 chain stitches, work 1 slip stitch in the first chain stitch worked
symbols = round 1 starts here
symbols = his round has already been worked
diagram
diagram
diagram
diagram
Do you have a question? See a list of frequently asked questions (FAQ)

Knitting tension is what determines the final measurements of your work, and is usually measured per 10 x 10 cm. It is provided like so: number of stitches in width x number of rows in height - eg: 19 stitches x 26 rows = 10 x 10 cm.

The knitting tension is very individual; some people knit/crochet loosely while others work tightly. You adjust the knitting tension with the needle size, which is why the suggested needle size is only meant as a guide! You need to adjust this (up or down) to ensure that YOUR knitting tension matches the knitting tension provided in the pattern. If you work with a different knitting tension than provided you will have a different yarn consumption, and your work will have different measurements than what the pattern suggests.

The knitting tension also determines which yarns can replace each other. As long as you achieve the same knitting tension you can replace one yarn with another.

See DROPS lesson: How to measure your tension/gauge

See DROPS video: How to make a gauge tension swatch

The required amount of yarn is provided in grams, eg: 450 g. To calculate how many balls you’ll need you first need to know how many grams are in 1 ball (25g, 50g or 100g). This information is available if you click on the individual yarn quality on our pages. Divide the amount required with the amount of each ball. For example, if each ball is 50g (the most common amount), the calculation will be as follows: 450 / 50 = 9 balls.

The important thing when changing from one yarn to another is that the knitting/crochet tension remains the same. This is so that the measurements of the finished piece will be the same as on the sketch provided. It is easier to achieve the same knitting tension using yarns from the same yarn group. It is also possible to work with multiple strands of a thinner yarn to achieve the knitting tension of a thicker one. Please try our yarn converter. We recommend you to always work a test swatch.

Please NOTE: when changing yarn the garment might have a different look and feel to the garment in the photo, due to individual properties and qualities of each yarn.

See DROPS lesson: Can I use a different yarn than the one mentioned in the pattern?

All our yarns are categorised into yarn groups (from A to F) according to thickness and knitting tension – group A contains the thinnest yarns and group F the thickest. This makes it easier for you to find alternative yarns to our patterns, should you wish to switch yarn. All yarns within the same group have a similar knitting tension and can easily replace each other. However, different yarn qualities have different structures and properties which will give the finished work a unique look and feel.

Click here for an overview of the yarns in each yarn group

At the top of all our patterns you’ll find a link to our yarn calculator, which is a helpful tool should you wish to use a different yarn than suggested. By filling in the yarn quality you wish to replace, the amount (in your size) and number of strands, the calculator will present good alternative yarns with the same knitting tension. Additionally it will tell you how much you’ll require in the new qualities and whether you’ll need to work with multiple strands. Most skeins are 50g (some are 25g or 100g).

If the pattern is worked with multiple colours, every colour will have to be calculated separately. Similarly, if the pattern is worked with several strands of different yarns (for example 1 strand Alpaca and 1 strand Kid-Silk) you will have to find alternatives for each, individually.

Click here to see our yarn calculator

Since different yarns have different qualities and textures we have chosen to keep the original yarn in our patterns. However, you can easily find options among our available qualities by using our yarn calculator, or simply pick a yarn from the same yarn group.

It is possible that some retailers still have discontinued yarns in stock, or that someone has a few skeins at home that they would like to find patterns for.

The yarn calculator will provide both alternative yarn as well as required amount in the new quality.

If you think it's hard to decide what size to make, it can be a good idea to measure a garment you own already and like the size of. Then you can pick the size by comparing those measures with the ones available in the pattern's size chart.

You'll find the size chart at the bottom of the pattern.

See DROPS lesson: How to read size chart

The needle size provided in the pattern serves only as a guide, the important thing is to follow the knitting tension. And since knitting tension is very individual, you will have to adjust the needle size to ensure that YOUR tension is the same as in the pattern – maybe you’ll have to adjust 1, or even 2 needle sizes, up or down to achieve the correct tension. For this, we recommend that you work test swatches.

Should you work with a different knitting tension than the one provided, the measurements of the finished garment might deviate from the measurement sketch.

See DROPS lesson: How to measure your tension/gauge

See DROPS video: How to make a tension/gauge swatch

Working a garment top-down provides more flexibility and room for personal adjustment. For example it is easier to try the garment on while working, as well as making adjustments to length of yoke and shoulder caps.

The instructions are carefully explaining every step, in the correct order. Diagrams are adjusted to the knitting direction and are worked as usual.

The diagram depicts all rows/rounds, and every stitch seen from the right side. It is read from bottom to top, from right to left. 1 square = 1 stitch.

When working back and forth, every other row is worked from the right side and every other row is worked from the wrong side. When working from the wrong side, the diagram will have to be worked reversed: from left to right, knit stitches are purled, purl stitches are knit etc.

When working in the round every round is worked from the right side and the diagram are worked from right to left on all rounds.

See DROPS lesson: How to read knitting diagrams

The diagram depicts all rows/rounds, and every stitch seen from the right side. It is worked from bottom to top, from right to left.

When working back and forth every other row is worked from the right side: from right to left and every other row is worked from the wrong side: from left to right.

When working in the round, every row in the diagram are worked from the right side, from right to left.

When working a circular diagram you start in the middle and work your way outwards, counter clockwise, row by row.

The rows usually start with a given number of chain stitches (equivalent to the height of the following stitch), this will either be depicted in the diagram or explained in the pattern.

See DROPS lesson: How to read crochet diagrams

Instructions for working several diagrams after each other on the same row/round, will often be written like so: “work A.1, A.2, A.3 a total of 0-0-2-3-4 times". This means you work A.1 once, then A.2 is worked once, and A.3 is repeated (in width) the number of times provided for your size – in this case like so: S = 0 times, M = 0 times, L=2 times, XL= 3 times and XXL = 4 times.

The diagrams are worked as usual: begin with the first row in A.1, then work the first row in A.2 etc.

See DROPS lesson: How to read knitting diagrams

See DROPS lesson: How to read crochet diagrams

The total width of the garment (from wrist-to-wrist) will be larger in the larger sizes, despite the actual sleeves being shorter. The larger sizes have longer sleeve caps and wider shoulders, so there will be a good fit in all sizes.

The measurement sketch/schematic drawing provides information regarding the full length of the garment. If it’s a jumper or a jacket the length is measured from the highest point on the shoulder closest to the neckline, and straight down to the bottom of the garment. It is NOT measured from the tip of shoulder. Similarly, the length of yoke is measured from the highest point on the shoulder and down to where yoke is split into body and sleeves.

On a jacket measures are never taken along bands, unless specifically stated. Always measure inside band stitches when measuring the length.

See DROPS lesson: How to read a schematic drawing

Diagrams are often repeated on the round or in height. 1 repeat is the diagram the way it appears in the pattern. If it says to work 5 repeats of A.1 in the round, then you work A.1 a total of 5 times after/next to each other in the round. If it says to work 2 repeats of A.1 vertically/in height you work the entire diagram once, then begin again at the start and work the entire diagram one more time.

Chain stitches are slightly narrower than other stitches and to avoid working the cast-on edge too tight, we simply chain more stitches to begin with. The stitch count will be adjusted on the following row to fit the pattern and measurement sketch.

The rib edge is more elastic and will contract slightly compared to, for example, stocking stitch. By increasing before the rib edge, you avoid a visible difference in width between the rib edge and the rest of the body.

It’s very easy to cast off too tightly, and by making yarn overs while casting off (and simultaneously casting these off) you avoid a too tight cast off edge.

See DROPS video: How to bind off with yarn overs (yo)

To achieve an even increase (or decrease) you can increase on, for example: every 3rd and 4th row alternately, like so: work 2 rows and increase on the 3rd row, work 3 rows and increase on the 4th. Repeat this until the increase is complete.

See DROPS lesson: Increase or decrease 1 st on every 3rd and 4th row alternately

Should you prefer to work in the round instead of back and forth, you may of course adjust the pattern. You’ll need to add steeks mid-front (usually 5 stitches), and follow the instructions. When you would normally turn and work from the wrong side, simply work across the steek and continue in the round. At the end you’ll cut the piece open, pick up stitches to work bands, and cover the cut edges.

See DROPS video: How to knit steeks and cut open

Should you prefer to work back and forth instead of in the round, you may of course adjust the pattern so you work the pieces separately and then assemble them at the end. Divide the stitches for the body in 2, add 1 edge stitch in each side (for sewing) and work the front and back pieces separately.

See DROPS lesson: Can I adapt a pattern for circular needles into straight needles?

Pattern repeats can vary slightly in the different sizes, in order to get the correct proportions. If you’re not working the exact same size as the garment in the photo, yours might deviate slightly. This has been carefully developed and adjusted so that the complete impression of the garment is the same in all sizes.

Make sure to follow instructions and diagrams for your size!

If you have found a pattern you like which is available in women’s size it’s not very difficult to convert it to men’s size. The biggest difference will be the length of sleeves and body. Start working on the women size that you think would fit across the chest. The additional length will be worked right before you cast off for the armhole/sleeve cap. If the pattern is worked top-down you can add the length right after the armhole or before the first decrease on sleeve.

Regarding additional yarn amount, this will depend on how much length you add, but it is better with a skein too many than too few.

All yarns will have excess fibres (from production) that might come off as lint or shedding. Brushed yarns (ie hairier yarns) have more of these loose, excess fibres, causing more shedding.

Shedding also depends on what is worn under or over the garment, and whether this pulls at the yarn fibres. It’s therefore not possible to guarantee that there will be no shedding

Below are some tips on how to get the best result when working with hairier yarns:

1. When the garment is finished (before you wash it) shake it vigorously so the looser hairs come off. NOTE: do NOT use a lint roller, brush or any method that pulls at the yarn.

2. Place the garment in a plastic bag and put it in your freezer - the temperature will cause the fibres to become less attached to each other, and excess fibres will come off easier.

3. Leave in the freezer for a few hours before taking it out and shaking it again.

4. Wash the garment according to the instructions on the yarn label.

Pilling is a natural process that happens to even the most exclusive of fibers. It's a natural sign of wear and tear that is hard to avoid, and that is most visible in high friction areas of your garment like a sweater's arms and cuffs.

You can make your garment look as new by removing the pilling, using a fabric comb or a pill/lint remover.

Still can't find the answer you need? Then scroll down and leave your question so one of our experts can try to help you. This will be done normally within 5 to 10 working days.
In the meantime, you can read the questions and answers that others have left to this pattern or join the DROPS Workshop on Facebook to get help from fellow knitters/crocheters!

You might also like...

Queensland

Renata, Australia

Queensland

Mart-Mari Breedt, South Africa

Post a comment to pattern DROPS 186-12

We would love to hear what you have to say about this pattern!

If you want to leave a question, please make sure you select the correct category in the form below, to speed up the answering process. Required fields are marked *.

Comments / Questions (60)

country flag Gail wrote:

Disregard my previous query, I have gone back to row 2 of A1 and realised that I put some stitches into the incorrect space.

25.08.2022 - 03:10

country flag Gail wrote:

Neck query: Second last row of neck, my stitch count is correct - 143 stitches for second size, but I only have 11 repeats. When I do the last row of A1, I definitely do not get 200 hundred stitches. I really cannot see where I’ve gone wrong. Please help.

25.08.2022 - 02:49

DROPS Design answered:

Dear Gail, read A.1 bottom up, ie start A.1 over 11 stitches and repeat 13 times the diagram in width over the 143 sts. On the last row in A.1 you will increase to 15 sts in each A.1 x 13 repeats = 195 sts and increase evenly 5 sts on last row = 195+5=200 sts. Happy crocheting!

25.08.2022 - 09:39

country flag Mirja Eenmaa wrote:

Why do the beginning of round chain 4 stitches alternate between A4a and A4c if the pattern is crochet in round? They should all be in A4a as that is where the round begins! Right now it looks like the chart is to be read back and forth

17.08.2022 - 22:18

country flag Marie wrote:

Hej !håller på med klänningen o tycker det inte blir så snyggt med varvbyte mitt bak så undrar om ni har nåt tips eller är det bara o gilla läget ?

28.07.2022 - 10:07

DROPS Design answered:

Hej Marie, det findes lidt forskellige videoer hvordan man undgår hak ved varvbyte. Her ser du hvordan vi gør: Virka runt med stolpar

04.08.2022 - 09:50

country flag Kate Grant wrote:

I'm struggling to understand A4 and where each row finishes and the next one starts. Could you please clarify ?

21.07.2022 - 22:45

DROPS Design answered:

Dear Kate, at the beginning of the row/ round you work A.4A once. Then, repeat A.4B, when you reach the last stitch of A.4B return to the first one and work A.4B again. Repeat A.4B until 7 stitches remain in row/ round. Then, work A.4C once over these 7 stitches. Happy knitting!

24.07.2022 - 17:26

country flag Uta Grosse wrote:

Hallo, wird immer von der rechten Seite gehäkelt oder nach jeder Runde gewendet.?

30.03.2022 - 15:22

DROPS Design answered:

Liebe Frau Grosse, dieses Kleid wird in Runden (immer von der rechten Seiten) gehäkelt. Viel Spaß beim häkeln!

30.03.2022 - 16:18

country flag Marie M wrote:

Leider verstehe ich den Rechenweg noch immer nicht. Ich starte mit 236Stäbchen. An jeder Markierung nehme ich 2Stäbchen zu (=8Stäbchen je Runde). Am Ende von Runde 1 also 244Stäbchen. Somit in R2 = 252Stb. R3 = 260, usw. Ich verstehe nicht, wie in Runde 1 lediglich 4Stäbchen zugenommen werden wenn es je Ecke 2 Stäbchen Zunahme sind?\r\nKönnen Sie das bitte genauer erklären?\r\nDanke und viele Grüße

16.11.2021 - 22:20

DROPS Design answered:

Liebe Marie M, wenn Sie in 1 Masche (1 Stb, 2 Lm, 1 Stb) häkeln, nehmen Sie nur jeweils 1 Stb (= Mal 4 = 4 Stb in der Runde), aber wenn Sie dann um den Luftmaschenbogen 1 Stb, 2 Lm, 1 Stb häkeln, dann nehmen Sie jeweils 2 Stb (einfach weil Sie um den Luftmaschenbogen und nicht in einer Masche häkeln), ist das klarer?

17.11.2021 - 07:59

country flag Marie M wrote:

Ich bin gerade bei der Passe angekommen und habe auch schon markiert. Allerdings brauche ich jetzt Hilfe! Es steht in Runde 1 an jeder Markierung 1Stb 2LM 1Stb bedeutet eine Zunahme von 2 Stäbchen je Ecke also in der Runde 8Stb. Am Ende wären es ja bei XXL dann aber 244 anstatt 240 wie in der Anleitung. Ebenfalls in den Folgerunden. Können Sie mir das bitte erklären, wie es richtig gemacht wird?\r\nDanke und viele Grüße

15.11.2021 - 22:14

DROPS Design answered:

Liebe Marie M, vor der 1. Runde haben Sie 232 M, dann häkeln Sie 1 Stb+2 Lm+1 Stb in je 1 Masche x 4 (= 4 Zunahmnen ) = 236 Stb; dann häkeln Sie 1 Stb + 2 Lm + 1 Stb um den Luftmaschenbogen = 2 Stb werden jeweils zugenommen = 8 Stb insgesamt = 236+8=244 Stb. Viel Spaß beim häkeln!

16.11.2021 - 09:26

country flag Malin Johansen wrote:

Hei. Jeg er kommet til berestykket der jeg skal sette inn fire merker. Jeg har bare 231 masker etter A1 mønster (lager størrelse xxxl), men jeg greier ikke å forstå hvor jeg har glemt å øke.. har økt i omgang 3 og i siste stmaskerad i A1..

29.09.2021 - 22:33

DROPS Design answered:

Hej Malin. När A.1 är heklet 1 gang på höjden så ska du ha 15 staver i hver rapport, men i 11 av dessa ska du öka så att du har 16 staver istället. Dvs att du har totalt 15 rapporter på omgangen och 4 av dessa består av 15 staver och 11 av dessa består av 16 staver. (4 x 15) + ( 11 x 16) = 236 staver. Hoppas det är till hjälp. Mvh DROPS Design

30.09.2021 - 10:38

country flag Jacqueline wrote:

I am not understanding how A4 section is worked. Is this section turned and worked back and forth or is it supposed to be done in the round? With the chain 4 appearing at opposite sides in the graph it appears that this would be turned after the completion of each round.

01.08.2021 - 17:48

DROPS Design answered:

Dear Jacqueline, A.4 is done on the round just as well as all the other parts of the piece. Happy Stitching!

02.08.2021 - 01:11