Clicking the ORDER button will redirect you to Wool Warehouse Direct Ltd website
The yarn cost is calculated from the pattern’s smallest size and the yarn’s cheapest product type. Looking for an even better price? You might find it on the DROPS Deals!
-------------------------------------------------------
Alternative Yarn – See how to change yarns here
Yarn Groups A to F – Use the same pattern and change the yarn here
Yarn usage using an alternative yarn – Use our yarn converter here
-------------------------------------------------------
Clicking the ORDER button will redirect you to Wool Warehouse Direct Ltd website
The yarn cost is calculated from the pattern’s smallest size and the yarn’s cheapest product type. Looking for an even better price? You might find it on the DROPS Deals!
This pattern has been corrected. Click here to see the correction/s.
= knit from the right side, purl from the wrong side | |
= purl from the right side, knit from the wrong side | |
= knit 2 together | |
= slip 1 stitch knitwise, knit 1, pass slipped stitch over | |
= between 2 stitches make 1 yarn over | |
= slip 2 stitches knitwise, knit 1, pass the 2 slipped stitches over | |
= on this round decrease 6 stitches evenly | |
= on this round/row decrease 12 stitches evenly |
Each of our patterns has specific tutorial videos to help you.
These step-by-step tutorials might also help you:
Why is the knitting/crochet tension so important?
Knitting tension is what determines the final measurements of your work, and is usually measured per 10 x 10 cm. It is provided like so: number of stitches in width x number of rows in height - eg: 19 stitches x 26 rows = 10 x 10 cm.
The knitting tension is very individual; some people knit/crochet loosely while others work tightly. You adjust the knitting tension with the needle size, which is why the suggested needle size is only meant as a guide! You need to adjust this (up or down) to ensure that YOUR knitting tension matches the knitting tension provided in the pattern. If you work with a different knitting tension than provided you will have a different yarn consumption, and your work will have different measurements than what the pattern suggests.
The knitting tension also determines which yarns can replace each other. As long as you achieve the same knitting tension you can replace one yarn with another.
See DROPS lesson: How to measure your tension/gauge
See DROPS video: How to make a gauge tension swatch
How do I know how many balls of yarn I need?
The required amount of yarn is provided in grams, eg: 450 g. To calculate how many balls you’ll need you first need to know how many grams are in 1 ball (25g, 50g or 100g). This information is available if you click on the individual yarn quality on our pages. Divide the amount required with the amount of each ball. For example, if each ball is 50g (the most common amount), the calculation will be as follows: 450 / 50 = 9 balls.
Can I use a different yarn than what the pattern suggests?
The important thing when changing from one yarn to another is that the knitting/crochet tension remains the same. This is so that the measurements of the finished piece will be the same as on the sketch provided. It is easier to achieve the same knitting tension using yarns from the same yarn group. It is also possible to work with multiple strands of a thinner yarn to achieve the knitting tension of a thicker one. Please try our yarn converter. We recommend you to always work a test swatch.
Please NOTE: when changing yarn the garment might have a different look and feel to the garment in the photo, due to individual properties and qualities of each yarn.
See DROPS lesson: Can I use a different yarn than the one mentioned in the pattern?
What are the yarn groups?
All our yarns are categorised into yarn groups (from A to F) according to thickness and knitting tension – group A contains the thinnest yarns and group F the thickest. This makes it easier for you to find alternative yarns to our patterns, should you wish to switch yarn. All yarns within the same group have a similar knitting tension and can easily replace each other. However, different yarn qualities have different structures and properties which will give the finished work a unique look and feel.
How do I use the yarn calculator?
At the top of all our patterns you’ll find a link to our yarn calculator, which is a helpful tool should you wish to use a different yarn than suggested. By filling in the yarn quality you wish to replace, the amount (in your size) and number of strands, the calculator will present good alternative yarns with the same knitting tension. Additionally it will tell you how much you’ll require in the new qualities and whether you’ll need to work with multiple strands. Most skeins are 50g (some are 25g or 100g).
If the pattern is worked with multiple colours, every colour will have to be calculated separately. Similarly, if the pattern is worked with several strands of different yarns (for example 1 strand Alpaca and 1 strand Kid-Silk) you will have to find alternatives for each, individually.
Why do you show discontinued yarns in the patterns?
Since different yarns have different qualities and textures we have chosen to keep the original yarn in our patterns. However, you can easily find options among our available qualities by using our yarn calculator, or simply pick a yarn from the same yarn group.
It is possible that some retailers still have discontinued yarns in stock, or that someone has a few skeins at home that they would like to find patterns for.
The yarn calculator will provide both alternative yarn as well as required amount in the new quality.
What size should I knit?
If you think it's hard to decide what size to make, it can be a good idea to measure a garment you own already and like the size of. Then you can pick the size by comparing those measures with the ones available in the pattern's size chart.
You'll find the size chart at the bottom of the pattern.
See DROPS lesson: How to read size chart
Why do I get the wrong knitting tension with the suggested needle size?
The needle size provided in the pattern serves only as a guide, the important thing is to follow the knitting tension. And since knitting tension is very individual, you will have to adjust the needle size to ensure that YOUR tension is the same as in the pattern – maybe you’ll have to adjust 1, or even 2 needle sizes, up or down to achieve the correct tension. For this, we recommend that you work test swatches.
Should you work with a different knitting tension than the one provided, the measurements of the finished garment might deviate from the measurement sketch.
See DROPS lesson: How to measure your tension/gauge
See DROPS video: How to make a tension/gauge swatch
Why is the pattern worked top-down?
Working a garment top-down provides more flexibility and room for personal adjustment. For example it is easier to try the garment on while working, as well as making adjustments to length of yoke and shoulder caps.
The instructions are carefully explaining every step, in the correct order. Diagrams are adjusted to the knitting direction and are worked as usual.
How do I work according to a knitting diagram?
The diagram depicts all rows/rounds, and every stitch seen from the right side. It is read from bottom to top, from right to left. 1 square = 1 stitch.
When working back and forth, every other row is worked from the right side and every other row is worked from the wrong side. When working from the wrong side, the diagram will have to be worked reversed: from left to right, knit stitches are purled, purl stitches are knit etc.
When working in the round every round is worked from the right side and the diagram are worked from right to left on all rounds.
See DROPS lesson: How to read knitting diagrams
How do I work according to a crochet diagram?
The diagram depicts all rows/rounds, and every stitch seen from the right side. It is worked from bottom to top, from right to left.
When working back and forth every other row is worked from the right side: from right to left and every other row is worked from the wrong side: from left to right.
When working in the round, every row in the diagram are worked from the right side, from right to left.
When working a circular diagram you start in the middle and work your way outwards, counter clockwise, row by row.
The rows usually start with a given number of chain stitches (equivalent to the height of the following stitch), this will either be depicted in the diagram or explained in the pattern.
See DROPS lesson: How to read crochet diagrams
How do I work several diagrams simultaneously on the same row/round?
Instructions for working several diagrams after each other on the same row/round, will often be written like so: “work A.1, A.2, A.3 a total of 0-0-2-3-4 times". This means you work A.1 once, then A.2 is worked once, and A.3 is repeated (in width) the number of times provided for your size – in this case like so: S = 0 times, M = 0 times, L=2 times, XL= 3 times and XXL = 4 times.
The diagrams are worked as usual: begin with the first row in A.1, then work the first row in A.2 etc.
See DROPS lesson: How to read knitting diagrams
See DROPS lesson: How to read crochet diagrams
Why are the sleeves shorter in larger sizes?
The total width of the garment (from wrist-to-wrist) will be larger in the larger sizes, despite the actual sleeves being shorter. The larger sizes have longer sleeve caps and wider shoulders, so there will be a good fit in all sizes.
Where on the garment is the length measured?
The measurement sketch/schematic drawing provides information regarding the full length of the garment. If it’s a jumper or a jacket the length is measured from the highest point on the shoulder closest to the neckline, and straight down to the bottom of the garment. It is NOT measured from the tip of shoulder. Similarly, the length of yoke is measured from the highest point on the shoulder and down to where yoke is split into body and sleeves.
On a jacket measures are never taken along bands, unless specifically stated. Always measure inside band stitches when measuring the length.
See DROPS lesson: How to read a schematic drawing
What is a repeat?
Diagrams are often repeated on the round or in height. 1 repeat is the diagram the way it appears in the pattern. If it says to work 5 repeats of A.1 in the round, then you work A.1 a total of 5 times after/next to each other in the round. If it says to work 2 repeats of A.1 vertically/in height you work the entire diagram once, then begin again at the start and work the entire diagram one more time.
Why does the piece start with more chain stitches than it’s worked with?
Chain stitches are slightly narrower than other stitches and to avoid working the cast-on edge too tight, we simply chain more stitches to begin with. The stitch count will be adjusted on the following row to fit the pattern and measurement sketch.
Why increase before the rib edge when the piece is worked top-down?
The rib edge is more elastic and will contract slightly compared to, for example, stocking stitch. By increasing before the rib edge, you avoid a visible difference in width between the rib edge and the rest of the body.
Why increase in the cast-off edge?
It’s very easy to cast off too tightly, and by making yarn overs while casting off (and simultaneously casting these off) you avoid a too tight cast off edge.
See DROPS video: How to bind off with yarn overs (yo)
How do I increase/decrease on every 3rd and 4th row/round alternately?
To achieve an even increase (or decrease) you can increase on, for example: every 3rd and 4th row alternately, like so: work 2 rows and increase on the 3rd row, work 3 rows and increase on the 4th. Repeat this until the increase is complete.
See DROPS lesson: Increase or decrease 1 st on every 3rd and 4th row alternately
How can I work a jacket in the round instead of back and forth?
Should you prefer to work in the round instead of back and forth, you may of course adjust the pattern. You’ll need to add steeks mid-front (usually 5 stitches), and follow the instructions. When you would normally turn and work from the wrong side, simply work across the steek and continue in the round. At the end you’ll cut the piece open, pick up stitches to work bands, and cover the cut edges.
See DROPS video: How to knit steeks and cut open
Can I work a jumper back and forth instead of in the round?
Should you prefer to work back and forth instead of in the round, you may of course adjust the pattern so you work the pieces separately and then assemble them at the end. Divide the stitches for the body in 2, add 1 edge stitch in each side (for sewing) and work the front and back pieces separately.
See DROPS lesson: Can I adapt a pattern for circular needles into straight needles?
Why is the pattern slightly different than what I see in the photo?
Pattern repeats can vary slightly in the different sizes, in order to get the correct proportions. If you’re not working the exact same size as the garment in the photo, yours might deviate slightly. This has been carefully developed and adjusted so that the complete impression of the garment is the same in all sizes.
Make sure to follow instructions and diagrams for your size!
How do I make a women’s size garment into a men’s size one?
If you have found a pattern you like which is available in women’s size it’s not very difficult to convert it to men’s size. The biggest difference will be the length of sleeves and body. Start working on the women size that you think would fit across the chest. The additional length will be worked right before you cast off for the armhole/sleeve cap. If the pattern is worked top-down you can add the length right after the armhole or before the first decrease on sleeve.
Regarding additional yarn amount, this will depend on how much length you add, but it is better with a skein too many than too few.
How do I prevent a hairy garment from shedding?
All yarns will have excess fibres (from production) that might come off as lint or shedding. Brushed yarns (ie hairier yarns) have more of these loose, excess fibres, causing more shedding.
Shedding also depends on what is worn under or over the garment, and whether this pulls at the yarn fibres. It’s therefore not possible to guarantee that there will be no shedding
Below are some tips on how to get the best result when working with hairier yarns:
1. When the garment is finished (before you wash it) shake it vigorously so the looser hairs come off. NOTE: do NOT use a lint roller, brush or any method that pulls at the yarn.
2. Place the garment in a plastic bag and put it in your freezer - the temperature will cause the fibres to become less attached to each other, and excess fibres will come off easier.
3. Leave in the freezer for a few hours before taking it out and shaking it again.
4. Wash the garment according to the instructions on the yarn label.
Why does my garment pill?
Pilling is a natural process that happens to even the most exclusive of fibers. It's a natural sign of wear and tear that is hard to avoid, and that is most visible in high friction areas of your garment like a sweater's arms and cuffs.
You can make your garment look as new by removing the pilling, using a fabric comb or a pill/lint remover.
Serafina |
|||||||||||||||||||||||||
|
|
||||||||||||||||||||||||
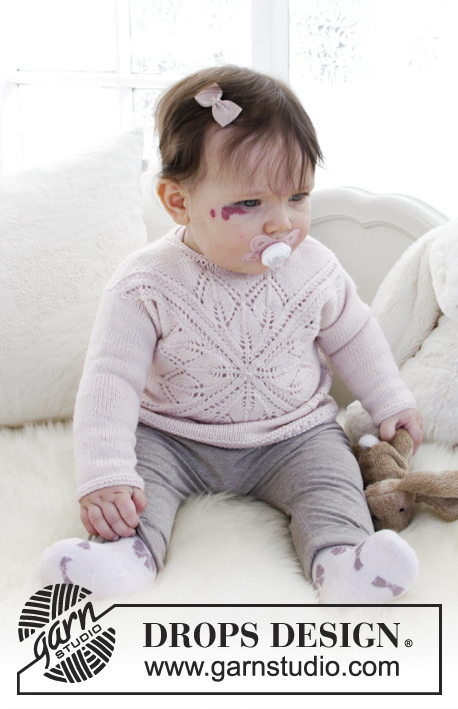
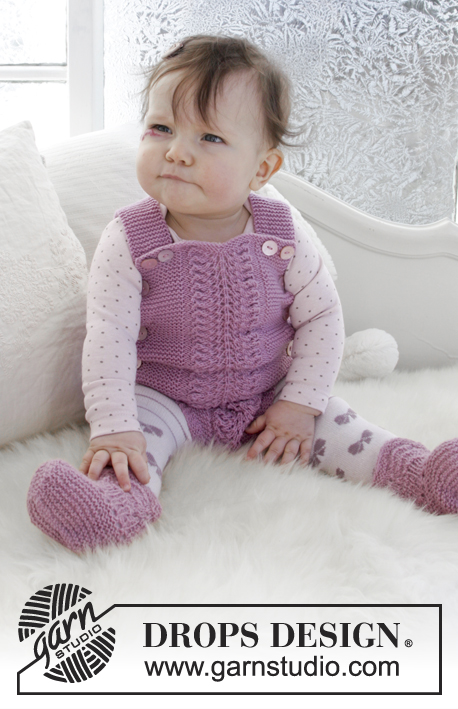
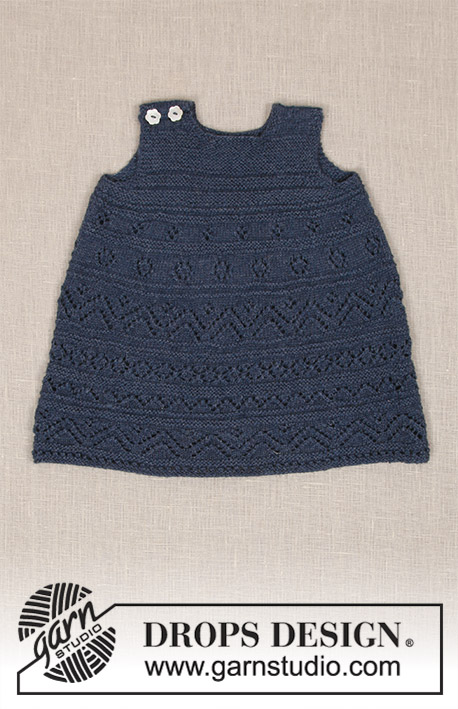
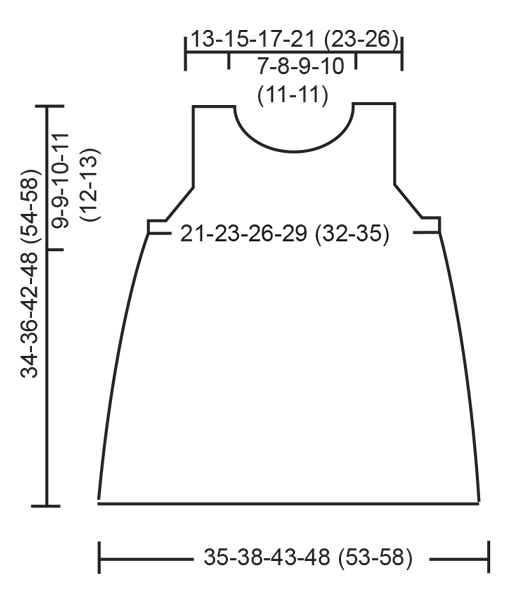
Knitted dress with lace pattern and garter stitch for baby. Size 0 - 4 years Piece is knitted in DROPS Alpaca.
DROPS Baby 31-17 |
|||||||||||||||||||||||||
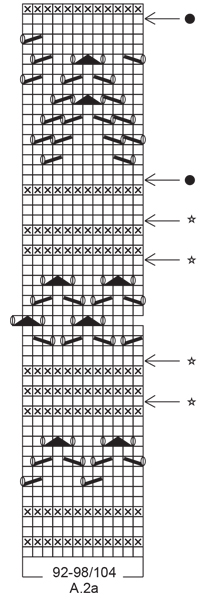
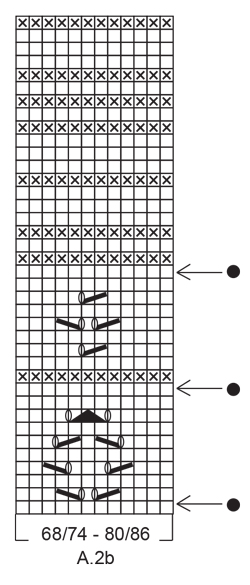
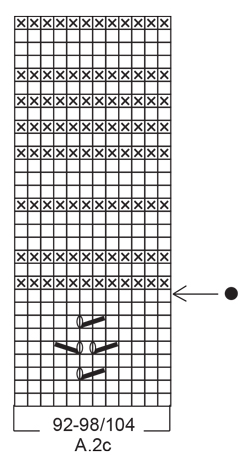
INFORMATION FOR PATTERN: GARTER STITCH (worked in the round): 1 ridge = 2 rounds. Knit 1 round and purl 1 round. GARTER STITCH (back and forth): 1 ridge = knit 2 rows. PATTERN: See diagrams A.1 and A.2 (first A.2a, then A.2b and A.2c). Choose diagram for your size. Diagrams show all rows in pattern seen from the right side. DECREASE TIP-1 (applies evenly spaced decrease): To calculate how to decrease evenly, use the total number of stitches on row (e.g. 168 stitches) and divide stitches by number of decreases to be done (e.g. 6) = 28. In this example work approx. every 27th and 28th stitch together. DECREASE TIP-2 (applies to armholes): Decrease inside 3 edge stitches in garter stitch. All decreases are done from the right side. Decrease before 3 edge stitches as follows: Knit 2 together. Decrease after 3 edge stitches as follows: Slip 1 stitch knitwise, knit 1, pass slipped stitch over stitch worked. ---------------------------------------------------------- DRESS: Worked in the round on circular needle up to armhole, then work front and back piece back and forth separately. Neck edge is worked back and forth on needle. BODY: Cast on 168-180-204-228 (252-276) stitches on circular needle size 3 mm with Alpaca. Insert 1 marker at beginning of round and 1 marker after 84-90-102-114 (126-138) stitches, markers indicates side of garment. Then work A.1 (= 12 stitches) over all stitches (= 14-15-17-19 (21-23) times in width). REMEMBER THE KNITTING TENSION! When A.1 has been worked 1 time vertically, piece measures approx. 8 cm. Then work A.2 (= 12 stitches) over all stitches (= 14-15-17-19 (21-23) times in width). On rounds marked with arrow decrease stitches evenly - read DECREASE TIP-1. For every time 12 stitches are decreased in total, work 1 repetition less of A.2 in width. When all decreases are done, there are 108-120-132-156 (156-180) stitches on needle (= 54-60-66-78 (78-90) stitches on each side of marker). READ ALL OF THE FOLLOWING SECTION BEFORE CONTINUING! WORK PATTERN WHILE AT THE SAME TIME DECREASING FOR ARMHOLE THE SIDE AS FOLLOWS: PATTERN: Continue with pattern. When A.2 has been worked vertically, continue in GARTER STITCH - see explanation above. Piece measures approx. 27-27-33-33 (39-39) cm. ARMHOLE: When piece measures 24-26-31-36 (41-44) cm, continue as follows: Work 9 stitches in garter stitch, work pattern/garter stitch as before, but decrease 4-4-4-8 (2-6) stitches evenly until 9 stitches remain before next marker, work 18 stitches in garter stitch, work pattern/garter stitch as before, but decrease 4-4-4-8 (2-6) stitches evenly until 9 stitches remain on round, finish with 9 stitches in garter stitch = 100-112-124-140 (152-168) stitches in total (= 50-56-62-70 (76-84) stitches on each side of markers). Continue like this until piece measures 25-27-32-37 (42-45) cm. Now cast off stitches for armhole as follows: Cast off the first 6 stitches, work 3 stitches in garter stitch, work pattern until 9 stitches remain before next marker, work 3 stitches in garter stitch, cast off the next 12 stitches, work 3 stitches in garter stitch, work pattern as before until 9 stitches remain, work 3 stitches in garter stitch and cast off the last 6 stitches. Now finish front and back piece separately. BACK PIECE: Now work back and forth. = 38-44-50-58 (64-72) stitches. Continue with pattern and 3 stitches in garter stitch in each side of piece. Then decrease 1 stitch for armhole inside 3 stitches in garter stitch in each side of piece - read DECREASE TIP-2! Decrease like this on every other row 3-4-5-4 (4-5) times in total = 32-36-40-50 (56-62) stitches. When piece measures 32-34-40-46 (52-56) cm, cast off the middle 16-18-22-24 (26-26) stitches for neck = 8-9-9-13 (15-18) stitches on each shoulder. Now finish each shoulder separately. LEFT SHOULDER: Continue in stocking stitch with 3 stitches in garter stitch out towards armhole as before until piece measures 34-36-42-48 (54-58) cm in total. Cast off by purling from wrong side. This shoulder is sewn together with left shoulder on front piece later. RIGHT SHOULDER: Continue in stocking stitch with 3 stitches in garter stitch out towards armhole as before until piece measures 34-36-42-48 (54-58) cm in total. Cast off by knitting from wrong side. On this shoulder sew on buttons later. FRONT PIECE: Work as on back piece until piece measures 30-32-37-42 (48-51) cm. Now cast off the middle 10-12-16-16 (18-18) stitches for neck = 11-12-12-17 (19-22) stitches on each shoulder. Now finish each shoulder separately. RIGHT SHOULDER: Cast off 1 stitch on every row from neck 3-3-3-4 (4-4) times in total = 8-9-9-13 (15-18) stitches. When piece measures 32-34-40-46 (52-56) cm, work in stocking stitch with 3 stitches in garter stitch out towards armhole. When piece measures 34-36-42-48 (54-58) cm, decrease for 2 buttonholes from right side as follows: Knit 1-1-1-2 (3-3), knit 2 together, make 1 yarn over (= 1 buttonhole), knit 2-2-2-4 (5-8), knit 2 together, make 1 yarn over (= 1 buttonhole), finish with 1-2-2-3 (3-3) stitches in garter stitch. Cast off by knitting on next row from wrong side. LEFT SHOULDER: Cast off 1 stitch on every row from neck 3-3-3-4 (4-4) times in total = 8-9-9-13 (15-18) stitches. Continue in stocking stitch with 3 stitches in garter stitch out towards armhole as before until piece measures 34-36-42-48 (54-58) cm in total. Cast off by purling from wrong side. This shoulder is sewn together with left shoulder on back piece later. ASSEMBLY: Sew buttons on to right shoulder on back piece. Sew left shoulder together with grafting/kitchener stitches. NECK EDGE: Worked back and forth. Begin at right shoulder on back piece and pick up 46-70 stitches around the neck from right side. Knit 3 rows, cast off by knitting, make sure to avoid a tight cast-off edge, cast off with 1 larger needle size if needed. |
|||||||||||||||||||||||||
Diagram explanations |
|||||||||||||||||||||||||
|
|||||||||||||||||||||||||
Have you made this or any other of our designs? Tag your pictures in social media with #dropsdesign so we can see them! Do you need help with this pattern?You'll find tutorial videos, a Comments/Questions area and more by visiting the pattern on garnstudio.com. © 1982-2024 DROPS Design A/S. We reserve all rights. This document, including all its sub-sections, has copyrights. Read more about what you can do with our patterns at the bottom of each pattern on our site. |
With over 40 years in knitting and crochet design, DROPS Design offers one of the most extensive collections of free patterns on the internet - translated to 17 languages. As of today we count 304 catalogues and 11422 patterns - 11422 of which are translated into English (UK/cm).
We work hard to bring you the best knitting and crochet have to offer, inspiration and advice as well as great quality yarns at incredible prices! Would you like to use our patterns for other than personal use? You can read what you are allowed to do in the Copyright text at the bottom of all our patterns. Happy crafting!
Comments / Questions (101)
Nancy wrote:
Ich stricke “Serafina” in Grösse 92. In dem Diagramm A.2a 92-98/104 ist eine Reihe nach links versetzt. Wie wird das gestrickt damit die Rapports bleiben?
19.02.2024 - 15:05DROPS Design answered:
Liebe Nancy, am Anfang dieser Reihe heben Sie die 1. Masche ab (die wird erst am Ende der Runde gestrickt, dann stricken Sie das Diagram weiter: die 2 letzten Maschen von jedem Rapport werden zusammen mit der 1. Maschen von dem nächsten Rapport gestrickt, der letzte Umschlag in jedem Rapport wird dann die 1. Masche nächsten Rapport. Viel Spaß beim stricken!
19.02.2024 - 15:27Jola wrote:
Witam, mam problem z sukienką Serafina - Drops Baby 31-17, druty 3, włóczka yarn art jeans kolor 65, ponieważ robię rozmiar 56/62cm i po przerobieniu całego schematu A1 na szerokość wychodzi mi 42cm a nie jak w opisie 38. Wcześniej robiłam na rozmiar 80/86, ale była jeszcze większa. Ile oczek powinnam mieć na początku, aby była dla dziewczynki wiek 12miesięcy?
22.03.2023 - 19:29DROPS Design answered:
Witaj Jolu, koniecznie zobacz kurs TUTAJ. Najważniejsza jest próbka-aby finalne rozmiary były takie jak na schemacie, Twoja próbka musi być zgodna z próbką we wzorze. Czasami trzeba będzie wziąć mniejsze/większe druty, aby to osiągnąć. Pamiętaj, że model jest zaprojektowany na konkretną włóczkę DROPS. Jeżeli używasz innej włóczki (inna grubość, faktura, splot...) próbka może się nie zgadzać. Pozdrawiamy!
23.03.2023 - 08:24Sonja Lindholm wrote:
Milloin tehdään kaavion A.2a ja milloin A.2b mukaan? Ohjeessa lukee vain neulo kaavion a2 mukaan.
01.03.2023 - 21:49DROPS Design answered:
Aluksi neulotaan piirroksen A.2a mukaan, sitten piirroksen A.2b mukaan ja lopuksi piirroksen A.2c mukaan.
06.03.2023 - 16:45Gabi Nickel wrote:
Hallo liebes Team, ich stricke das Kleid in Gr. 56/62. Ich habe 180 Maschen aufgenommen und bin beim Ende von A2. Nach den Abnahmen sollte ich 120 Maschen haben. Ich habe aber 156 Maschen. Ich habe bei A2 insgesamt 24 Maschen abgenommen. Wo liegt bei mir der Fehler vor? Vielen Dank für die wirklich tollen Anleitungen. Ich habe schon viel nachgestrickt. Viele Grüße aus Bayern Gabi Nickel
21.01.2023 - 16:44DROPS Design answered:
Liebe Frau Nickel, wenn A.2a gestrickt war, dann haben Sie 156 Maschen auf der Nadel, dann stricken Sie A.2b und gleichzeitig nehmen Sie 12 Maschen 3 Mal ab = 120 Maschen sind noch übrig. Viel Spaß beim stricken!
23.01.2023 - 09:09Dorothy Chu wrote:
In the pattern under Decrease Tip 1 - work 1 repetition less of A.2 in width. What does this mean? Thank you for the beautiful pattern.
16.10.2022 - 07:46DROPS Design answered:
Dear Dorothy, in width usually means on the round. So, after decreasing, you will need to work 1 less repeat of A.2 on the round (if you work A.2 14 times on the round before decreasing, you will only have enough stitches to repeat A.2 13 times in the round after decreasing 12 stitches). Happy knitting!
16.10.2022 - 23:58Dorothy Chu wrote:
My question is, in Decrease Tip 1 - work 1 repetition less of A.2 in width. What does this mean? Thank you for the beautiful pattern.
16.10.2022 - 07:44DROPS Design answered:
Dear Dorothy, please see the answer above. Happy knitting!
16.10.2022 - 23:59Emily Kim wrote:
Hello, I am a bit confused at the ARMHOLE part where I have decreased one round but then the next part says to ‘Continue like this until piece measures 25-27-32-37 (42-45) cm. ‘ So how many stitches should I be left with on each side of the markers?
29.09.2022 - 23:25DROPS Design answered:
Dear Kim, you have to continue pattern as before with 18 stitches in garter stitch on each side of piece (= 9 sts in garter stitch on each side of each marker) for armhole until piece measures 25-27-32-37 (42-45) cm, then you will cast off the middle 12 sts of these 18 sts and continue each piece spearately with 3 sts in garter stitch on each side. Happy knitting!
30.09.2022 - 08:14Laura Hammel wrote:
Liebes Drops Team, ich habe eine Frage zum Diagramm A.2: Werden die Diagramme A.2a, A.2b und ggf. A.2c nacheinander in die Höhe gestrickt oder werden in einer Reihe nacheinander A.2a, A.2b und ggf. A.2c nacheinander gestrickt?
14.09.2022 - 13:18DROPS Design answered:
Liebe Frau Hammel, zuerst stricken Sie A.1a, dann stricken Sie A.1b und endlich A.1c also jeweils nach einander in der Höhe und nicht nacheinander in der Breite/Runde (wir habe das Diagram in 3 Teilen geschnitten damit jedes einfacher zu lesen wird). Viel Spaß beim stricken!
14.09.2022 - 16:31Liisa Rossi wrote:
Kädenteiden ohjeessa on epätarkkuus. Ensin neuvotaan neulomaan kerros, jossa kerroksen alussa ja keskellä neulotaan 18 s aina oikeaa ja väleissä kavennetaan molemmin puolin neljä. Sitten sanotaan "jatka tähän tapaan", mikä antaa ymmärtää, että kavennukset toistuvat. Seuraavan osion silmukkamäärästä kuitenkin näkee, että kavennukset kuuluu tehdä vain kerran. Kannattaisi tarkentaa ohjeeseen, ettei muutkin joudu purkamaan.
23.08.2022 - 10:44Liz wrote:
Hi, good morning, I've slept on it and looked with fresh eyes and it's all clear now. Sorry to have bothered you. Beautiful pattern by the way and an absolute joy to knit, I'm using flora
22.07.2022 - 08:07