
Popular categories
Looking for a yarn?


|
||||
Time for Fun |
||||
 |
 |
|||
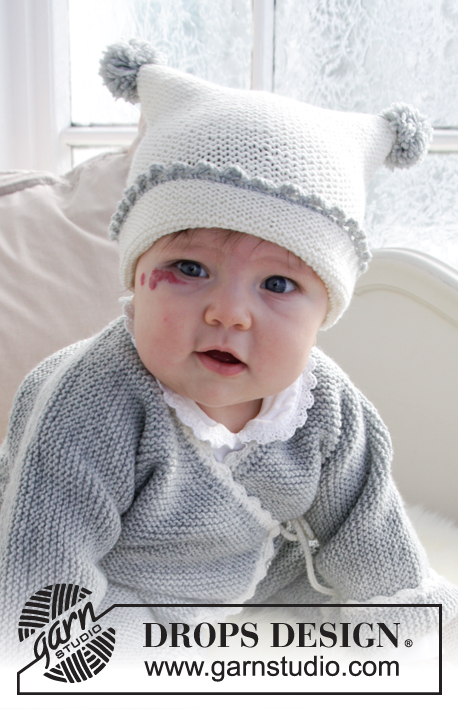
Set consists of: Knitted baby overall in garter stitch with crocheted edge, hat in garter stitch with crocheted edge and pompoms and socks. Size premature - 4 years Set is knitted in DROPS BabyMerino.
DROPS Baby 31-15 |
||||
|
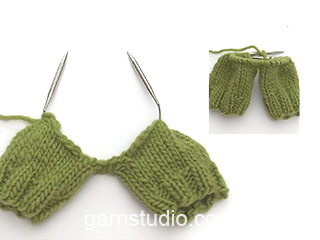
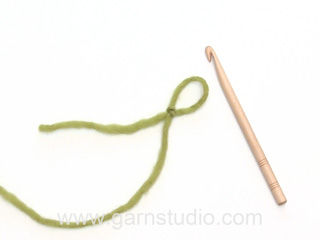
INFORMATION FOR PATTERN: GARTER STITCH (worked back and forth - applies to suit and socks): Knit all rows. 1 ridge = knit 2 rows. GARTER STITCH (in the round - applies to hat): 1 ridge = 2 rounds. Knit 1 round and purl 1 round. INCREASE TIP (applies to suit): Increase inside 1 band stitch. All increases are done from the right side. Increase by making 1 yarn over. Knit yarn over twisted on next row, it should not make holes. DECREASE TIP (applies to suit): Decrease inside 1 band stitch. All decreases are done from the right side. Decrease as follows after 1 band stitch: Slip 1 stitch knitwise, knit 1, pass slipped stitch over. Decrease as follows before 1 band stitch: Knit 2 together. ---------------------------------------------------------- SUIT: Work from bottom up. First work 2 legs, then work the legs together and knit back and forth up to sleeve. Cast on stitches for sleeve in each side of piece, and finish front and back pieces separately until finished. Sew shoulder and sleeve seams and crochet an edge around the opening on suit in off white at the end. The entire suit is worked in GARTER STITCH - see explanation above. LEG: Worked back and forth on circular needle to make room for all the stitches. Cast on 46-50-54-58 (66-70) stitches (including 1 edge stitch in each side) on circular needle size 3 mm with light grey. Work in garter stitch. REMEMBER THE KNITTING TENSION! When piece measures 6 cm, increase 1 stitch in each side of piece inside 1 edge stitch in garter stitch (= 2 stitches increased). Increase like this every 3rd-4th-5th-5th (8th-8th) row 11-11-12-14 (13-16) times in total = 68-72-78-86 (92-102) stitches. When piece measures 15-18-21-24 (29-34) cm, cast off 5 stitches at the beginning of the 2 next rows (i.e. stitches are cast off in each side of piece) = 58-62-68-76 (82-92) stitches. Put piece aside and knit another leg the same way. SUIT: Slip both legs on to same circular needle size 3 mm with cast off stitches towards each other = 116-124-136-152 (164-184) stitches. Insert 1 marker thread in the piece. NOW MEASURE PIECE FROM HERE! Work 3 ridges back and forth, begin mid front. Then work as follows: Cast on 3 band stitches at the end of the next 2 rows = 122-130-142-158 (170-190) stitches. Insert 1 marker after 32-34-37-41 (44-49) stitches in from each side. Move the markers upwards when working, they mark front pieces and back piece. Now increase stitches mid front (i.e. in each side of piece) so that the front pieces overlap. Increase 1 stitch inside 1 band stitch in each side of piece (= 2 stitches increased) - read INCREASE TIP! Increase on very 4th row 3-2-0-3 (2-13) more times, then on every 6th row 8-11-16-17 (21-15) times (= 12-14-17-21 (24-29) stitches increased in total in each side of piece) = 44-48-54-62 (68-78) stitches on each front piece = 146-158-176-200-218-248 stitches in total. READ ALL OF THE FOLLOWING SECTION BEFORE CONTINUING! DECREASE MID FRONT FOR NECK INSIDE 1 BAND STITCH WHILE AT THE SAME TIME DIVIDING THE PIECE AND CASTING ON STITCHES FOR SLEEVE. DECREASE MID FRONT FOR NECK AS FOLLOWS: Work in garter stitch over all stitches until piece measures 17-20-25-28 (32-34) cm from marker thread. Then decrease 1 stitch inside 1 band stitch for neck in each side of piece (= 2 stitches decreased) - read DECREASE TIP! Decrease like this on every other row 20-24-27-31 (35-41) more times, then on very 4th row 2 times (= 23-27-30-34 (38-44) stitches decreased in total in each side of piece). DIVIDE THE PIECE AND CAST ON STITCHES FOR SLEEVE AS FOLLOWS: RIGHT FRONT PIECE: When piece measures 21-26-30-35 (40-43) cm from marker thread, divide piece at the 2 markers and finish front and back piece separately. Adjust so that next row is from right side. Now work over stitches until first marker (= right front piece). Slip the remaining stitches on a stitch holder. Now cast on stitches for sleeve at the end of every row from right side as follows (NOTE: Continue to decrease inside 1 band stitch at the beginning of row as before): Cast on 4-6-6-6 (6-6) stitches in 4-4-5-6 (7-8) times in total, then 17-17-16-16 (18-20) stitches 1 time in total (= 33-41-46-52 (60-68) stitches cast on in total for sleeve). When all stitches are cast on and all decreases are done, there are 54-62-70-80 (90-102) stitches on needle. Work in garter stitch until piece measures 45-53-62-70 (81-90) cm in total, measured from leg to shoulder. Cast off. LEFT FRONT PIECE: Work over the last stitches slipped on a stitch holder, until marker. Work as right front piece but reversed. I.e. cast on stitches for sleeve at the end of row from wrong side. Continue to decrease inside 1 band stitch at the end of row as before for neck. BACK PIECE: = 58-62-68-76 (82-92) stitches. Cast on new stitches at the end of every row in each side for sleeves as follows: Cast on 4-6-6-6 (6-6) stitches in 4-4-5-6 (7-8) times in total, then 17-17-16-16 (18-20) stitches 1 time in total (= 33-41-46-52 (60-68) stitches cast on in total for sleeve in each side of piece) = 124-144-160-180 (202-228) stitches. When piece measures 44-52-61-69 (80-89) cm in total, cast off the middle 16-20-20-20 (22-24) stitches for neck and finish each shoulder/sleeve separately (= 54-62-70-80 (90-102) stitches remain on each shoulder). Work like this until piece measures 45-53-62-70 (81-90) cm in total, measured from leg to shoulder, adjust according to front pieces. Cast off. Work the other shoulder the same way. ASSEMBLY: Sew overarm-/shoulder seams with grafting/Kitchener stitches from right side. Sew underarm seams together edge to edge in front loop of outermost stitches. Sew legs together inside 1 edge stitch, and sew the 5 stitches cast off between legs together. Sew vent up to where the 3 new stitches were cast on in each side for band stitches and sew the 3 band stitches in each side of piece to suit. CROCHET EDGE: Crochet on hook size 2.5 mm with off white around the entire opening mid front on suit as follows: ROW 1 (= from wrong side): Begin mid front at the bottom of left front piece, work 1 double crochet in first stitch where 3 band stitches were cast on, * 1 chain stitch, skip approx. 1 cm, 1 double crochet in next stitch *, repeat from *-* (make sure to avoid a tight edge), continue crochet edge around suit until corner where decrease for neck began on left front piece, work tie as follows: 1 double crochet in tip, then work chain stitches for approx. 20-25 cm, turn and work 1 slip stitch in every chain stitch, then work 1 double crochet in tip on front piece again, work in the round until next tip (i.e. on right front piece), work tie, continue as before around the rest of suit down to where 3 band stitches were cast on, adjust to finish with 1 double crochet. ROW 2 (from right side): Work 1 chain stitch, 1 double crochet around first chain stitch, * 4 chain stitches, 1 treble crochet in 4th chain stitch from hook, skip 1 double crochet + 1 chain stitch + 1 double crochet, work 1 double crochet around next chain stitch *, repeat from *-* (make sure to work over ties so that the ties are under the edge, i.e. do not work in stitch in tie), finish with 1 slip stitch in first double crochet on previous row. Fasten off. Crochet on hook size 2.5 mm with off white at the bottom around both legs as follows: ROUND 1: Begin at the seam. Work 1 double crochet in first stitch, * 1 chain stitch, skip 2 stitches, 1 double crochet in next stitch *, repeat from *-* and finish with 1 slip stitch in first double crochet at beginning of round. ROUND 2: Work 1 chain stitch, 1 double crochet around first chain stitch, * 4 chain stitches, 1 treble crochet in 4th chain stitch from hook, skip 1 double crochet + 1 chain stitch + 1 double crochet, work 1 double crochet around next chain stitch *, repeat from *-* the entire round, finish with 1 slip stitch in first double crochet at beginning of round. Crochet on hook size 2.5 mm with off white at the edge around both sleeves as follows: ROUND 1: Work 1 double crochet in first stitch at the bottom of sleeve, * 1 chain stitch, skip approx. 1 cm, 1 double crochet in next stitch *, repeat from *-* (make sure to avoid a tight edge) and finish with 1 slip stitch in first double crochet at beginning of round. ROUND 2: Work 1 chain stitch, 1 double crochet around first chain stitch, * 4 chain stitches, 1 treble crochet in 4th chain stitch from hook, skip 1 double crochet + 1 chain stitch + 1 double crochet, work 1 double crochet around next chain stitch *, repeat from *-* the entire round, finish with 1 slip stitch in first double crochet at beginning of round. Then work 1 tie like the one in the tip on right and left front piece, on the outside of left front piece, under sleeve (i.e. in the side) and on the inside of right front piece – make sure that the ties are at the same hight as tips on front piece. ---------------------------------------------------------- HAT: Worked in the round on double pointed needles. Cast on (68) 82-94-100-104 (112-116) stitches on double pointed needles size 2.5 mm with off white. Work in GARTER STITCH – see explanation above – until piece measures 3.5 cm (= edge). On next round with knit, switch to double pointed needles size 3 mm and decrease 8 stitches evenly = (60) 74-86-92-96 (104-108) stitches. REMEMBER THE KNITTING TENSION! Continue in garter stitches until piece measures (17) 18-19-20-21 (22-23) cm. Cast off. Place hat flat and sew together at the top. POMPOM: Make 2 dense pompoms with a diameter of 5 cm with light grey and fasten at each end of seam. CROCHET EDGE: Turn hat inside out so that edge is worked from wrong side, this is folded later. Work on hook size 2.5 mm with light grey around the edge on hat as follows: ROUND 1: Work 1 double crochet in first stitch, * 2 chain stitches, skip 2 stitches, 1 double crochet in next stitch *, repeat from *-* and finish with 1 slip stitch in first double crochet at beginning of round. ROUND 2: Work 1 chain stitch, 1 double crochet around first chain stitch, * 4 chain stitches, 1 treble crochet in 4th chain stitch from hook, skip 1 double crochet + 1 chain stitch + 1 double crochet, work 1 double crochet around next chain stitch *, repeat from *-* the entire round. Finish with 1 slip stitch in first double crochet at beginning of round. Turn the hat with right side out and fold the edge up. ---------------------------------------------------------- SOCKS: The sock is worked back and forth from mid back. LEG: Cast on 48-52-56 (56) stitches on circular needles size 2.5 mm with off white. Work rib (= knit 2/purl 2) for 5-6-6 (7) cm, adjust so that next row is worked from wrong side. REMEMBER THE KNITTING TENSION! Purl 1 row from wrong side while AT THE SAME TIME decreasing 14-14-18 (14) stitches evenly = 34-38-38 (42) stitches. WITH EYELET HOLES: Work next row as follows from right side: Knit 1, * knit 2 together, 1 yarn over *, repeat from *-* and finish with knit 1. Purl 1 row from wrong side. WITHOUT EYELET HOLES: Knit 1 row from right side and purl 1 row from wrong side. FOOT: Now slip the outermost 12-13-13 (15) stitches in each side on 1 stitch holder. Work 4-4½-5½ (6½) cm in GARTER STITCH – see explanation above, over the middle 10-12-12 (12) stitches (= middle piece). Slip stitches from stitch holders back on needle and pick up 10-11-13 (16) stitches on each side of middle piece = 54-60-64 (74) stitches. Insert 1 marker after 27-30-32 (37) stitches in = middle of piece. Work in garter stitch for 3-4-5 (5) cm AT THE SAME TIME after 1½-2-2½ (3) cm decrease on every other row until finished measurements, as follows: Decrease 1 stitch at the beginning and the end of piece and knit 2 together on each side of the 2 middle stitches. Cast off and sew together mid under foot and continue up mid back in outer loops of edge stitches to avoid a chunky seam. If you wish, thread a silk ribbon through the eyelet holes. |
||||
Diagram explanations |
||||
|
||||

|
||||
|
Have you made this or any other of our designs? Tag your pictures in social media with #dropsdesign so we can see them! Do you need help with this pattern?You'll find tutorial videos, a Comments/Questions area and more by visiting the pattern on garnstudio.com. © 1982-2024 DROPS Design A/S. We reserve all rights. This document, including all its sub-sections, has copyrights. Read more about what you can do with our patterns at the bottom of each pattern on our site. |
||||


With over 40 years in knitting and crochet design, DROPS Design offers one of the most extensive collections of free patterns on the internet - translated to 17 languages. As of today we count 304 catalogues and 11422 patterns - 11422 of which are translated into English (UK/cm).
We work hard to bring you the best knitting and crochet have to offer, inspiration and advice as well as great quality yarns at incredible prices! Would you like to use our patterns for other than personal use? You can read what you are allowed to do in the Copyright text at the bottom of all our patterns. Happy crafting!
Comments / Questions (42)
Jag har kommit till vänster framstycke. Höger med ärm är klart. Bakstyckets maskor sitter på tråd. Nu undrar jag hur jag skall göra. Det står; ”Sticka över de sista maskorna som sattes på en tråd, fram till markören.” Vad menas?
19.03.2024 - 08:38DROPS Design answered:
Hej Pia. Nu sätter du maskorna som hör till vänster framstycke på stickan och stickar de enligt beskrivningen. Mvh DROPS Design
20.03.2024 - 13:36Help! I am really struggling to understand the instructions for the second row of the crochet border. What do you mean by double crochet around the first chain? What does treble crochet in 4th chain from hook meanWhen you say skip 1 double crochet + 1 chain stitch + 1 double crochet, does this mean skip all of them. I wam very new to crochet
01.02.2024 - 19:41DROPS Design answered:
Dear Lorraine, you will work 1 double crochet in the 1-chain-space, ie not in the chain but around the chain. Then work *4 chains and 1 treble crochet in the 1st of these 4 chains to create a picot, skip then (1 dc, 1 ch, 1 dc) and repeat from *. Happy crocheting!
02.02.2024 - 08:14In the overall:"Increase on very 4th row 3-2-0-3 (2-13) more times, then on every 6th row 8-11-16-17 (21-15) times (= 12-14-17-21 (24-29) stitches increased in total in each side of piece) = 44-48-54-62 (68-78) stitches on each front piece". My size is 6/9months so 0+16 is not 17 stitches. Could you please explain it. Thank you.
25.01.2024 - 10:09DROPS Design answered:
Dear Victoria, in this size you have to work the first increase as described + 0 more times = 1 time then 16 times on every 6th row = 17 sts in total. Happy knitting!
26.01.2024 - 07:00Skall jag dela upp arbetet INNAN jag börjar med ärmarna? Fortsätter jag med rundstickorna? Mäter jag från grenens markör eller från framstycketsmarkören när det skall mätas från”markören”?
05.01.2024 - 21:57DROPS Design answered:
Hej Pia, arbejdet er allerede delt fra der hvor du har sat arbejdet sammen efter benene.... så vi forstår ikke rigtig hvor du er i opskriften. Start opskriften efter der hvor det står HELDRESSEN .... BEN ... Lägg upp 46 m (i den minste størrelse) osv...
11.01.2024 - 14:23När benen ska sättas på samma rundsticka, vad gör man med garnänden, från ena benet, som man inte fortsätter sticka med? På något sätt måste den ju fästas i arbetet, annars går det upp.
03.01.2024 - 19:54DROPS Design answered:
Hej Lovisa, ja du fäster alle ender når du er færdig med at strikke :)
09.01.2024 - 15:11Hello, for the hat it says Work 1 chain stitch, 1 double crochet around first chain stitch. I am not sure what that means. Is there any video explaining this part of the pattern? Thank you.
01.01.2024 - 11:36DROPS Design answered:
Dear Benafsha, this video should help you understanding how to crochet the first row of the crochet edge. Just remember to follow the number of stitches stated in the pattern, even if the video is different, it's just showing the technique but other variations are worked the same way. Happy knitting!
02.01.2024 - 11:57Buona sera - sto eseguendo la tutina taglia 1/3 mesi.\r\ncome si fanno gli aumenti? dopo le 3 maglie del bordo e dai segnapunti per cui 4 aumenti per giro ? 2 ogni 4 ferri? 11 ogni 6 ferri? alla fine i numeri di maglie non mi tornano. forse sbaglio qualcosa ?\r\ngrazie e saluti\r\nBarbara
07.09.2023 - 21:17DROPS Design answered:
Buonasera Barbara, deve aumentare ad ogni lato del lavoro 1 maglia (2 maglie aumentate), poi deve aumentare ogni 4 ferri altre 2 volte (4 maglie aumentate), poi ogni 6 ferri 11 volte (22 aumenti), per un totale di 28 maglie aumentate: passerà quindi da 130 a 158 maglie. Buon lavoro!
07.09.2023 - 23:25Ved montering, skal alle ‘sømmer’ syes sammen fra retten?
22.03.2023 - 10:51DROPS Design answered:
Hei Myrth Ja, da vil du ikke få en tykk monteringskant. Men om du syns det blir penest fra vrangen, selv med en noe tykkere kant, kan du fint gjøre det. mvh DROPS Design
27.03.2023 - 10:54Hvordan knyter man sammen dressen? Det skal lages knytebåns på hver spiss, men det gir ikke mening når man skal feste den rundt? Eller har jeg tenkt helt feil?
06.03.2022 - 11:55DROPS Design answered:
Hej, Længere nede i opskriften står det hvordan du hækler knytebåndene i siderne: Deretter hekles det 1 knytebånd tilsvarende det i spissen på høyre og venstre forstykke, på utsiden av venstre forstykke, under ermet (dvs i siden) og på innsiden av høyre forstykket – pass på at båndene kommer i samme høyde som spissene på forstykkene. :)
09.03.2022 - 10:27In the foot section of the sock pattern, it states " decrease every other row until finished measurements", but the finished measurement does not seem to be stated in the pattern. What is the finished measurement suppose to be?
24.02.2022 - 04:35DROPS Design answered:
Dear Debbie, you work in garter stitch for 3-4-5 (5) cm but when garter stitch section measures1½-2-2½ (3) cm start to decrease, and decrease for 1½-2-2½ (2) cm (so that garter stitch section measures 3-4-5(5) cm. Happy knitting!
24.02.2022 - 10:34