
Popular categories
Looking for a yarn?


|
|||||||||||||||||||||||||||||||||||||
Celestina |
|||||||||||||||||||||||||||||||||||||
 |
 |
||||||||||||||||||||||||||||||||||||
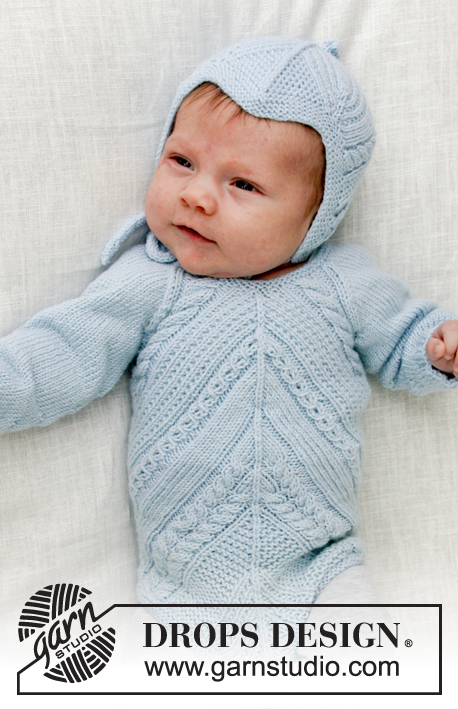
Knitted baby body with lace pattern and cables. Sizes premature - 4 years. Piece is worked in DROPS BabyMerino.
DROPS Baby 31-6 |
|||||||||||||||||||||||||||||||||||||
|
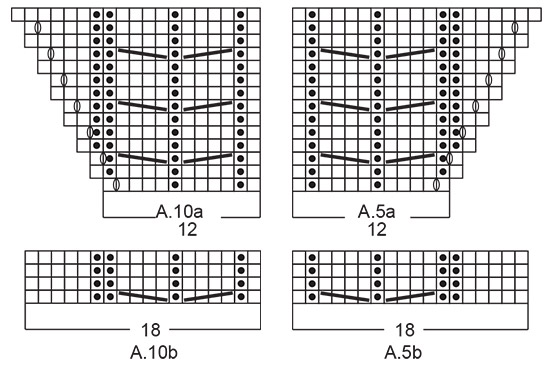
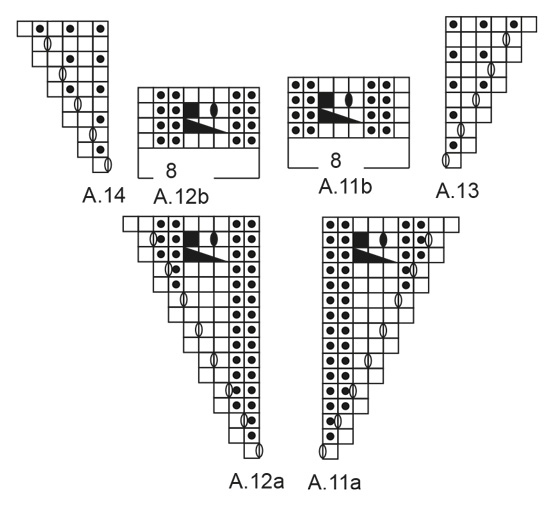
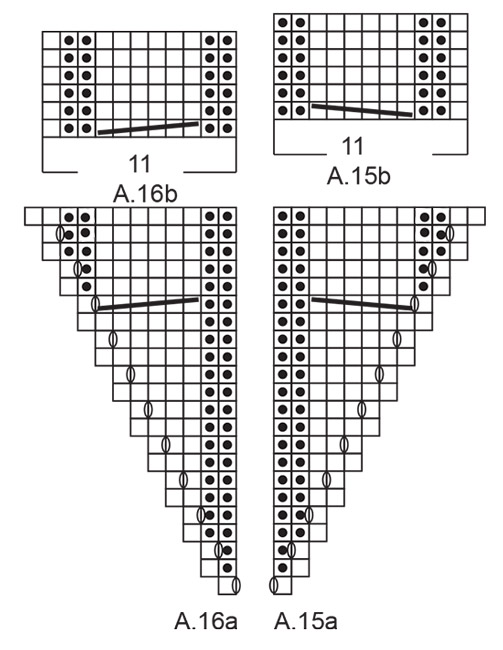
INFORMATION FOR THE PATTERN: RIDGE/GARTER STITCH (worked back and forth): 1 ridge = Knit 2 rows. PATTERN: See diagrams A.1 to A.16. The diagrams show all the rows in the pattern seen from the right side. When you have too few stitches to work a cable, continue with knit over knit and purl over purl. INCREASE TIP: Work until there is 1 stitch left before the marker, 1 yarn over (= 1 stitch increased), knit 2 stitches (the marker sits in the middle of these 2 stitches), 1 yarn over (= 1 stitch increased). The yarn overs are worked twisted on the next round to avoid holes. RAGLAN: The decreases are different on front/back pieces and on sleeves – read DECREASE TIP! FRONT/BACK PIECE: Decrease on each row from the right side (= every 2nd row) as follows: Decrease 1 stitch a total of (7) 6-4-8-6 (3-0) times, then 2 stitches a total of (1) 4-6-5-7 (10-13) times. SLEEVE: Decrease a total of 2 stitches on each sleeve on every row from the right side (= every 2nd row) a total of (6) 7-5-9-8 (6-3) times, then every row (4) 6-10-8-10 (14-20) times. DECREASE TIP (for raglan): BACK PIECE: All decreases are made from the right side. DECREASE 1 STITCH: Decrease to raglan on the left back piece as follows: Knit twisted together the 2 stitches after the 5 band stitches (= 1 stitch decreased). Decrease to raglan on the right back piece as follows: Knit together the last 2 stitches before the 5 band stitches (= 1 stitch decreased). DECREASE 2 STITCHES: Decrease to raglan on the left back piece as follows: Knit twisted together the 3 stitches after the 5 band stitches (= 2 stitches decreased). Decrease to raglan on the right back piece as follows: Knit together the last 3 stitches before the 5 band stitches (= 2 stitches decreased). FRONT PIECE: DECREASE 1 STITCH ON EACH SIDE OF THE MIDDLE STITCH: Work until there is 1 stitch left before the stitch with marker mid front, slip 2 stitches as if to knit, knit 1, pass the 2 slipped stitches over the knitted stitch (= 2 stitches decreased). DECREASE 2 STITCHES ON EACH SIDE OF THE MIDDLE STITCH: Work until there are 2 stitches left before the stitch with marker mid front, slip 3 stitches as if to knit, knit 2 together, pass the 3 slipped stitches over the knitted together stitches (= 4 stitches decreased). SLEEVE: Work as far as the marker thread in the transition between body and sleeve, knit twisted together the first 2 stitches on the sleeve (= 1 stitch decreased), work until there are 2 stitches left before the marker thread in the transition between body and sleeve, knit together the last 2 stitches on the sleeve (= 1 stitch decreased = a total of 2 stitches decreased on each sleeve). BUTTONHOLES: Work buttonholes on right band. 1 buttonhole = knit together the third and fourth stitch from the edge and make 1 yarn over. Work buttonholes when the piece measures: <0: 1 and 3 cm. 0/1 MONTH + 1/3 MONTHS: 1 and 4 cm. 6/9 MONTHS + 12/18 MONTH: 1 and 4½ cm. 2 YEARS + 3/4 YEARS: 1 and 5 cm. ---------------------------------------------------------- BODY: The piece is worked back and forth, bottom up. First in 2 small parts both for the front and back pieces, which are then worked together; back and forth to where the front and back pieces are worked together and then you continue in the round with circular needle. The sleeves are worked in the round with double pointed needles. The parts are put together and the yoke is worked back and forth, i.e. there will be a split mid back. The garment will stretch in width by approx. 3-5 cm when worn. FRONT PIECE: You first work 2 small parts (edges at bottom of gusset), which are put together, and then you continue by working these together back and forth. Cast on 5 stitches with circular needle size 3 mm and BabyMerino. Knit 1 row. Then work A.1 (= 5 stitches). When A.1 has been worked 1 time in height, there are 9 stitches on the needle. Lay the piece to one side and work 1 more part in the same way. Put the pieces together and work A.2 over the stitches (first row = from the wrong side) = 21 stitches. Cut the strand. Lay the piece to one side and work the back piece. BACK PIECE: Cast on and work as for front piece BODY: Now put the pieces together and the work is continued in the round as follows: * Cast on (16) 22-24-28-30 (34-38) new stitches, continue working from the right side over the back/front piece: Work A.3 over the first 9 stitches, A.4 over the next 3 stitches (insert 1 marker in the middle stitch A.4 = mid front/mid back = middle stitch), A.3 over the last 9 stitches, cast on (16) 22-24-28-30 (34-38) new stitches, insert 1 marker thread (= the side) *, work from *-* a total of 2 times = (106) 130-138-154-162 (178-194) stitches (= (53) 65-69-77-81-(89-97) stitches between marker threads). The marker threads sit in the sides and the markers sit mid front/mid back. Then work as follows: * Work A.5a over the first 12 stitches, A.6 over the next (4) 6-6-6-6 (6-6) stitches, repeat A.7 over the next (0) 4-6-10-12 (16-20) stitches, work pattern as before (i.e. A.3) until there is 1 stitch left before the stitch with marker (= mid front/ mid back), work A.4 over the next 3 stitches, work pattern as before until there are (16) 22-24-28-30 (34-38) stitches left before the marker thread in the side, repeat A.8 over the next (0) 4-6-10-12 (16-20) stitches, A.9 over the next (4) 6-6-6-6 (6-6) stitches, A.10a over the last 12 stitches before the marker thread in the side * (i.e. the pattern is mirror image on each side of the stitch with marker mid front/mid back), work from *-* a total of 2 times. REMEMBER THE KNITTING TENSION! Continue the pattern in this way. In other words, on every 2nd row decrease 2 stitches mid front/mid back and increase 1 stitch on each side of the marker thread in each side, so that the number of stitches stays the same. The pattern continues as before to finished length, i.e. continue with knit over knit, garter stitch over garter stitch, purl over purl and cable over cable (the pattern decreases mid front/mid back and increases to new pattern in each side of the piece). SIZE <0: When A.5a and A.10a have been worked 1 time in height, * work A.13 over the first stitch in A.5a, A.5b over the next 18 stitches, pattern as before until there are 19 stitches left before the marker thread in the side, A.10b over the next 18 stitches, A.14 over the last stitch before the marker thread in the side *, work from *-* a total of 2 times. SIZES 0/1 - 1/3 - 6/9 - 12/18 MONTHS (2 - 3/4) YEARS: When A.5a and A.10a have been worked 1 time in height, * work A.11a over the first stitch in A.5a, A.5b over the next 18 stitches, work pattern as before until there are 19 stitches left before the marker thread in the side, A.10b over the next 18 stitches, A.12a over the last stitch before the marker thread in the side *, work from *-* a total of 2 times. When A.11a and A.12a have been worked 1 time in height * work A.13 over the first stitch in A.11a, A.11b over the next 8 stitches, pattern as before until there are 9 stitches left before the marker thread in the side, A.12b over the next 8 stitches, A.14 over the last stitch before the marker thread in the side *, work from *-* a total of 2 times. ALL SIZES: Repeat A.13 and A.14 and pattern as before in height until the piece measures (7) 9-13-13-14 (14-17) cm measured along the marker thread in the side, adjust so that the last stitch increased in the side is knitted. Then work * A.15a over the first stitch in A.13, continue with pattern as before until there is 1 stitch left before the marker thread in the side, A.16a over the last stitch before the marker thread *, work from *-* a total of 2 times. When A.15a and A.16a have been worked 1 time in height * work A.13 over the first stitch in A.15a, A.15b over the next 11 stitches, pattern as before until there are 12 stitches left before the marker thread in the side, A.16b over the next 11 stitches, A.14 over the last stitch before the marker thread *, work from *-* a total of 2 times. Continue the pattern like this until the piece measures a total of (14) 16-20-20-21 (24-27) cm, adjust so that the last round is an increase/decrease round. Then work the next round as follows: Cast off the first 4 stitches, work pattern as before until there are 4 stitches left before the marker thread in the side, cast off the next 8 stitches, work pattern as before until there are 4 stitches left on the round, cast off the last 4 stitches = 8 stitches cast off for armhole in each side of the piece = (90) 114-122-138-146 (162-178) stitches = (45) 57-61-69-73 (81-89) stitches on both the front and back pieces. Cut and fasten the strand. Lay the piece to one side and work the sleeves. SLEEVE: The piece is worked in the round with double pointed needles. Cast on (36) 40-40-40-44 (44-48) stitches with double pointed needles size 2.5 mm and BabyMerino. Work rib (= knit 2 /purl 2) for 3 cm. Change to double pointed needles size 3 mm. Then continue with stocking stitch. Insert 1 marker at the beginning of the round When the piece measures 8 cm increase 1 stitch on each side of the marker – read INCREASE TIP. Repeat the increase every (0) 4-3-2-2 (2- 2½) cm a total of (1) 2-4-6-7 (9-10) times = (38) 44-48-52-58 (62-68) stitches. Work until the piece measures (12) 16-20-20-24 (29-35 cm). This measurement gives the sleeve approx. 3-5 cm to fold at the cuff. Cast off 4 stitches on each side of the marker (= 8 stitches in total) = (30) 36-40-44-50 (54-60) stitches. Lay the piece to one side and work 1 more sleeve in the same way. YOKE: Place the sleeves on the same circular needle as the body where stitches were cast off for armholes = (150) 186-202-226-246 (270-298) stitches. Insert 1 marker thread in all transitions between body and sleeves (= 4 marker threads). The piece is now continued back and forth from 2 stitches before mid back (i.e. 2 stitches before stitch with marker) from the right side and decrease to RAGLAN - see description above, as follows: Work 5 stitches GARTER STITCH – see description above, (= band) – see BUTTONHOLE, work pattern as before and decrease to raglan, cast on 5 new stitches at the end of the row (= band). Continue like this. The band is worked in garter stitch to finished length. When the decreases to raglan are finished, there are (79) 83-83-91-99 (103-107) stitches on the needle. Change to circular needle size 2.5 mm. Work 2 ridges AT THE SAME TIME as you decrease on the first row (19) 19-19-23-23 (25-25) stitches evenly on row (do not decrease over the band stitches) = (60) 64-64-68-76 (78-82) stitches. Cast off. BOTTOM EDGE: The piece is worked back and forth. BACK PIECE: Knit up approx. 14-16 stitches along the bottom edge of the back piece (bottom of gusset) with double pointed needles size 2.5 mm. Work 3 ridges. Cast off. FRONT PIECE: Knit up and work as for back piece, but work 3 buttonholes evenly on the 3rd row, by knitting 2 stitches together and making a yarn over; the yarn overs are knitted on the next row to leave holes. Cast off. EDGE AROUND LEGS: The piece is worked back and forth. Knit up approx. (42) 54-58-66-68 (76-84) stitches with circular needle size 2.5 mm, make sure the edge is not tight; knit up more stitches if necessary. Work 3 ridges. Loosely cast off. Work the edge around the other leg in the same way. ASSEMBLY: Sew openings under sleeves. Sew the left band under the right band. Sew 2 buttons onto the left band in the neck and 3 buttons at bottom of body on the back piece. ---------------------------------------------------------- For hat see DROPS number 31-7. For socks see DROPS number 31-8. ---------------------------------------------------------- |
|||||||||||||||||||||||||||||||||||||
Diagram explanations |
|||||||||||||||||||||||||||||||||||||
|
|||||||||||||||||||||||||||||||||||||

|
|||||||||||||||||||||||||||||||||||||
|
|||||||||||||||||||||||||||||||||||||
|
|||||||||||||||||||||||||||||||||||||
|
|||||||||||||||||||||||||||||||||||||

|
|||||||||||||||||||||||||||||||||||||
|
Have you made this or any other of our designs? Tag your pictures in social media with #dropsdesign so we can see them! Do you need help with this pattern?You'll find tutorial videos, a Comments/Questions area and more by visiting the pattern on garnstudio.com. © 1982-2024 DROPS Design A/S. We reserve all rights. This document, including all its sub-sections, has copyrights. Read more about what you can do with our patterns at the bottom of each pattern on our site. |
|||||||||||||||||||||||||||||||||||||


With over 40 years in knitting and crochet design, DROPS Design offers one of the most extensive collections of free patterns on the internet - translated to 17 languages. As of today we count 304 catalogues and 11422 patterns - 11422 of which are translated into English (UK/cm).
We work hard to bring you the best knitting and crochet have to offer, inspiration and advice as well as great quality yarns at incredible prices! Would you like to use our patterns for other than personal use? You can read what you are allowed to do in the Copyright text at the bottom of all our patterns. Happy crafting!
Comments / Questions (24)
I have to admit I am confused. In the instructions for the body, when A.15 a and A.16 a have been worked 1 tỉme in height, how many times A3, A4, A6, A7, A8 have been worked in height? And how many stitches are there when body pattern finished. In the instructions for the size >0,, when A.11 a and A.12 a have been worked 1 tỉme in height, how many times A13, A14 have been worked in height? Thank you!
17.07.2022 - 11:39DROPS Design answered:
Dear Hà Vân, the number of times you will repeat in height will depends on your tension, repeat each diagram from row 1 as soon as it has been finished (the decreases in A.4 are worked on every other round; the cables in A.5b/A.10b are worked on every 4th round, etc) - when all increases are done you should have 106 sts (45 sts for front and back piece + 8 sts cast off on each side for armholes). Happy knitting!
01.08.2022 - 10:33Noget giver ikke mening. Jeg skal slå 22 masker op 4 gange hvilket bliver 88 masker plus front og ryg stykkerne hvilket er 21 masker gange 2 så 42 =130. MEn så skal jeg gøre A.4 Hvilket opgiver 4 masker så kommer vi ned på 126 . Men der står at jeg skal have 130 ( total of 2 times = (106) 130). Så i den runde, skal jeg lave A4 og så total masker er 126 eller bare strik den "slå masker op" runde så jeg har 130 masker?
29.05.2022 - 11:57DROPS Design answered:
Hei Sara. Du legger opp 22 masker, strikker A.3 over de første 9 maskene, A.4 over de neste 3 maskene , A.3 over de siste 9 maskene (du har nå strikket over 21 masker / den ene delen av de 2 delene som var satt samen), legg opp 22 nye masker. Du har nå strikket over 22+21+22 = 65 masker. Så gjør du dette 1 gang til, du har da strikket over 65+65 masker = 130 masker. mvh DROPS Design
30.05.2022 - 10:00Hallo liebes Drops Team, ich habe eine Frage zu der Abnahme bei den Raglanärmeln. Ist es denn korrekt, dass bei den Ärmeln auf beiden Seiten des Markierungsfaden immer nur die Maschen rechts zusammengestrickt werden. Muss nicht auf der einen Seite eine Masche rechts abgehoben werden, die nächste rechts gestrickt und dann die abgehobene drüber gezogen werden? Bin mir gerade unsicher, ob man mit nur rechts zusammenstricken eine schöne Schräge bekommt? oder? Vielen Dank für eine Antwort.
21.02.2022 - 15:42DROPS Design answered:
Liebe Frau Handke, ja stimmt, vor der Markierung muss man 2 Maschen rechts verschränkt stricken - eine Korrektur erfolgt. Danke für den Hinweis. Viel Spaß beim stricken!
21.02.2022 - 16:12I am slightly confused. I have now connected front and back, while knitting A.4 on the same round as I cast on new masks. Should I on the next round do A.5? That would result in increasing extra masks on the round where I do not decrease, is this correct? As I can read later in the instructions, I have to close off for the sleeves on the round where I do not increase/decrease. What have I misunderstood? Thanks for an otherwise nice knitting pattern.
30.12.2021 - 22:53DROPS Design answered:
Dear Mini, after you have cast on the new stitches and work the first row in A.3/A.4, work one more round knitting the new stitches and working the 2nd row in A.3/A.4, then start with A.5, A.6, A.7. Rounds starts in one side of the piece - A.4 is on mid back and mid front, just as before. Happy knitting!
03.01.2022 - 10:18Kysymykseni koskee raglankavennuksia, kun etukappaleessa kavennetaan kaksi silmukkaa keskisilmukan molemmin puolin = työstä kaventui 4 silmukkaa. Jos työssä nostetaan neulomatta 3 silmukkaa yhden neulotun silmukan yli, eikö silloin myös kavennu 3 silmukkaa? Selventäisittekö, miten kavennus kuuluisi tehdä niin, että saisin neljän silmukan kavennuksen täsmäämään symmetrisesti?
12.09.2021 - 20:45Når jeg prøver og skrive ut denne oppskriften fra mobilen blir diagramforklaring og alle diagrammer borte. Håper dette er noe dere kan rette på.
20.03.2021 - 11:43DROPS Design answered:
Hei Vera. Husk å trykke på "Skriv ut" knappen og velg oppskrift, så skal det fungere. Om ikke, må du sjekke dine innstillinger. mvh DROPS design
22.03.2021 - 15:46I am already confused at diagram A.1.. when the pattern says to start with 5 stitches, and A.1 shows you to yarn over twice in the first row, I get 7 stitches in total and not 9 as stated in the pattern - what am I doing wrong?
05.09.2020 - 10:33DROPS Design answered:
Dear Sarah, you are right that after first row you will get 7 sts, but after WHOLE A.1 (in height, = 3 rows) you will get 9 sts as stated in pattern. Happy knitting!
05.09.2020 - 19:56Det kan betale sig at sove på problemet. Nu har jeg fundet ud af opskriften og er godt i gang nu.
13.04.2020 - 21:15Når jeg har strikket forstykke og bagside, A1 en gang i højden og sat disse to sammen og strikket A2 en gang i højden, er der 21 masker på pinden, men jeg har kun strikket ialt 6 pinde i højden, her mangler et eller andet, der skal da være plads til benene inden ryg og forstykke strikkes sammen?
12.04.2020 - 21:15DROPS Design answered:
Hei Sigrun. Så bra at du fant ut av det. Vi skal prøve å lage en video på begynnelsen av denne body`n. Kan være flere som stusser litt og da er det fint med en video. mvh DROPS design
27.04.2020 - 13:29Made the socks love the design. Do you have this romper pattern as well as the hat pattern for this set in written instruction rather than by diagram? Thanks.
16.03.2020 - 15:14DROPS Design answered:
Dear Marie, there are only diagrams to this pattern, but this could help you to understand how to work diagrams. Happy knitting!
16.03.2020 - 15:53