
Popular categories
Looking for a yarn?


|
||||||||||||||||||||||||||||
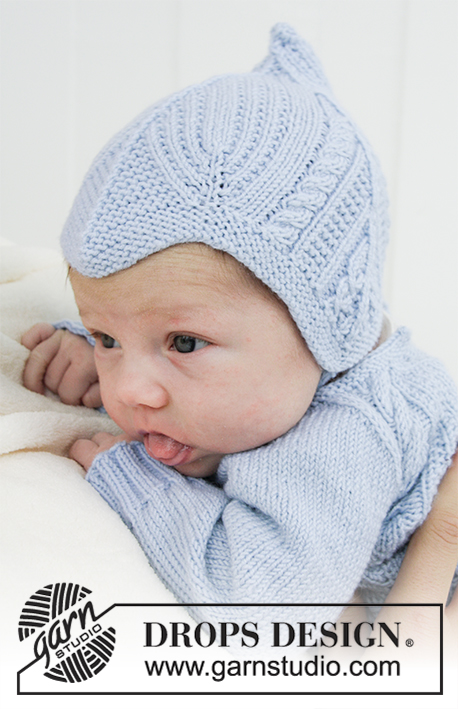
Celestina Hat |
||||||||||||||||||||||||||||
 |
 |
|||||||||||||||||||||||||||
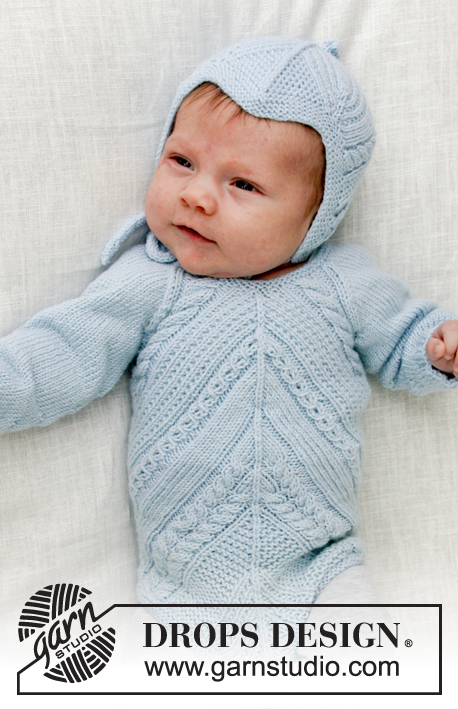
Knitted baby hat with cables and garter stitch. Sizes 1 month - 4 years. The piece is worked in DROPS BabyMerino.
DROPS Baby 31-7 |
||||||||||||||||||||||||||||
|
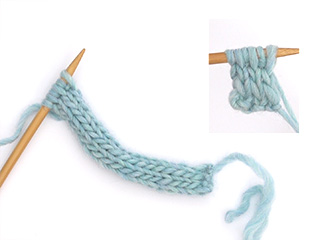
INFORMATION FOR THE PATTERN: RIDGE/GARTER STITCH (worked back and forth): 1 ridge = Knit 2 rows. PATTERN: See diagrams A.1 to A.5. Choose diagram for your size. ---------------------------------------------------------- HAT: The piece is worked back and forth from mid back and is sewn together mid back to finish. Cast on 123-129-135 (141-147) stitches (including 1 edge stitch in each side) with needle size 2.5 mm and BabyMerino. Work 4 RIDGES – see description above. Then work the next row from right side as follows: Work 1 edge stitch in garter stitch, knit 1, A.1 (= 1 stitch) (= 1 stitch increased), * A.2 over the next 21-22-23 (24-25) stitches, A.3 over the next 3 stitches (= 2 stitches decreased), A.4 over the next 21-22-23 (24-25) stitches, A.5 over the next 2 stitches (= 1 stitch increased) *, A.1 over the next stitch, 9-10-11 (12-13) stitches in garter stitch, A.3 over the next 3 stitches (= 2 stitches decreased) (= mid front of hat), 9-10-11 (12-13) stitches in garter stitch, A.5 over the next 2 stitches, A.1 over the next stitch (= 1 stitch increased), work from *-* 1 more time, finish with 1 edge stitch in garter stitch. Then work next row from wrong side as follows: Work 1 edge stitch in garter stitch, *A.5 over 3 stitches, A.4 over 20-21-22 (23-24) stitches (i.e. skip last square in diagram, this stich in A.4 has been decreased in A.3), A.3 over 3 stitches, skip 1st square in diagram A.2, and work the remaining stitches in A.2 over 20-21-22 (23-24) stitches *, A.1 over 2 stitches, A.5 over 3 stitches, 8-9-10 (11-12) stitches in garter stitch (i.e. the stitches in garter stitch are decreased in A.3), A.3 over 3 stitches, 8-9-10 (11-12) stitches in garter stitch (i.e. one stitch in garter stitch has been decreased in A.3), A.1 over 2 stitches, work from *-* 1 more time, A.1 over 2 stitches, purl 1 stitch and finish with 1 stitch in garter stitch. I.e. There will be 1 stitch less in each A.2 and A.4 (i.e. skip 1 square in the diagram for every 2nd row of diagram A.2 and A.4) and 1 stitch less in garter stitch in mid front on each side of A.3 on every 2nd row because of the decrease in A.3. Continue the pattern like this, i.e. decrease 1 stitch on each side of each A.3 on every row from the right side (= 6 stitches decreased), and increase 1 stitch in each of A.1 and A.5 (= 6 stitches increased). In other words, the number of stitches stays the same, you increase and decrease the same number of stitches, but the ridges mid front and the patterns in A.2 and A.4 are will disappear. Continue with knit over knit, purl over purl, garter stitch over garter stitch and cable over cable. REMEMBER THE KNITTING TENSION! When A.1 and A.5 have been worked 1 time in height, continue with knit over knit and garter stitch over garter stitch over these stitches, i.e. do not increase any more. When you do not have enough stitches for the cables, do not work cables; the remaining stitches here are worked in stocking stitch Continue the pattern as before over the remaining stitches, i.e. decrease 6 stitches every 2nd round (= 2 stitches by each A.3), until there are 21 stitches left on the needle. The piece measures approx. 16-16-17 (17-18) cm from the bottom tip of the first and last A.3 (= ear flaps). The next row is worked as follows from the right side: Knit 1, knit 2 together, 15 stitches pattern as before, knit 2 together, knit 1 = 19 stitches. Decrease like this in each side every row (from the wrong side purl together the 2 stitches before and after the edge stitches) until there are 5 stitches left on the needle. Cut the yarn and pull the end through the remaining stitches and tighten. ASSEMBLY: Sew the hat together mid back inside the 1 edge stitch. The middle tip of the 3 whole tips (= A.3) on the cast-on edge goes down onto the forehead mid front. CORD: Cast on 4 stitches with needle size 2.5 mm. Work as follows: * Knit 1, move the strand to front of piece (towards you), slip 1 stitch as if to purl, move the strand to back of piece again (away from you) *, work from *-* 1 more time and then continue in the same way on all rows to finished length. You have now worked a round cord. Cast off when the cord measures approx. 20-22-24 (26-28) cm. Work 1 more cord in the same way. Sew the cords to the bottom tip of each ear-flap in each side. ---------------------------------------------------------- For body see DROPS number 31-06. ---------------------------------------------------------- |
||||||||||||||||||||||||||||
Diagram explanations |
||||||||||||||||||||||||||||
|
||||||||||||||||||||||||||||

|
||||||||||||||||||||||||||||
|
Have you made this or any other of our designs? Tag your pictures in social media with #dropsdesign so we can see them! Do you need help with this pattern?You'll find tutorial videos, a Comments/Questions area and more by visiting the pattern on garnstudio.com. © 1982-2024 DROPS Design A/S. We reserve all rights. This document, including all its sub-sections, has copyrights. Read more about what you can do with our patterns at the bottom of each pattern on our site. |
||||||||||||||||||||||||||||


With over 40 years in knitting and crochet design, DROPS Design offers one of the most extensive collections of free patterns on the internet - translated to 17 languages. As of today we count 304 catalogues and 11422 patterns - 11422 of which are translated into English (UK/cm).
We work hard to bring you the best knitting and crochet have to offer, inspiration and advice as well as great quality yarns at incredible prices! Would you like to use our patterns for other than personal use? You can read what you are allowed to do in the Copyright text at the bottom of all our patterns. Happy crafting!
Comments / Questions (66)
Oka nu forstod jeg selve opskriftwn, men a1 og a4 kan jeg ikke få til passe med at mine omslag skal strikkes drejet ret for der kommer jeg til en vrang måske ved omslag, jeg har været inde og læse jeres diagram at ret højde til venstre, og vrang venstre til højre men uanset hvad vil jeg ramme et omslag med en vrang maske skal jeg så strikke drejet vrang? Men nogen gange rammer jeg med en ret måske så skal den strikkes dr. Ret?
21.02.2020 - 15:29DROPS Design answered:
Hej igen, omslaget skal strikkes drejet, men i maskerne du er kommet til ifølge diagrammet. Prøv at strikke en lille prøve af A.4 og A.5 først, så du forstår mønsteret :)
24.02.2020 - 16:36Hej igen ang mit tidligere spørgsmål, ang. Masker der forsvinder på hver 2 pind dvs, retsiden, skal jeg så selv hver gang regne en maske fra begge diagrammer når jeg har sprunget de masker over på hver anden pind, Fra vrang siden?
18.02.2020 - 22:20DROPS Design answered:
Hej Marie-Louise, ja du kan gøre det at du sætter et lille mærke imellem hver diagram, da er det let at se hvilke masker som "forsvinder". God fornøjelse!
19.02.2020 - 10:36Hov et spørgsmål mere når man når til række 3 på retsiden så står der strik 1 kantmaske, 1 ret og derefter begynder mønster, skal jeg stadig på alle ret pinde strikke en kantmaske og 1 ret måske og derefter mønster? Eller var det kun i 1 række jeg skulle teikke en ret måske efter kantmaske?
17.02.2020 - 06:36DROPS Design answered:
Hej igen, du strikker yderste maske i hver side i retstrik på alle pinde. God fornøjelse!
18.02.2020 - 14:05Giver ingen mening dette mønster her har strikket 2 pinde og skal på ret siden igen men nu der jo kun 20 masker i a2 og a4 skal jeg så bare stille over de 20 masker? Og slette den jeg hoppede over på vrang siden?
17.02.2020 - 06:22DROPS Design answered:
Hej Marie-Louise, ja det stemmer, når du tager masker ind ifølge A.3 forsvinder de fra A.4 i den ene side og fra A.2 i den anden side. God fornøjelse!
18.02.2020 - 14:04Hej, ett par frågor. 1) Ska man sticka från vänster till höger på mönstret på avigsidan? 2) Betyder en rad på mönstret det du ska hålla dig till på ett varv? Det vill säga på A3 ska man varvet efter de 8 rätstickade varven i början, minska 2 maskor på A3 men men på nästa varv (avigsidan) sticka 3 aviga maskor? Vad menar ni då här med " A.3 över 3 maskor, 8-9-10 (11-12) maskor rätstickning (dvs de rätstickade maskorna minskas i A.3)"?
28.12.2019 - 10:57DROPS Design answered:
Hej Ja på avigsidan stickar du diagrammen från vänster till höger. De olika varven är förklarade i mönstret så det första varvet efter de rätstickade 8 varven stickar du 1 kantmaska i rätstickning, 1 rm, A.1 (=1 m) osv. Om du bara följer det som står beskrivet i mönstret så blir det riktigt. Lycka till!
29.01.2020 - 10:57Hej! Angående min tidigare fråga den 12 november: symbolen för A3-mönstret (dvs triangeln) syns inte för mig. Istället är det bara som en enda stor vit ruta. Vet inte om det bara är jag som har det problemet, men tänkte att ni kanske vill veta att symbolen inte syns för alla.
13.11.2019 - 19:41Hej! Jag förstår inte A3 eftersom motsvarande symbol med en triangel inte finns med i första varvet. I texten står det att jag ska minska två maskor över tre maskor, men den enda symbolbeskrivningen jag kan hitta är den med en ”halv” triangel, där 1 maska minskas över 3 maskor. Exakt hur ska jag sticka A3?
12.11.2019 - 20:42DROPS Design answered:
Hej. Symbolförklaringen till symbolen i A.3 har nu förtydligats. Du ska lyfta 2 maskor över på höger sticka som om de skulle stickas räta, sticka 1 rätmaska och sedan dra de 2 lyfta maskorna över rätmaskan (= 2 maskor minskade). Du hittar en video på hur detta ska göras här. Lycka till!
13.11.2019 - 08:12Ska man minska med 2 maskor på Alla A. 3 på ALLA varv? Ska man hoppa över 1 maska på diagram A. 2 och A. 4 på ALLA varv eller bara AVIGA varv?
24.10.2019 - 21:14DROPS Design answered:
Hei Johanna. Nei, du minsker på annenhver rad. På 1. rad i A.3 minsker du, på 2 rad i A.3 strikkes det vrang fra vrangen. I diagram A.2 og A.4 er det en sort firkant (4. pinne og det strikkes fra vrangen), det er ingen maske fordi den ble felt tidligere/forrige rad. Alle diagram viser alle pinner som strikkes fra retten (les diagrammet fra høyre til venstre) og alle diagram viser alle pinner fra vrangen (les diagrammene fra venstre mot høyre). God Fornøyelse!
28.10.2019 - 10:02Bonjour, J'ai un petit doute j'ai tricoté le premier rang du diagramme de droite a gauche, du coup est ce que dois tricoter le deuxième rang en partant de la gauche ? Moi j'ai tricoté le deuxième en partant de la droite mais je suis en train de me dire que c'est bizarre 😅 merci beaucoup
30.09.2019 - 11:35DROPS Design answered:
Bonjour Sonia, tout à fait, les rangs sur l'endroit se lisent de droite à gauche et les rangs sur l'envers de gauche à droite - vous trouverez ici plus d'infos sur les diagrammes. Bon tricot!
30.09.2019 - 11:49Je vous remercie je me remets au tricot l'explication était facile à déchiffrer merci pour votre rapidité
11.09.2019 - 11:59