
Popular categories
Looking for a yarn?


|
||||||||||||||||||||||||||||
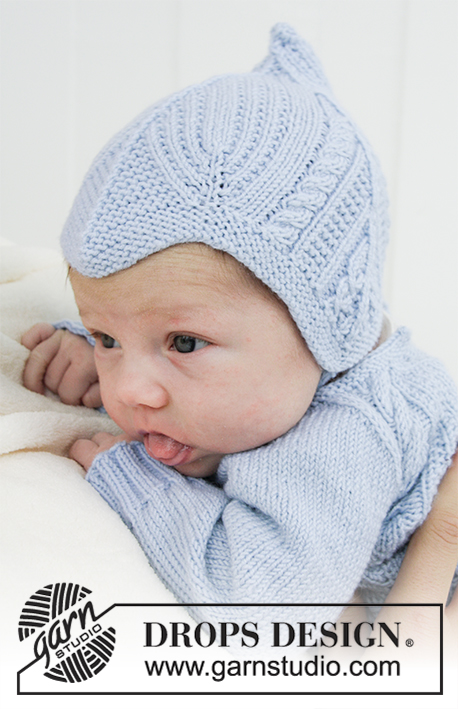
Celestina Hat |
||||||||||||||||||||||||||||
 |
 |
|||||||||||||||||||||||||||
Knitted baby hat with cables and garter stitch. Sizes 1 month - 4 years. The piece is worked in DROPS BabyMerino.
DROPS Baby 31-7 |
||||||||||||||||||||||||||||
|
INFORMATION FOR THE PATTERN: RIDGE/GARTER STITCH (worked back and forth): 1 ridge = Knit 2 rows. PATTERN: See diagrams A.1 to A.5. Choose diagram for your size. ---------------------------------------------------------- HAT: The piece is worked back and forth from mid back and is sewn together mid back to finish. Cast on 123-129-135 (141-147) stitches (including 1 edge stitch in each side) with needle size 2.5 mm and BabyMerino. Work 4 RIDGES – see description above. Then work the next row from right side as follows: Work 1 edge stitch in garter stitch, knit 1, A.1 (= 1 stitch) (= 1 stitch increased), * A.2 over the next 21-22-23 (24-25) stitches, A.3 over the next 3 stitches (= 2 stitches decreased), A.4 over the next 21-22-23 (24-25) stitches, A.5 over the next 2 stitches (= 1 stitch increased) *, A.1 over the next stitch, 9-10-11 (12-13) stitches in garter stitch, A.3 over the next 3 stitches (= 2 stitches decreased) (= mid front of hat), 9-10-11 (12-13) stitches in garter stitch, A.5 over the next 2 stitches, A.1 over the next stitch (= 1 stitch increased), work from *-* 1 more time, finish with 1 edge stitch in garter stitch. Then work next row from wrong side as follows: Work 1 edge stitch in garter stitch, *A.5 over 3 stitches, A.4 over 20-21-22 (23-24) stitches (i.e. skip last square in diagram, this stich in A.4 has been decreased in A.3), A.3 over 3 stitches, skip 1st square in diagram A.2, and work the remaining stitches in A.2 over 20-21-22 (23-24) stitches *, A.1 over 2 stitches, A.5 over 3 stitches, 8-9-10 (11-12) stitches in garter stitch (i.e. the stitches in garter stitch are decreased in A.3), A.3 over 3 stitches, 8-9-10 (11-12) stitches in garter stitch (i.e. one stitch in garter stitch has been decreased in A.3), A.1 over 2 stitches, work from *-* 1 more time, A.1 over 2 stitches, purl 1 stitch and finish with 1 stitch in garter stitch. I.e. There will be 1 stitch less in each A.2 and A.4 (i.e. skip 1 square in the diagram for every 2nd row of diagram A.2 and A.4) and 1 stitch less in garter stitch in mid front on each side of A.3 on every 2nd row because of the decrease in A.3. Continue the pattern like this, i.e. decrease 1 stitch on each side of each A.3 on every row from the right side (= 6 stitches decreased), and increase 1 stitch in each of A.1 and A.5 (= 6 stitches increased). In other words, the number of stitches stays the same, you increase and decrease the same number of stitches, but the ridges mid front and the patterns in A.2 and A.4 are will disappear. Continue with knit over knit, purl over purl, garter stitch over garter stitch and cable over cable. REMEMBER THE KNITTING TENSION! When A.1 and A.5 have been worked 1 time in height, continue with knit over knit and garter stitch over garter stitch over these stitches, i.e. do not increase any more. When you do not have enough stitches for the cables, do not work cables; the remaining stitches here are worked in stocking stitch Continue the pattern as before over the remaining stitches, i.e. decrease 6 stitches every 2nd round (= 2 stitches by each A.3), until there are 21 stitches left on the needle. The piece measures approx. 16-16-17 (17-18) cm from the bottom tip of the first and last A.3 (= ear flaps). The next row is worked as follows from the right side: Knit 1, knit 2 together, 15 stitches pattern as before, knit 2 together, knit 1 = 19 stitches. Decrease like this in each side every row (from the wrong side purl together the 2 stitches before and after the edge stitches) until there are 5 stitches left on the needle. Cut the yarn and pull the end through the remaining stitches and tighten. ASSEMBLY: Sew the hat together mid back inside the 1 edge stitch. The middle tip of the 3 whole tips (= A.3) on the cast-on edge goes down onto the forehead mid front. CORD: Cast on 4 stitches with needle size 2.5 mm. Work as follows: * Knit 1, move the strand to front of piece (towards you), slip 1 stitch as if to purl, move the strand to back of piece again (away from you) *, work from *-* 1 more time and then continue in the same way on all rows to finished length. You have now worked a round cord. Cast off when the cord measures approx. 20-22-24 (26-28) cm. Work 1 more cord in the same way. Sew the cords to the bottom tip of each ear-flap in each side. ---------------------------------------------------------- For body see DROPS number 31-06. ---------------------------------------------------------- |
||||||||||||||||||||||||||||
Diagram explanations |
||||||||||||||||||||||||||||
|
||||||||||||||||||||||||||||

|
||||||||||||||||||||||||||||
|
Have you made this or any other of our designs? Tag your pictures in social media with #dropsdesign so we can see them! Do you need help with this pattern?You'll find tutorial videos, a Comments/Questions area and more by visiting the pattern on garnstudio.com. © 1982-2024 DROPS Design A/S. We reserve all rights. This document, including all its sub-sections, has copyrights. Read more about what you can do with our patterns at the bottom of each pattern on our site. |
||||||||||||||||||||||||||||


With over 40 years in knitting and crochet design, DROPS Design offers one of the most extensive collections of free patterns on the internet - translated to 17 languages. As of today we count 304 catalogues and 11422 patterns - 11422 of which are translated into English (UK/cm).
We work hard to bring you the best knitting and crochet have to offer, inspiration and advice as well as great quality yarns at incredible prices! Would you like to use our patterns for other than personal use? You can read what you are allowed to do in the Copyright text at the bottom of all our patterns. Happy crafting!
Comments / Questions (66)
Når jeg prøver og skrive ut denne oppskriften fra mobilen blir diagramforklaring og alle diagrammer borte. Håper dette er noe dere kan rette på.
20.03.2021 - 11:44DROPS Design answered:
Hei Vera. Husk å trykke på "Skriv ut" knappen og velg oppskrift, så skal det fungere. Om ikke, må du sjekke dine innstillinger. mvh DROPS design
22.03.2021 - 15:46Bonjour, j'avoue que je ne comprends pas bien comment tricoter la suite à partir du tour 3 (= le 3ème tour après les 4 côtes mousses). Dois-je réappliquer exactement la même chose que dans les deux premiers tours ? Dans ce cas, comment A1 et A5 peuvent-ils augmenter tout en gardant le même nombre de mailles au total ? Merci d'avance pour votre explication.
16.01.2021 - 17:36DROPS Design answered:
Bonjour Mme Miko, vous tricotez de la même façon les diagrammes, mais vous allez diminuer avec A.3 (= tricotez par ex. la dernière maille de A.2 + la maille de A.3 + la première maille de A.4) et augmentez dans les diagrammes comme indiqué. Vous conservez ainsi le même nombre de mailles. Bon tricot!
18.01.2021 - 08:43Bonjour, je voudrais m'assurer que je comprends bien le diagramme A3 : "glisser 2 mailles comme pour les tricoter ensemble à l'endroit, tricoter 1 maille endroit, passer la maille glissée par-dessus la maille tricotée." Il s'agit bien de glisser DEUX mailles, d'en tricoter une à l'endroit et puis de repasser UNE seule, des deux mailles précédemment glissées, au-dessus celle que l'on a tricoté à l'endroit ? Merci d'avance.
12.01.2021 - 16:32DROPS Design answered:
Bonjour Mme Miko, la légende du dernier symbole a été corrigée, on doit bien repasser les 2 mailles glissées par-dessus la maille tricotée, autrement dit, quand on tricote A.3, on diminue 1 maille du diagramme avant A.3 (la première des 2 mailles glissées) et 1 maille du diagramme après A.3 (la maille tricotée). Raison pour laquelle le nombre de mailles avant/après A.3 diminue. Bon tricot!
12.01.2021 - 17:00Wenn dort steht " 1 Masche wie zum Rechtsstricken abheben, 2 Maschen rechts, die abgehobene Masche überziehen" dann nehme ich damit doch eine Masche ab. Das passiert in A2 und A4. Laut Text soll doch aber die Gesamtmaschenzahl gleich bleiben. Habe ich etwas falsch verstanden?
24.12.2020 - 01:19DROPS Design answered:
Liebe Frau Knobelsdorf-Mühl, ja genau, aber diese "abgenommene" Masche wird bei der nächsten Reihe sofort "zugenommen" (= siehe 4. Reihe in A.2 und A.4) - diese Zöpfe werden über 3 Maschen gestrickt - siehe hier. Viel Spaß beim stricken!
04.01.2021 - 07:51Liebes Drops-Team, ich bin nun in der 3. Reihe des eigentlichen Musters. Also in der 2. Hinreihe. Muss ich nun in A2 und A4 auch ein Kästchen überspringen, wie ich es in der Rückreihe getan habe? Und auch jeweils bei den kraus rechts gestrickten Maschen eine weniger stricken? Wenn ich das nicht tue, sondern mich an die Maschenangaben der 1. Hinreihe halte, werden es insgesamt mehr Maschen, da A5 ja jetzt schon aus 3 Naschen besteht. Liebe Grüße, Simone
09.12.2020 - 11:02DROPS Design answered:
Liebe Simone, ja genau, wenn Sie in A.3 abnehmen, werden Sie die letzte Masche A.2 + die Abnahme von der vorrigen Hinreihe + die erste Masche A.4 zusammenstricken; und immer so weiterstricken, dh A.3 wird die andere Diagramme "essen" und eine Masche wird jeweils beidseitig von A.3 abgenommen (und weniger im Muster/krausrechts) gestrickt. Die Zunahmen in A.1/A.5 nicht vergessen, so bleibe die Maschenanzahl immer dieselbe. (= 6 Maschen mit A.3 abegnommen und 6 Maschen mit A.1/A.5 zugenommen). Viel Spaß beim stricken!
09.12.2020 - 15:51På varv 2 från avigsidan så stämmer det inte efter kantmaskan och A5, på början av A4, ser inte ut att stämma, har tolkat mönstret att läsa från höger till vänster på rätsidan och läst från vänster till höger på avigsidan. Har jag förstått det fel? När jag tittar på jag stickat så lägger sig inte maskorna rätt över varandra, så jag tolkar det som att det inte kommer stämma i slutet heller. Vad gör jag fel?
24.11.2020 - 12:21DROPS Design answered:
Hei PiF. Ja, du leser diagrammet fra høyre til venstre fra retten, og fra venstre til høyre fra vrangen. I forklaringen til 1. rad fra vrangen er det forklart i teksten at noen masker er felt bort og man skal hopp over noen ruter i diagrammene. Er dette blitt fulgt? mvh DROPS design
30.11.2020 - 11:09Stämmer detta mönster? Jag och dotter har försökt sticka detta i några dagar nu men vi får inte ihop det! Nåt är fel. Kan man inte skriva om mönstret med enbart text och ta bort diagrammet helt.
23.11.2020 - 11:59DROPS Design answered:
Hei Pif. Skriv gjerne ned hva dere har problemer med, så skal vi prøve å hjelpe dere så godt vi kan. Opplys også hvilken str dere strikker. Man kan ikke fjerne diagrammet. mvh DROPS design
24.11.2020 - 12:04Hei! Jeg strikker i str 6/9mnd og etter første rad mønster står jeg med 4 masker igjen. Når jeg legger sammen antall masker i mønsteret blir det bare 125 masker strikket. Hva gjør jeg med de resterende 4 av 129 masker?
29.07.2020 - 11:42DROPS Design answered:
Hej Kirsten, det lyder til at du ikke fået alle udtagninger med ifølge diagrammerne. Prøv at sætte et mærke imellem hver diagram, så du er sikker på at alle masker i diagrammerne strikkes. God fornøjelse!
05.08.2020 - 15:44Efter billedet at dømme ser det ud som om, opskriften er forkert. Skal det ikke spejlvendes, således at snoningerne er øverst på hovedet i begge sider ????
12.04.2020 - 08:09DROPS Design answered:
Hej Kirsten, opskriften stemmer, sørg for at følge den nøje i den størrelse du strikker. God fornøjelse!
24.04.2020 - 09:47Hov mente a5 ikke a4
21.02.2020 - 15:31