
Popular categories
Looking for a yarn?


|
||||||||||||||||
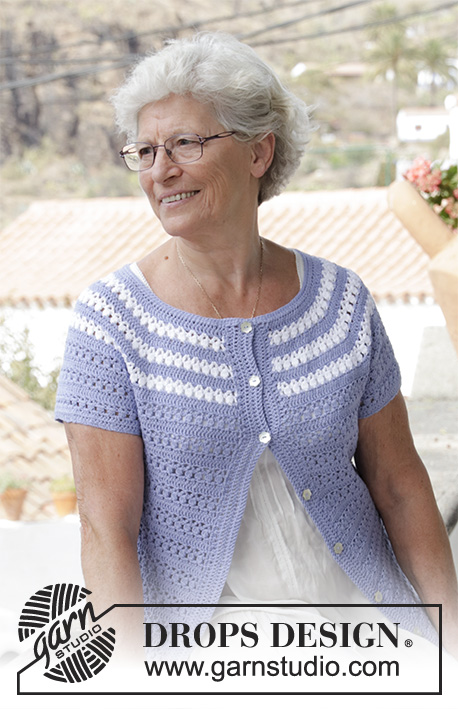
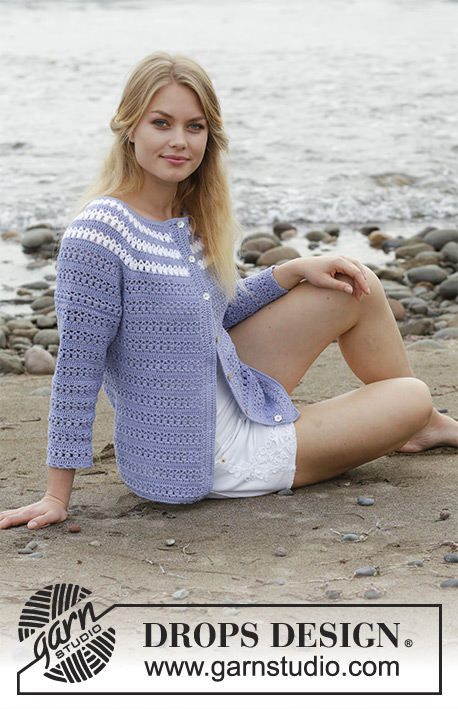
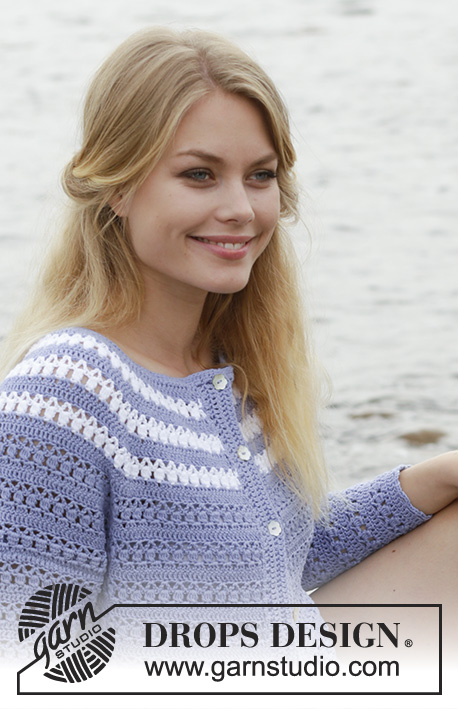
Meet Me in Provence Cardigan |
||||||||||||||||
 |
 |
|||||||||||||||
Jacket with lace pattern and stripes, crocheted top down. Size: S - XXXL Piece is crocheted in DROPS Safran.
DROPS 186-32 |
||||||||||||||||
|
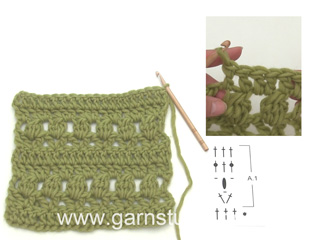
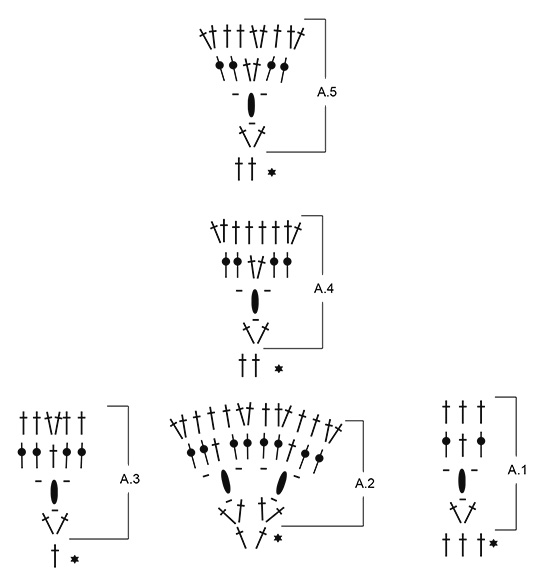
INFORMATION FOR PATTERN: PATTERN: See diagrams A.1 to A.5. CROCHET INFO: Begin every treble crochet row with 3 chain stitches (replaces first treble crochet). When sleeves are worked in the round, begin and end every round in A.1 as follows: Begin 1st and 2nd round in A.1 with 3 chain stitches (do not replace first treble crochet) and finish with 1 slip stitch in 3rd chain stitch at beginning of round Begin 3rd and 4th round in A.1 with 3 chain stitches (replace first treble crochet) and finish with 1 slip stitch in 3rd chain stitch at beginning of round STRIPES: In the first 3 repetitions of the diagrams vertically work 1st and 2nd row with white, work the remaining rows in light blue purple - read COLOUR CHANGE. Then work the remaining repetitions of A.1 in light blue purple. COLOUR CHANGE: When changing colour work as follows: Work last treble crochet with first colour but wait with last pull through, switch to next colour and work last pull through, then continue working. INCREASE/DECREASE TIP: To calculate how to increase/decrease evenly, use the total number of stitches to be increased/decreased over (e.g. 24 stitches) and divide stitches by number of increases/decreases to be done (e.g. 3) = 8. To increase evenly in this example work 2 treble crochets in every 8th treble crochet. To decrease evenly in this example work every 7th and 8th treble crochet together. Decrease 1 treble crochet by working 2 treble crochets together as follows: Work 1 treble crochet in/around first stitch, but wait with last pull through, work 1 treble crochet in/around next treble crochet/stitch, but on last pull through pull yarn through all 3 loops on hook. ---------------------------------------------------------- JACKET: Yoke and body are worked back and forth from mid front, top down. Sleeves are worked in the round. Band and neck edge are worked back and forth at the end. YOKE: Work 144-154-158-168-168-175 chain stitches (including 3 chain stitches to turn with) on hook size 3.5 mm with light blue purple. Work 1 treble crochet in 4th chain stitch from hook (= 2 treble crochets) - read CROCHET INFO, 1 treble crochet in each of the next 0-3-0-3-3-3 chain stitches, * skip 1 chain stitch, 1 treble crochet in each of the next 6 chain stitches *, repeat from *-* = 122-131-134-143-143-149 treble crochets. Work first row from wrong side as follows: Work 1 treble crochet in each of the first 18-21-21-24-24-24 treble crochets, * work 2 treble crochets in next treble crochet, 1 treble crochet in next treble crochet *, repeat from *-* over the next 22 treble crochets (= 11 treble crochets increased), 1 treble crochet in each of the next 42-45-48-51-51-57 treble crochets, repeat from *-* over the next 22 treble crochets (= 11 treble crochets increased), 1 treble crochet in each of the last 18-21-21-24-24-24 treble crochets = 144-153-156-165-165-171 treble crochets. Work next row as follows from right side - read STRIPES: Work 1 treble crochet in first treble crochet, A.1 over 21-24-24-27-27-27 treble crochets (= 7-8-8-9-9-9 repetitions of 3 treble crochets) (= left front piece), A.2 (= 2 treble crochets), A.1 over 12 treble crochets (= 4 repetitions), A.3 over 1 treble crochet, A.1 over 12 treble crochets (= 4 repetitions), A.2 over 2 treble crochets (= left sleeve), A.1 over 42-45-48-51-51-57 treble crochets (= 14-15-16-17-17-19 repetitions) (= back piece), A.2 over 2 treble crochets, A.1 over 12 treble crochets (= 4 repetitions), A.3 over 1 treble crochet, A.1 over 12 treble crochets (= 4 repetitions), A.2 over 2 treble crochets (= right sleeve), finish with A.1 over 21-24-24-27-27-27 treble crochets (= 7-8-8-9-9-9 repetitions) and 1 treble crochet in last treble crochet (= right front piece). REMEMBER THE CROCHET TENSION! On last row in A.1 to A.3 increase 0-0-3-3-3-0 treble crochets evenly over each of the front pieces – read INCREASE/DECREASE TIP and 0-0-6-0-12-3 treble crochets evenly over back piece (= 0-0-12-6-18-3 treble crochets increased in total). When A.1 to A.3 have been worked 1 time vertically, there are 202-211-226-229-241-232 treble crochets on last row. Piece measures approx. 5 cm. Continue to work 1 treble crochet in first and last treble crochet and A.1 as before. Repeat diagram A.2 over the 2 middle treble crochets in each repetition over A.2 0-0-1-1-2-3 more times (i.e. A.2 is worked 1-1-2-2-3-4 times in total vertically), over the remaining stitches work A.1 (i.e. work 2 repetitions of A.1 over every A.3 on sleeves and work 2 repetitions of A.1 on each side of A.2). When A.2 is done there are 202-211-274-277-337-376 treble crochets on last row. Piece measures approx. 5-5-8-8-12-15 cm. Now work A.4 over the middle 2 treble crochets in every repetition of A.2 2-3-2-3-2-2 times in total vertically, work the remaining stitches in A.1. I.e. over every A.2 work as follows: Work 2 repetitions of A.1 (= 6 treble crochets), A.4 (= 2 treble crochets) and 2 repetitions of A.1 (= 6 treble crochets). Every time A.4 is repeated work 16 repetitions more of A.1. When A.4 is done there are 250-283-322-349-385-424 treble crochets on last row. Piece measures approx. 12-15-15-18-19-22 cm. Now work A.5 over the middle 2 treble crochets in every repetition of A.4 1 time in total vertically, work the remaining stitches in A.1. I.e. over every A.4 work as follows: Work 1 repetition of A.1 (= 3 stitches), A.5 (= 2 stitches) and 1 repetition of A.1 (= 3 stitches). When A.5 is done there are 278-311-350-377-413-452 treble crochets on last row. Piece measures approx. 15-18-18-21-22-25 cm. Now work 1 treble crochet in first and last treble crochet and A.1 over the remaining stitches (= 92-103-116-125-137-150 repetitions of A.1) until piece measures 17-19-20-22-24-26 cm. Now work body and sleeves as follows: Work 1 treble crochet in first treble crochet, work pattern as before over the next 39-45-48-54-60-66 stitches (= 13-15-16-18-20-22 repetitions of A.1 = front piece), skip the next 57-66-75-81-84-90 treble crochets (= 19-22-25-27-28-30 repetitions of A.1 = sleeve), work 12 chain stitches under sleeve, work pattern as before over the next 84-87-102-105-123-138 stitches (= 28-29-34-35-41-46 repetitions of A.1 = back piece), skip the next 57-66-75-81-84-90 stitches (= 19-22-25-27-28-30 repetitions A.1 = sleeve), work 12 chain stitches under sleeve, work pattern as before over the next 39-45-48-54-60-66 stitches (= 13-15-16-18-20-22 repetitions of A.1 = front piece), finish with 1 treble crochet in last treble crochet. BODY: = 188-203-224-239-269-296 stitches. Work 1 treble crochet in first treble crochet, work A.1 as before until 1 treble crochet remains (= 62-67-74-79-89-98 repetitions), finish with 1 treble crochet in last treble crochet. When piece measures 1 cm from where body was divided from sleeves, decrease treble crochets evenly every time A.1 is repeated vertically, decrease on 3rd row in A.1 as follows: Decrease 6 treble crochets 3-3-3-2-2-2 times in total and 3 treble crochets 0-0-1-0-1-1 time in total = 170-185-203-227-254-281 stitches. Now repeat A.1 56-61-67-75-84-93 times in width. When piece measures 14 cm from where sleeve was divided from body, increase on every 3rd row in A.1 as follows: Increase 15 treble crochets evenly 0-0-1-1-0-0 times in total, increase 9 treble crochets evenly 3-3-3-2-4-3 times in total, increase 6 treble crochets evenly 1-1-0-1-0-1 time in total = 203-218-245-266-290-314 stitches. Work the increased stitches in A.1. Repeat A.1 67-72-81-88-96-104 times in total in width. Work A.1 until piece measures 34-34-35-35-35-35 cm from where body was divided from sleeves (51-53-55-57-59-61 cm from neck edge), finish after 1 row with treble crochets. Fasten off. SLEEVE: Sleeve is worked in the round, top down. Beg by working mid under sleeve as follows: Work 1 double crochet in the 7th chain stitch of the 12 chain stitches worked under sleeve on yoke, 3 chains (= 1st treble), work 1 treble crochet in each of the next 5 chain stitches, work A.1 as before over the 57-66-75-81-84-90 stitches, finish with 1 treble crochet in each of the last 6 chain stitches under sleeve = 69-78-87-93-96-102 stitches. Continue with A.1 in the round (= 23-26-29-31-32-34 times in width). When sleeve measures 1 cm, decrease treble crochets evenly every time A.1 is repeated vertically, decrease on 3rd round in A.1 as follows: Decrease 6 treble crochets 0-1-3-5-6-6 times in total and 3 treble crochets 5-6-4-2-0-0 times in total = 54-54-57-57-60-66 treble crochets. Repeat A.1 18-18-19-19-20-22 times in total in width. Work A.1 until piece measures 38-36-35-34-32-30 cm from where sleeve was divided from body. Adjust so that last round is 1 round with only treble crochets. Then work an edge around the sleeve as follows: Work 1 chain stitch, * 1 double crochet in first/next treble crochet, 4 chain stitches, skip approx. 1 cm *, work from *-* around the entire sleeve and finish with 1 slip stitch in first double crochet at beginning of round. Fasten off. Work the other sleeve the same way. BAND: Worked back and forth. Work from right side with light blue purple as follows: Work 1 slip stitch around first treble crochet, 1 double crochet around same stitch, * 2 chain stitches, 1 double crochet around next stitch *, repeat from *-* down the entire edge on jacket, finish with 1 double crochet in last treble crochet. Then work approx. 112 to 134 treble crochets around chain spaces evenly (make sure to avoid tightening or widening piece). Continue with 1 treble crochet in every treble crochet until band measures 3 cm (= approx. 4 rows). Fasten off. Work the other band the same way. NECK EDGE: Work back and forth over chain stitch row in neck with light blue purple as follows: ROW 1 (= from right side): Begin on band, fasten yarn to piece with 1 slip stitch in first band stitch, work 2 half treble crochets (first half treble crochet on row is replaced with 2 chain stitches) around every treble crochet row on bands, work 1 half treble crochet in the gap between every treble crochet on chain stitch row in neck = approx. 138-147-150-158-158-165 half treble crochets. ROW 2: Work 1 double crochet in every half treble crochet (first double crochet on row replaced with 1 chain stitch) = approx. 138-147-150-158-158-165 double crochets. Fasten off. ASSEMBLY: Sew the buttons on to left front piece as follows: Sew first button approx. 1½-2 cm down from neck edge, then fasten the remaining 6-6-6-7-7-7 buttons approx. 8-9 cm apart. Button through treble crochets on right band. |
||||||||||||||||
Diagram explanations |
||||||||||||||||
|
||||||||||||||||
|
||||||||||||||||

|
||||||||||||||||
|
Have you made this or any other of our designs? Tag your pictures in social media with #dropsdesign so we can see them! Do you need help with this pattern?You'll find tutorial videos, a Comments/Questions area and more by visiting the pattern on garnstudio.com. © 1982-2024 DROPS Design A/S. We reserve all rights. This document, including all its sub-sections, has copyrights. Read more about what you can do with our patterns at the bottom of each pattern on our site. |
||||||||||||||||


With over 40 years in knitting and crochet design, DROPS Design offers one of the most extensive collections of free patterns on the internet - translated to 17 languages. As of today we count 304 catalogues and 11422 patterns - 11422 of which are translated into English (UK/cm).
We work hard to bring you the best knitting and crochet have to offer, inspiration and advice as well as great quality yarns at incredible prices! Would you like to use our patterns for other than personal use? You can read what you are allowed to do in the Copyright text at the bottom of all our patterns. Happy crafting!
Comments / Questions (29)
Bonjour. J avais repéré ce modèle en format pull à manches longues. Il n est plus affiché. Est ce possible de le recevoir malgré tout si oui comment procéder ? Merci
15.10.2023 - 18:13DROPS Design answered:
Bonjour Katia, ce modèle existe juste en version gilet manches courtes ou manches longues; retrouvez tous nos pulls au crochet ici. Bon crochet!
16.10.2023 - 10:06Bonjour, j'ai réussi tant bien que mal à avoir mes 229 br, mais je ne comprends pas vraiment la prochaine étape, pourriez-vous m'éclairer svp ? Merci et bonne journée à vous tous
22.11.2021 - 11:21DROPS Design answered:
Bonjour Josie, crochetez maintenant les diagrammes comme avant, en brides et A.1, mais cette fois, crochetez A.2 au milieu de chaque A.2 du rang précédent (= on répète A.2 une 2ème fois en hauteur - autrement dit, au-dessus des A.2 précédents (chacun de 14 brides), crochetez: 2 x A.1 (6 brides) + A.2 (2 brides) + 2 x A.1 (= 6 brides), et vous continuez A.1 comme avant le reste du rang (et les brides de chaque côté). Bon crochet!
22.11.2021 - 16:11Hallo! Lieben Dank für die Antwort. Ich hänge nun bei der Beschreibung für die Teilung in Ärmel und Rumpfteil bzw. am Rumpfteil (Größe M) . Ich habe ein Rapport A1 für die Teilung gehäkelt, das heißt beidseitig jeweils 22 Rapport ausgelassen. Nun habe ich für den Rumpfteil jeweils beidseitig 15 Rapporte A1 und in der Mitte 29 Rapporte A1. Ist das korrekt? Ich verstehe dann die weitere Anleitung für den Rumpfteil nicht. Woher stammen die 67 Rapporte? Liebe Grüße und danke, Annika
05.07.2021 - 20:32DROPS Design answered:
Liebe Annika, bei der Verteilung haben Sie die Maschen für die Ärmel übersrpungen und 12 Luftmaschen anstatt gehäkelt, so haben Sie: 15 x A.1 + 12 Lm + 29 x A.1 + 12 Lm + 15 x A.1 - über die 12 Lm auf beiden Seiten (unter jede Ärmel) häkeln Sie 4 x A.1 = 15 x A.1 + 4 x A.1 + 29 x A.1 + 4 x A.1 + 15 x A.1 = 15+4+29+4+15= 67 x A.1. Viel Spaß beim häkeln!
06.07.2021 - 09:08Hallo! Ich habe eine Frage zu der Anleitung Meet me in Provence, Größe M: Ich habe nun beim Pässe die erste Höhe Rapport gehäkelt,ca 5 cm lang. Wie mache ich nun weiter? Ich kann die Anleitung nicht verstehen. Danke und viele Grüße , Annika
16.06.2021 - 16:28DROPS Design answered:
Liebe Annika, jezt wiederholen Sie die Diagramme mit A.1 wie zuvor, über die Maschen von den vorrigen A.2 (= 14 M) häkeln Sie jetzt: 2 Mal A.1 (= 6 M), A.4 (= 2 M), 2 Mal A.1 (6 M). In M wird A.4 insgesamt 3 Mal in der Höhe gehäkelt, dh bei jeder neuer Wiederholung: 1 Mal A.1 (= 3 M), A.4 (= 2 M), 1 Mal A.1 (= 3M) über die Maschen von den vorrigen A.4 häkeln. Nach 3 Wiederholungen von A.4 in der Höhe haben Sie dann 283 Maschen. Viel Spaß beim häkeln!
17.06.2021 - 08:13Scusate, non avevo considerato le 24 catenelle fatte x la separazione delle maniche , queste le lavoro sempre seguendo il diagramma A1 ? Anche se non coincide il giro con il davanti e il dietro ?
11.03.2021 - 23:00DROPS Design answered:
Buonasera Clara, si, deve lavorare tutte le maglie in A.1. Buon lavoro!
11.03.2021 - 23:07Buona sera, non mi trovo nel numero di maglie che date dopo lo sprone quando si separa il davanti e il dietro dalle maniche, infatti con la taglia M dalle 311 tolgo le 66 maglie x ogni manica quindi dovrei restare con 179 maglie mentre voi indicate 203 maglie come mai?
11.03.2021 - 22:24DROPS Design answered:
Buonasera Clara, ha considerato le 12 catenelle avviate per la manica a ogni lato? Buon lavoro!
11.03.2021 - 23:06In effetti non avevo fatto il campione, adesso ho iniziato il tutto con uncinetto 2.5,grazie mille...
04.03.2021 - 20:31Buongiorno, io sono al diagramma A4 per la misura M è il lavoro misura 5 cm in più rispetto alle vostre indicazioni e nonostante stia usando l’uncinetto 3 in questo caso cosa mi consigliate di fare?Grazie mille!Clara
03.03.2021 - 07:49DROPS Design answered:
Buonasera Clara, ha lavorato il campione prima di iniziare? Buon lavoro!
03.03.2021 - 23:08Bonjour Je fais ce modèle en XL. Merci
08.02.2021 - 11:10DROPS Design answered:
Bonjour Josie, à la fin de A.1-3 vous devez avoir: 1 bride, A.1 (= 27 brides) (= devant gauche), A.2 (= 14 brides), A.1 (= 12 brides), A.3 (= 6 brides), A.1 (= 12 brides), A.2 (= 14 brides), A.1 (= 51 brides), A.2 (= 14 brides), A.1 (= 12 brides), A.3 (= 6 brides), A.1 (= 12 brides), A.2 (= 14 brides), A.1 (= 27 brides) et 1 bride = 1+27+14+12+6+12+14+51+14+12+6+12+14+27+1= 223 brides + 3 brides augmentées sur chaque devant au dernier rang de A.1-A.3= 229 brides au total. Bon crochet!
08.02.2021 - 11:28Bonjour Arrivée au 4ème rang motif 1, 2, 3, je trouve 4 br de plus. J'ai cherché et cherché et finalement à bien y regarder, le 4eme rang du motif numéro 2 ne va pas. Le diagramme : 2 br sur 1 br, 2 br individuelles,2 br sur 1 br, 1 br individuelle, 2 br sur 1 br, et là 3 br individuelles au lieu de 2 comme l'autre côté et ensuite 2 br sur 1 br. Voilà pourquoi j'ai 4 br en trop. Merci de vérifier par vous même.
07.02.2021 - 21:56DROPS Design answered:
Bonjour Josie, après vérification dans toutes les tailles, je trouve le bon nombre de brides à la fin du dernier rang, si vous nous indiquez votre taille, je peux vous donner le décompte des mailles pour chaque diagramme avant les augmentations du dernier rang. Bon crochet!
08.02.2021 - 10:45