DROPS Air
DROPS Air
65% Alpaca, 28% Polyamide, 7% Wool
from 4.80 £ /50g
Get the yarn to make this pattern from 28.80£.

The yarn cost is calculated from the pattern’s smallest size and the yarn’s cheapest product type. Looking for an even better price? You might find it on the DROPS Deals!

DROPS SS24

Skye

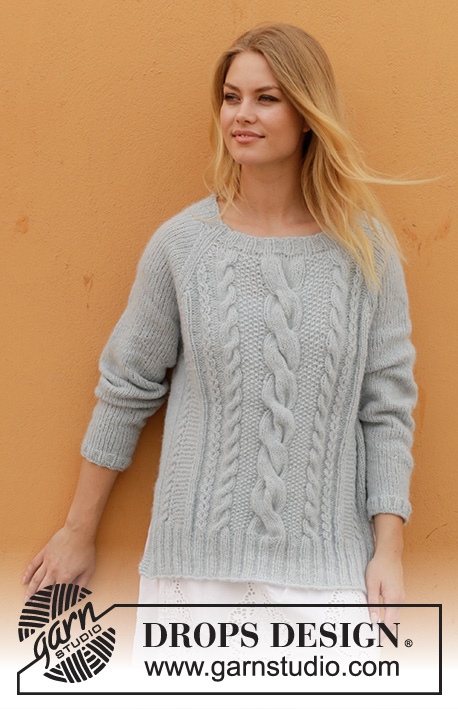
Knitted jumper with cables, lace pattern, split and raglan. Sizes S - XXXL. The piece is worked in DROPS Air.

DROPS 188-36
DROPS Design: Pattern no ai-105
Yarn group C or A + A
-----------------------------------------------------------
Sizes: S - M - L - XL - XXL - XXXL
Materials:
DROPS AIR from Garnstudio (belongs to yarn group C)
300-350-400-400-450-500 g colour 18, light grey green

The piece can also be knitted with yarn from:
"Alternative yarn (Yarn group C)" – see link below.

DROPS DOUBLE POINTED NEEDLES AND CIRCULAR NEEDLE (40 and 80 cm) SIZE 5 MM – or the size needed to get 17 stitches and 22 rows stocking stitch on 10 cm in width and 10 cm in height. Patterns A.1 + A.2 + A.3 + A.4 + A.5 measure approx. 48 cm in width.

DROPS DOUBLE POINTED NEEDLES AND CIRCULAR NEEDLE (40 and 80 cm) SIZE 4 MM for rib – or the size needed to get 19 stitches and 25 rows stocking stitch on 10 cm in width and 10 cm in height.

DROPS CABLE NEEDLE – for cables.
----------------------------------------------------------

-------------------------------------------------------

Alternative Yarn – See how to change yarns here
Yarn Groups A to F – Use the same pattern and change the yarn here
Yarn usage using an alternative yarn – Use our yarn converter here

-------------------------------------------------------

DROPS Air
DROPS Air
65% Alpaca, 28% Polyamide, 7% Wool
from 4.80 £ /50g
Get the yarn to make this pattern from 28.80£.

The yarn cost is calculated from the pattern’s smallest size and the yarn’s cheapest product type. Looking for an even better price? You might find it on the DROPS Deals!

Pattern instructions

NOTE: This pattern is written in British English. All measurements in charts are in cm. For conversion from cm to inches - click here. There are different terms for crocheting in British and American English. If this pattern includes crochet, click for "crochet terms" here. For this pattern in American English, please click here.
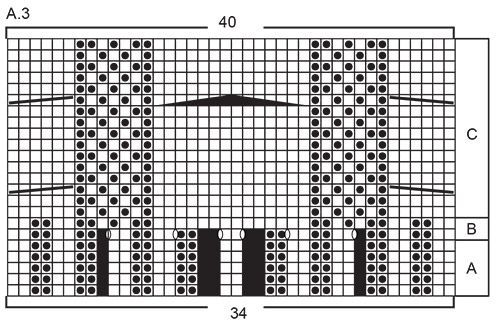
INFORMATION FOR THE PATTERN:

RIDGE/GARTER STITCH (worked back and forth):
1 ridge = Knit 2 rows.

PATTERN:
See diagrams A.1 to A.5. The diagrams show all the rows in the pattern seen from the right side.

DECREASE TIP (evenly spaced):
To work out how to decrease evenly, count the total number of stitches on the needle (e.g. 40 stitches), and divide by the number of decreases to be made (e.g. 4) = 10. In this example, knit every 9th and 10th stitch together.

INCREASE TIP (for sleeve):
Increase as follows mid under sleeve – start 1 stitch before the marker thread: Make 1 yarn over, knit 2 stitches (the marker thread sits in the middle of these 2 stitches), 1 yarn over. On the next round knit the yarn overs twisted to avoid holes.

RAGLAN:
* Work over the back/front piece until there are 3 stitches left before the marker thread. Purl 2 stitches together, knit 2 stitches (the marker thread sits in the middle of these 2 stitches), slip 1 stitch as if to knit, knit 1, pass the slipped stitch over the knitted stitch, work sleeve stitches until there are 3 stitches left before the marker thread, knit 2 together, knit 2 (the marker thread sits in the middle of these 2 stitches), purl 2 stitches together *, work from *-* a total of 2 times.
----------------------------------------------------------

JUMPER:
The piece is worked bottom up. The front and back pieces are worked separately back and forth with circular needle as far as the split. Then they are worked together in the round. The sleeves are worked in the round with double pointed needles/short circular needle.

BACK PIECE:
Cast on 88-92-100-108-108-120 stitches with circular needle size 4 mm and Air. Purl 1 row from the wrong side. The next row is worked as follows - from the right side: Work 3 stitches GARTER STITCH - see description above, knit 2-0-0-0-0-2, * purl 2, knit 2 *, work from *-* a total of 0-1-2-3-1-2 times, A.4A (= 8 stitches) 0-0-0-0-1-1 time, A.1A (= 14 stitches), A.2A (= 8 stitches), A.3A (= 34 stitches), A.4A (= 8 stitches), A.5A (= 14 stitches), A.2A (= 8 stitches) 0-0-0-0-1-1 time, * knit 2, purl 2 *, work from *-* a total of 0-1-2-3-1-2 times, knit 2-0-0-0-0-2, 3 stitches in garter stitch. Continue the rib like this until the piece measures 8 cm. REMEMBER THE KNITTING TENSION!
Change to circular needle size 5 mm. The next row is worked as follows – from the right side: Work 3 stitches in garter stitch, 2-0-0-0-0-2 stitches in stocking stitch, * purl 2, knit 2 *, work from *-* a total of 0-1-2-3-1-2 times, work diagrams as before but work B above A, * knit 2, purl 2 *, work from *-* a total of 0-1-2-3-1-2 times, 2-0-0-0-0-2 stitches in stocking stitch, 3 stitches in garter stitch. When A.1B to A.5B are finished there are 102-106-114-122-128-140 stitches on the needle.
The next row is worked as follows - from the right side: Work 3 stitches in garter stitch, 2-4-8-12-4-10 stitches in stocking stitch – decrease 0-0-0-1-0-1 stitch over these stitches, A.4C (= 11 stitches) 0-0-0-0-1-1 time, A.1C (= 15 stitches), A.2C (= 11 stitches), A.3C (= 40 stitches), A.4C (= 11 stitches), A.5C (= 15 stitches), A.2C (= 11 stitches) 0-0-0-0-1-1 time, 2-4-8-12-4-10 stitches in stocking stitch – decrease 0-0-0-1-0-1 stitch over these stitches, 3 stitches in garter stitch = 102-106-114-120-128-138 stitches. Continue this pattern until the piece measures 18 cm in all sizes.

FRONT PIECE:
Work as for back piece.

BODY:
Place the back piece on the same circular needle as the front piece = 204-212-228-240-256-276 stitches. Insert 1 marker thread in each side and allow the marker threads to follow your work onwards. Continue with pattern as before, but the stitches in garter stitch in each side are replaced with stocking stitch from now onwards. When the piece measures 37-37-36-36-37-36 cm cast off 6-6-8-8-10-10 stitches in each side (= 3-3-4-4-5-5 stitches on each side of the marker threads). There are now 96-100-106-112-118-128 stitches on the back and front pieces. Lay the piece to one side and work the sleeves.

SLEEVE:
The piece is worked in the round with double pointed needle; change to short circular needle when you have enough stitches. Cast on 40-40-44-44-48-48 stitches with double pointed needles size 4 mm and Air. Knit 1 round, then work rib (= knit 2 / purl 2). When the piece measures 2 cm change to double pointed needles size 5 mm. Knit 1 round where you decrease 4-2-4-4-6-4 stitches evenly on round – read DECREASE TIP = 36-38-40-40-42-44 stitches. Insert 1 marker at the beginning of the round (= mid under sleeve). Continue with stocking stitch. When the piece measures 8-6-9-6-5-9 cm increase 2 stitches mid under the sleeve – read INCREASE TIP. Increase like this every 2½-2½-1½-1½-1½.-1cm a total of 12-13-16-19-20-20 times = 60-64-72-78-82-84 stitches. When the piece measures 40-39-36-36-36-33 cm (shorter measurements in larger sizes due to longer yoke) cast off the middle 6-6-8-8-10-10 stitches under the sleeve (= 3-3-4-4-5-5 stitches on each side of the marker thread) = 54-58-64-70-72-74 stitches. Lay the piece to one side and work the other sleeve.

YOKE:
Place the sleeves on the same circular needle as the body, where the stitches were cast off for the armholes = 300-316-340-364-380-404 stitches. Insert a marker thread in each transition between body and sleeves (= 4 marker threads). Continue the pattern as before and decrease to RAGLAN – see description above. Decrease like this every 2nd round a total of 22-24-27-28-30-33 times – the stitches which do not fit into the diagrams are knitted over knitted stitches and purled over purled stitches AT THE SAME TIME when there is 1 round left before A.1/A.5 meets the raglan decrease, decrease in addition 4 stitches evenly over the cable in A.1/A.5 (applies only to the diagrams towards the raglan).
After all the decreases there are 108-108-108-124-124-124 stitches on the round. The yoke measures approx. 20-22-25-26-27-30 cm. Knit 1 round and decrease 3 stitches over each cable with 6 stitches and decrease 7 stitches over the cable with14 stitches = 82-82-82-98-98-98 stitches.

NECK:
Change to short circular needle size 4 mm and knit 1 round where you increase 10-10-14-6-10-14 stitches evenly on round = 92-92-96-104-108-112 stitches. Work rib (= knit 2 / purl 2) for 3 cm, cast off with knit over knit and purl over purl.

ASSEMBLY:
Sew the openings under the sleeves.

This pattern has been corrected.

Updated online: 12.09.2019
After all the decreases there are 108-108-108-124-124-124 stitches on the round. The yoke measures approx. 20-22-25-26-27-30 cm. Knit 1 round and decrease 3 stitches over each cable with 6 stitches and decrease 7 stitches over the cable with14 stitches = 82-82-82-98-98-98 stitches.

1 new diagramsymbol added.

Diagram

symbols = knit from right side, purl from wrong side
symbols = purl from right side, knit from wrong side
symbols = knit 2 together
symbols = slip 1 stitch as if to knit, knit 1, pass the slipped stitch over the knitted stitch
symbols = between 2 stitches make 1 yarn over
symbols = between 2 stitches make 1 yarn over; on the next round/row work the yarn over twisted to avoid a hole
symbols = slip 1 stitch as if to knit, knit 2, pass the slipped stitch over the 2 knitted stitches
symbols = no stitch, skip this square
symbols = place 2 stitches on the cable needle in front of piece, knit 2, knit 2 from the cable needle
symbols = place 2 stitches on the cable needle behind piece, knit 2, knit 2 from the cable needle
symbols = place 3 stitches on the cable needle behind piece, knit 3, knit 3 from the cable needle
symbols = place 3 stitches on the cable needle in front of piece, knit 3, knit 3 from the cable needle
symbols = place 7 stitches on the cable needle in front of piece, knit 7, knit 7 from the cable needle
diagram
diagram
diagram
diagram

Each of our patterns has specific tutorial videos to help you.

Do you have a question? See a list of frequently asked questions (FAQ)

Knitting tension is what determines the final measurements of your work, and is usually measured per 10 x 10 cm. It is provided like so: number of stitches in width x number of rows in height - eg: 19 stitches x 26 rows = 10 x 10 cm.

The knitting tension is very individual; some people knit/crochet loosely while others work tightly. You adjust the knitting tension with the needle size, which is why the suggested needle size is only meant as a guide! You need to adjust this (up or down) to ensure that YOUR knitting tension matches the knitting tension provided in the pattern. If you work with a different knitting tension than provided you will have a different yarn consumption, and your work will have different measurements than what the pattern suggests.

The knitting tension also determines which yarns can replace each other. As long as you achieve the same knitting tension you can replace one yarn with another.

See DROPS lesson: How to measure your tension/gauge

See DROPS video: How to make a gauge tension swatch

The required amount of yarn is provided in grams, eg: 450 g. To calculate how many balls you’ll need you first need to know how many grams are in 1 ball (25g, 50g or 100g). This information is available if you click on the individual yarn quality on our pages. Divide the amount required with the amount of each ball. For example, if each ball is 50g (the most common amount), the calculation will be as follows: 450 / 50 = 9 balls.

The important thing when changing from one yarn to another is that the knitting/crochet tension remains the same. This is so that the measurements of the finished piece will be the same as on the sketch provided. It is easier to achieve the same knitting tension using yarns from the same yarn group. It is also possible to work with multiple strands of a thinner yarn to achieve the knitting tension of a thicker one. Please try our yarn converter. We recommend you to always work a test swatch.

Please NOTE: when changing yarn the garment might have a different look and feel to the garment in the photo, due to individual properties and qualities of each yarn.

See DROPS lesson: Can I use a different yarn than the one mentioned in the pattern?

All our yarns are categorised into yarn groups (from A to F) according to thickness and knitting tension – group A contains the thinnest yarns and group F the thickest. This makes it easier for you to find alternative yarns to our patterns, should you wish to switch yarn. All yarns within the same group have a similar knitting tension and can easily replace each other. However, different yarn qualities have different structures and properties which will give the finished work a unique look and feel.

Click here for an overview of the yarns in each yarn group

At the top of all our patterns you’ll find a link to our yarn calculator, which is a helpful tool should you wish to use a different yarn than suggested. By filling in the yarn quality you wish to replace, the amount (in your size) and number of strands, the calculator will present good alternative yarns with the same knitting tension. Additionally it will tell you how much you’ll require in the new qualities and whether you’ll need to work with multiple strands. Most skeins are 50g (some are 25g or 100g).

If the pattern is worked with multiple colours, every colour will have to be calculated separately. Similarly, if the pattern is worked with several strands of different yarns (for example 1 strand Alpaca and 1 strand Kid-Silk) you will have to find alternatives for each, individually.

Click here to see our yarn calculator

Since different yarns have different qualities and textures we have chosen to keep the original yarn in our patterns. However, you can easily find options among our available qualities by using our yarn calculator, or simply pick a yarn from the same yarn group.

It is possible that some retailers still have discontinued yarns in stock, or that someone has a few skeins at home that they would like to find patterns for.

The yarn calculator will provide both alternative yarn as well as required amount in the new quality.

If you think it's hard to decide what size to make, it can be a good idea to measure a garment you own already and like the size of. Then you can pick the size by comparing those measures with the ones available in the pattern's size chart.

You'll find the size chart at the bottom of the pattern.

See DROPS lesson: How to read size chart

The needle size provided in the pattern serves only as a guide, the important thing is to follow the knitting tension. And since knitting tension is very individual, you will have to adjust the needle size to ensure that YOUR tension is the same as in the pattern – maybe you’ll have to adjust 1, or even 2 needle sizes, up or down to achieve the correct tension. For this, we recommend that you work test swatches.

Should you work with a different knitting tension than the one provided, the measurements of the finished garment might deviate from the measurement sketch.

See DROPS lesson: How to measure your tension/gauge

See DROPS video: How to make a tension/gauge swatch

Working a garment top-down provides more flexibility and room for personal adjustment. For example it is easier to try the garment on while working, as well as making adjustments to length of yoke and shoulder caps.

The instructions are carefully explaining every step, in the correct order. Diagrams are adjusted to the knitting direction and are worked as usual.

The diagram depicts all rows/rounds, and every stitch seen from the right side. It is read from bottom to top, from right to left. 1 square = 1 stitch.

When working back and forth, every other row is worked from the right side and every other row is worked from the wrong side. When working from the wrong side, the diagram will have to be worked reversed: from left to right, knit stitches are purled, purl stitches are knit etc.

When working in the round every round is worked from the right side and the diagram are worked from right to left on all rounds.

See DROPS lesson: How to read knitting diagrams

The diagram depicts all rows/rounds, and every stitch seen from the right side. It is worked from bottom to top, from right to left.

When working back and forth every other row is worked from the right side: from right to left and every other row is worked from the wrong side: from left to right.

When working in the round, every row in the diagram are worked from the right side, from right to left.

When working a circular diagram you start in the middle and work your way outwards, counter clockwise, row by row.

The rows usually start with a given number of chain stitches (equivalent to the height of the following stitch), this will either be depicted in the diagram or explained in the pattern.

See DROPS lesson: How to read crochet diagrams

Instructions for working several diagrams after each other on the same row/round, will often be written like so: “work A.1, A.2, A.3 a total of 0-0-2-3-4 times". This means you work A.1 once, then A.2 is worked once, and A.3 is repeated (in width) the number of times provided for your size – in this case like so: S = 0 times, M = 0 times, L=2 times, XL= 3 times and XXL = 4 times.

The diagrams are worked as usual: begin with the first row in A.1, then work the first row in A.2 etc.

See DROPS lesson: How to read knitting diagrams

See DROPS lesson: How to read crochet diagrams

The total width of the garment (from wrist-to-wrist) will be larger in the larger sizes, despite the actual sleeves being shorter. The larger sizes have longer sleeve caps and wider shoulders, so there will be a good fit in all sizes.

The measurement sketch/schematic drawing provides information regarding the full length of the garment. If it’s a jumper or a jacket the length is measured from the highest point on the shoulder closest to the neckline, and straight down to the bottom of the garment. It is NOT measured from the tip of shoulder. Similarly, the length of yoke is measured from the highest point on the shoulder and down to where yoke is split into body and sleeves.

On a jacket measures are never taken along bands, unless specifically stated. Always measure inside band stitches when measuring the length.

See DROPS lesson: How to read a schematic drawing

Diagrams are often repeated on the round or in height. 1 repeat is the diagram the way it appears in the pattern. If it says to work 5 repeats of A.1 in the round, then you work A.1 a total of 5 times after/next to each other in the round. If it says to work 2 repeats of A.1 vertically/in height you work the entire diagram once, then begin again at the start and work the entire diagram one more time.

Chain stitches are slightly narrower than other stitches and to avoid working the cast-on edge too tight, we simply chain more stitches to begin with. The stitch count will be adjusted on the following row to fit the pattern and measurement sketch.

The rib edge is more elastic and will contract slightly compared to, for example, stocking stitch. By increasing before the rib edge, you avoid a visible difference in width between the rib edge and the rest of the body.

It’s very easy to cast off too tightly, and by making yarn overs while casting off (and simultaneously casting these off) you avoid a too tight cast off edge.

See DROPS video: How to bind off with yarn overs (yo)

To achieve an even increase (or decrease) you can increase on, for example: every 3rd and 4th row alternately, like so: work 2 rows and increase on the 3rd row, work 3 rows and increase on the 4th. Repeat this until the increase is complete.

See DROPS lesson: Increase or decrease 1 st on every 3rd and 4th row alternately

Should you prefer to work in the round instead of back and forth, you may of course adjust the pattern. You’ll need to add steeks mid-front (usually 5 stitches), and follow the instructions. When you would normally turn and work from the wrong side, simply work across the steek and continue in the round. At the end you’ll cut the piece open, pick up stitches to work bands, and cover the cut edges.

See DROPS video: How to knit steeks and cut open

Should you prefer to work back and forth instead of in the round, you may of course adjust the pattern so you work the pieces separately and then assemble them at the end. Divide the stitches for the body in 2, add 1 edge stitch in each side (for sewing) and work the front and back pieces separately.

See DROPS lesson: Can I adapt a pattern for circular needles into straight needles?

Pattern repeats can vary slightly in the different sizes, in order to get the correct proportions. If you’re not working the exact same size as the garment in the photo, yours might deviate slightly. This has been carefully developed and adjusted so that the complete impression of the garment is the same in all sizes.

Make sure to follow instructions and diagrams for your size!

If you have found a pattern you like which is available in women’s size it’s not very difficult to convert it to men’s size. The biggest difference will be the length of sleeves and body. Start working on the women size that you think would fit across the chest. The additional length will be worked right before you cast off for the armhole/sleeve cap. If the pattern is worked top-down you can add the length right after the armhole or before the first decrease on sleeve.

Regarding additional yarn amount, this will depend on how much length you add, but it is better with a skein too many than too few.

All yarns will have excess fibres (from production) that might come off as lint or shedding. Brushed yarns (ie hairier yarns) have more of these loose, excess fibres, causing more shedding.

Shedding also depends on what is worn under or over the garment, and whether this pulls at the yarn fibres. It’s therefore not possible to guarantee that there will be no shedding

Below are some tips on how to get the best result when working with hairier yarns:

1. When the garment is finished (before you wash it) shake it vigorously so the looser hairs come off. NOTE: do NOT use a lint roller, brush or any method that pulls at the yarn.

2. Place the garment in a plastic bag and put it in your freezer - the temperature will cause the fibres to become less attached to each other, and excess fibres will come off easier.

3. Leave in the freezer for a few hours before taking it out and shaking it again.

4. Wash the garment according to the instructions on the yarn label.

Pilling is a natural process that happens to even the most exclusive of fibers. It's a natural sign of wear and tear that is hard to avoid, and that is most visible in high friction areas of your garment like a sweater's arms and cuffs.

You can make your garment look as new by removing the pilling, using a fabric comb or a pill/lint remover.

Still can't find the answer you need? Then scroll down and leave your question so one of our experts can try to help you. This will be done normally within 5 to 10 working days.
In the meantime, you can read the questions and answers that others have left to this pattern or join the DROPS Workshop on Facebook to get help from fellow knitters/crocheters!

You might also like...

188-36 Skye

Margrethe, Norway

188-36 Skye

Deborah, Italy

Skye

Martina, Czech Republic

Skye

Martina, Czech Republic

Post a comment to pattern DROPS 188-36

We would love to hear what you have to say about this pattern!

If you want to leave a question, please make sure you select the correct category in the form below, to speed up the answering process. Required fields are marked *.

Comments / Questions (55)

country flag Michael Harish wrote:

Is there a way to knit this patter with 2 needles?

22.12.2023 - 15:19

DROPS Design answered:

Dear Michael, due to the raglan and the elevated number of stitches it's recommended to use a circular needle. However, you could use straight needles for the rest of the piece and only use circular needles for the yoke. You can read more in the following lesson: https://www.garnstudio.com/lesson.php?id=13&cid=19. Happy knitting!

28.12.2023 - 19:35

country flag Mandy wrote:

A.4A (= 8 stitches) 0-0-0-0-1-1 time, A.1A (= 14 stitches), A.2A (= 8 stitches), A.3A (= 34 stitches), A.4A (= 8 stitches), A.5A (= 14 stitches), A.2A (= 8 etc. I am confused when it says 4A = 8 stitches 0 times ? as opposed tp 2A(=8 stitches)? I am trying to knit a large size.Pls explain and help. Thank ypu

14.11.2023 - 15:32

DROPS Design answered:

Hi Mandy, This means that in your size L you do not work A.4A, starting with A.1A after the first ribbed section. In the same way, do not work A.2A before the next ribbed section. Happy knitting!

15.11.2023 - 06:53

country flag Maureen Baker wrote:

SKYE PATTERN Yoke decrease raglan up until when A1/A5 meet the raglan I understand. Then I’m confused At the same time decrease an additional 4 stitches evenly over cable in A1/A5 is this mean 4 stitches to be decreased on every row when A1/A5 meet the raglan decrease Regards Maureen

18.10.2022 - 14:44

DROPS Design answered:

Dear Mrs Baker, when the cable A.1/A.5 will meet the raglan line, you have to decrease the number of stitches in these cables to keep correct width (you always need more stitches to work cable as to work stocking stitch and since you are decreasing the number of sts, the cable cannot be worked anymore, reason why you should decrease 4 sts in the cable, but only on the first row as this cable meet the raglan line and extra to the raglan decrease; then continue decreasing as before for raglan (do not decrease further stitches in the diagram except for the raglan). Happy knitting!

18.10.2022 - 16:03

country flag Corinne wrote:

Bonjour , Je ne comprends pas les explications au niveau de l'empiècement. On diminue 22 fois 8 mailles pour le raglan, ça , c'est bon. En même temps sur les torsades A1-A5 , 4 mailles. Est-ce que c'est 1 maille par torsade 4 fois ou 4 mailles sur chaque torsade en une seule fois? Merci d'avance.

09.10.2022 - 20:55

DROPS Design answered:

Bonjour Corinne, pour la même largeur, il faut plus de mailles pour une torsade que pour du jersey, autrement dit, quand on diminue pour le raglan, on doit rétrécir les mailles des torsades pour éviter qu'elles ne déforment l'ouvrage en largeur quand on ne peut plus les tricoter, autrement dit, quand vous diminuez la 1ère maille envers de A.1/la dernière m envers de A.5 pour le raglan, sur ce même tour, tricotez les 8 mailles des torsades ensemble 2 par 2 à l'endroit. Vous diminuez ainsi 16 mailles supplémentaires (4 dans chaque torsade/8 sur le devant + 8 sur le dos). Bon tricot!

10.10.2022 - 09:58

country flag Karin wrote:

Hur gör jag här? SAMTIDIGT när det återstår 1 varv till A.1/A.5 träffar raglanminskningen, minskas det dessutom 4 maskor jämnt fördelat över flätan i A.1/A.5 (gäller endast diagrammen mot raglanen).

26.12.2021 - 16:21

DROPS Design answered:

Hej Karin, du minsker over fletten ved at strikke maskerne i diagrammet med fletten sammen 2 og 2 :)

03.01.2022 - 15:34

country flag Ola wrote:

Podczas zamykania oczek na reglan, kiedy schematy A1/A5 już wchodzą do tych zamykanych oczek, mam zamknąć 4 oczka nad warkoczami. Czy jak warkocze uznaję 8 oczek w schemacie? Jak mam zamykać te oczka, czy przerabiać np. 2 na prawo?

21.12.2021 - 20:50

DROPS Design answered:

Witaj Olu, za te warkocze, o których mowa uznajesz 4 warkocze, każdy po 8 oczek w schemacie. Zamykasz oczka przerabiając każde 2 kolejne oczka razem na prawo ponad każdym warkoczem. W całym okrążeniu zamkniesz w ten sposób 16 oczek. Pozdrawiamy!

22.12.2021 - 09:05

country flag Ola wrote:

Opis nie jest do końca dokładny. Pierwszy, ogólny opis swetra mówi, że przerabiamy przód i tył oddzielnie, a potem na okrągło od pęknięć. Nic na ten temat nie jest później wspomniane w tekście głównym, dlatego czy dobrze rozumiem, że mam przerabiać oddzielnie na taką wysokość, jaką ma mieć pęknięcie na bokach, a potem połączyć obie części i przerabiać na okrągło, razem? Czy schematy będą się wtedy zgadzać?

22.11.2021 - 10:31

DROPS Design answered:

Witaj Olu, sweter jest przerabiany od dołu do góry. Przód i tył są przerabiane oddzielnie w tę i z powrotem na drutach z żyłką, aż do końca pęknięć na bokach. Dalej przerabiane są razem, na okrągło. Jak zaczynasz przerabiać na okrągło, dalej przerabiasz schematy jak wcześniej (kontynuujesz to co przerabiałaś w tę i z powrotem), ale oczka ściegiem francuskim z każdej strony są teraz przerabiane dżersejem. Pozdrawiamy!

22.11.2021 - 15:53

country flag Monika wrote:

Dzień dobry Czy przerabiając robótkę w tę i z powrotem rzędy ściegu fantazyjnego przerabiam tylko na prawej stronie, a na lewej oczka prawe ponad prawymi i lewe ponad lewymi?

18.06.2021 - 09:19

DROPS Design answered:

Witaj Moniko, zobacz kurs DROPS w tym temacie TUTAJ, albo napisz, o który dokładnie schemat ci chodzi. Pozdrawiamy!

18.06.2021 - 17:05

country flag Jana wrote:

Raglánové ujímání: 3 oka před značkou, 2 oka spleteme hladce, 2 oka upleteme hladce (značka leží mezi nim), 2 oka spleteme obrace - nemá být ...2 oka spleteme hladce (značka leží mezi nim)?

01.04.2021 - 16:16

DROPS Design answered:

Dobrý den, Jano, díky za upozornění - opraveno! Hezký den, Hana

25.04.2021 - 08:14

country flag Maja wrote:

Es geht aber um A2. Nicht A1.

08.03.2021 - 11:46

DROPS Design answered:

Liebe Maja, in A.2 strickt man den gleichen Zopf wie beim A.4 - siehe Video, dh man hat abwechslungsweise 3 Maschen (= Reihe 2, 3, 4 in A.2C) und 2 Maschen (= Reihe 1 und 5 - siehe 7. Symbol). Viel Spaß beim stricken!

08.03.2021 - 14:13