DROPS Paris
DROPS Paris
100% Cotton
from 1.10 £ /50g
Get the yarn to make this pattern from 11.00£.

The yarn cost is calculated from the pattern’s smallest size and the yarn’s cheapest product type. Looking for an even better price? You might find it on the DROPS Deals!

DROPS SS24

Teresa

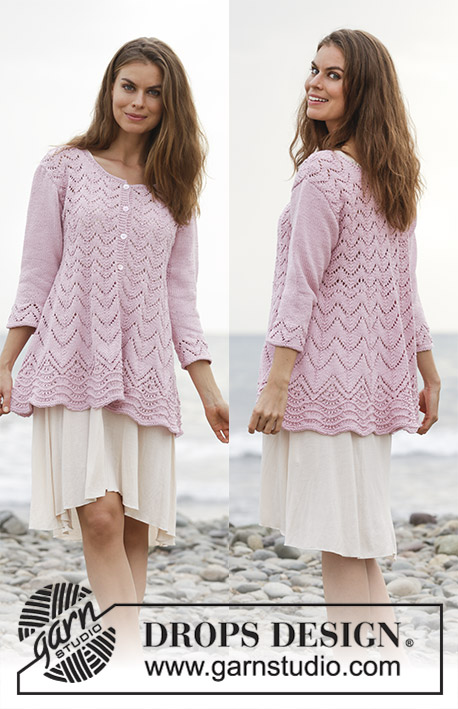
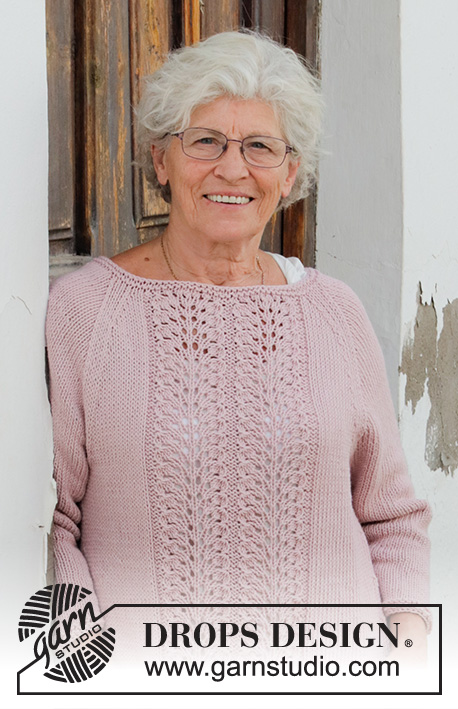
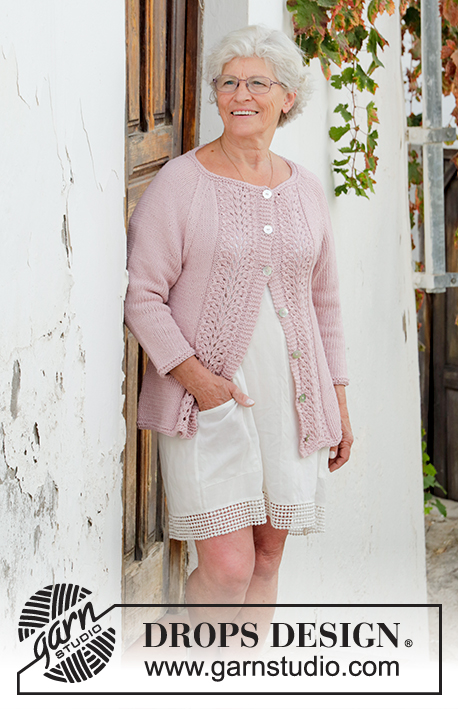
Knitted jacket with lace pattern and raglan. Sizes S - XXXL. The piece is worked in DROPS Paris.

DROPS 188-33
DROPS Design: Pattern no w-687
Yarn group C
-----------------------------------------------------------
Sizes: S - M - L - XL - XXL - XXXL
Materials:
DROPS PARIS from Garnstudio (belongs to yarn group C)
500-550-600-650-700-800 g colour 59, light old pink

The piece can also be knitted with yarn from:
"Alternative yarn (Yarn group C)" – see link below.

DROPS DOUBLE POINTED NEEDLES AND CIRCULAR NEEDLE (40 +60 or 80 cm) SIZE 5 MM – or the size needed to get 17 stitches and 22 rows stocking stitch on 10 cm in width and 10 cm in height.

DROPS MOTHER OF PEARL BUTTONS, ARCHED (white), NO 522: 6-6-6-7-7-7 items.
----------------------------------------------------------

-------------------------------------------------------

Alternative Yarn – See how to change yarns here
Yarn Groups A to F – Use the same pattern and change the yarn here
Yarn usage using an alternative yarn – Use our yarn converter here

-------------------------------------------------------

DROPS Paris
DROPS Paris
100% Cotton
from 1.10 £ /50g
Get the yarn to make this pattern from 11.00£.

The yarn cost is calculated from the pattern’s smallest size and the yarn’s cheapest product type. Looking for an even better price? You might find it on the DROPS Deals!

Pattern instructions

NOTE: This pattern is written in British English. All measurements in charts are in cm. For conversion from cm to inches - click here. There are different terms for crocheting in British and American English. If this pattern includes crochet, click for "crochet terms" here. For this pattern in American English, please click here.
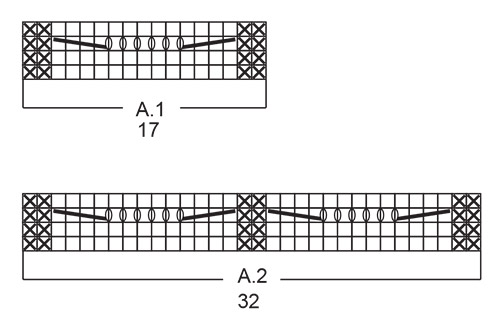
INFORMATION FOR THE PATTERN:

RIDGE/GARTER STITCH (worked back and forth):
1 ridge = Knit 2 rows

RIDGE/GARTER STITCH (worked in the round):
1 ridge = 2 rounds. Knit 1 round and purl 1 round. 

PATTERN: 
See diagrams A.1 and A.2. The diagrams show all the rows in the pattern seen from the right side

RAGLAN:
All decreases are worked from the right side.
Decrease as follows before the marker thread: Start 3 stitches before the marker thread:
Knit 2 together, knit 1, marker thread.
Decrease as follows after the marker thread: Marker thread, knit 1, slip 1 stitch as if to knit, knit 1, pass the slipped stitch over the knitted stitch.

KNITTING TIPS: 
If the knitting tension is not correct in height and you work too tightly, the raglan decreases will be too short and the armhole too small. This can be adjusted for by working 1 extra round without decreases regularly between decreases. 

INCREASE TIP:
Increase as follows mid under sleeve – start 1 stitch before the marker thread: Make 1 yarn over, knit 2 stitches (the marker thread sits in the middle of these 2 stitches), 1 yarn over. On the next round knit the yarn overs twisted to avoid holes.

BUTTONHOLES:
Work buttonholes on the right band. 1 BUTTONHOLE = knit third and fourth stitch from the edge together and make 1 yarn over. On the next round knit the yarn over = hole.
Work buttonholes when the piece measures:
S: 11, 20, 29, 38, 47 and 56 cm
M: 11, 20, 29, 38, 47 and 58 cm
L: 11, 20, 30, 40, 50 and 60 cm
XL: 11, 19, 27, 35, 44, 53 and 62 cm
XXL: 11, 19, 28, 37, 46, 55 and 64 cm
XXXL: 12, 21, 30, 39, 48, 57 and 66 cm
---------------------------------------------------------

JACKET: 
The piece is worked back and forth with circular needle, from mid front. The sleeves are worked in the round with double pointed needles; change to short circular needle when there are enough stitches. The parts are put together and the yoke is worked back and forth with raglan decreases.

BODY:
The piece is worked back and forth with circular needle, from mid front.
Cast on 170-182-198-212-234-254 stitches (including 5 band stitches in each side towards mid front) with circular needle size 5 mm and Paris. Work 2 RIDGES – see description above, then work as follows – from the right side:
5 stitches garter stitch (= band), A.1 (= 17 stitches), knit 47-53-61-68-79-89, A.2 (= 32 stitches), knit 47-53-61-68-79-89, A.1, 5 stitches garter stitch (= band). Insert 2 marker threads in the piece, 45-48-52-56-61-66 stitches in from each side (back piece = 80-86-94-100-112-122 stitches). Continue the pattern upwards. REMEMBER THE KNITTING TENSION! When the piece measures 8 cm decrease 1 stitch on each side of each marker thread (= 4 stitches decreased), decrease every 6 cm a total of 6 times = 146-158-174-188-210-230 stitches. Work BUTTONHOLES on right band – see description above. When the piece measures 40-40-41-41-41-41 cm cast off 6-6-8-8-10-12 stitches in each side (= 3-3-4-4-5-6 stitches on each side of the marker threads). There are now 62-68-74-80-90-98 stitches on the back piece and 36-39-42-46-50-54 stitches on each front piece. Lay the piece to one side and work the sleeves. 

SLEEVE:
The piece is worked in the round with double pointed needles; change to short circular needle when there are enough stitches. Cast on 38-38-40-42-44-46 stitches with double pointed needles size 5 mm and Paris. Work 1 RIDGE – see description above, then work stocking stitch. Insert 1 marker at the beginning of the round (= mid under the sleeve). When the piece measures 6-6-6-6-4-6 cm increase 2 stitches mid under sleeve – READ INCREASE TIP. Increase every 3-2-1½-1½-1½-1cm a total of 8-12-14-15-15-16 times = 54-62-68-72-74-78 stitches. When the piece measures 33-31-31-29-28-26 cm (shorter measurements in larger sizes because of longer yoke) cast off the middle 6-6-8-8-10-12 stitches under the sleeve = 48-56-60-64-64-66 stitches. Lay the piece to one side and work 1 more sleeve.

YOKE: 
Place the sleeves on the same circular needle as the body, where the stitches were cast off for the armholes = 230-258-278-300-318-338 stitches. Insert a marker thread in all transitions between body and sleeves. Continue with pattern and stocking stitch as before and decrease to RAGLAN – see description above. Decreases are different on body and sleeves. Decrease as follows:

RAGLAN SLEEVE:
Decrease 1 stitch on each side of each sleeve (= 2 stitches decreased on each sleeve each time). Decrease every 4th row 4-2-2-2-4-5 times, then every 2nd row 13-19-21-23-21-21 times = a total of 17-21-23-25-25-26 times.

RAGLAN BODY:
Decrease 1 stitch on each side of the back piece and 1 stitch on each front piece towards the sleeve (= 2 stitches decreased on back piece and 1 stitch decreased on each front piece each time). Decrease every 4th row 8-9-9-8-8-7 times then every 2nd row 5-5-7-11-13-17 times = a total of 13-14-16-19-21-24 times. 

After all the decreases there are 110-118-122-124-134-138 stitches on the needle. Work 2 ridges over all stitches; on the first row decrease 12-16-16-16-18-20 stitches evenly on row = 98-102-106-108-116-118 stitches. Cast off. The jacket measures a total of 62-64-66-68-70-72 cm from the shoulder.

ASSEMBLY:
Sew openings under the sleeves. Sew buttons onto the left band.

Diagram

symbols = knit from right side, purl from wrong side
symbols = knit from wrong side, purl from right side
symbols = between 2 stitches make 1 yarn over
symbols = knit 4 stitches twisted together
symbols = knit 4 stitches together
diagram
diagram

Each of our patterns has specific tutorial videos to help you.

Do you have a question? See a list of frequently asked questions (FAQ)

Knitting tension is what determines the final measurements of your work, and is usually measured per 10 x 10 cm. It is provided like so: number of stitches in width x number of rows in height - eg: 19 stitches x 26 rows = 10 x 10 cm.

The knitting tension is very individual; some people knit/crochet loosely while others work tightly. You adjust the knitting tension with the needle size, which is why the suggested needle size is only meant as a guide! You need to adjust this (up or down) to ensure that YOUR knitting tension matches the knitting tension provided in the pattern. If you work with a different knitting tension than provided you will have a different yarn consumption, and your work will have different measurements than what the pattern suggests.

The knitting tension also determines which yarns can replace each other. As long as you achieve the same knitting tension you can replace one yarn with another.

See DROPS lesson: How to measure your tension/gauge

See DROPS video: How to make a gauge tension swatch

The required amount of yarn is provided in grams, eg: 450 g. To calculate how many balls you’ll need you first need to know how many grams are in 1 ball (25g, 50g or 100g). This information is available if you click on the individual yarn quality on our pages. Divide the amount required with the amount of each ball. For example, if each ball is 50g (the most common amount), the calculation will be as follows: 450 / 50 = 9 balls.

The important thing when changing from one yarn to another is that the knitting/crochet tension remains the same. This is so that the measurements of the finished piece will be the same as on the sketch provided. It is easier to achieve the same knitting tension using yarns from the same yarn group. It is also possible to work with multiple strands of a thinner yarn to achieve the knitting tension of a thicker one. Please try our yarn converter. We recommend you to always work a test swatch.

Please NOTE: when changing yarn the garment might have a different look and feel to the garment in the photo, due to individual properties and qualities of each yarn.

See DROPS lesson: Can I use a different yarn than the one mentioned in the pattern?

All our yarns are categorised into yarn groups (from A to F) according to thickness and knitting tension – group A contains the thinnest yarns and group F the thickest. This makes it easier for you to find alternative yarns to our patterns, should you wish to switch yarn. All yarns within the same group have a similar knitting tension and can easily replace each other. However, different yarn qualities have different structures and properties which will give the finished work a unique look and feel.

Click here for an overview of the yarns in each yarn group

At the top of all our patterns you’ll find a link to our yarn calculator, which is a helpful tool should you wish to use a different yarn than suggested. By filling in the yarn quality you wish to replace, the amount (in your size) and number of strands, the calculator will present good alternative yarns with the same knitting tension. Additionally it will tell you how much you’ll require in the new qualities and whether you’ll need to work with multiple strands. Most skeins are 50g (some are 25g or 100g).

If the pattern is worked with multiple colours, every colour will have to be calculated separately. Similarly, if the pattern is worked with several strands of different yarns (for example 1 strand Alpaca and 1 strand Kid-Silk) you will have to find alternatives for each, individually.

Click here to see our yarn calculator

Since different yarns have different qualities and textures we have chosen to keep the original yarn in our patterns. However, you can easily find options among our available qualities by using our yarn calculator, or simply pick a yarn from the same yarn group.

It is possible that some retailers still have discontinued yarns in stock, or that someone has a few skeins at home that they would like to find patterns for.

The yarn calculator will provide both alternative yarn as well as required amount in the new quality.

If you think it's hard to decide what size to make, it can be a good idea to measure a garment you own already and like the size of. Then you can pick the size by comparing those measures with the ones available in the pattern's size chart.

You'll find the size chart at the bottom of the pattern.

See DROPS lesson: How to read size chart

The needle size provided in the pattern serves only as a guide, the important thing is to follow the knitting tension. And since knitting tension is very individual, you will have to adjust the needle size to ensure that YOUR tension is the same as in the pattern – maybe you’ll have to adjust 1, or even 2 needle sizes, up or down to achieve the correct tension. For this, we recommend that you work test swatches.

Should you work with a different knitting tension than the one provided, the measurements of the finished garment might deviate from the measurement sketch.

See DROPS lesson: How to measure your tension/gauge

See DROPS video: How to make a tension/gauge swatch

Working a garment top-down provides more flexibility and room for personal adjustment. For example it is easier to try the garment on while working, as well as making adjustments to length of yoke and shoulder caps.

The instructions are carefully explaining every step, in the correct order. Diagrams are adjusted to the knitting direction and are worked as usual.

The diagram depicts all rows/rounds, and every stitch seen from the right side. It is read from bottom to top, from right to left. 1 square = 1 stitch.

When working back and forth, every other row is worked from the right side and every other row is worked from the wrong side. When working from the wrong side, the diagram will have to be worked reversed: from left to right, knit stitches are purled, purl stitches are knit etc.

When working in the round every round is worked from the right side and the diagram are worked from right to left on all rounds.

See DROPS lesson: How to read knitting diagrams

The diagram depicts all rows/rounds, and every stitch seen from the right side. It is worked from bottom to top, from right to left.

When working back and forth every other row is worked from the right side: from right to left and every other row is worked from the wrong side: from left to right.

When working in the round, every row in the diagram are worked from the right side, from right to left.

When working a circular diagram you start in the middle and work your way outwards, counter clockwise, row by row.

The rows usually start with a given number of chain stitches (equivalent to the height of the following stitch), this will either be depicted in the diagram or explained in the pattern.

See DROPS lesson: How to read crochet diagrams

Instructions for working several diagrams after each other on the same row/round, will often be written like so: “work A.1, A.2, A.3 a total of 0-0-2-3-4 times". This means you work A.1 once, then A.2 is worked once, and A.3 is repeated (in width) the number of times provided for your size – in this case like so: S = 0 times, M = 0 times, L=2 times, XL= 3 times and XXL = 4 times.

The diagrams are worked as usual: begin with the first row in A.1, then work the first row in A.2 etc.

See DROPS lesson: How to read knitting diagrams

See DROPS lesson: How to read crochet diagrams

The total width of the garment (from wrist-to-wrist) will be larger in the larger sizes, despite the actual sleeves being shorter. The larger sizes have longer sleeve caps and wider shoulders, so there will be a good fit in all sizes.

The measurement sketch/schematic drawing provides information regarding the full length of the garment. If it’s a jumper or a jacket the length is measured from the highest point on the shoulder closest to the neckline, and straight down to the bottom of the garment. It is NOT measured from the tip of shoulder. Similarly, the length of yoke is measured from the highest point on the shoulder and down to where yoke is split into body and sleeves.

On a jacket measures are never taken along bands, unless specifically stated. Always measure inside band stitches when measuring the length.

See DROPS lesson: How to read a schematic drawing

Diagrams are often repeated on the round or in height. 1 repeat is the diagram the way it appears in the pattern. If it says to work 5 repeats of A.1 in the round, then you work A.1 a total of 5 times after/next to each other in the round. If it says to work 2 repeats of A.1 vertically/in height you work the entire diagram once, then begin again at the start and work the entire diagram one more time.

Chain stitches are slightly narrower than other stitches and to avoid working the cast-on edge too tight, we simply chain more stitches to begin with. The stitch count will be adjusted on the following row to fit the pattern and measurement sketch.

The rib edge is more elastic and will contract slightly compared to, for example, stocking stitch. By increasing before the rib edge, you avoid a visible difference in width between the rib edge and the rest of the body.

It’s very easy to cast off too tightly, and by making yarn overs while casting off (and simultaneously casting these off) you avoid a too tight cast off edge.

See DROPS video: How to bind off with yarn overs (yo)

To achieve an even increase (or decrease) you can increase on, for example: every 3rd and 4th row alternately, like so: work 2 rows and increase on the 3rd row, work 3 rows and increase on the 4th. Repeat this until the increase is complete.

See DROPS lesson: Increase or decrease 1 st on every 3rd and 4th row alternately

Should you prefer to work in the round instead of back and forth, you may of course adjust the pattern. You’ll need to add steeks mid-front (usually 5 stitches), and follow the instructions. When you would normally turn and work from the wrong side, simply work across the steek and continue in the round. At the end you’ll cut the piece open, pick up stitches to work bands, and cover the cut edges.

See DROPS video: How to knit steeks and cut open

Should you prefer to work back and forth instead of in the round, you may of course adjust the pattern so you work the pieces separately and then assemble them at the end. Divide the stitches for the body in 2, add 1 edge stitch in each side (for sewing) and work the front and back pieces separately.

See DROPS lesson: Can I adapt a pattern for circular needles into straight needles?

Pattern repeats can vary slightly in the different sizes, in order to get the correct proportions. If you’re not working the exact same size as the garment in the photo, yours might deviate slightly. This has been carefully developed and adjusted so that the complete impression of the garment is the same in all sizes.

Make sure to follow instructions and diagrams for your size!

If you have found a pattern you like which is available in women’s size it’s not very difficult to convert it to men’s size. The biggest difference will be the length of sleeves and body. Start working on the women size that you think would fit across the chest. The additional length will be worked right before you cast off for the armhole/sleeve cap. If the pattern is worked top-down you can add the length right after the armhole or before the first decrease on sleeve.

Regarding additional yarn amount, this will depend on how much length you add, but it is better with a skein too many than too few.

All yarns will have excess fibres (from production) that might come off as lint or shedding. Brushed yarns (ie hairier yarns) have more of these loose, excess fibres, causing more shedding.

Shedding also depends on what is worn under or over the garment, and whether this pulls at the yarn fibres. It’s therefore not possible to guarantee that there will be no shedding

Below are some tips on how to get the best result when working with hairier yarns:

1. When the garment is finished (before you wash it) shake it vigorously so the looser hairs come off. NOTE: do NOT use a lint roller, brush or any method that pulls at the yarn.

2. Place the garment in a plastic bag and put it in your freezer - the temperature will cause the fibres to become less attached to each other, and excess fibres will come off easier.

3. Leave in the freezer for a few hours before taking it out and shaking it again.

4. Wash the garment according to the instructions on the yarn label.

Pilling is a natural process that happens to even the most exclusive of fibers. It's a natural sign of wear and tear that is hard to avoid, and that is most visible in high friction areas of your garment like a sweater's arms and cuffs.

You can make your garment look as new by removing the pilling, using a fabric comb or a pill/lint remover.

Still can't find the answer you need? Then scroll down and leave your question so one of our experts can try to help you. This will be done normally within 5 to 10 working days.
In the meantime, you can read the questions and answers that others have left to this pattern or join the DROPS Workshop on Facebook to get help from fellow knitters/crocheters!

You might also like...

Post a comment to pattern DROPS 188-33

We would love to hear what you have to say about this pattern!

If you want to leave a question, please make sure you select the correct category in the form below, to speed up the answering process. Required fields are marked *.

Comments / Questions (13)

country flag Mari wrote:

Är det verkligen garn drops Paris på bilden på koftan Teresa? Ser tunnare och mjukare ut än min påbörjade stickning.

29.06.2023 - 14:42

country flag Marina wrote:

Hallo liebes Team, bin diese Jacke gerade am stricken. Habe nun das Gefühl, dass der Raglanabschnitt zu groß wird. Nun meine Frage; wird bei der Raglanabnahme die Rückreihe mitgezählt? ( z. B. alle 2 Reihen = 1 Hinreihe und 1 Rückreihe) LG

13.02.2023 - 20:21

DROPS Design answered:

Liebe Marina, die Raglanabnahmen entsehen zuerst in jeder 4. Reihe (= in jeder 2. Hinreihe, also 3 Reihen zwischen die Zunahmenreihen) und dann in jeder 2. Reihe (= in jeder Hinreihe). Die Abnahmen für Ärmel und Rumpfteil werden gleichzeitig gestrickt, aber um einen unterschiedlichen Rythmus. Beachten Sie auch, daß Ihre Maschenprobe in der Höhe richtig ist (22 Reihen = 10 cm), dann bekommen Sie die Maßnahmen wie in der Maßskizze. Viel Spaß beim stricken!

14.02.2023 - 13:49

country flag Nassima Makhloufi wrote:

Bonjour, pour les manches est-ce qu’il faut utiliser des aiguilles circulaires de 40cm ou 60 cm ? Merci

19.09.2021 - 02:13

DROPS Design answered:

Bonjour Mme Makhloufi, vous commencez les manches par les aiguilles doubles pointes et vous changez pour les aiguilles plus longues quand il y a trop de mailles pour les aiguilles doubles pointes (vous pouvez aussi tricoter les manches entièrement en "magic loop" - cf vidéo). Bon tricot!

20.09.2021 - 10:59

country flag Nassima Makhloufi wrote:

Bonjour, le motif ajouré se tricote aussi dans le dos ? Dommage il n’y a pas de photo du dos du gilet

07.09.2021 - 02:26

DROPS Design answered:

Bonjour Mme Makhloufi, tout à fait, on tricote M.1 sur chacun des devants et M.2 au milieu dos. Bon tricot!

07.09.2021 - 08:45

country flag Inga Olausson wrote:

Hej! Jag letar efter ett cardigan / koftmönster i Alpaca Silk brushed (Drops), där man stickar rbakstycke för sig och framstyckena för sig. Tycker plaggen håller formen bättre och inte blir så lätt säckiga som när man stickar allt-i-ett... Men jag hittar ingeet sådant mönster. Finns det? Mvh Inga Olausson

03.03.2019 - 13:51

DROPS Design answered:

Hej. Vi har t.ex mönster 201-21 som är stickat på det sättet. Du kan söka på kofta och Brushed alpaca silk för att få upp alla mönster i det garnet som vi har. Mvh DROPS Design

04.03.2019 - 11:33

country flag Susi Meyer wrote:

In wievielte Reihe wird das Muster gestrickt

28.08.2018 - 15:21

DROPS Design answered:

Liebe Frau Meyer, A.1 und A.2 sind über 4 Reihen gestrickt. Viel Spaß beim stricken!

06.09.2018 - 10:16

country flag Ania wrote:

Bardzo mi się podoba wzór swetra.

04.04.2018 - 13:19

country flag Diane Michaud wrote:

Bonjour j'attends toujours la réponse pour ma question sur la diminution de la manche ..Elle quelle se fait au même endroit que celle du dos et devant près des marqueurs..

29.03.2018 - 19:59

DROPS Design answered:

Bonjour Mme Michaud, vous allez diminuer à un rythme différent sur les manches et sur le dos/les devants, les diminutions vont se faire: à la fin du devant droit/des manches/du dos avant le marqueur (cf RAGLAN) et/ou au début des manches/dos/devant gauche. On diminue 2 m sur chaque manche et sur le dos et 1 m sur chaque devant. En fonction de la taille vous diminuerez soit 8 m (= sur chaque partie) soit seulement 4 m (= manches seulement ou dos/devants). Bon tricot!

30.03.2018 - 12:02

country flag Diane Michaud wrote:

Bonjour une petite question mes manches sont ajoutées avec le reste sur la même broche circulaire avec le reste du tricot je voudrais comment ce fait la diminution reglan pour la manche je comprends pas car j\\\'ai mis un marqueur des deux côtés des manches pour la diminution reglan dos et devant mais pour les manche ? Merci

28.03.2018 - 18:05

country flag Diane Michaud wrote:

J'aimerais savoir ...Ce gilet se tricote de bas en haut ?

15.03.2018 - 01:01

DROPS Design answered:

Bonjour Mme Michaud, tout à fait, on tricote de bas en haut en commençant par le dos et les devants tricotés d'une seule pièce jusqu'aux emmanchures. On met ensuite en attente pour tricoter les manches, et on reprend ensuite toutes les pièces pour tricoter l'empiècement. Bon tricot!

15.03.2018 - 08:28