
Popular categories
Looking for a yarn?


|
||||||||||||||||||||||||||||
Portofino |
||||||||||||||||||||||||||||
|
|
||||||||||||||||||||||||||||
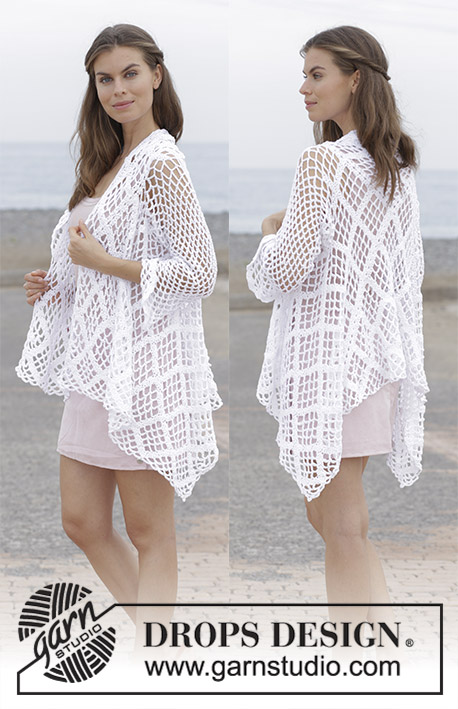
Knitted tunic with lace pattern and vent in the sides. Size: S - XXXL Piece is knitted in DROPS Paris.
DROPS 187-16 |
||||||||||||||||||||||||||||
|
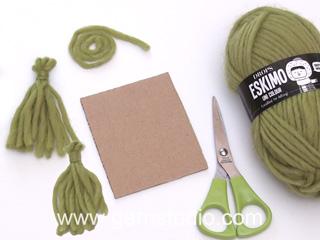
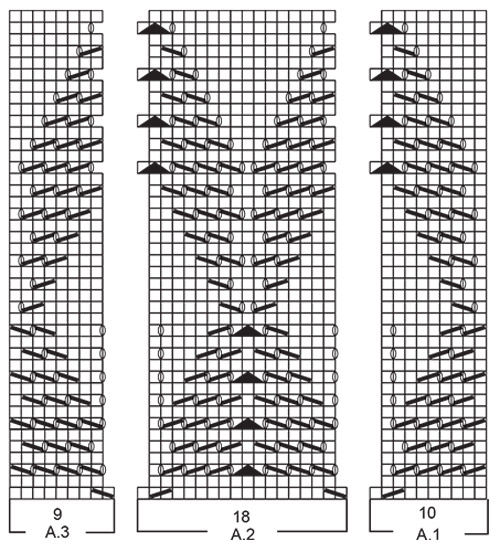
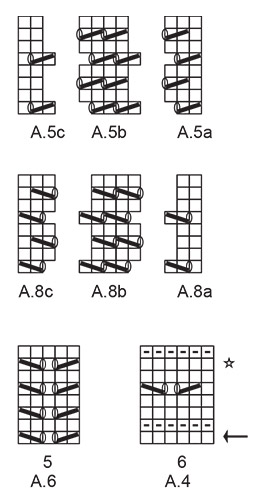
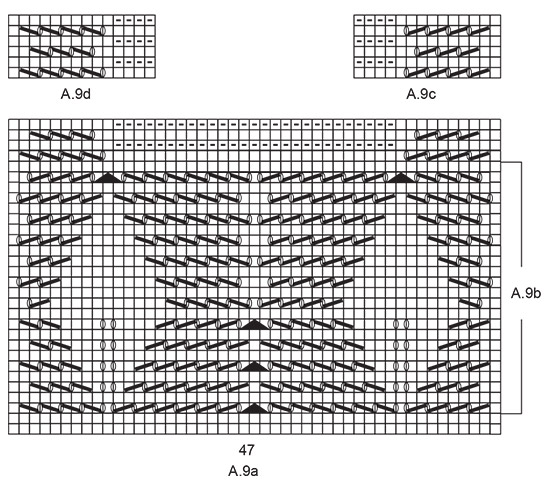
INFORMATION FOR PATTERN: GARTER STITCH (back and forth): 1 ridge = knit 2 rows. PATTERN: See diagrams A.1 to A.9. Diagrams show all rows in pattern seen from the right side. DECREASE TIP: Decrease 1 stitch by knitting 2 together. INCREASE TIP: Increase 1 stitch by making a yarn over. On next row work yarn overs twisted to avoid holes. KNITTING TIP: To make the band lay nicely where decrease for neck begins work a short row over the outermost 4 stitches in garter stitch towards mid front. When working A.7a work the short row from right side of piece as follows: Work all stitches on needle, turn and knit over the 4 stitches in band, turn, knit over the 4 stitches in band, turn and work back over all stitches. When working A.7b work the short row from right side of piece as follows: Knit over the 4 stitches in band, turn and knit over the 4 stitches in band, turn and work as before over all stitches. ---------------------------------------------------------- TUNIC: Piece is worked back and forth bottom up in parts and sewn together when finished. FRONT PIECE: Cast on 99-117-135-153 stitches on circular needle size 5 mm with Paris. Work 2 ridges in GARTER STITCH - see explanation above. Work pattern as follows: 4 stitches in garter stitch, A.1 (= 10 stitches), A.2 (= 18 stitches) 4-5-6-7 times in width, A.3 (= 9 stitches), 4 stitches in garter stitch. After first row in A.1 to A.3 there are 89-105-121-137 stitches on needle. REMEMBER THE KNITTING TENSION! When A.1 to A.3 have been worked, continue with stocking stitch and 4 stitches in garter stitch in each side until piece measures 26-28-30-32 cm. Now work pattern, AT THE SAME TIME on first row decrease 2-0-4-2 stitches evenly – read DECREASE TIP (but not over stitches in garter stitch) as follows: 4 stitches in garter stitch, A.4 until 5 stitches remain, work first stitch in A.4, 4 stitches in garter stitch = 87-105-117-135 stitches. On next to last row in A.4 increase 3-1-5-3 stitches evenly – read INCREASE TIP (but not over stitches in garter stitch) = 90-106-122-138 stitches. Work last row from wrong side as follows: Work the first 45-53-61-69 stitches before slipping them on a stitch holder for right front piece. Continue over the last 45-53-61-69 stitches (= left front piece). LEFT FRONT PIECE: = 45-53-61-69 stitches. Insert a marker thread here. NOW MEASURE PIECE FROM HERE! Work pattern from right side as follows: 4 stitches in garter stitch, A.5a (= 2 stitches), A.5b (= 4 stitches) over the next 8-16-24-32 stitches, A.5c (= 3 stitches), A.6 (= 5 stitches), A.7a (= 23 stitches). Continue pattern like this. When piece measures 10-10-8-8 cm, cast on 8 new stitches at the end of next row from wrong side = 53-61-69-77 stitches. Continue pattern from right side as follows: 4 stitches in garter stitch, A.5a, A.5b over the next 16-24-32-40 stitches, and continue A.5c, A.6 and A.7a as before. On row with star in A.7a work a short row so that band lays nicely - read KNITTING TIP! When entire A.7a has been worked vertically, there are 44-52-60-68 stitches for shoulder and piece measures approx. 38 cm in all sizes. Work 1 ridge over all stitches. Cast off - make sure that the cast-off edge is not too tight! Piece measures approx. 68-70-72-74 cm from shoulder and down. RIGHT FRONT PIECE: = 45-53-61-69 stitches. Insert a marker thread here. NOW MEASURE PIECE FROM HERE! Work pattern from right side as follows: A.7b (= 23 stitches), A.6 (= 5 stitches), A.8a (= 3 stitches), A.8b (= 4 stitches) over the next 8-16-24-32 stitches, A.8c (= 2 stitches), 4 stitches in garter stitch. Continue pattern like this. When piece measures 10-10-8-8 cm, cast on 8 new stitches at the end of next row from right side = 53-61-69-77 stitches. Work 1 row in pattern as before but knit over the new stitches cast on. Continue pattern from right side as follows: A.7b, A.6 (= 5 stitches), A.8a, A.8b over the next 16-24-32-40 stitches, A.8c, 4 stitches in garter stitch. On row with star in A.7b work a short row the same way as on left band but reversed, so that band lays nicely - remember KNITTING TIP! When entire A.7b has been worked vertically, there are 44-52-60-68 stitches for shoulder and piece measures approx. 38 cm in all sizes. Work 1 ridge over all stitches. Cast off - make sure that the cast-off edge is not too tight! Piece measures approx. 68-70-72-74 cm from shoulder and down. BACK PIECE: Cast on and work the same way as on front piece until A.4. Piece now measures 26-28-30-32 cm. Now work pattern, AT THE SAME TIME on first row decrease 2-0-4-2 stitches evenly (but not over stitches in garter stitch) as follows: 4 stitches in garter stitch, A.4 until 5 stitch remain, work first stitch in A.4, 4 stitches in garter stitch = 87-105-117-135 stitches. On next to last row in A.4 increase 4-2-6-4 stitches evenly = 91-107-123-139 stitches. When entire A.4 is done, insert a marker thread here. NOW MEASURE PIECE FROM HERE! Work pattern as follows: 4 stitches in garter stitch, A.5a (= 2 stitches), A.5b (= 4 stitches) over the next 8-16-24-32 stitches, A.5c (= 3 stitches), A.6 (= 5 stitches), A.9a (= 47 stitches), A.6 (= 5 stitches), A.8a (= 3 stitches), A.8b (= 4 stitches) over the next 8-16-24-32 stitches, A.8c (= 2 stitches), 4 stitches in garter stitch. When the first 2 rows in A.9a have been worked, repeat A.9b 3 times in total vertically, AT THE SAME TIME when piece measures 10-10-8-8 cm, cast on 8 new stitches at the end of the next 2 rows for sleeves = 107-123-139-155 stitches. Continue pattern as follows from right side: 4 stitches in garter stitch, A.5a (= 2 stitches), A.5b (= 4 stitches) over the next 16-24-32-40 stitches, A.5c (= 3 stitches), A.6 (= 5 stitches), A.9a (= 47 stitches), A.6 (= 5 stitches), A.8a (= 3 stitches), A.8b (= 4 stitches) over the next 16-24-32-40 stitches, A.8c (= 2 stitches), 4 stitches in garter stitch. When A.9b has been done 3 times in total vertically, work the last 4 rows in diagram A.9a. Work next row from right side as follows: Work pattern as before over the first 30-38-46-54 stitches, work A.9c (= 14 stitches), and slip these 44-52-60-68 stitches on a stitch holder (= right shoulder), cast off the next 19 stitches for neck, work A.9d (= 14 stitches), work the last 30-38-46-54 stitches as before. Now work back and forth over the last 44-52-60-68 stitches worked after decrease for neck (= left shoulder). Continue back and forth until A.9d has been worked vertically. Work 1 ridge over all the 44-52-60-68 stitches. Cast off - make sure that the cast-off edge is not too tight! Piece measures approx. 68-70-72-74 cm from shoulder and down. Slip the 44-52-60-68 stitches from stitch holder back on circular needle size 5 mm and continue pattern back and forth until A.9c has been worked. Work 1 ridge over all the 44-52-60-68 stitches. Cast off - make sure that the cast-off edge is not too tight. Piece measures approx. 68-70-72-74 cm from shoulder and down. ASSEMBLY: Sew shoulder seams with grafting/kitchener stitch - make sure the seam is not tight. Sew seam under sleeves and continue down the body until first row in A.4 to make a vent in the side from A.4 and down. Repeat in the other side. Sew band together mid front by sewing in outermost loop of one and one stitch upwards from first row in A.7a/A.7b and until approx. 7 ridges remain before neck decrease begins. TWINED STRING AND TASSELS: Cut 2 lengths of yarn of 65 cm. Twine the strands together until they resist, fold the string double so that it twines again. Make a knot at each end. Thread the string through each of the bands approx. 12 rows above the neck decrease and make a knot. Cut 15 lengths of yarn of 18 cm. Thread them through end on the twined string and distribute so that they are even. Place a strand around the tassel, tighten and make a knot. Repeat on the other end of string so that there is a tassel in each end of string. |
||||||||||||||||||||||||||||
Diagram explanations |
||||||||||||||||||||||||||||
|
||||||||||||||||||||||||||||
|
||||||||||||||||||||||||||||
|
||||||||||||||||||||||||||||

|
||||||||||||||||||||||||||||
|
||||||||||||||||||||||||||||

|
||||||||||||||||||||||||||||
|
Have you made this or any other of our designs? Tag your pictures in social media with #dropsdesign so we can see them! Do you need help with this pattern?You'll find tutorial videos, a Comments/Questions area and more by visiting the pattern on garnstudio.com. © 1982-2024 DROPS Design A/S. We reserve all rights. This document, including all its sub-sections, has copyrights. Read more about what you can do with our patterns at the bottom of each pattern on our site. |
||||||||||||||||||||||||||||


With over 40 years in knitting and crochet design, DROPS Design offers one of the most extensive collections of free patterns on the internet - translated to 17 languages. As of today we count 304 catalogues and 11422 patterns - 11422 of which are translated into English (UK/cm).
We work hard to bring you the best knitting and crochet have to offer, inspiration and advice as well as great quality yarns at incredible prices! Would you like to use our patterns for other than personal use? You can read what you are allowed to do in the Copyright text at the bottom of all our patterns. Happy crafting!
Comments / Questions (27)
The most confusing pattern ive ever seen not sure what any of the instructions mean after the band . Whats A1 -A7 im confused about all the outer this and that is there a more simple instructions?
31.07.2020 - 03:26DROPS Design answered:
Dear Tia, sorry to read you have so many troubles with this pattern, this lesson about diagrams might help you to follow the pattern. Happy knitting!
31.07.2020 - 08:06Hej, Någon som har bilden på baksidan av tunikan. Jag har svårt att sammanfatta beskrivningen på mönstret. Hade velat se tydlig bild på det hela ? Har gjort den nedre delen av båda fram och bakstycket, men alla de små mönstren som visas, blir jag tokig av.
11.02.2019 - 20:26Syntes ikke maske antal stemmer overens med mønster? Starter fint med 53 m i mønster men når jeg strikker anden p i mønster, passer det ikke længere. Har pillet op flere gange, men får samme resultat
03.02.2019 - 14:23DROPS Design answered:
Hei Brita. Jeg antar du strikker størrelse M, og er på forstykket da dette er eneste gang du skal ha 53 masker på pinnen. Når du strikker over diagrammer vil det maskeantallet som står i parentes kun stemme med den første omgangen i diagrammet - de videre omgangene kan variere i forhold til dette maskeantallet. Feks strikkes A.5a over 2 masker på første omgang, men 3 masker 2 omgang. Men om du ser på A.5b og A.5c er det tilsvarende forskyvninger her som gjør at det totale maskeantallet på omgangen forblir konstant. God fornøyelse
08.02.2019 - 10:22Hi I can't seem to find out how much Material in Drops Paris this tunic takes? Can you help?
14.01.2019 - 12:21DROPS Design answered:
Dear Sharon, you will find the required materials in each size under the header, ie 550-600-650-750 g DROPS Paris in size S/M - L - XL/XXL - XXXL. Happy knitting!
14.01.2019 - 13:04Graciela wrote:
Buenas noches, estoy trabajando el patrón, pero no logro entender cómo es la disminución y vuelta acortada, gracias
07.12.2018 - 04:38DROPS Design answered:
Hola Graciela. Para las disminuciones se trabajan 2 puntos juntos después de los puntos de la cenefa del escote ( para darle forma de V al escote). Para cómo trabajar las vueltas acortadas puedes consultar este vídeo:
30.12.2018 - 15:59Arlee wrote:
When will this pattern come in estonian? I've been waiting for months now and I would really love to make it for the next summer.
11.10.2018 - 15:35Hola, estoy tejiendo el poncho y la verdad es que queda muy chulo. Las mangas no salen en el patrón. Me podeis facilitar el número de puntos y el patrón? Gracias
06.10.2018 - 20:28DROPS Design answered:
Hola Mar. Las mangas se trabajan junto con el cuerpo. ".. AL MISMO TIEMPO cuando la labor mida 10-10-8-8 cm, montar 8 puntos nuevos al final de las siguientes 2 filas para las mangas = 107-123-139-155 puntos."
09.10.2018 - 23:27Bonjour, je pense qu'il y a une erreur vous avez écris : Continuer en allers et retours jusqu'à ce que A.9b ait été tricoté 1 fois en hauteur. D'après moi c'est plutôt A.9d. ceci se trouve dans le haut du dos.
08.05.2018 - 21:17DROPS Design answered:
Bonjour Régine, vous avez raison, la correction a été faite, merci. Bon tricot!
09.05.2018 - 08:40Bonjour Pouvez vous me expliquer : EN MÊME TEMPS, quand l'ouvrage mesure 10-10-8-8 cm, monter 8 mailles à la fin des 2 rangs suivants pour les manches = 107-123-139-155 mailles. j ai pas compris comment il faut monter les mailles, dans quels rangs et pourquoi 2 rang? merci
04.05.2018 - 13:50DROPS Design answered:
Bonjour Tatiana, à 10-10-8-8 cm de hauteur totale, montez 8 m à la fin du rang, tournez, tricotez le rang suivant et montez 8 m à la fin de ce rang (= vous avez monté 1 fois 8 m de chaque côté). Montez les mailles comme le montre cette vidéo mais des 2 côtés de l'ouvrage (la vidéo montre comment monter les mailles d'un seul côté, ici, vous devez les monter en fin de rang sur l'endroit et en fin de rang sur l'envers). Bon tricot!
04.05.2018 - 14:17Nelle istruzioni c'è scritto di leggere i suggerimenti per il lavoro ma non ci sono, io ne ho bisogno per fare il ferro accorciato in A.7a e A.7b
02.04.2018 - 18:07DROPS Design answered:
Buonasrra Samanta, abbiamo corretto il testo: ora sono presenti tutte le informazioni. Buon lavoro!
02.04.2018 - 20:08