
Popular categories
Looking for a yarn?


|
|||||||||||||||||||||||||
Quartier Latin |
|||||||||||||||||||||||||
 |
 |
||||||||||||||||||||||||
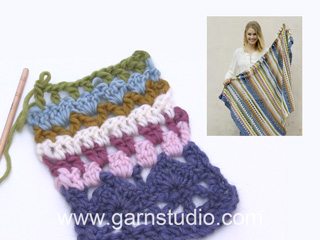
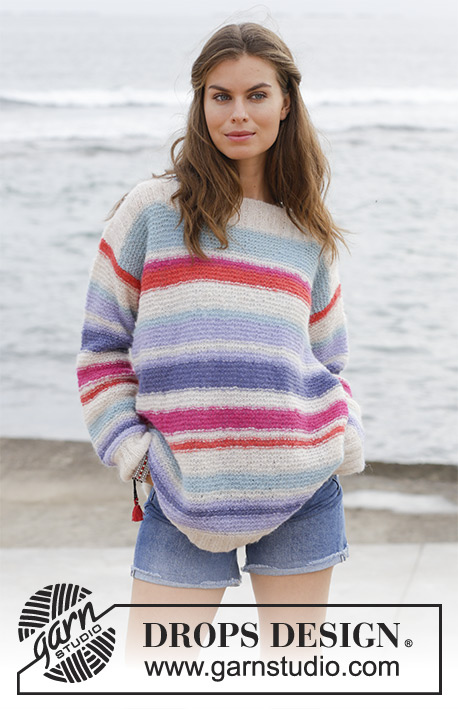
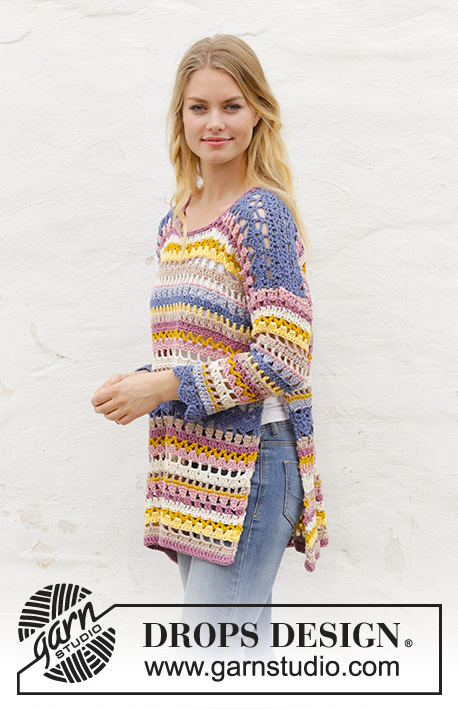
Jumper with stripes, lace pattern, long vent and ¾ sleeves, crocheted top down. Size: S - XXXL Piece is crocheted in DROPS Paris.
DROPS 187-24 |
|||||||||||||||||||||||||
|
INFORMATION FOR PATTERN: CROCHET INFO: At beginning of every row with treble crochets replace first treble crochet with 3 chain stitches. Finish row with 1 treble crochet in 3rd or 2nd chain stitch from beginning of previous row (depending on whether previous round began with 3 or 2 chain stitches). On every row with double crochets replace first double crochet with 2 chain stitches. Finish row with 1 double crochet in 3rd or 2nd chain stitch from beginning of previous row. PATTERN: See diagrams A.1 to A.3. STRIPES BODY: Stripes are explained below - rows are numbered in A.1, A.2 and A.3. 1-4: grey blue 5: light old pink 6: dark old pink 7: off white 8: mustard 9: vanilla 10-11: dark beige 12: off white 13: light old pink 14: light blue purple 15: grey blue 16: vanilla 17: dark beige 18: dark old pink 19: mustard 20: light old pink 21-22: off white 23: dark beige 24: mustard 25: light blue purple 26-30: grey blue 31: dark beige 32: dark old pink 33: mustard 34: light old pink 35-36: off white 37: dark beige 38: mustard 39: light old pink 40: dark old pink STRIPES SLEEVE: Stripes are explained below - rows are numbered in A.1, A.2 and A.3. 7: off white 8: mustard 9: vanilla 10-11: dark beige 12: off white 13: light old pink 14: light blue purple 15: grey blue 16: vanilla 17: dark beige 18: dark old pink 19: mustard 20: light old pink 21-22: off white 23: dark beige 24: mustard 25: light blue purple COLOUR CHANGE TIP: To get a nice transition when switching colour work last yarn over and pull through on last stitch before switching colour with the new colour, then continue with the new colour. TIP FOR FASTENING STRANDS: To avoid sewing many strands after colour change work the first 2 treble crochets/double crochets at beginning of every row with new colour with double yarn (in the same colour). This is done as follows: Make sure to leave a long yarn end (approx. 20-25 cm) when switching colour, work yarn end together with strand from ball. Then place yarn end along stitches from previous row and work around it so that the yarn end is hidden inside the stitches. In addition should the yarn end left at the end of row also be placed along the stitches when turning the piece to work around this yarn end as well. The way the strands are fastened without using a needle. DECREASE TIP: Decrease 1 stitch in each side inside the 2 outermost stitches in each side. Decrease by skipping last stitch in each side before the 2 outermost stitches. It is difficult to predict where the decrease is done in the pattern, the decreases are therefore not in any chart, but try to adjust to a row with treble crochets/chain stitch (not large chain spaces). INCREASE TIP (applies to bottom of sleeves): Increase 1 stitch by working 2 double crochets in 1 stitch. ---------------------------------------------------------- JUMPER: Work front and back piece back and forth in parts. First work right shoulder at the front with increase for neck, then work left shoulder at the front with increase for neck before pieces are put together then work back and forth until finished measurements. Work back piece the same way. Work sleeves back and forth, top down. RIGHT SHOULDER FRONT (when garment is worn): Read CROCHET INFO and COLOUR CHANGE TIP! Work 36-36-36-44-44-44 chain stitches on hook size 5.5 mm with grey blue. Work first row as follows from wrong side: Work 1 treble crochet in 4th chain stitch from hook, * skip 1 chain stitch, 1 treble crochet in each of the next 3 chain stitches *, work from *-* the entire row = 26-26-26-32-32-32 treble crochets on row. Then work STRIPES BODY - see explanation above, AT THE SAME TIME work pattern as explained below. Work first row as follows from right side (with grey blue): Work A.1A (= 2 stitches), work A.1B over the next 18-18-18-24-24-24 stitches (= 3-3-3-4-4-4 repetitions of 6 stitches) and finish with A.1C (= 6 stitches). Continue with stripes and pattern back and forth like this until A.1 has been worked. REMEMBER THE CROCHET TENSION! Put piece aside and work left shoulder as explained below. LEFT SHOULDER FRONT (when garment is worn): Work 36-36-36-44-44-44 chain stitches on hook size 5.5 mm with grey blue. Work first row as follows from wrong side: Work 1 treble crochet in 4th chain stitch from hook, * skip 1 chain stitch, 1 treble crochet in each of the next 3 chain stitches *, work from *-* the entire row = 26-26-26-32-32-32 treble crochets on row. Then work STRIPES BODY, AT THE SAME TIME work pattern as explained below. Work first row as follows from right side (with grey blue): Work A.1D (= 7 stitches), work A.1B over the next 12-12-12-18-18-18 stitches (= 2-2-2-3-3-3 repetitions of 6 stitches) and finish with A.1E (= 7 stitches). Continue with stripes and pattern back and forth like this until A.1 has been worked. At the end of last row work 13-19-25-19-25-31 somewhat loose chain stitches for neck. Now work parts together for front piece as explained below. FRONT PIECE: Begin from right side with right shoulder front, continue over chain stitches for neck (work 1 treble crochet in every chain stitch) and then work over stitches on left shoulder front as follows: Work A.2A (= 2 stitches), work A.2B over the next 60-66-72-78-84-90 stitches (= 10-11-12-13-14-15 repetitions of 6 stitches) and finish with A.2C (= 7 stitches). Continue with stripes and pattern back and forth like this. When A.2 has been worked 1 time vertically, work A.3 1 time vertically the same way. Then work A.2 again until 2 cm remain before finished measurements as explained further down in pattern. AT THE SAME TIME when piece measures 17-17-20-20-22-22 cm from cast-on edge, insert 1 marker in each side to mark the armholes. Then work the 2 outermost stitches in each side with double yarn until finished measurements - read TIP FOR FASTENING STRANDS! Then work as explained below until piece measures approx. 64-66-68-70-72-74 cm. Switch to dark old pink and work 1 row with treble crochets - NOTE: Choose a row with treble crochets from one of the diagrams that fit where you are in repetitions to get 69-75-81-87-93-99 treble crochets on row. Fasten off. Front piece measures approx. 66-68-70-72-74-76 cm from shoulder and down. LEFT SHOULDER BACK (when garment is worn): Work 36-36-36-44-44-44 chain stitches on hook size 5.5 mm with grey blue. Work first row as follows from wrong side: Work 1 treble crochet in 4th chain stitch from hook, * skip 1 chain stitch, 1 treble crochet in each of the next 3 chain stitches *, work from *-* the entire row = 26-26-26-32-32-32 treble crochets on row. Put piece aside and work right shoulder back as explained below. RIGHT SHOULDER BACK (when garment is worn): Work 36-36-36-44-44-44 chain stitches on hook size 5.5 mm with grey blue. Work first row as follows from wrong side: Work 1 treble crochet in 4th chain stitch from hook, * skip 1 chain stitch, 1 treble crochet in each of the next 3 chain stitches *, work from *-* the entire row = 26-26-26-32-32-32 treble crochets on row. At the end of this row work 17-23-29-23-29-35 somewhat loose chain stitches for neck. Now work parts together for back piece as explained below. BACK PIECE: Begin from right side with right shoulder back, continue over chain stitches for neck and then work over stitches on left shoulder back as follows: Work A.1A (= 2 stitches), work A.1B over the next 60-66-72-78-84-90 stitches (= 10-11-12-13-14-15 repetitions of 6 stitches) and finish with A.1E (= 7 stitches). Continue with stripes and pattern back and forth like this. When A.1 has been worked, work A.2 the same way. After A.2 work A.3 the same way until A.3 has been worked 1 time vertically. Then work A.2 again until 2 cm remain before finished measurements - adjust according to front piece. AT THE SAME TIME when piece measures 17-17-20-20-22-22 cm from cast-on edge, insert 1 marker in each side to mark the armholes. Then work the 2 outermost stitches in each side with double yarn until finished measurements as on front piece. Work until piece measures approx. 64-66-68-70-72-74 cm, adjust according to front piece. Switch to dark old pink and work 1 row with treble crochets - NOTE: Choose a row from one of the diagrams that fit where you are in repetitions to get 69-75-81-87-93-99 treble crochets on row. Fasten off. Back piece measures approx. 66-68-70-72-74-76 cm from shoulder and down. SLEEVE: Remember TIP FOR FASTENING STRANDS! Work 61-61-69-69-77-77 chain stitches on hook size 5.5 mm with light old pink. Work first row as follows from right side: Work 1 treble crochet in 4th chain stitch from hook, work 1 treble crochet in next chain stitch, * skip 1 chain stitch, work 1 treble crochet in each of the next 3 chain stitches *, repeat from *-* the entire row = 45-45-51-51-57-57 treble crochets on row. Next row is worked from the wrong side: 4 chain stiches (equals to 1 treble crochet and 1 chain stitch), skip 2 treble crochets, * 2 treble crochets in the space before the next 3 treble crochets, 1 chain stitch *, work from *-* until 3 treble crochets remain on row, skip 2 treble crochets and finish with 1 treble crochet in last treble crochet = 45-45-51-51-57-57 stitches on row. Then work STRIPES SLEEVE – see explanation above, AT THE SAME TIME continue pattern as on body, i.e. begin at beginning of A.2 (row 7) and work A.2. When A.2 has been worked, work the 2 first rows in A.3, then work A.2 to finished measurement (in most sizes the correct sleeve length will be finished before A.2 is done first time). AT THE SAME TIME when piece measures 2 cm, decrease 1 stitch in each side - read DECREASE TIP. Decrease like this approx. every 5-4½-3½-3-2½-2½ cm 7-7-9-9-10-10 times in total in each side = 31-31-33-33-37-37 stitches on row. When sleeve measures approx. 33-31-30-28-27-26 cm (shorter measurements in the larger sizes because of wider shoulders) work with grey blue from now on. Work 1 row with double crochets from wrong side while increasing 2-2-6-6-8-8 stitches evenly - read INCREASE TIP = 33-33-39-39-45-45 double crochets. Work next row as follows from right side: A.1A (= 2 stitches), work A.1B over the next 24-24-30-30-36-36 stitches (= 4-4-5-5-6-6 repetitions of 6 stitches) and finish with A.1E (= 7 stitches). Continue pattern like this but finish after 3rd row in A.1. Fasten off. Sleeve measures approx. 39-37-36-34-33-32 cm from top and down. Work the other sleeve the same way. ASSEMBLY: Sew the shoulder seams with grey blue. Sew in sleeves between the markers on front and back piece. Sew underarm and side seams in one - begin at the bottom of sleeve and sew in edge stitch but finish seam when approx. 34 cm remain for vent in each side on front and back piece. NECK EDGE: Begin on shoulder and work first round as follows on hook size 5.5 mm with dark old pink: Work 1 double crochet in first stitch, * 3 chain stitches, 1 double crochet around next row/chain space *, work from *-* along the entire neck, finish with 3 chain stitches and 1 slip stitch in first double crochet at beginning of round. Work slip stitches until middle of first chain space, work 3 chain stitches, * 1 double crochet around next chain space, 2 chain stitches *, work from *-* the entire round, finish with 1 slip stitch in first chain stitch at beginning of round. Fasten off. |
|||||||||||||||||||||||||
Diagram explanations |
|||||||||||||||||||||||||
|
|||||||||||||||||||||||||

|
|||||||||||||||||||||||||

|
|||||||||||||||||||||||||

|
|||||||||||||||||||||||||

|
|||||||||||||||||||||||||
|
Have you made this or any other of our designs? Tag your pictures in social media with #dropsdesign so we can see them! Do you need help with this pattern?You'll find tutorial videos, a Comments/Questions area and more by visiting the pattern on garnstudio.com. © 1982-2024 DROPS Design A/S. We reserve all rights. This document, including all its sub-sections, has copyrights. Read more about what you can do with our patterns at the bottom of each pattern on our site. |
|||||||||||||||||||||||||


With over 40 years in knitting and crochet design, DROPS Design offers one of the most extensive collections of free patterns on the internet - translated to 17 languages. As of today we count 304 catalogues and 11422 patterns - 11422 of which are translated into English (UK/cm).
We work hard to bring you the best knitting and crochet have to offer, inspiration and advice as well as great quality yarns at incredible prices! Would you like to use our patterns for other than personal use? You can read what you are allowed to do in the Copyright text at the bottom of all our patterns. Happy crafting!
Comments / Questions (44)
Hur mycket garn går det åt om man virkar tröjan enfärgad
17.05.2018 - 20:27DROPS Design answered:
Hei Eva. Vi har dessverre ikke mulighet til å oppgi garnmengde dersom det kun strikkes med en farge. Du kan regne med at det går med litt mindre garn enn hva som er oppgitt til flerfarget sammenlagt. God fornøyelse
24.05.2018 - 09:37Ik wil deze in 1 kleur haken, hoeveel garen heb ik dan nodig?
13.05.2018 - 13:43DROPS Design answered:
Hallo Leonore, Deze vraag zal ik doorspelen aan designafdeling. Als je niet kunt wachten met beginnen: vaak kun je overgebleven garen terug brengen bij de winkel. (Vraag even binnen welke termijn) Als je dan het achterpand en een mouw haakt, kun je dit wegen en uitrekenen hoeveel je in totaal nodig hebt.
14.05.2018 - 18:57Buenos días, me surge una duda acerca de los puntos del cuello: 13-19-25-19-25-31. ¿Es correcto que para la talla L sean más puntos (25) que para la talla XL (19)? Gracias!
08.05.2018 - 08:08DROPS Design answered:
Hola Noelia, si, es correcto, porque el hombro de la talla XL es más ancho que el de la talla L.
13.05.2018 - 12:36Har nu förstått. Behöver inget svar-
22.04.2018 - 19:58In de informatie voor het haken staat dat op het begin van iedere toer het eerste stokje (of vaste) vervangen moet worden door 3 (2) lossen. Dat zie ik wel bij A.1A en A.1E, maar niet bij A.1C en A.1D. Daar zouden bij toer 2 ,4 en 6 toch ook lossen in de tekening moeten staan?
22.04.2018 - 16:26DROPS Design answered:
Dag Willemijn, Dat komt omdat telpatroon A.1e en A.1a aan het begin en/of het einde van de toer gehaakt worden. A.1C en A.1D zitten er tussenin en dus is het dan niet van toepassing.
03.06.2018 - 17:29Trevligt plagg. Dock förstår jag inte hur halsringningen fungerar. I mönstret för Vänster axel fram anges : I slutet på sista varvet virkas det 13-19-25-19-25-31 lite lösa luftmaskor till hals." Vad gör jag?
21.04.2018 - 11:52DROPS Design answered:
Hej Monica, du har nu de två axelstycken och virkar 13 luftmaskor i st S, eller 19 lm i st M.... för att nå över till höger axelstycke, innan du virkar ihopp och fortsätter enligt FRAMSTYCKE. Lycka till :)
24.04.2018 - 12:33Ik zou dit patroon graag willen maken met drops alpaca omdat ik daar behoorlijk wat restjes van heb liggen. Hoeveel zou ik dan nodig hebben voor maat xxl?
11.04.2018 - 17:27DROPS Design answered:
Hallo Antoinette, Hier heb je ongeveer dezelfde hoeveelheid garen voor nodig in grammen gerekend en je breit dan met 2 draden Alpaca.
12.04.2018 - 07:09Mir gefällt das Modell 187-24. Können Sie mir die entsprechenden Farben zusammenstellen und mitteilen, was das Material insgesamt kostet???? mfg. Gabi Pluemper
07.04.2018 - 18:08DROPS Design answered:
Liebe Frau Pluemper, Sie können die Garnangaben in jeder Farbe unter Material finden, (1 Knäuel Paris = 50 g) - In der Farbekarte finden Sie Preis je nach dem Laden, so können Sie Kost kalkulieren. Viel Spaß beim häkeln!
09.04.2018 - 09:50Bonjour, je ne comprends pas la signification de la première maille dans le diagramme a1a, rang 1 rang 3 et 5.
04.04.2018 - 11:15DROPS Design answered:
Bonjour Patricia, c'est le nombre de mailles en l'air que vous devez faire au début de ces rangs (= sur l'endroit), soit 2 ml aux rangs 1 et 3 et 3 ml au rang 5. Bon crochet!
04.04.2018 - 11:54Vilken storlek bär hon på bilden?
10.03.2018 - 22:57DROPS Design answered:
Hej Anna, modellen är ca 170 cm och bär en storlek M. :)
13.03.2018 - 16:22