DROPS Air
DROPS Air
65% Alpaca, 28% Polyamide, 7% Wool
from 5.30 € /50g
Get the yarn to make this pattern from 42.40€.

The yarn cost is calculated from the pattern’s smallest size and the yarn’s cheapest product type. Looking for an even better price? You might find it on the DROPS Deals!

DROPS SS24

Nougat

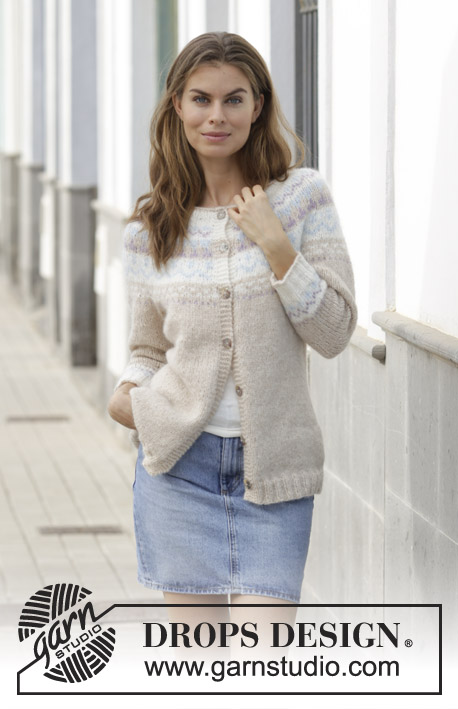
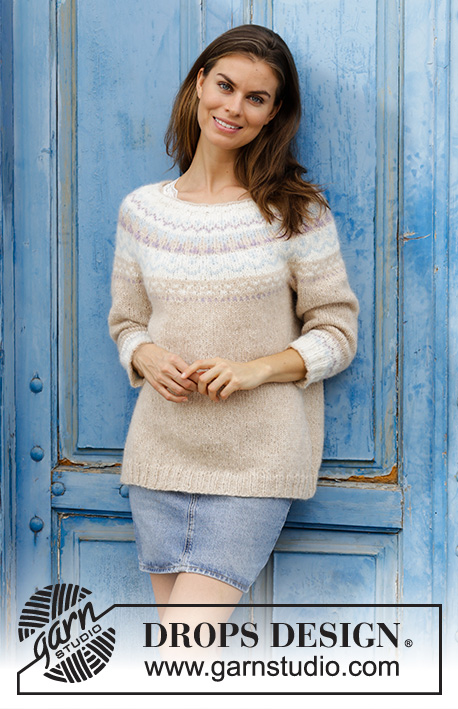
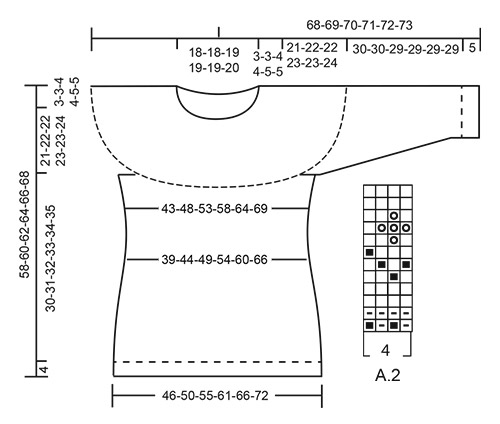
Knitted jumper with round yoke and multi-coloured Norwegian pattern, worked top down. Sizes S - XXXL. The piece is worked in DROPS Air.

DROPS 191-12
DROPS Design: Pattern no ai-115
Yarn group C or A + A
-----------------------------------------------------------
Sizes: S - M - L - XL - XXL - XXXL
Materials:
DROPS AIR from Garnstudio (belongs to yarn group C)
250-250-250-300-350-350 g colour 02, wheat
50-50-50-50-50-50 g colour 01, off white
50-50-50-50-50-50 g colour 18, light grey green
50-50-50-50-50-50 g colour 15, purple haze

The piece can also be knitted with yarn from:
"Alternative yarn (Yarn group C)" – see link below.

DROPS DOUBLE POINTED NEEDLES AND CIRCULAR NEEDLE (40 + 80 cm) SIZE 5.5 MM – or the size needed to get 16 stitches and 20 rows stocking stitch on 10 cm in width and 10 cm in height.


DROPS DOUBLE POINTED NEEDLES AND CIRCULAR NEEDLE (40 + 80 cm) SIZE 4.5 MM – or the size needed to get 18 stitches and 23 rows stocking stitch on 10 cm in width and 10 cm in height.

-------------------------------------------------------
Colour combinations shown are:
A) DROPS Air 04, 03, 16, 10.
B) DROPS Air 03, 01, 15, 14.
-------------------------------------------------------

-------------------------------------------------------

Alternative Yarn – See how to change yarns here
Yarn Groups A to F – Use the same pattern and change the yarn here
Yarn usage using an alternative yarn – Use our yarn converter here

-------------------------------------------------------

DROPS Air
DROPS Air
65% Alpaca, 28% Polyamide, 7% Wool
from 5.30 € /50g
Get the yarn to make this pattern from 42.40€.

The yarn cost is calculated from the pattern’s smallest size and the yarn’s cheapest product type. Looking for an even better price? You might find it on the DROPS Deals!

Pattern instructions

NOTE: This pattern is written in British English. All measurements in charts are in cm. For conversion from cm to inches - click here. There are different terms for crocheting in British and American English. If this pattern includes crochet, click for "crochet terms" here. For this pattern in American English, please click here.
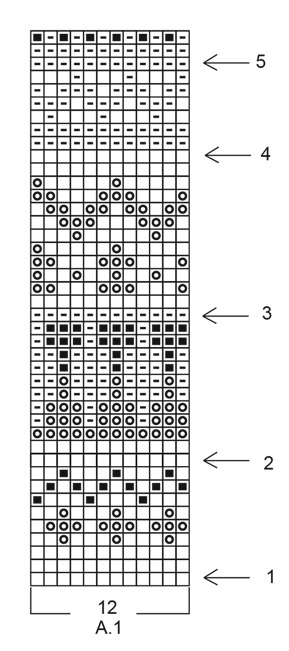
INFORMATION FOR THE PATTERN:

PATTERN:
See diagrams A.1 and A.2.

KNITTING TIP:
To avoid the knitting tension becoming tighter when working pattern, it is important that the strands at the back of the piece are not tight. You can increase a needle size when working pattern if this is a problem.

DECREASE/INCREASE TIP (evenly spaced):
To work out how to decrease/increase evenly, count the total number of stitches on the needle (e.g. 80 stitches), and divide by the number of decreases/increases to be made (e.g. 3) = 26.7.
In this example, knit approx. every 26th and 27th stitch together when decreasing.
When increasing make 1 yarn over after approx. every 26th and 27th stitch; on the next round knit the yarn overs twisted to avoid holes.

DECREASE TIP:
Decrease as follows before the marker thread (start 3 stitches before the marker thread): Knit 2 together, knit 1.
Decrease as follows after the marker thread: Knit 1, slip 1 stitch as if to knit, knit 1, pass the slipped stitch over.

INCREASE TIP:
Start 1 stitch before the marker thread, 1 yarn over, knit 2 stitches, 1 yarn over. On the next round knit the yarn overs twisted to avoid holes.
----------------------------------------------------------

JUMPER:
The piece is worked in the round with circular needle from mid back, top down. You can work an elevation in the back of the neck to get a better fit; the neck will then a bit higher at the back. This elevation can be left out and the neck will then be the same height front and back – see description of elevation further down in the text. After the yoke the body is worked in the round with circular needle. The sleeves are worked in the round with double pointed needles, top down.

NECK:
Cast on 80-84-88-92-96-100 stitches with circular needle size 4.5 mm and wheat.
Knit 1 round. Change to off white and work rib (knit 2 / purl 2) for 3-3-4-4-5-5 cm. Knit 1 round where you decrease 3-5-5-4-4-4 stitches evenly on round – read DECREASE/INCREASE TIP = 77-79-83-88-92-96 stitches. Change to circular needle size 5.5 mm.
Now you can work an elevation in the back of the neck or go straight to working the yoke if you do not want an elevation.

ELEVATION IN BACK OF NECK:
Skip this section if you do not want an elevation.
Insert 1 marker at the beginning of the round = mid back. Start from the right side with off white and knit 11-11-12-13-13-14 stitches past the marker, turn, tighten the strand and purl 22-22-24-26-26-28 stitches. Turn, tighten the strand and knit 33-33-36-39-39-42 stitches, turn tighten the strand and purl 44-44-48-52-52-56 stitches. Turn, tighten the strand and knit to mid back.

YOKE:
Now work pattern A.1 in the round - read KNITTING TIP, and increase stitches evenly on each round marked with an arrow as follows:
REMEMBER THE KNITTING TENSION!
On round marked with arrow 1 increase 31-41-37-44-40-48 stitches evenly = 108-120-120-132-132-144 stitches.
On round marked with arrow 2 increase 36-36-48-48-48-60 stitches evenly = 144-156-168-180-180-204 stitches.
On round marked with arrow 3 increase 36-36-48-48-48-60 stitches evenly = 180-192-216-228-228-264 stitches.
On round marked with arrow 4 increase 36-36-36-36-48-48 stitches evenly = 216-228-252-264-276-312 stitches.
On round marked with arrow 5 increase 0-12-12-16-28-16 stitches evenly = 216-240-264-280-304-328 stitches.
Change to wheat. Continue with wheat and stocking stitch until the piece measures 24-25-26-27-28-29 cm from the cast-on edge mid front and down (if the knitting tension is correct in height, this measurement is reached in size S when A.1 has been completed).

The next round is worked as follows:
Knit the first 30-34-38-41-46-50 stitches (= half the back piece), place the next 47-52-56-57-60-63 stitches on a thread for sleeve, cast on 8-8-8-10-10-10 new stitches on the needle (= side under the sleeve), knit the next 61-68-76-83-92-101 stitches (= front piece), place the next 47-52-56-57-60-63 stitches on a thread for sleeve, cast on 8-8-8-10-10-10 new stitches on the needle (=side under the sleeve) and knit the next 31-34-38-42-46-51 stitches (= half back piece).
Body and sleeves are finished separately. THE PIECE IS NOW MEASURED FROM HERE!

BODY:
= 138-152-168-186-204-222 stitches. Insert a marker thread in each side, in the middle of the 8-8-8-10-10-10 new stitches cast on under the sleeves (= 4-4-4-5-5-5 new stitches on each side of the marker thread). Continue in the round with wheat and stocking stitch. When the piece measures 4 cm decrease 2 stitches in each side – read DECREASE TIP. Decrease like this every 4-4-5-5-6-6 cm a total of 3 times = 126-140-156-174-192-210 stitches. When the piece measures 15-15-17-17-19-19 cm increase 2 stitches in each side – read INCREASE TIP. Increase like this every 3 cm a total of 5 times = 146-160-176-194-212-230 stitches. When the piece measures 30-31-32-33-34-35 cm increase 14-16-16-18-20-22 stitches evenly on round = 160-176-192-212-232-252 stitches. Change to circular needle size 4.5 mm and work rib (knit 2 /purl 2) for 4 cm. Cast off with knit over knit and purl over purl. To avoid the cast-off edge being tight you can make 1 yarn over after every 4th stitch at the same time as you cast off (yarn overs cast off as normal stitches).
The jumper measures approx. 58-60-62-64-66-68 cm from the shoulder down. 

SLEEVE:
= 47-52-56-57-60-63 stitches. Place the 47-52-56-57-60-63 stitches from the thread on the one side of the piece on double pointed needles size 5.5 mm and, in addition, knit up 1 stitch in each of the 8-8-8-10-10-10 new stitches cast on under the sleeve with wheat = 55-60-64-67-70-73 stitches. Insert 1 marker thread in the middle of the 8-8-8-10-10-10 new stitches (= 4-4-4-5-5-5 new stitches on each side of the marker thread).
Start the round here and work stocking stitch in the round with wheat. When the piece measures 4-4-4-4-3-3 cm from the division, decrease 2 stitches under the sleeve – read DECREASE TIP. Decrease like this every 4th-3rd-3rd-3rd-3rd-3rd round 10-12-13-13-14-14 times = 35-36-38-41-42-45 stitches. When the piece measures 24-24-23-23-23-23 cm increase 1-4-2-3-2-3 stitches evenly on round = 36-40-40-44-44-48 stitches. Work A.2 (= 4 stitches) in the round. When the whole of A.2 has been worked in height, change to double pointed needles size 4.5 mm and off white. Work rib (knit 2 /purl 2) for 5 cm. Change to wheat, work 1 round of rib as before and cast off with wheat and knit over knit and purl over purl. To avoid the cast-off edge being tight you can make 1 yarn over after every 4th stitch at the same time as you cast off (yarn overs cast off as normal stitches).
The sleeve measures 35-35-34-34-34-34-34 cm from the division.
Work the other sleeve in the same way.

Diagram

symbols = off white
symbols = wheat
symbols = purple haze
symbols = light grey green
symbols = increase round - see description in text
diagram
diagram

Each of our patterns has specific tutorial videos to help you.

Do you have a question? See a list of frequently asked questions (FAQ)

Knitting tension is what determines the final measurements of your work, and is usually measured per 10 x 10 cm. It is provided like so: number of stitches in width x number of rows in height - eg: 19 stitches x 26 rows = 10 x 10 cm.

The knitting tension is very individual; some people knit/crochet loosely while others work tightly. You adjust the knitting tension with the needle size, which is why the suggested needle size is only meant as a guide! You need to adjust this (up or down) to ensure that YOUR knitting tension matches the knitting tension provided in the pattern. If you work with a different knitting tension than provided you will have a different yarn consumption, and your work will have different measurements than what the pattern suggests.

The knitting tension also determines which yarns can replace each other. As long as you achieve the same knitting tension you can replace one yarn with another.

See DROPS lesson: How to measure your tension/gauge

See DROPS video: How to make a gauge tension swatch

The required amount of yarn is provided in grams, eg: 450 g. To calculate how many balls you’ll need you first need to know how many grams are in 1 ball (25g, 50g or 100g). This information is available if you click on the individual yarn quality on our pages. Divide the amount required with the amount of each ball. For example, if each ball is 50g (the most common amount), the calculation will be as follows: 450 / 50 = 9 balls.

The important thing when changing from one yarn to another is that the knitting/crochet tension remains the same. This is so that the measurements of the finished piece will be the same as on the sketch provided. It is easier to achieve the same knitting tension using yarns from the same yarn group. It is also possible to work with multiple strands of a thinner yarn to achieve the knitting tension of a thicker one. Please try our yarn converter. We recommend you to always work a test swatch.

Please NOTE: when changing yarn the garment might have a different look and feel to the garment in the photo, due to individual properties and qualities of each yarn.

See DROPS lesson: Can I use a different yarn than the one mentioned in the pattern?

All our yarns are categorised into yarn groups (from A to F) according to thickness and knitting tension – group A contains the thinnest yarns and group F the thickest. This makes it easier for you to find alternative yarns to our patterns, should you wish to switch yarn. All yarns within the same group have a similar knitting tension and can easily replace each other. However, different yarn qualities have different structures and properties which will give the finished work a unique look and feel.

Click here for an overview of the yarns in each yarn group

At the top of all our patterns you’ll find a link to our yarn calculator, which is a helpful tool should you wish to use a different yarn than suggested. By filling in the yarn quality you wish to replace, the amount (in your size) and number of strands, the calculator will present good alternative yarns with the same knitting tension. Additionally it will tell you how much you’ll require in the new qualities and whether you’ll need to work with multiple strands. Most skeins are 50g (some are 25g or 100g).

If the pattern is worked with multiple colours, every colour will have to be calculated separately. Similarly, if the pattern is worked with several strands of different yarns (for example 1 strand Alpaca and 1 strand Kid-Silk) you will have to find alternatives for each, individually.

Click here to see our yarn calculator

Since different yarns have different qualities and textures we have chosen to keep the original yarn in our patterns. However, you can easily find options among our available qualities by using our yarn calculator, or simply pick a yarn from the same yarn group.

It is possible that some retailers still have discontinued yarns in stock, or that someone has a few skeins at home that they would like to find patterns for.

The yarn calculator will provide both alternative yarn as well as required amount in the new quality.

If you think it's hard to decide what size to make, it can be a good idea to measure a garment you own already and like the size of. Then you can pick the size by comparing those measures with the ones available in the pattern's size chart.

You'll find the size chart at the bottom of the pattern.

See DROPS lesson: How to read size chart

The needle size provided in the pattern serves only as a guide, the important thing is to follow the knitting tension. And since knitting tension is very individual, you will have to adjust the needle size to ensure that YOUR tension is the same as in the pattern – maybe you’ll have to adjust 1, or even 2 needle sizes, up or down to achieve the correct tension. For this, we recommend that you work test swatches.

Should you work with a different knitting tension than the one provided, the measurements of the finished garment might deviate from the measurement sketch.

See DROPS lesson: How to measure your tension/gauge

See DROPS video: How to make a tension/gauge swatch

Working a garment top-down provides more flexibility and room for personal adjustment. For example it is easier to try the garment on while working, as well as making adjustments to length of yoke and shoulder caps.

The instructions are carefully explaining every step, in the correct order. Diagrams are adjusted to the knitting direction and are worked as usual.

The diagram depicts all rows/rounds, and every stitch seen from the right side. It is read from bottom to top, from right to left. 1 square = 1 stitch.

When working back and forth, every other row is worked from the right side and every other row is worked from the wrong side. When working from the wrong side, the diagram will have to be worked reversed: from left to right, knit stitches are purled, purl stitches are knit etc.

When working in the round every round is worked from the right side and the diagram are worked from right to left on all rounds.

See DROPS lesson: How to read knitting diagrams

The diagram depicts all rows/rounds, and every stitch seen from the right side. It is worked from bottom to top, from right to left.

When working back and forth every other row is worked from the right side: from right to left and every other row is worked from the wrong side: from left to right.

When working in the round, every row in the diagram are worked from the right side, from right to left.

When working a circular diagram you start in the middle and work your way outwards, counter clockwise, row by row.

The rows usually start with a given number of chain stitches (equivalent to the height of the following stitch), this will either be depicted in the diagram or explained in the pattern.

See DROPS lesson: How to read crochet diagrams

Instructions for working several diagrams after each other on the same row/round, will often be written like so: “work A.1, A.2, A.3 a total of 0-0-2-3-4 times". This means you work A.1 once, then A.2 is worked once, and A.3 is repeated (in width) the number of times provided for your size – in this case like so: S = 0 times, M = 0 times, L=2 times, XL= 3 times and XXL = 4 times.

The diagrams are worked as usual: begin with the first row in A.1, then work the first row in A.2 etc.

See DROPS lesson: How to read knitting diagrams

See DROPS lesson: How to read crochet diagrams

The total width of the garment (from wrist-to-wrist) will be larger in the larger sizes, despite the actual sleeves being shorter. The larger sizes have longer sleeve caps and wider shoulders, so there will be a good fit in all sizes.

The measurement sketch/schematic drawing provides information regarding the full length of the garment. If it’s a jumper or a jacket the length is measured from the highest point on the shoulder closest to the neckline, and straight down to the bottom of the garment. It is NOT measured from the tip of shoulder. Similarly, the length of yoke is measured from the highest point on the shoulder and down to where yoke is split into body and sleeves.

On a jacket measures are never taken along bands, unless specifically stated. Always measure inside band stitches when measuring the length.

See DROPS lesson: How to read a schematic drawing

Diagrams are often repeated on the round or in height. 1 repeat is the diagram the way it appears in the pattern. If it says to work 5 repeats of A.1 in the round, then you work A.1 a total of 5 times after/next to each other in the round. If it says to work 2 repeats of A.1 vertically/in height you work the entire diagram once, then begin again at the start and work the entire diagram one more time.

Chain stitches are slightly narrower than other stitches and to avoid working the cast-on edge too tight, we simply chain more stitches to begin with. The stitch count will be adjusted on the following row to fit the pattern and measurement sketch.

The rib edge is more elastic and will contract slightly compared to, for example, stocking stitch. By increasing before the rib edge, you avoid a visible difference in width between the rib edge and the rest of the body.

It’s very easy to cast off too tightly, and by making yarn overs while casting off (and simultaneously casting these off) you avoid a too tight cast off edge.

See DROPS video: How to bind off with yarn overs (yo)

To achieve an even increase (or decrease) you can increase on, for example: every 3rd and 4th row alternately, like so: work 2 rows and increase on the 3rd row, work 3 rows and increase on the 4th. Repeat this until the increase is complete.

See DROPS lesson: Increase or decrease 1 st on every 3rd and 4th row alternately

Should you prefer to work in the round instead of back and forth, you may of course adjust the pattern. You’ll need to add steeks mid-front (usually 5 stitches), and follow the instructions. When you would normally turn and work from the wrong side, simply work across the steek and continue in the round. At the end you’ll cut the piece open, pick up stitches to work bands, and cover the cut edges.

See DROPS video: How to knit steeks and cut open

Should you prefer to work back and forth instead of in the round, you may of course adjust the pattern so you work the pieces separately and then assemble them at the end. Divide the stitches for the body in 2, add 1 edge stitch in each side (for sewing) and work the front and back pieces separately.

See DROPS lesson: Can I adapt a pattern for circular needles into straight needles?

Pattern repeats can vary slightly in the different sizes, in order to get the correct proportions. If you’re not working the exact same size as the garment in the photo, yours might deviate slightly. This has been carefully developed and adjusted so that the complete impression of the garment is the same in all sizes.

Make sure to follow instructions and diagrams for your size!

If you have found a pattern you like which is available in women’s size it’s not very difficult to convert it to men’s size. The biggest difference will be the length of sleeves and body. Start working on the women size that you think would fit across the chest. The additional length will be worked right before you cast off for the armhole/sleeve cap. If the pattern is worked top-down you can add the length right after the armhole or before the first decrease on sleeve.

Regarding additional yarn amount, this will depend on how much length you add, but it is better with a skein too many than too few.

All yarns will have excess fibres (from production) that might come off as lint or shedding. Brushed yarns (ie hairier yarns) have more of these loose, excess fibres, causing more shedding.

Shedding also depends on what is worn under or over the garment, and whether this pulls at the yarn fibres. It’s therefore not possible to guarantee that there will be no shedding

Below are some tips on how to get the best result when working with hairier yarns:

1. When the garment is finished (before you wash it) shake it vigorously so the looser hairs come off. NOTE: do NOT use a lint roller, brush or any method that pulls at the yarn.

2. Place the garment in a plastic bag and put it in your freezer - the temperature will cause the fibres to become less attached to each other, and excess fibres will come off easier.

3. Leave in the freezer for a few hours before taking it out and shaking it again.

4. Wash the garment according to the instructions on the yarn label.

Pilling is a natural process that happens to even the most exclusive of fibers. It's a natural sign of wear and tear that is hard to avoid, and that is most visible in high friction areas of your garment like a sweater's arms and cuffs.

You can make your garment look as new by removing the pilling, using a fabric comb or a pill/lint remover.

Still can't find the answer you need? Then scroll down and leave your question so one of our experts can try to help you. This will be done normally within 5 to 10 working days.
In the meantime, you can read the questions and answers that others have left to this pattern or join the DROPS Workshop on Facebook to get help from fellow knitters/crocheters!

You might also like...

191-12 Nougat

Theresa, Slovakia

Nougat

Sophie, Germany

Post a comment to pattern DROPS 191-12

We would love to hear what you have to say about this pattern!

If you want to leave a question, please make sure you select the correct category in the form below, to speed up the answering process. Required fields are marked *.

Comments / Questions (28)

country flag Jenny Douglas wrote:

Please can you tell me what the alternative colour combinations are. You only list the ones for the main pattern and not the two other examples. Thank you.

20.11.2022 - 18:30

DROPS Design answered:

Dear Jenny, the other colour combinations are indicated in the materials section, just after the needles and gauges. The letter for each combination is shown in the photos for the combination. "Colour combinations shown are: A) DROPS Air 04, 03, 16, 10. (blue combination) B) DROPS Air 03, 01, 15, 14."(red combination) Happy knitting!

21.11.2022 - 00:58

country flag Anne-Ly wrote:

Kas kehaosas enne soonikut tuleb kahandada või kasvatada silmuseid? Vastuoluline juhis on. Juhise järgi kahandada, aga kui vaadata uut silmuste arvu, siis pigem kasvatada. Kumb on õige?

27.10.2022 - 11:35

DROPS Design answered:

Tere Anne-Ly! Vahetult enne soonikut kasvatatakse silmuseid, et soonik ei kisuks liialt kokku. Seda ei pea tegema, kui tahetakse tihedalt ümberhoidvat soonikut. Viga parandatud. Tänan!

27.10.2022 - 15:29

country flag Alexandra Strnadová wrote:

Chci plést pulover Nougat v jiné barevnosti než je v návodu , ale je ve vaší nabídce, jak zjistím, která čísla přízí použít ? Děkuji\r\nStrnadová Alexandra

21.08.2022 - 20:16

DROPS Design answered:

Dobrý den, čísla použitých odstínů jsme doplnili přímo do návodu - najdete je vypsané pod hlavičkou návodu; pořadí odpovídá pořadí v odstavci Materiál. Hodně zdaru! Hana

10.09.2022 - 15:57

country flag Wilhelmien Van Rixtel wrote:

Hallo ik ben met telpatroon 191-12 bezig. Na de tweede meerdering klopt het telpatroon niet meer. Hoe kan ik dit oplossen Met vriendelijke groet.

28.02.2022 - 16:39

DROPS Design answered:

Dag Wilhelmien,

Je meerdert steeds een meervoud van 12 steken en 1 patroonherhaling in de breedte is ook 12 steken. Het totaal aantal steken op de toer is dus een meervoud van 12 steken. Op deze manier zou je precies uit moeten komen. Je hoeft verder niet te kijken naar of bijvoorbeeld de steek in paarse mist boven de steek onder de meerdering van pijl 2 komt. Hier zit natuurlijk een verschuiving in door het meerderen, maar dat maakt niet uit.

02.03.2022 - 11:47

country flag Carolina Dagevos Millin wrote:

Ik ga beginnen met dit patroon. Heeft het blonde meisje op de foto een verhoging in de achterkant van de hals? Met vriendelijke groet, Carolina

22.03.2021 - 21:22

DROPS Design answered:

Dag Caroline

Eerlijk gezegd weet ik dat niet. Maar of je al dan niet een verhoging maakt op de achterkant, heeft geen invloed op hoe het patroon er aan de voorkant uitziet.

02.04.2021 - 11:39

country flag Yvonne wrote:

Kann mann die Strickanleitung auch in Papier zur Wolle bekommen ?

13.01.2021 - 18:23

DROPS Design answered:

Liebe Yvonne, klicken Sie auf dem Icon "Drucken" um die Anleitung zu drücken - hier finden Sie die Liste von den DROPS Händlern in Deutschland. Viel Spaß beim stricken!

14.01.2021 - 07:20

country flag MARTIN Marie José wrote:

Je reviens vers vous car c’est la 1er fois que je tricote un top down En ce qui concerne le modèle nougat n°ai 115 après la réhausse de l’encolure dois je faire les 1er Augmentations sur le 1er rang en totalité ? Et ainsi de suite en face des flèches ? Merci

14.11.2020 - 20:25

DROPS Design answered:

Bonjour Mme Martin, après la réhausse, vous tricotez A.1 à partir du milieu dos et augmentez le nombre de mailles indiqué pour chaque taille à chacun des rangs avec une flèche, par ex. au rang avec la flèche-1 dans A.1, vous augmente 31 à 48 m selon la taille sur ce tour - cette leçon explique comment procéder. Au tour suivant, tricotez A.1 comme avant (= vous répétez les 12 m du diagramme) et augmentez de nouveau au tour avec la flèche-2, au tour suivant, répétez A. 1 comme avant (le motif ne sera plus aligné en raison des augmentations, répétez-le simplement en largeur), et ainsi de suite. Bon tricot!

16.11.2020 - 08:40

country flag Martin MJosé wrote:

Bonjour Je voudrais savoir s’il est possible de tricoter les manches avec les aiguilles circulaires Plutôt que les doubles pointes Je viens de commencer le modèle Nougat n°ai 115 Merci

09.11.2020 - 16:41

DROPS Design answered:

Bonjour Mme Martin, tout à fait, vous pouvez utiliser soit une petite aiguille circulaire de 40 cm au début, soit dès le début tricoter en magic loop avec une longue aiguille circulaire comme on le montre dans cette vidéo. Bon tricot!

10.11.2020 - 08:50

country flag Sylvie SABAU wrote:

Bonjour, Comment procéder pour commander la laine et les aiguilles pour réaliser ce modèle? Où trouver la laine correspondante? Merci pour votre aide Cordialement Sylvie Sabau

18.11.2019 - 11:57

DROPS Design answered:

Bonjour Mme Sabau, vous trouverez ici la liste des magasins DROPS en France, si vous n'avez pas la chance d'avoir une boutique près de chez vous, vous pouvez vous commander dans l'une des boutiques en ligne. Bon tricot!

18.11.2019 - 12:16

country flag Mariaana wrote:

Hei. Voinko vaihtaa ohjeen langan suoraan perusvahvuiseen villalankaan? En ole aikasemmin kutonut ohjeen langalla ja koko villainen paita olisi ihana. Esim islantilaisesta villasta tai sitten ohuemmasta alpacasta.

31.07.2019 - 08:26

DROPS Design answered:

Kun vaihdat toiseen lankaan, voit valita jonkun lankaryhmään C kuuluvan langan. Voit myös valita langan lankaryhmästä A ja tällöin neulot puseron kaksinkertaisella langalla. Lankaryhmät löytyvät sivun yläreunan Langat-linkin alta.

19.12.2019 - 14:05