
Popular categories
Looking for a yarn?


|
|||||||||||||||||||||||||
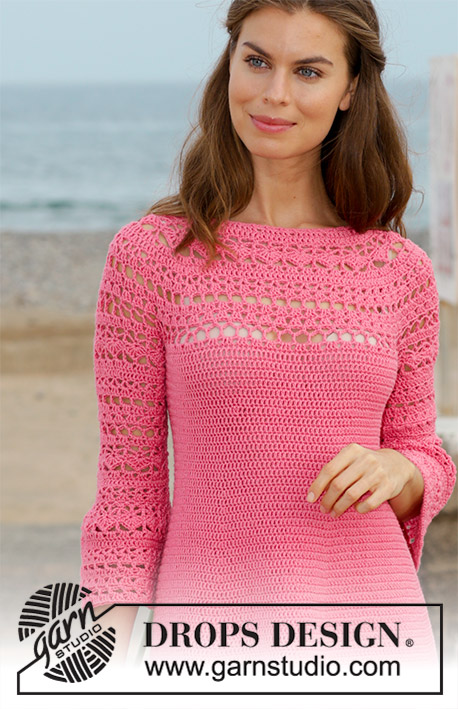
Primrose Dress |
|||||||||||||||||||||||||
 |
 |
||||||||||||||||||||||||
Dress with lace pattern and round yoke, worked top down. Size: S - XXXL Piece is crocheted in DROPS Cotton Merino.
DROPS 186-2 |
|||||||||||||||||||||||||
|
INFORMATION FOR PATTERN: PATTERN: See diagrams A.1 to A.5. Diagrams A.1 and A.5 show how diagram begins and ends. On 7th, 11th and 13th round, A.5 and A.1 do not replace first stitch in A.4 and A.2, i.e. the rounds start with 3 chain stitches (does not replace first treble crochet) and finishes with 1 slip stitch in first stitch in A.2 and A.4. On the remaining rounds, first stitch in A.2 and A.4 is replaced with A.1 and A.5 CROCHET INFO: At beginning of every round with treble crochet replace first treble crochet with 3 chain stitches. Finish round with 1 slip stitch in 3rd chain stitch at beginning of round. On every round with double crochets replace first double crochet with 1 chain stitch. Finish round with 1 slip stitch in first chain stitch at beginning of round. INCREASE TIP-1 (evenly spaced): To calculate how to increase evenly, use the total number of stitches on round (e.g. 94 treble crochets) and divide stitches by number of increases to be done (e.g. 18) = 5.2. I.e. in this example work 2 treble crochets in approx. 5th treble crochet. INCREASE TIP-2 (applies to side of body): Work until 2 treble crochets remain before marker thread, work 2 treble crochets in next treble crochet, 1 treble crochet in each of the next 2 treble crochets (marker thread is in the middle of these treble crochets), work 2 treble crochets in next treble crochet. Increase like this at both marker threads (= 4 treble crochets increased in total). WORK 2 TREBLE CROCHETS TOGETHER: * Make 1 yarn over, insert hook in next stitch, get yarn, make 1 yarn over and pull yarn through the 2 first loops on hook *, repeat from *-* 1 more time, make 1 yarn over and pull yarn through all 3 loops on hook (= 1 treble crochet decreased). DECREASE TIP (applies to body): Decrease 1 treble crochet on each side of every marker thread as follows: Work until 3 treble crochets remain before marker thread, WORK 2 TREBLE CROCHETS TOGETHER - see explanation above, work 1 treble crochet in each of the next 2 treble crochets (marker thread is in the middle of these stitches), work the next 2 treble crochets together. Decrease like this at both marker threads (= 4 treble crochets decreased in total). DECREASE TIP-1 (evenly spaced): To calculate how to evenly decrease, take the total number of stitches on round (for example 60 stitches) and divide by the number of decreases that should be made (for example 6) = 10. In this example work every 9th and 10th stitch together. ---------------------------------------------------------- DRESS: Work in the round top down. Round begins approx. mid back (this varies in the different sizes due to number of pattern repetitions on back piece). YOKE: Work 108-108-117-117-124-124 chain stitches on hook size 4 mm with Cotton Merino and form 1 ring with 1 slip stitch in first chain stitch. Work first round as follows: Work 3 chain stitches (= 1 treble crochet) - read CROCHET INFO, 1 treble crochet in each of the next 3-3-5-5-5-5 chain stitches, * skip 1 chain stitch, 1 treble crochet in each of the next 6 chain stitches *, repeat from *-* = 94-94-102-102-108-108 treble crochets. Work 1 round with 1 treble crochet in every treble crochet and increase 18-18-22-22-28-40 treble crochets evenly - read INCREASE TIP-1 = 112-112-124-124-136-148 treble crochets. Work next round and insert 4 marker threads in the piece as follows: A.1 shows how round begins and ends - read PATTERN. Work A.2 (= 6 treble crochets) over the first 18-18-24-24-24-30 treble crochets (= 3-3-4-4-4-5 times in width) (= approx. half back piece), A.3 (= 4 treble crochets), insert 1st marker thread, A.2 over the next 12 treble crochets (= 2 times in width), insert 2nd marker thread, A.3 over the next 4 treble crochets (= sleeve), A.2 over the next 36-36-42-42-48-54 treble crochets (= 6-6-7-7-8-9 times in width) (= front piece), A.3 over the next 4 treble crochets, insert 3rd marker thread, A.2 over the next 12 treble crochets (= 2 times in width), insert 4th marker thread, A.3 over the next 4 treble crochets (= sleeve) and finish with A.2 over the last 18-18-18-18-24-24 treble crochets (= 3-3-3-3-4-4 times in width). REMEMBER THE CROCHET TENSION! Continue pattern like this and increase as shown in diagram A.3. AT THE SAME TIME increase evenly on sleeve (i.e. between 1st and 2nd marker thread and between 3rd and 4th marker thread) as follows: ROUND 8: Increase 0-6-6-6-6-6 treble crochets on each sleeve (= 0-12-12-12-12-12 treble crochets increased in total). ROUND 10: Increase 0-0-0-0-6-6 treble crochets on each sleeve (= 0-0-0-0-12-12 treble crochets increased in total). ROUND 14: Increase 0-0-0-0-0-6 treble crochets on each sleeve (= 0-0-0-0-0-12 treble crochets increased in total). When A.1 to A.3 have been worked 1 time vertically, there are 240-252-264-264-288-312 treble crochets on last round. Piece measures approx. 15 cm. Work the first 0-0-2-2-4-4 rounds of A.2a over all stitches. Piece measures approx. 15-15-17-17-19-19 cm. Now work treble crochets over body and pattern over sleeves as follows: Work 1 treble crochet in each of the first 33-33-39-39-39-45 treble crochets and increase 0-2-2-2-2-2 treble crochets evenly (= approx. half back piece), work A.4 (= 6 treble crochets) over the next 54-60-60-60-66-72 treble crochets (= 9-10-10-10-11-12 times in width) (= sleeve), work 1 treble crochet in each of the next 66-66-72-72-78-84 treble crochets and increase 0-4-4-4-4-4 treble crochets evenly (= front piece), A.4 over the next 54-60-60-60-66-72 treble crochets (= 9-10-10-10-11-12 times in width) (= sleeve) and finish with 1 treble crochet in each of the last 33-33-33-33-39-39 treble crochets and increase 0-2-2-2-2-2 treble crochets evenly (= approx. half back piece) (= 0-8-8-8-8-8 treble crochets increased in total). Increase like this every round 0-2-2-3-4-5 times in total = 240-268-280-288-320-352 stitches. On round 7, 10 and 12 in diagram A.4a work transition between treble crochets and pattern as follows: Work treble crochets until 1 treble crochet remains before pattern, work 2 chain stitches and 1 double crochet in last treble crochet, work pattern as before, work 1 double crochet in first treble crochet after pattern and 2 chain stitches. Continue like this until piece measures 18-19-21-23-25-27 cm. Now divide sleeves and body as follows: Work 1 treble crochet in each of the first 33-37-43-45-47-55 treble crochets (= approx. half back piece), work 6-6-6-12-12-12 chain stitches, skip the next 54-60-60-60-66-72 stitches (= A.4) for sleeve, work 1 treble crochet in each of the next 66-74-80-84-94-104 treble crochets (= front piece), work 6-6-6-12-12-12 chain stitches, skip the next 54-60-60-60-66-72 stitches (= A.4) for sleeve and finish with 1 treble crochet in each of the last 33-37-37-39-47-49 treble crochets (= approx. half back piece). Finish sleeves and body separately. BODY: = 144-160-172-192-212-232 treble crochets/chain stitches. Insert a marker thread in the middle of the new stitches under each sleeve. Continue with 1 treble crochet in every stitch. When piece measures 4 cm from where body was divided for sleeves, decrease 1 treble crochet on each side of every marker thread (= 4 treble crochets decreased) - read DECREASE TIP! Decrease like this every 0-3½-6-3½-3½-0 cm 1-3-2-3-3-1 time in total = 140-148-164-180-200-228 treble crochets. Continue with 1 treble crochet in every treble crochet. When piece measures 37-39-41-43-45-47 cm from neck edge, increase 1 treble crochet on each side of every marker thread (= 4 treble crochets increased) – read INCREASE TIP-2. Increase like this every 1½ cm 16-17-16-15-19-18 times in total = 204-216-228-240-276-300 treble crochets. When piece measures 47-48-48-48-48-48 cm from where piece was divided from sleeves, work A.4a over all stitches (= 34-36-38-40-46-50 times in width). Diagram A.5 shows how every round begins and ends. When A.4a has been worked 1 time vertically, piece measures approx. 59-60-60-60-60-60 cm from where piece was divided from sleeves. Fasten off. Piece measures approx. 77-79-81-83-85-87 cm from neck edge. SLEEVE: Worked in the round, top down. Work 1 double crochet in the 1st chain stitch of the 6-6-12-12-12-12 chain stitches worked in armhole on body, work A.4a over chain stitches (= 1-1-1-2-2-2 times in width), adjust pattern according to rest of sleeve, then work pattern as before over the 54-60-60-60-66-72 stitches (i.e. work A.4a, A.5 shows how every round begins and ends) = 60-66-72-72-78-84 stitches. Diagram A.4a is now worked 10-11-12-12-13-14 times in width. Continue pattern like this. When piece measures 4 cm from where sleeves were divided from body, adjust so that next round is 1 round with treble crochets, decrease 6 treble crochets evenly – READ DECREASE TIP-1. Work A.4a 1 time less in width. Decrease like this every 8-6-6-5-5-3 cm 2-3-3-3-3-4 times in total = 48-48-54-54-60-60 treble crochets. A.4a is now worked 8-8-9-9-10-10 times in width. Continue pattern like this until piece measures 22-22-20-18-17-15 cm from where sleeve was divided from body, adjust so that next round is a round with treble crochets. On next round increase 24-24-30-30-36-36 treble crochets evenly = 72-72-84-84-96-96 treble crochets. A.4a is now worked 12-12-14-14-16-16 times in width. Continue like this until sleeve measures 34-34-32-30-29-27 cm from where it was divided from body, adjust to finish nicely according to pattern. Fasten off. Sleeve measures approx. 52-53-53-53-54-54 cm from neck edge. NECK EDGE: Crochet an edge around the neck. Begin mid back. Work * 1 double crochet in first/next treble crochet, 3 chain stitches, skip approx. 1 cm *, repeat from *-* around the entire neck. Make sure to avoid a tight neck edge, adjust to finish with 1 slip stitch in first double crochet. Fasten off. |
|||||||||||||||||||||||||
Diagram explanations |
|||||||||||||||||||||||||
|
|||||||||||||||||||||||||

|
|||||||||||||||||||||||||

|
|||||||||||||||||||||||||

|
|||||||||||||||||||||||||
|
Have you made this or any other of our designs? Tag your pictures in social media with #dropsdesign so we can see them! Do you need help with this pattern?You'll find tutorial videos, a Comments/Questions area and more by visiting the pattern on garnstudio.com. © 1982-2024 DROPS Design A/S. We reserve all rights. This document, including all its sub-sections, has copyrights. Read more about what you can do with our patterns at the bottom of each pattern on our site. |
|||||||||||||||||||||||||


With over 40 years in knitting and crochet design, DROPS Design offers one of the most extensive collections of free patterns on the internet - translated to 17 languages. As of today we count 304 catalogues and 11422 patterns - 11422 of which are translated into English (UK/cm).
We work hard to bring you the best knitting and crochet have to offer, inspiration and advice as well as great quality yarns at incredible prices! Would you like to use our patterns for other than personal use? You can read what you are allowed to do in the Copyright text at the bottom of all our patterns. Happy crafting!
Comments / Questions (72)
Zomer roosje
11.12.2017 - 16:15J’adore cette robe! J’espere la retrouver dans les modèles gratuits pour pouvoir me la faire
11.12.2017 - 14:19