
Popular categories
Looking for a yarn?


|
|||||||||||||||||||||||||
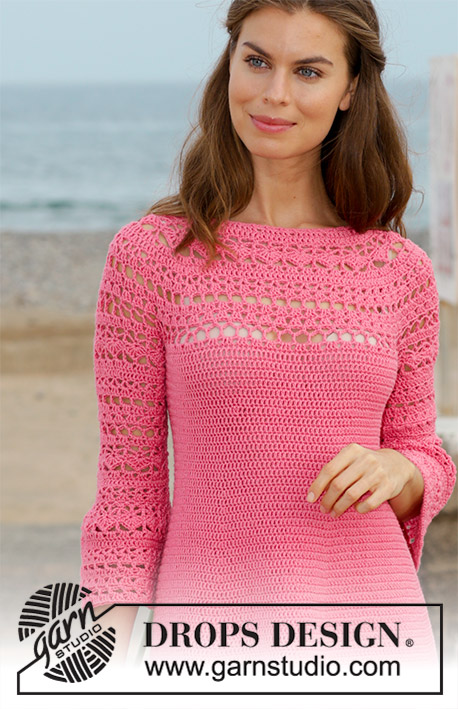
Primrose Dress |
|||||||||||||||||||||||||
 |
 |
||||||||||||||||||||||||
Dress with lace pattern and round yoke, worked top down. Size: S - XXXL Piece is crocheted in DROPS Cotton Merino.
DROPS 186-2 |
|||||||||||||||||||||||||
|
INFORMATION FOR PATTERN: PATTERN: See diagrams A.1 to A.5. Diagrams A.1 and A.5 show how diagram begins and ends. On 7th, 11th and 13th round, A.5 and A.1 do not replace first stitch in A.4 and A.2, i.e. the rounds start with 3 chain stitches (does not replace first double crochet) and finishes with 1 slip stitch in first stitch in A.2 and A.4. On the remaining rounds, first stitch in A.2 and A.4 is replaced with A.1 and A.5 CROCHET INFO: At beginning of every round with double crochet replace first double crochet with 3 chain stitches. Finish round with 1 slip stitch in 3rd chain stitch at beginning of round. On every round with single crochets replace first single crochet with 1 chain stitch. Finish round with 1 slip stitch in first chain stitch at beginning of round. INCREASE TIP-1 (evenly spaced): To calculate how to increase evenly, use the total number of stitches on round (e.g. 94 double crochets) and divide stitches by number of increases to be done (e.g. 18) = 5.2. I.e. in this example work 2 double crochets in approx. 5th double crochet. INCREASE TIP-2 (applies to side of body): Work until 2 double crochets remain before marker thread, work 2 double crochets in next double crochet, 1 double crochet in each of the next 2 double crochets (marker thread is in the middle of these double crochets), work 2 double crochets in next double crochet. Increase like this at both marker threads (= 4 double crochets increased in total). WORK 2 DOUBLE CROCHETS TOGETHER: * Make 1 yarn over, insert hook in next stitch, get yarn, make 1 yarn over and pull yarn through the 2 first loops on hook *, repeat from *-* 1 more time, make 1 yarn over and pull yarn through all 3 loops on hook (= 1 double crochet decreased). DECREASE TIP (applies to body): Decrease 1 double crochet on each side of every marker thread as follows: Work until 3 double crochets remain before marker thread, WORK 2 DOUBLE CROCHETS TOGETHER - see explanation above, work 1 double crochet in each of the next 2 double crochets (marker thread is in the middle of these stitches), work the next 2 double crochets together. Decrease like this at both marker threads (= 4 double crochets decreased in total). DECREASE TIP-1 (evenly spaced): To calculate how to evenly decrease, take the total number of stitches on round (for example 60 stitches) and divide by the number of decreases that should be made (for example 6) = 10. In this example work every 9th and 10th stitch together. ---------------------------------------------------------- DRESS: Work in the round top down. Round begins approx. mid back (this varies in the different sizes due to number of pattern repetitions on back piece). YOKE: Work 108-108-117-117-124-124 chain stitches on hook size 4 mm / G/6 with Cotton Merino and form 1 ring with 1 slip stitch in first chain stitch. Work first round as follows: Work 3 chain stitches (= 1 double crochet) - read CROCHET INFO, 1 double crochet in each of the next 3-3-5-5-5-5 chain stitches, * skip 1 chain stitch, 1 double crochet in each of the next 6 chain stitches *, repeat from *-* = 94-94-102-102-108-108 double crochets. Work 1 round with 1 double crochet in every double crochet and increase 18-18-22-22-28-40 double crochets evenly - read INCREASE TIP-1 = 112-112-124-124-136-148 double crochets. Work next round and insert 4 marker threads in the piece as follows: A.1 shows how round begins and ends - read PATTERN. Work A.2 (= 6 double crochets) over the first 18-18-24-24-24-30 double crochets (= 3-3-4-4-4-5 times in width) (= approx. half back piece), A.3 (= 4 double crochets), insert 1st marker thread, A.2 over the next 12 double crochets (= 2 times in width), insert 2nd marker thread, A.3 over the next 4 double crochets (= sleeve), A.2 over the next 36-36-42-42-48-54 double crochets (= 6-6-7-7-8-9 times in width) (= front piece), A.3 over the next 4 double crochets, insert 3rd marker thread, A.2 over the next 12 double crochets (= 2 times in width), insert 4th marker thread, A.3 over the next 4 double crochets (= sleeve) and finish with A.2 over the last 18-18-18-18-24-24 double crochets (= 3-3-3-3-4-4 times in width). REMEMBER THE CROCHET GAUGE! Continue pattern like this and increase as shown in diagram A.3. AT THE SAME TIME increase evenly on sleeve (i.e. between 1st and 2nd marker thread and between 3rd and 4th marker thread) as follows: ROUND 8: Increase 0-6-6-6-6-6 double crochets on each sleeve (= 0-12-12-12-12-12 double crochets increased in total). ROUND 10: Increase 0-0-0-0-6-6 double crochets on each sleeve (= 0-0-0-0-12-12 double crochets increased in total). ROUND 14: Increase 0-0-0-0-0-6 double crochets on each sleeve (= 0-0-0-0-0-12 double crochets increased in total). When A.1 to A.3 have been worked 1 time vertically, there are 240-252-264-264-288-312 double crochets on last round. Piece measures approx. 15 cm / 6". Work the first 0-0-2-2-4-4 rounds of A.2a over all stitches. Piece measures approx. 15-15-17-17-19-19 cm / 6"-6"-6¾"-6¾"-7½"-7½". Now work double crochets over body and pattern over sleeves as follows: Work 1 double crochet in each of the first 33-33-39-39-39-45 double crochets and increase 0-2-2-2-2-2 double crochets evenly (= approx. half back piece), work A.4 (= 6 double crochets) over the next 54-60-60-60-66-72 double crochets (= 9-10-10-10-11-12 times in width) (= sleeve), work 1 double crochet in each of the next 66-66-72-72-78-84 double crochets and increase 0-4-4-4-4-4 double crochets evenly (= front piece), A.4 over the next 54-60-66-60-66-72 double crochets (= 9-10-11-10-11-12 times in width) (= sleeve) and finish with 1 double crochet in each of the last 33-33-33-33-39-39 double crochets and increase 0-2-2-2-2-2 double crochets evenly (= approx. half back piece) (= 0-8-8-8-8-8 double crochets increased in total). Increase like this every round 0-2-2-3-4-5 times in total = 240-268-280-288-320-352 stitches. On round 7, 10 and 12 in diagram A.4a work transition between double crochets and pattern as follows: Work double crochets until 1 double crochet remains before pattern, work 2 chain stitches and 1 single crochet in last double crochet, work pattern as before, work 1 single crochet in first double crochet after pattern and 2 chain stitches. Continue like this until piece measures 18-19-21-23-25-27 cm / 7"-7½"-8¼"-9"-9¾"-10½". Now divide sleeves and body as follows: Work 1 double crochet in each of the first 33-37-43-45-47-55 double crochets (= approx. half back piece), work 6-6-6-12-12-12 chain stitches, skip the next 54-60-60-60-66-72 stitches (= A.4) for sleeve, work 1 double crochet in each of the next 66-74-80-84-94-104 double crochets (= front piece), work 6-6-6-12-12-12 chain stitches, skip the next 54-60-60-60-66-72 stitches (= A.4) for sleeve and finish with 1 double crochet in each of the last 33-37-37-39-47-49 double crochets (= approx. half back piece). Finish sleeves and body separately. BODY: = 144-160-172-192-212-232 double crochets/chain stitches. Insert a marker thread in the middle of the new stitches under each sleeve. Continue with 1 double crochet in every stitch. When piece measures 4 cm / 1½" from where body was divided for sleeves, decrease 1 double crochet on each side of every marker thread (= 4 double crochets decreased) - read DECREASE TIP! Decrease like this every 0-3½-6-3½-3½-0 cm / 0"-1¼"-2¼"-1¼"-1¼"-0" 1-3-2-3-3-1 time in total = 140-148-164-180-200-228 double crochets. Continue with 1 double crochet in every double crochet. When piece measures 37-39-41-43-45-47 cm / 14½"-15¼"-16⅛"-17"-17¾"-18½" from neck edge, increase 1 double crochet on each side of every marker thread (= 4 double crochets increased) – read INCREASE TIP-2. Increase like this every 1½ cm / ½" 16-17-16-15-19-18 times in total = 204-216-228-240-276-300 double crochets. When piece measures 47-48-48-48-48-48 cm / 18½"-19"-19"-19"-19"-19"" from where piece was divided from sleeves, work A.4a over all stitches (= 34-36-38-40-46-50 times in width). Diagram A.5 shows how every round begins and ends. When A.4a has been worked 1 time vertically, piece measures approx. 59-60-60-60-60-60 cm / 23¼"-23½"-23½"-23½"-23½-"23½" from where piece was divided from sleeves. Fasten off. Piece measures approx. 77-79-81-83-85-87 cm / 30⅜"-31"-32"-32¾"-33½"-34¼" from neck edge. SLEEVE: Worked in the round, top down. Work 1 single crochet in the 1st chain stitch of the 6-6-12-12-12-12 chain stitches worked in armhole on body, work A.4a over chain stitches (= 1-1-1-2-2-2 times in width), adjust pattern according to rest of sleeve, then work pattern as before over the 54-60-60-60-66-72 stitches (i.e. work A.4a, A.5 shows how every round begins and ends) = 60-66-72-72-78-84 stitches. Diagram A.4a is now worked 10-11-12-12-13-14 times in width. Continue pattern like this. When piece measures 4 cm / 1½" from where sleeves were divided from body, adjust so that next round is 1 round with double crochets, decrease 6 double crochets evenly – READ DECREASE TIP-1. Work A.4a 1 time less in width. Decrease like this every 8-6-6-5-5-3 cm / 3"-2½"-2½"-2"-2"-1" 2-3-3-3-3-4 times in total = 48-48-54-54-60-60 double crochets. A.4a is now worked 8-8-9-9-10-10 times in width. Continue pattern like this until piece measures 22-22-20-18-17-15 cm / 8¾"-8¾"-8"-7"-6¾"-6" from where sleeve was divided from body, adjust so that next round is a round with double crochets. On next round increase 24-24-30-30-36-36 double crochets evenly = 72-72-84-84-96-96 double crochets. A.4a is now worked 12-12-14-14-16-16 times in width. Continue like this until sleeve measures 34-34-32-30-29-27 cm / 13½"-13½"-12½"-11¾"-11½"-10½" from where it was divided from body, adjust to finish nicely according to pattern. Fasten off. Sleeve measures approx. 52-53-53-53-54-54 cm / 20½"-21"-21"-21"-21¼"-21¼" from neck edge. NECK EDGE: Crochet an edge around the neck. Begin mid back. Work * 1 single crochet in first/next double crochet, 3 chain stitches, skip approx. 1 cm / ⅜" *, repeat from *-* around the entire neck. Make sure to avoid a tight neck edge, adjust to finish with 1 slip stitch in first single crochet. Fasten off. |
|||||||||||||||||||||||||
Diagram explanations |
|||||||||||||||||||||||||
|
|||||||||||||||||||||||||

|
|||||||||||||||||||||||||

|
|||||||||||||||||||||||||

|
|||||||||||||||||||||||||
|
Have you made this or any other of our designs? Tag your pictures in social media with #dropsdesign so we can see them! Do you need help with this pattern?You'll find tutorial videos, a Comments/Questions area and more by visiting the pattern on garnstudio.com. © 1982-2024 DROPS Design A/S. We reserve all rights. This document, including all its sub-sections, has copyrights. Read more about what you can do with our patterns at the bottom of each pattern on our site. |
|||||||||||||||||||||||||


With over 40 years in knitting and crochet design, DROPS Design offers one of the most extensive collections of free patterns on the internet - translated to 17 languages. As of today we count 304 catalogs and 11422 patterns - 11417 of which are translated into English (US/in).
We work hard to bring you the best knitting and crochet have to offer, inspiration and advice as well as great quality yarns at incredible prices! Would you like to use our patterns for other than personal use? You can read what you are allowed to do in the Copyright text at the bottom of all our patterns. Happy crafting!
Comments / Questions (72)
Hallo, bij de kleur staat nummer 13 raspberry, maar deze kleur bestaat niet... 13 is koraal, 14 is roze. Welke is de kleur vd afbeelding?\r\nAlvast bedankt voor jet antwoord! Hartelijke groeten, Ingrid
24.06.2018 - 01:24DROPS Design answered:
Dag Ingrid, Dankjewel voor het doorgeven. Het is inmiddels gecorrigeerd. Het is inderdaad nr 13, koraal.
25.06.2018 - 10:44Hallo, bij de kleur staat nummer 13 raspberry, maar deze kleur bestaat niet... 13 is koraal, 14 is roze. Welke is de kleur vd afbeelding?\r\nAlvast bedankt voor jet antwoord! Hartelijke groeten, Ingrid
20.06.2018 - 13:51Det verkar vara problem med diagrammen på de flesta av era virkmönster, i ska fall när man kollar på mobilen. Symbolerna har blivit ersatta av vita rutor.
06.05.2018 - 11:14DROPS Design answered:
Hei Sofia. Det var ingen problemer med symbolene når jeg sjekket dem nå. Det kan være at de er i et format mobilen ikke klarer å lese og at det er derfor de vises som hvite firkanter.
09.05.2018 - 08:38After completing the increase second row, it says work 6 double crochet over the first 24 double crochet 4 times. Does this mean 6 double crochet in each 24 double crochet? Or, one double crochet in each of the 24 double crochet?
10.04.2018 - 23:07DROPS Design answered:
Dear Elecia, A.2 is worked over 6 double crochet, ie when working 1st row (inserting marker), repeat row 1 in A.2 (= the row after the one with a star) a total of 4 times over the first 24 double crochet, when you have to crochet A.2 over the next 12 dc, you will repeat A.2 a total of 2 times in width and so on. Happy crocheting!
11.04.2018 - 09:38I want to make this using a sports weight yarn for someone in Florida. Would I have to go up a size and hook?
02.04.2018 - 16:37DROPS Design answered:
Dear Elecia, if you want to do this from a sportweight yarn, and go up a hook-size your crocheted fabric would not have the same densness, it would not hold up, like a thicker yarn. If anything, you should go down and use smaller hooks, make a swatch and recalculate the stitchnumber accordingly. Happy Crafting!
02.04.2018 - 22:31Hej, varv 5 på A3 börjar med st-lm-st i fm. Ska jag virka så även i slutet av A3, innan A2 ärm börjar. Om inte, ska jag då istället göra A3 spegelvänt efter A2 ärm?
08.03.2018 - 06:46DROPS Design answered:
Hej Kristina, du virkar endast st-lm-st där det står i diagrammet, du skall inte virka spegelvänt om inte vi skriver det. Lycka till :)
07.05.2018 - 16:18Bij de lente patronen van 2018 stond een rood gehaakt jurkje waarvan het patroon beschikbaar zou komen. Nu de lente-boeken er zijn kan ik nergens het rode jurkje meer vinden. Wordt het nog verwacht of wordt het patroon niet meer beschikbaar gesteld.
28.02.2018 - 15:12DROPS Design answered:
Hallo Inge, Uiteindelijk zullen alle patronen van de Lente & Zomer collectie vertaald en gepubliceerd worden. Degene met de meeste stemmen zijn als eerste op de site gekomen. Het plaatsen van nieuwe patronen gaat door tot juli. Houd de site dus goed in de gaten voor nieuwe patronen.
04.03.2018 - 19:22186-2 Står i mønsteret øk i 8 omgang. Er det 8 omgang fra mønsterstart eller 8 omgang fra plaggets start?
27.02.2018 - 22:19DROPS Design answered:
Hei Lene. Det er fra plaggets start (= 1.omgang). God Fornøyelse!
02.03.2018 - 08:07Jul wrote:
Dress "Inspiration"
03.02.2018 - 23:10Legina wrote:
I suggest "Leira" for the name
16.01.2018 - 15:27